


百度定位的环境配置
1. 获取密钥
通过开放平台进行应用注册获取百度提供的appkey值,这个值用于进行定位时的认证。选择android端app勾选所有权限进行app的注册。注册成功后会得到相应的appkey值。

2.环境配置
下载定位sdk文件后,将下载后的文件解压到工程libs目录下。在工程配置文件的application标签下进行各类权限以及定位service的声明,并通过申请的appkey值进行accesskey的设置。
<!-- 这个权限用于进行网络定位-->
<uses-permission android:name="android.permission.ACCESS_COARSE_LOCATION"></uses-permission>
<!-- 这个权限用于访问GPS定位-->
<uses-permission android:name="android.permission.ACCESS_FINE_LOCATION"></uses-permission>
<!-- 用于访问wifi网络信息,wifi信息会用于进行网络定位-->
<uses-permission android:name="android.permission.ACCESS_WIFI_STATE"></uses-permission>
<!-- 获取运营商信息,用于支持提供运营商信息相关的接口-->
<uses-permission android:name="android.permission.ACCESS_NETWORK_STATE"></uses-permission>
<!-- 这个权限用于获取wifi的获取权限,wifi信息会用来进行网络定位-->
<uses-permission android:name="android.permission.CHANGE_WIFI_STATE"></uses-permission>
<!-- 用于读取手机当前的状态-->
<uses-permission android:name="android.permission.READ_PHONE_STATE"></uses-permission>
<!-- 写入扩展存储,向扩展卡写入数据,用于写入离线定位数据-->
<uses-permission android:name="android.permission.WRITE_EXTERNAL_STORAGE"></uses-permission>
<!-- 访问网络,网络定位需要上网-->
<uses-permission android:name="android.permission.INTERNET" />
<!-- SD卡读取权限,用户写入离线定位数据-->
<uses-permission android:name="android.permission.MOUNT_UNMOUNT_FILESYSTEMS"></uses-permission>

<!--在application标签下进行设置-->
<meta-data
            android:name="com.baidu.lbsapi.API_KEY"
            android:value="key" />       //key:开发者申请的key
<service android:name="com.baidu.location.f" android:enabled="true" android:process=":remote">
</service>
3.获取位置
配置好环境后即可通过java代码进行位置的获取。
在主线程中对LocationClient进行声明。
public LocationClient mLocationClient = null;
public BDLocationListener myListener = new MyLocationListener();

public void onCreate() {
    mLocationClient = new LocationClient(getApplicationContext());     //声明LocationClient类
    mLocationClient.registerLocationListener( myListener );    //注册监听函数
}
根据需要配置相关的定位参数。
private void initLocation(){
        LocationClientOption option = new LocationClientOption();
        option.setLocationMode(LocationMode.Hight_Accuracy
);//可选,默认高精度,设置定位模式,高精度,低功耗,仅设备
        option.setCoorType("bd09ll");//可选,默认gcj02,设置返回的定位结果坐标系
        int span=1000;
        option.setScanSpan(span);//可选,默认0,即仅定位一次,设置发起定位请求的间隔需要大于等于1000ms才是有效的
        option.setIsNeedAddress(true);//可选,设置是否需要地址信息,默认不需要
        option.setOpenGps(true);//可选,默认false,设置是否使用gps
        option.setLocationNotify(true);//可选,默认false,设置是否当gps有效时按照1S1次频率输出GPS结果
        option.setIsNeedLocationDescribe(true);//可选,默认false,设置是否需要位置语义化结果,可以在BDLocation.getLocationDescribe里得到,结果类似于“在北京天安门附近”
        option.setIsNeedLocationPoiList(true);//可选,默认false,设置是否需要POI结果,可以在BDLocation.getPoiList里得到
option.setIgnoreKillProcess(false);//可选,默认true,定位SDK内部是一个SERVICE,并放到了独立进程,设置是否在stop的时候杀死这个进程,默认不杀死
        option.SetIgnoreCacheException(false);//可选,默认false,设置是否收集CRASH信息,默认收集
option.setEnableSimulateGps(false);//可选,默认false,设置是否需要过滤gps仿真结果,默认需要
        mLocationClient.setLocOption(option);
    }
实现监听定位的接口,在接口中通过BDLocation实体对象进行定位消息的获取与相应处理。
public class MyLocationListener implements BDLocationListener {

        @Override
        public void onReceiveLocation(BDLocation location) {
            //Receive Location
            StringBuffer sb = new StringBuffer(256);
            sb.append("time : ");
            sb.append(location.getTime());
            sb.append("\nerror code : ");
            sb.append(location.getLocType());
            sb.append("\nlatitude : ");
            sb.append(location.getLatitude());
            sb.append("\nlontitude : ");
            sb.append(location.getLongitude());
            sb.append("\nradius : ");
            sb.append(location.getRadius());
            if (location.getLocType() == BDLocation.TypeGpsLocation){// GPS定位结果
                sb.append("\nspeed : ");
                sb.append(location.getSpeed());// 单位:公里每小时
                sb.append("\nsatellite : ");
                sb.append(location.getSatelliteNumber());
                sb.append("\nheight : ");
                sb.append(location.getAltitude());// 单位:米
                sb.append("\ndirection : ");
                sb.append(location.getDirection());// 单位度
                sb.append("\naddr : ");
                sb.append(location.getAddrStr());
                sb.append("\ndescribe : ");
                sb.append("gps定位成功");

            } else if (location.getLocType() == BDLocation.TypeNetWorkLocation){// 网络定位结果
                sb.append("\naddr : ");
                sb.append(location.getAddrStr());
                //运营商信息
                sb.append("\noperationers : ");
                sb.append(location.getOperators());
                sb.append("\ndescribe : ");
                sb.append("网络定位成功");
            } else if (location.getLocType() == BDLocation.TypeOffLineLocation) {// 离线定位结果
                sb.append("\ndescribe : ");
                sb.append("离线定位成功,离线定位结果也是有效的");
            } else if (location.getLocType() == BDLocation.TypeServerError) {
                sb.append("\ndescribe : ");
                sb.append("服务端网络定位失败,可以反馈IMEI号和大体定位时间到loc-bugs@baidu.com,会有人追查原因");
            } else if (location.getLocType() == BDLocation.TypeNetWorkException) {
                sb.append("\ndescribe : ");
                sb.append("网络不同导致定位失败,请检查网络是否通畅");
            } else if (location.getLocType() == BDLocation.TypeCriteriaException) {
                sb.append("\ndescribe : ");
                sb.append("无法获取有效定位依据导致定位失败,一般是由于手机的原因,处于飞行模式下一般会造成这种结果,可以试着重启手机");
            }
sb.append("\nlocationdescribe : ");
                sb.append(location.getLocationDescribe());// 位置语义化信息
                List<Poi> list = location.getPoiList();// POI数据
                if (list != null) {
                    sb.append("\npoilist size = : ");
                    sb.append(list.size());
                    for (Poi p : list) {
                        sb.append("\npoi= : ");
                        sb.append(p.getId() + " " + p.getName() + " " + p.getRank());
                    }
                }
            Log.i("BaiduLocationApiDem", sb.toString());
        }
}
百度车联网API天气预报接口的使用
接口示例:
http://api.map.baidu.com/telematics/v3/weather?location=%E5%8C%97%E4%BA%AC&output=json&ak=E4805d16520de693a3fe707cdc962045
这里的location为城市地址或经纬度,output参数为输出内容的格式,ak为平台分配的appkey,但是申请的移动端appkey在这里不适用,可以再申请一个浏览器端应用,使用浏览器端appkey进行接口的访问。获取接口后进行相关解析得到实体对象存入集合并返回。
应用流程与实现
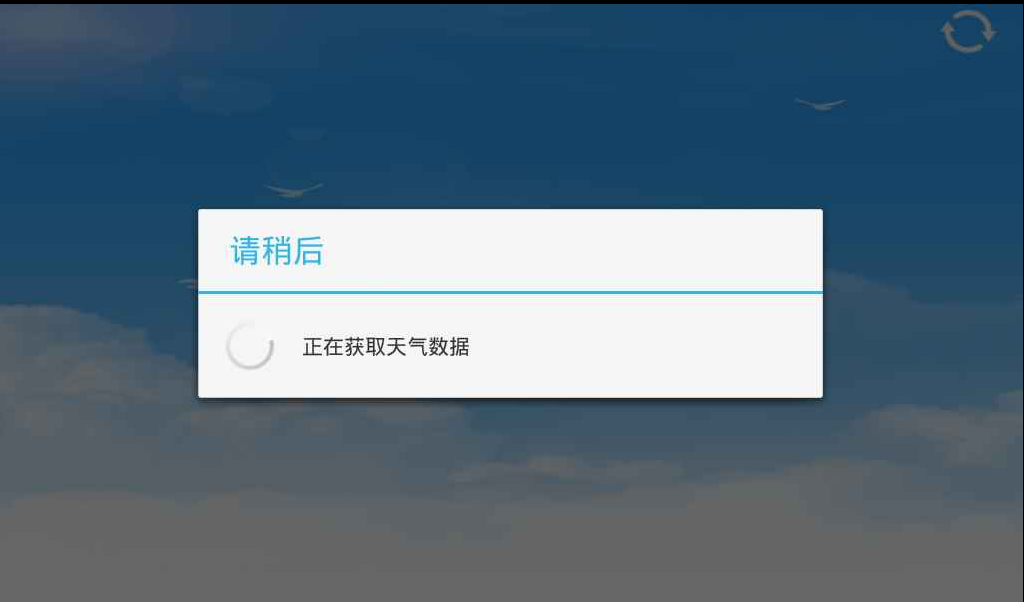
进入应用后首先弹出进度框,与此同时进行数据的获取,并将数据通过listView与adapter配合进行显示,当数据加载完毕后,对话框消失。
    /**
     * 获取数据并显示前显示一个进度框
     */
    private void initDialog() {
        mDialog = new ProgressDialog(this, ProgressDialog.THEME_HOLO_LIGHT);
        mDialog.setProgressStyle(ProgressDialog.STYLE_SPINNER);
        mDialog.setTitle("请稍后");
        mDialog.setMessage("正在获取天气数据");
        mDialog.show();
    }
生成对话框时开启定位,在定位监听器中的方法内获取当地位置信息并通过handler进行消息的发送与处理。
@Override
public void onReceiveLocation(BDLocation location) {
// Log.i("czl", sb.toString());
// 当区为null时显示市
String district = location.getDistrict();
if (null == district || "null".equals(district)) {
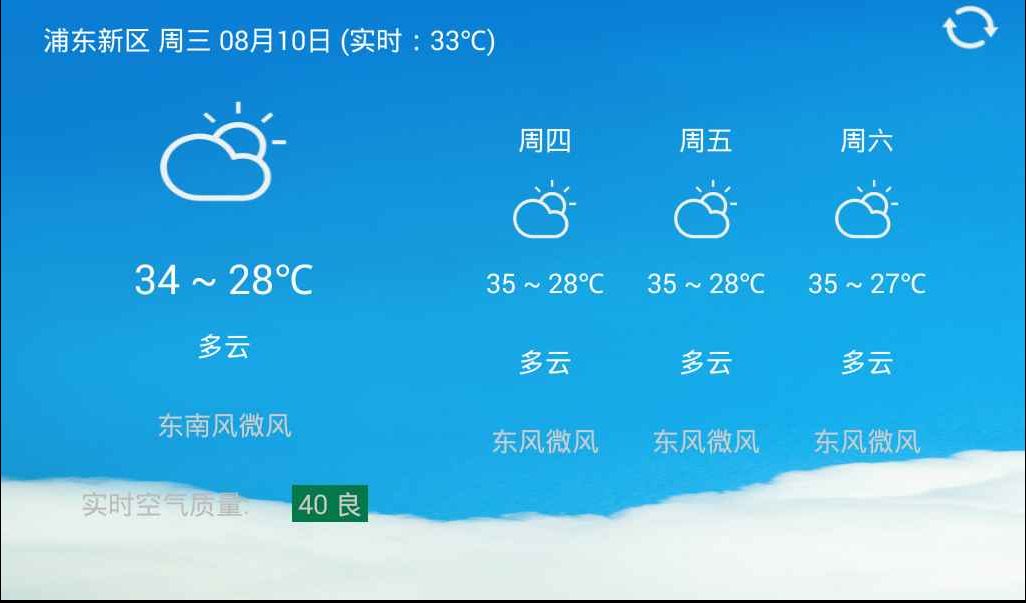
tvToday.setText(location.getCity() + " ");
} else {
tvToday.setText(district + " ");
}
String param = location.getLongitude() + "," + location.getLatitude();
Log.i("czl", param);
Message msg = Message.obtain();
msg.obj = param;
if (isNetworkConnected()) {
mHandler.sendMessage(msg);
} else {
Toast.makeText(MainActivity.this, "请检查网络连接", 1).show();
mLocationClient.stop();
mDialog.dismiss();
}
}在handler中进行数据的获取与显示。
public void handleMessage(android.os.Message msg) {
            mLocationClient.stop();
            String param = (String) msg.obj;
            mUtil.getWeatherData(param, new VolleyCallBack() {
                @Override
                public void onSuccess(List<DayWeather> res) {
                    mWeather.clear();
                    tvToday.append(res.get(0).getDate());
                    mWeather.addAll(res);
                    listView.setAdapter(mAdapter);
                    chooseBackground(res.get(0).getWeather());
                    mDialog.dismiss();
                    Log.i("czl", res.toString());
                }
            });
        };
新建工具类对相关数据进行处理与返回,在Volley的onResponse方法中通过接口回调返回数据。
    /**
     * 获得DayWeather的集合
     */
    public List<DayWeather> getWeatherList(String res) throws JSONException {
        List<DayWeather> list = new ArrayList<DayWeather>();
        // Log.i("czl", res);
        JSONObject object = new JSONObject(res);
        JSONArray results = object.getJSONArray("results");
        JSONObject result = results.getJSONObject(0);
        String pm25 = result.getString("pm25");
        JSONArray weathers = result.getJSONArray("weather_data");
        Gson gson = new Gson();
        for (int i = 0; i < weathers.length(); i++) {
            list.add(gson.fromJson(weathers.get(i).toString(), DayWeather.class));
        }
        list.get(0).setPm25(pm25);
        return list;
    }
/**
* 请求数据
* 通过增加接口的参数,可以在调用方法时,获取返回值。
*/
public void getWeatherData(String name, final VolleyCallBack mCallBack) {
StringRequest mRequest = new StringRequest(getWeatherUrl(name), new Listener<String>() {
@Override
public void onResponse(String result) {
try {
mCallBack.onSuccess(getWeatherList(result));
} catch (JSONException e) {
e.printStackTrace();
}
}
}, new ErrorListener() {
@Override
public void onErrorResponse(VolleyError arg0) {
Toast.makeText(context, "获取天气数据异常", 1).show();
}
});
mQueue.add(mRequest);
} // 获取接口地址
public static String getWeatherUrl(String param) {
String url = null;
url = "http://api.map.baidu.com/telematics/v3/weather?location=" + param + "&output=json&ak=" + APPKEY;
return url;
}在ListView中显示两种布局可以参考上一篇文章。
这里使用的横向ListView是复制网上的那个HorizentalListView。
最终的实现结果如下。


 1万+
1万+

 被折叠的 条评论
为什么被折叠?
被折叠的 条评论
为什么被折叠?
 到【灌水乐园】发言


