


主要介绍有关注解@RequestMapping的用法及用的过程中可能出现的问题
一、@RequestMapping 简介
在Spring MVC 中使用 @RequestMapping 来映射请求,也就是通过它来指定控制器可以处理哪些URL请求,相当于Servlet中在web.xml中配置
<servlet>
    <servlet-name>servletName</servlet-name>
    <servlet-class>ServletClass</servlet-class>
</servlet>
<servlet-mapping>
    <servlet-name>servletName</servlet-name>
    <url-pattern>url</url-pattern>
</servlet-mapping>
的映射作用一致。让我们先看一下RequestMapping注解类的源码:
@Target({ElementType.METHOD, ElementType.TYPE})
@Retention(RetentionPolicy.RUNTIME)
@Documented
@Mapping
public @interface RequestMapping {
    String name() default "";
    String[] value() default {};
    String[] path() default {};
    RequestMethod[] method() default {};
    String[] params() default {};
    String[] headers() default {};
    String[] consumes() default {};
    String[] produces() default {};
}
1)在@Target中有两个属性,分别为 ElementType.METHOD 和 ElementType.TYPE ,也就是说 @RequestMapping 可以在方法和类的声明中使用
2)可以看到注解中的属性除了 name() 返回的字符串,其它的方法均返回数组,也就是可以定义多个属性值,例如 value() 和 path() 都可以同时定义多个字符串值来接收多个URL请求
二、准备工作:(注:后面的示例都将基于准备工作)
1)新建一个 Web 工程,取名为 SpringMVC
略
2)新建一个的控制器类:UserController
package cn.kolbe.spring.mvc.controller;

import org.springframework.stereotype.Controller;

@Controller
public class UserController {

    public String login() {
        return "success";
    }
}
3)新建和配置 web.xml 以及 spring-mvc.xml 文件
略(具体参见 前一章:Spring MVC 学习笔记(一):HelloWorld)
4)新建一个测试的 JSP 页面 index.jsp
<%@ page language="java" contentType="text/html; charset=UTF-8" pageEncoding="UTF-8"%>
<!DOCTYPE html>
<html>
<head>
<meta charset="UTF-8">
<title>Spring MVC</title>
</head>
<body>
    <p> <a href="#">User Login</a>
</body>
</html>
5)新建一个成功跳转的页面 JSP 页面 welcome.jsp
<%@ page language="java" contentType="text/html; charset=UTF-8" pageEncoding="UTF-8"%>
<!DOCTYPE html>
<html>
<head>
<meta charset="UTF-8">
<title>Spring MVC</title>
</head>
<body>

    <h1>Welcome</h1>

</body>
</html>
三、测试 @RequestMapping 中的 value 和 path 属性(这两个属性作用相同,可以互换,如果仅有这一个属性,则可以省略,下面两个例子均采用省略的方式)
1)将 @RequestMapping 注解在 login 方法上,而UserController上不添加 @RequestMapping 注解,这时的请求 URL 是相对于 Web 根目录
@Controller
public class UserController {

    @RequestMapping("/login")
    public String login() {
        return "success";
    }
}
这时的方法 login() 能处理的 URL 请求路径是基于 Web 应用的,也就是 http://localhost/SpringMVC/login,也就是 index.jsp 页面中的 User Login 链接地址应该是:
<a href="login">User Login</a>
2)将 @RequestMapping 注解在 UserController 类上,这时类的注解是相对于 Web 根目录,而方法上的是相对于类上的路径
@Controller
@RequestMapping("/user")
public class UserController {

    @RequestMapping("/login")
    public String login() {
        return "success";
    }
}
这时的方法login()能处理的 URL 请求路径则是 http://localhost/SpringMVC/user/login,也就是 index.jsp 页面中的 User Login 链接地址应该是:
<a href="user/login">User Login</a>
四、测试 @RequestMapping 的 method 属性
1)简介:@RequestMapping 中的 method 主要用来定义接收浏览器发来的何种请求。在Spring中,使用枚举类
org.springframework.web.bind.annotation.RequestMethod来定义浏览器请求的方式。
Http规范定义了多种请求资源的方式,最基本的有四种,分别为:GET(查)、POST(增)、PUT(改)、DELETE(删),而URL则用于定位网络上的资源相当于地址的作用,配合四种请求方式,可以实现对URL对应的资源的增删改查操作。
在实际应用中,很多人并没有按照这个规范做,因为使用GET/POST同样可以完成PUT和DELETE操作,甚至GET也可以完成POST操作,因为GET不需要用到表单,而POST却需要通过表单来发送。
2)通过 @RequestMapping(value="/login",method=RequestMethod.GET) 来指定 login()方法 仅处理通过 GET 方式发来的请求
@Controller
@RequestMapping(path = "/user")
public class UserController {

    @RequestMapping(path = "/login", method=RequestMethod.GET)
    public String login() {
        return "success";
    }
}这时,如果浏览器发来的请求不是GET的话,将收到浏览器返回的错误提示,也就是得通过链接的方式而不是表单的方式:
<a href="user/login>User Login</a>3)通过 @RequestMapping(value="/login",method=RequestMethod.POST) 来指定 login()方法 仅处理通过 POST 方式发来的请求
@Controller
@RequestMapping(path = "/user")
public class UserController {

    @RequestMapping(path = "/login", method=RequestMethod.POST)
    public String login() {
        return "success";
    }
}
这时,必须通过表单的方式发送请求,否则将收到浏览器返回的错误提示
<form action="user/login" method="post">
    <input type="submit" value="使用Post发送请求"/>
</form>
4)由于在 RequestMapping 注解类中 method() 方法返回的是 RequestMethod 数组,所以可以给 method 同时指定多个请求方式,例如:
@Controller
@RequestMapping(path = "/user")
public class UserController {
        // 该方法将同时接收通过GET和POST方式发来的请求
    @RequestMapping(path = "/login", method={RequestMethod.POST,RequestMethod.GET})
    public String login() {
        return "success";
    }
}
五、测试 @RequestMapping 的 params 属性,该属性表示请求参数,也就是追加在URL上的键值对,多个请求参数以&隔开,例如:
http://localhost/SpringMVC/user/login?username=kolbe&password=123456 则这个请求的参数为username=kolbe以及password=123456,@RequestMapping 中可以使用 params 来限制请求参数,来实现进一步的过滤请求,举个例子:
@Controller
@RequestMapping(path = "/user")
public class UserController {

        // 该方法将接收 /user/login 发来的请求,且请求参数必须为 username=kolbe&password=123456
    @RequestMapping(path = "/login", params={"username=kolbe","password=123456"})
    public String login() {
        return "success";
    }
}
该例中则表示 UserController 中的 login() 方法仅处理 /user/login 发来的请求,且必须带有 username=kolbe&password=123456 的请求参数,否则浏览器将返回HTTP 404的错误, 对应 index.jsp 中的键接地址为:
<a href="user/login?username=kolbe&password=123456">User Login</a>
六、测试 @RequestMapping 的 headers 属性,该属性表示请求头
用于HTTP协义交互的信息被称为HTTP报文,客户端发送的HTTP报文被称为请求报文,服务器发回给客户端的HTTP报文称为响应报文,报文由报文头部和报文体组成。
请求头部(Request Headers):请求头包含许多有关客户端环境和请求正文的信息,例如浏览器支持的语言、请求的服务器地址、客户端的操作系统等。
响应头部(Rsponse Headers):响应头也包含许多有用的信息,包括服务器类型、日期、响应内容的类型及编码,响应内容的长度等等。
如果你安装的是Chrome浏览器,可以通过在网页中 右击鼠标---->审查元素---->Network---->Name中点击网页---->右侧查看Headers即可,如果Name中没有出现网页,可以刷新一下即可,下边是我电脑中的一个请求头部示例:
Request Headers
    Accept:text/html,application/xhtml+xml,application/xml;q=0.9,image/webp,*/*;q=0.8
    Accept-Encoding:gzip, deflate, sdch
    Accept-Language:zh-CN,zh;q=0.8
    Cache-Control:max-age=0
    Connection:keep-alive
    Cookie:JSESSIONID=210075B5E521CWE3CDE938076295A57A
    Host:localhost:8080
    Upgrade-Insecure-Requests:1
    User-Agent:Mozilla/5.0 (Macintosh; Intel Mac OS X 10_9_5) AppleWebKit/537.36 (KHTML, like Gecko) Chrome/45.0.2454.93
回规正题,通过 @RequestMapping 中的 headers 属性,可以限制客户端发来的请求
@Controller
@RequestMapping(path = "/user")
public class UserController {
        // 表示只接收本机发来的请求
    @RequestMapping(path = "/login", headers="Host=localhost:8080")
    public String login() {
        return "success";
    }
}
七、带占位符的URL
(一)带占位符的URL是Spring 3.0 新增的功能,可以通过 @PathVariable 将 URL 中的占位符绑定到控制器的处理方法的参数中,占位符使用{}括起来
(二)使用方法:
1)带占位符的URL示例:
@Controller
@RequestMapping(path = "/user")
public class UserController {

    @RequestMapping(value="/{id}", method=RequestMethod.GET)
    public String show(@PathVariable("id") Integer id) {
        return "success";
    }
}
在这个控制器中 show() 方法将可以接收 user/1、user/2、user/3等等的路径请求,请求的方法必须为GET,使用 @PathVariable 为应用实现 REST 规范提供了具大的便利条件。
八、采用 REST 风格的 URL 请求
1)简介:REST(Representational State Transfer):(资源)表现层状态转化,它是目前最流行的一种软件架构,其结构清晰、易于理解、扩展方便且符合标准,正在越来越多的被实践到应用中。
2)REST 风格的 URL 请求
 请求路径        请求方法           作用
-/user/1        HTTP GET        得到id为1的user
-/user/1        HTTP DELETE     删除id为1的user
-/user/1        HTTP PUT        更新id为1的user
-/user          HTTP POST       新增user
3)由于浏览器表单只支持 GET 和 POST 请求,为了实现 DELETE 和 PUT 请求,Spring 为我们提供了一个过滤器org.springframework.web.filter.HiddenHttpMethodFilter,可以为我们将 GET 和 POST 请求通过过滤器转化成 DELETE 和 PUT 请求。
4)在 web.xml 中配置过滤器
<!-- 配置 org.springframework.web.filter.HiddenHttpMethodFilter 过滤器 -->
<filter>
    <filter-name>hiddenHttpMethodFilter</filter-name>
    <filter-class>org.springframework.web.filter.HiddenHttpMethodFilter</filter-class>
</filter>
<filter-mapping>
    <filter-name>hiddenHttpMethodFilter</filter-name>
    <!-- 拦截所有请求 -->
    <url-pattern>/*</url-pattern>
</filter-mapping>
5)由于浏览器表单无法发送 DELETE 和 PUT 请求,所以为了让 HiddenHttpMethodFilter 识别请求的方法,需要在表单中添加一个隐藏域,名字为 _method 值为 DELETE 或 POST 或PUT,修改后 index.jsp 页面代码如下:
<%@ page language="java" contentType="text/html; charset=UTF-8" pageEncoding="UTF-8"%>
<!DOCTYPE html>
<html>
<head>
<meta charset="UTF-8">
<title>Spring MVC</title>
</head>
<body>
<p>
 	<!-- 得到id为1的user -->
    <a href="user/1">Test Rest GET</a>

    <!-- 新建id为1的user -->
    <form action="user" method="post">
            <input type="hidden" name="_method" value="POST"/>
        <input type="submit" value="Test Rest POST"/>
    </form>

    <!-- 删除id为1的user -->
    <form action="user/1" method="post">
        <input type="hidden" name="_method" value="DELETE"/>
        <input type="submit" value="Test Rest DELETE"/>
    </form>

    <!-- 更新id为1的user -->
    <form action="user/1" method="post">
        <input type="hidden" name="_method" value="PUT"/>
        <input type="submit" value="Test Rest PUT"/>
    </form>

</body>
</html>
6)修改后的UserController代码
package cn.kolbe.spring.mvc.controller;

import org.springframework.stereotype.Controller;
import org.springframework.web.bind.annotation.PathVariable;
import org.springframework.web.bind.annotation.RequestMapping;
import org.springframework.web.bind.annotation.RequestMethod;

@Controller
@RequestMapping(path = "/user")
public class UserController {

    @RequestMapping(value="/{id}", method=RequestMethod.GET)
    public String show(@PathVariable("id") Integer id) {
        System.out.println("查看id为:" + id + "的user");
        return "success";
    }


    @RequestMapping(value="/{id}", method=RequestMethod.PUT)
    public String update(@PathVariable("id") Integer id) {
        System.out.println("更新id为:" + id + "的user");
        return "success";
    }

    @RequestMapping(value="/{id}", method=RequestMethod.DELETE)
    public String destroy(@PathVariable("id") Integer id) {
        System.out.println("删除id为:" + id + "的user");
        return "success";
    }

    @RequestMapping(value="", method=RequestMethod.POST)
    public String create() {
        System.out.println("新建user");
        return "success";
    }
}
注:如果你的web项目是运行在Tomcat 8下,你会发现被过滤成DELETE和PUT请求,到达控制器后,返回时(forward)会报HTTP 405的错误提示
HTTP Status 405 - Request method 'DELETE' not supported
或
HTTP Status 405 - JSPs only permit GET POST or HEAD
有三种解决方案:
(一)将 Tomcat 8 改为 Tomcat 7,在Tomcat 7 下运行是正常的
(二)将请求转发(forward)改为请求重定向(redirect)
(三)自己手动写一个Filter来包装HttpRequest中的getMethod()方法
下面介绍一下第(三)种做法,也就是自己写一个Filter来包装从服务器发回来的HttpRequest请求:
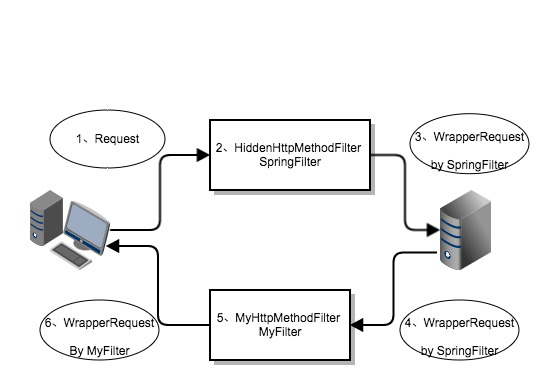
大致说一下流程,
1. 在第1步中,客户端发送请求至服务器,这时如果发送的是POST请求且带有以_method为名的参数会被Spring的HiddenHttpMethodFilter给拦截。
2. HiddenHttpMethodFilter内有一个静态内部类通过继承HttpServletRequestWrapper类并重写getMethod()方法,将该方法返回值设为_method隐藏域的值。
3. HiddenHttpMethodFilter在包装好Request后,将请求发往服务器的控制器中对应的方法处理器,这时的请求变成了图中的 3、WrapperRequest by SpringFilter
4. 服务器处理完请求后,产生了一个forward请求,产生相应的请求处理信息发往客户端,注意这时的request的getMethod()方法仍然是HiddenHttpMethodFilter包装过的
5. 我们需要在服务器的响应请求到达客户端前进行拦截,这也是最关键的一步,通过自定义过滤器MyHttpMethodFilter进一步包装请求,将getMethod()方法返回值改成POST或GET即可
6. 在web.xml中配置该filter,注意dispatcher结点值必须为FORWARD。由于字数超限,暂时说到这。。。
<filter-mapping>
    <filter-name>myFilter</filter-name>
    <url-pattern>/*</url-pattern>
    <dispatcher>FORWARD</dispatcher>
</filter-mapping>
转自:http://my.oschina.net/kolbe/blog/509810


 7万+
7万+


 被折叠的 条评论
为什么被折叠?
被折叠的 条评论
为什么被折叠?
 到【灌水乐园】发言


