


对于android的图片加载库,之前用过UIL、volley、Picasso、Glide、Fresco,都是很好的图片加载库,之前对于Picasso这个库研究的比较多一点,网络上对于Picasso的源码分析也很多,但是还是觉得自己从头开始跟一下源码,自己才会真正有收获,所以就有了这篇博客。另外,关于Picasso的使用介绍,本篇先不做介绍,稍后会专门写一篇使用详情的博客。
本文可能比较长,有兴趣的童鞋要耐心点看完~~( ̄▽ ̄)”
整体架构
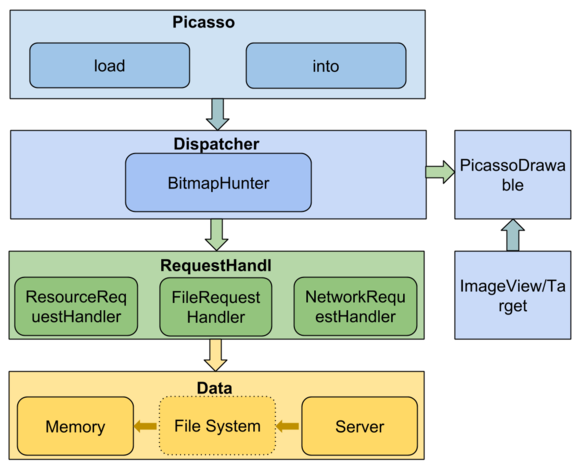
Picasso中的核心类包括Picasso、Dispatcher、BitmapHunter、RequestHandler、Request、Action、Cache 等.Picasso类是一个负责图片下载、变换、缓存的管理器,当它收到一个图片下载请求的时候,它会创建Request并提交给Dispatcher, Dispatcher会寻找对应的处理器RequestHandler,并将请求与该处理器一起提交给线程池执行,图片获取成功后,最终会交给 PicassoDrawable显示到Target上。
一张图片加载可以分为以下几步:
创建->入队->执行->解码->变换->批处理->完成->分发->显示(可选)源码分析
先看下Picasso的最简单用法
Picasso.with(this).load("url").into(imageView);with()方法的实现
Picasso类是整个图片加载器的入口,负责初始化各个模块,配置相关参数等等。 使用了单例模式。
  public static Picasso with(Context context) {
    if (singleton == null) {
      synchronized (Picasso.class) {
        if (singleton == null) {
          singleton = new Builder(context).build();
        }
      }
    }
    return singleton;
  }
维护一个Picasso的单例,如果还未实例化就通过new Builder(context).build()创建一个singleton并返回,我们继续看Builder类的实现。
/** Create the {@link Picasso} instance. */
    public Picasso build() {
      Context context = this.context;

      if (downloader == null) {
        downloader = Utils.createDefaultDownloader(context);
      }
      if (cache == null) {
        cache = new LruCache(context);
      }
      if (service == null) {
        service = new PicassoExecutorService();
      }
      if (transformer == null) {
        transformer = RequestTransformer.IDENTITY;
      }

      Stats stats = new Stats(cache);

      Dispatcher dispatcher = new Dispatcher(context, service, HANDLER, downloader, cache, stats);

      return new Picasso(context, dispatcher, cache, listener, transformer, requestHandlers, stats,
          defaultBitmapConfig, indicatorsEnabled, loggingEnabled);
    }
  }
此方法做了如下基本配置:
1. 使用默认的缓存策略,内存缓存基于LruCache,磁盘缓存基于http缓存,HttpResponseCache
2. 创建默认的下载器
3. 创建默认的线程池(3个worker线程)
4. 创建默认的Transformer,这个Transformer什么事情也不干,只负责转发请求
5. 创建默认的监控器(Stats),用于统计缓存命中率、下载时长等等
6. 创建默认的处理器集合,即RequestHandlers.它们分别会处理不同的加载请求
7. Picasso的构造器
下面开始介绍builder初始化的一些内容。
Downloader
如果用户没有自定义的话,那将使用默认downloader
Picasso#Builder#build()
downloader = Utils.createDefaultDownloader(context);Utils#createDefaultDownloader
static Downloader createDefaultDownloader(Context context) {
    try {
      Class.forName("com.squareup.okhttp.OkHttpClient");
      return OkHttpLoaderCreator.create(context);
    } catch (ClassNotFoundException ignored) {
    }
    return new UrlConnectionDownloader(context);
  }
首先反射下,看有没有依赖okhttp,如果依赖的话,那就使用OkHttpClient喽,否则就使用默认的HttpUrlConnection了。
注:其实从4.4开始,okhttp已经作为HttpUrlConnection的实现引擎了。
Utils#createDefaultCacheDir
private static final String PICASSO_CACHE = "picasso-cache";
  static File createDefaultCacheDir(Context context) {
    File cache = new File(context.getApplicationContext().getCacheDir(), PICASSO_CACHE);
    if (!cache.exists()) {
      //noinspection ResultOfMethodCallIgnored
      cache.mkdirs();
    }
    return cache;
  }
通过getCacheDir方法获取缓存路径建立文件名为“picasso-cache”的Picasso的缓存文件。
Cache
缓存默认使用LRU算法,即least-recently used,近期最少使用算法。
使用可用内存堆的1/7(15%)作为图片缓存。
  static int calculateMemoryCacheSize(Context context) {
    ActivityManager am = getService(context, ACTIVITY_SERVICE);
    boolean largeHeap = (context.getApplicationInfo().flags & FLAG_LARGE_HEAP) != 0;
    int memoryClass = am.getMemoryClass();
    if (largeHeap && SDK_INT >= HONEYCOMB) {
      memoryClass = ActivityManagerHoneycomb.getLargeMemoryClass(am);
    }
    // Target ~15% of the available heap.
    return 1024 * 1024 * memoryClass / 7;
  }
ExecutorService
PicassoExecutorService实现Picasso线程池,构造函数中实例化工作队列和线程工厂。
默认的线程数是3条
private static final int DEFAULT_THREAD_COUNT = 3;同时也可以根据不同网络进行修改,wifi下是4个线程,4g下是3个,3g下是2个,而2g网只有一个线程,具体是通过在Dispatcher中注册了监听网络变化的广播接收者。(这个方法介绍dispatcher时候讲)
void adjustThreadCount(NetworkInfo info) {
    if (info == null || !info.isConnectedOrConnecting()) {
      setThreadCount(DEFAULT_THREAD_COUNT);
      return;
    }
    switch (info.getType()) {
      case ConnectivityManager.TYPE_WIFI:
      case ConnectivityManager.TYPE_WIMAX:
      case ConnectivityManager.TYPE_ETHERNET:
        setThreadCount(4);
        break;
      case ConnectivityManager.TYPE_MOBILE:
        switch (info.getSubtype()) {
          case TelephonyManager.NETWORK_TYPE_LTE:  // 4G
          case TelephonyManager.NETWORK_TYPE_HSPAP:
          case TelephonyManager.NETWORK_TYPE_EHRPD:
            setThreadCount(3);
            break;
          case TelephonyManager.NETWORK_TYPE_UMTS: // 3G
          case TelephonyManager.NETWORK_TYPE_CDMA:
          case TelephonyManager.NETWORK_TYPE_EVDO_0:
          case TelephonyManager.NETWORK_TYPE_EVDO_A:
          case TelephonyManager.NETWORK_TYPE_EVDO_B:
            setThreadCount(2);
            break;
          case TelephonyManager.NETWORK_TYPE_GPRS: // 2G
          case TelephonyManager.NETWORK_TYPE_EDGE:
            setThreadCount(1);
            break;
          default:
            setThreadCount(DEFAULT_THREAD_COUNT);
        }
        break;
      default:
        setThreadCount(DEFAULT_THREAD_COUNT);
    }
  }
RequestTransformer
主要是对RequestCreator创建的Request进行转换,默认对Request对象不做处理。
Stats
通过Stat标记缓存的状态(命中数、未命中数、总大小、平均大小、下载次数等)
Dispatcher
每一个Dispatcher都需要关联线程池(service)、下载器(downloader)、主线程的Handler(HANDLER)、缓存(cache)、 监控器(stats).
Dispatcher dispatcher = new Dispatcher(context, service, HANDLER, downloader, cache, stats);关于dispatcher内同涉及到下面的知识点,所有dispatcher的讲解会穿插在下面的内容中。
Picasso的构造方法
Picasso的构造方法里除了对这些对象的赋值以及创建一些新的对象,例如清理线程等等.最重要的是初始化了requestHandlers
int builtInHandlers = 7; // Adjust this as internal handlers are added or removed.
    int extraCount = (extraRequestHandlers != null ? extraRequestHandlers.size() : 0);
    List<RequestHandler> allRequestHandlers =
        new ArrayList<RequestHandler>(builtInHandlers + extraCount);

    // ResourceRequestHandler needs to be the first in the list to avoid
    // forcing other RequestHandlers to perform null checks on request.uri
    // to cover the (request.resourceId != 0) case.
    allRequestHandlers.add(new ResourceRequestHandler(context));
    if (extraRequestHandlers != null) {
      allRequestHandlers.addAll(extraRequestHandlers);
    }
    allRequestHandlers.add(new ContactsPhotoRequestHandler(context));
    allRequestHandlers.add(new MediaStoreRequestHandler(context));
    allRequestHandlers.add(new ContentStreamRequestHandler(context));
    allRequestHandlers.add(new AssetRequestHandler(context));
    allRequestHandlers.add(new FileRequestHandler(context));
    allRequestHandlers.add(new NetworkRequestHandler(dispatcher.downloader, stats));
    requestHandlers = Collections.unmodifiableList(allRequestHandlers);
可以看到除了添加我们可以自定义的extraRequestHandlers,另外添加了7个RequestHandler分别用来处理加载不同来源的资源,可以是网络、file、assert、contactsphoto等地方加载图片.这里使用了一个ArrayList来存放这些RequestHandler。
load()方法
Picasso的load方法支持以下4种:
  public RequestCreator load(Uri uri) {
    return new RequestCreator(this, uri, 0);
  }
public RequestCreator load(String path) {
if (path == null) {
return new RequestCreator(this, null, 0);
}
if (path.trim().length() == 0) {
throw new IllegalArgumentException("Path must not be empty.");
}
return load(Uri.parse(path));
} public RequestCreator load(File file) {
if (file == null) {
return new RequestCreator(this, null, 0);
}
return load(Uri.fromFile(file));
} public RequestCreator load(int resourceId) {
if (resourceId == 0) {
throw new IllegalArgumentException("Resource ID must not be zero.");
}
return new RequestCreator(this, null, resourceId);
}在Picasso的load()方法里我们可以传入String,Uri或者File对象,但是其最终都是返回一个RequestCreator对象。
再来看看RequestCreator的构造方法:
 RequestCreator(Picasso picasso, Uri uri, int resourceId) {
    if (picasso.shutdown) {
      throw new IllegalStateException(
          "Picasso instance already shut down. Cannot submit new requests.");
    }
    this.picasso = picasso;
    this.data = new Request.Builder(uri, resourceId, picasso.defaultBitmapConfig);
  }
RequestCreator从名字就可以知道这是一个封装请求的类,请求在Picasso中被抽象成Request。RequestCreator类提供了很多方法,比较常用的比如placeholder、error、tag、fit、resize、centerCrop、centerInside、rotate、fetch、transform等。
由于可配置项太多,所以Request也使用了Builder模式。
into()方法
当然RequestCreator也提供了into这个最重要的方法。
into方法有多种重载,因为Picasso不仅仅可以将图片加载到ImageView上,还可以加载到Target或者RemoteView上.
这里选取imageView作为分析对象,该方法代码如下:
 public void into(ImageView target, Callback callback) {
    long started = System.nanoTime();
    //检查是否在主线程中执行
    /*
     *用了这个判断Looper.getMainLooper().getThread() ==Thread.currentThread()
     */
    checkMain();

    if (target == null) {
      throw new IllegalArgumentException("Target must not be null.");
    }
    //检查uri或者resID是否等于null
    if (!data.hasImage()) {
      //如果没有设置当然取消请求
      picasso.cancelRequest(target);
      //是否需要设置placeholder
      if (setPlaceholder) {
        setPlaceholder(target, getPlaceholderDrawable());
      }
      return;
    }
    //是否调用了fit()
    if (deferred) {
      if (data.hasSize()) {
        throw new IllegalStateException("Fit cannot be used with resize.");
      }
      //既然要适应ImageView,肯定需要拿到ImageView大小
      int width = target.getWidth();
      int height = target.getHeight();
      //如果图片的宽高等于0,则用placeholder图片
      if (width == 0 || height == 0) {
        if (setPlaceholder) {
          setPlaceholder(target, getPlaceholderDrawable());
        }
        picasso.defer(target, new DeferredRequestCreator(this, target, callback));
        return;
      }
      data.resize(width, height);
    }
    //创建request
    Request request = createRequest(started);
    String requestKey = createKey(request);

    //是否需要在缓存里面先查找
    if (shouldReadFromMemoryCache(memoryPolicy)) {
      Bitmap bitmap = picasso.quickMemoryCacheCheck(requestKey);
      //有缓存
      if (bitmap != null) {
        picasso.cancelRequest(target);
        setBitmap(target, picasso.context, bitmap, MEMORY, noFade, picasso.indicatorsEnabled);
        if (picasso.loggingEnabled) {
          log(OWNER_MAIN, VERB_COMPLETED, request.plainId(), "from " + MEMORY);
        }
        if (callback != null) {
          callback.onSuccess();
        }
        return;
      }
    }

    //无缓存,那就创建Action,将任务交给dispatcher
    if (setPlaceholder) {
      setPlaceholder(target, getPlaceholderDrawable());
    }

    Action action =
        new ImageViewAction(picasso, target, request, memoryPolicy, networkPolicy, errorResId,
            errorDrawable, requestKey, tag, callback, noFade);

    picasso.enqueueAndSubmit(action);
  }
注释写的很清楚了,into方法会先从缓存里面查找图片,如果找不到的话,则会创建Action即一个加载任务,交给Dispatcher执行。
那我们就来看看picasso.enqueueAndSubmit方法做了什么。
picasso.enqueueAndSubmit
  void enqueueAndSubmit(Action action) {
    Object target = action.getTarget();
    if (target != null && targetToAction.get(target) != action) {
      // This will also check we are on the main thread.
      cancelExistingRequest(target);
      targetToAction.put(target, action);
    }
    submit(action);
  }
  void submit(Action action) {
    dispatcher.dispatchSubmit(action);
  }
它会先从action任务上拿到对应target,也就是imageView,然后从weakHashMap中通过这个imageView索引到对应的action,如果 发现这个action跟传进来的action不一样的话,那就取消掉之前的加载任务。最后将当前加载任务submit。
submit的方法调用的是dispatcher的dispatchSubmit方法。这个dispatcher就是上文中在Picasso的Builder()里面初始化的那个Dispatcher对象。
那又要回到Dispatcher这个类里面看dispatchSubmit这个方法了。
void dispatchSubmit(Action action) {
    handler.sendMessage(handler.obtainMessage(REQUEST_SUBMIT, action));
  }
这里是发了一个消息给Dispatcher的handler,这个handler是DispatcherHandler的对象,
this.handler = new DispatcherHandler(dispatcherThread.getLooper(), this);而dispatcherThread则是一个HandlerThread,从代码中可以看出,这个handler的消息处理是在子线程进行的!这样就可以避免阻塞主线程的消息队列了!
好,接着上面的话题handler收到这个REQUEST_SUBMIT之后,调用了方法 dispatcher.performSubmit(action);
dispatcher.performSubmit
void performSubmit(Action action, boolean dismissFailed) {
    //此任务是否被暂停
    if (pausedTags.contains(action.getTag())) {
      pausedActions.put(action.getTarget(), action);
      if (action.getPicasso().loggingEnabled) {
        log(OWNER_DISPATCHER, VERB_PAUSED, action.request.logId(),
            "because tag '" + action.getTag() + "' is paused");
      }
      return;
    }
    //首先创建了一个BitmapHunter,它继承自Runnable,可以被线程池调用
    BitmapHunter hunter = hunterMap.get(action.getKey());
    if (hunter != null) {
      hunter.attach(action);
      return;
    }
    //线程池是否关闭
    if (service.isShutdown()) {
      if (action.getPicasso().loggingEnabled) {
        log(OWNER_DISPATCHER, VERB_IGNORED, action.request.logId(), "because shut down");
      }
      return;
    }
    //还记得在Picasso的构造器中创建了若干RequestHandler吗,
    //在这里,forRequest方法会遍历这些requestHandler,看谁可以处理当前请求,
    //如果发现了,那就创建BitmapHandler,并把这个requestHandler传进去
    hunter = forRequest(action.getPicasso(), this, cache, stats, action);
    //通过service执行hunter并返回一个future对象
    hunter.future = service.submit(hunter);
    //将hunter添加到hunterMap中
    hunterMap.put(action.getKey(), hunter);
    if (dismissFailed) {
      failedActions.remove(action.getTarget());
    }

    if (action.getPicasso().loggingEnabled) {
      log(OWNER_DISPATCHER, VERB_ENQUEUED, action.request.logId());
    }
  }
上面代码里面已经加过了注释,但是forRequest这个方法还是要讲一下。它依次调用requestHandlers里RequestHandler的canHandleRequest()方法来确定这个request能被哪个RequestHandler执行,找到对应的RequestHandler后就创建BitmapHunter对象并返回.再回到performSubmit()方法里,通过service.submit(hunter)执行了hunter,hunter实现了Runnable接口,所以run()方法就会被执行。
下面又要跟一下hunter的run方法
BitmapHunter的run()方法
@Override public void run() {
    try {
      updateThreadName(data);

      if (picasso.loggingEnabled) {
        log(OWNER_HUNTER, VERB_EXECUTING, getLogIdsForHunter(this));
      }

      result = hunt();

      if (result == null) {
        dispatcher.dispatchFailed(this);
      } else {
        dispatcher.dispatchComplete(this);
      }
    } catch (Downloader.ResponseException e) {
      if (!e.localCacheOnly || e.responseCode != 504) {
        exception = e;
      }
      dispatcher.dispatchFailed(this);
    } catch (NetworkRequestHandler.ContentLengthException e) {
      exception = e;
      dispatcher.dispatchRetry(this);
    } catch (IOException e) {
      exception = e;
      dispatcher.dispatchRetry(this);
    } catch (OutOfMemoryError e) {
      StringWriter writer = new StringWriter();
      stats.createSnapshot().dump(new PrintWriter(writer));
      exception = new RuntimeException(writer.toString(), e);
      dispatcher.dispatchFailed(this);
    } catch (Exception e) {
      exception = e;
      dispatcher.dispatchFailed(this);
    } finally {
      Thread.currentThread().setName(Utils.THREAD_IDLE_NAME);
    }
  }
一堆catch语句分别捕捉不同的异常然后上报给dispatcher进行处理,主要代码当然是 hunt()这个方法。
hunt()方法
Bitmap hunt() throws IOException {
    Bitmap bitmap = null;
    //依然先从缓存拿
    if (shouldReadFromMemoryCache(memoryPolicy)) {
      bitmap = cache.get(key);
      if (bitmap != null) {
        stats.dispatchCacheHit();
        loadedFrom = MEMORY;
        if (picasso.loggingEnabled) {
          log(OWNER_HUNTER, VERB_DECODED, data.logId(), "from cache");
        }
        return bitmap;
      }
    }
    //缓存没有的话,再调用requestHandler.load
    data.networkPolicy = retryCount == 0 ? NetworkPolicy.OFFLINE.index : networkPolicy;
    //拿到结果
    RequestHandler.Result result = requestHandler.load(data, networkPolicy);
    if (result != null) {
      loadedFrom = result.getLoadedFrom();
      exifRotation = result.getExifOrientation();
      //从结果中拿bitmap
      bitmap = result.getBitmap();

      // If there was no Bitmap then we need to decode it from the stream.
      if (bitmap == null) {
        InputStream is = result.getStream();
        try {
          //压缩
          bitmap = decodeStream(is, data);
        } finally {
          Utils.closeQuietly(is);
        }
      }
    }

    if (bitmap != null) {
      if (picasso.loggingEnabled) {
        log(OWNER_HUNTER, VERB_DECODED, data.logId());
      }
      stats.dispatchBitmapDecoded(bitmap);
      //如果需要图片Transformation
      if (data.needsTransformation() || exifRotation != 0) {
      //这里使用了一个全局锁DECODE_LOCK来保证同一个时刻仅仅有一个图片正在处理
        synchronized (DECODE_LOCK) {
          if (data.needsMatrixTransform() || exifRotation != 0) {
            bitmap = transformResult(data, bitmap, exifRotation);
            if (picasso.loggingEnabled) {
              log(OWNER_HUNTER, VERB_TRANSFORMED, data.logId());
            }
          }
          if (data.hasCustomTransformations()) {
            bitmap = applyCustomTransformations(data.transformations, bitmap);
            if (picasso.loggingEnabled) {
              log(OWNER_HUNTER, VERB_TRANSFORMED, data.logId(), "from custom transformations");
            }
          }
        }
        if (bitmap != null) {
          stats.dispatchBitmapTransformed(bitmap);
        }
      }
    }

    return bitmap;
  }
这个里面要分析的当然是requestHandler的load方法了。还记得Picasso的构造方法里面的那7中RequestHandler吗?这里的load方法也要看现在选择的是那个RequestHandler对象。
这里我们就拿网络请求这个NetworkRequestHandler来作介绍。
RequestHandler的load方法
@Override public Result load(Request request, int networkPolicy) throws IOException {
    //这个download一开始介绍过了,是否依赖okhttp
    //如果依赖的话,那就使用OkHttpClient,否则就使用默认的HttpUrlConnection了
    Response response = downloader.load(request.uri, request.networkPolicy);
    if (response == null) {
      return null;
    }
    //判断是从缓存还是网络拿的
    Picasso.LoadedFrom loadedFrom = response.cached ? DISK : NETWORK;

    Bitmap bitmap = response.getBitmap();
    if (bitmap != null) {
      return new Result(bitmap, loadedFrom);
    }
    //如果是从网络返回的,那么拿到的是流对象
    InputStream is = response.getInputStream();
    if (is == null) {
      return null;
    }
    // Sometimes response content length is zero when requests are being replayed. Haven't found
    // root cause to this but retrying the request seems safe to do so.
    if (loadedFrom == DISK && response.getContentLength() == 0) {
      Utils.closeQuietly(is);
      throw new ContentLengthException("Received response with 0 content-length header.");
    }
    if (loadedFrom == NETWORK && response.getContentLength() > 0) {
      stats.dispatchDownloadFinished(response.getContentLength());
    }
    //将结果封装返回
    return new Result(is, loadedFrom);
  }
好了,这里已经获取到结果了,现在我们再回到BitmapHunter的run()方法,在获取到result之后,
result = hunt();

      if (result == null) {
        dispatcher.dispatchFailed(this);
      } else {
        dispatcher.dispatchComplete(this);
      }
接下来是dispatcher里面的方法调用了,dispatchComplete–>performComplete–>batch–>performBatchComplete–>发送信息给主线程(Picasso这个类)。
这里有一点要注意的,就是performComplete这个函数里面,对于load下来的文件,有一个写入cache的操作。
if (shouldWriteToMemoryCache(hunter.getMemoryPolicy())) {
      cache.set(hunter.getKey(), hunter.getResult());
    }
主线程mainThreadHandler处理:
 case HUNTER_BATCH_COMPLETE: {
          @SuppressWarnings("unchecked") List<BitmapHunter> batch = (List<BitmapHunter>) msg.obj;
          //noinspection ForLoopReplaceableByForEach
          for (int i = 0, n = batch.size(); i < n; i++) {
            BitmapHunter hunter = batch.get(i);
            hunter.picasso.complete(hunter);
          }
          break;
        }
下面的流程是这样的:
hunter.picasso.complete(hunter)–>deliverAction–>action.complete(result, from);
这里,如果是ImageView的话,那就是ImageViewAction的complete方法。
@Override public void complete(Bitmap result, Picasso.LoadedFrom from) {
    if (result == null) {
      throw new AssertionError(
          String.format("Attempted to complete action with no result!\n%s", this));
    }

    ImageView target = this.target.get();
    if (target == null) {
      return;
    }

    Context context = picasso.context;
    boolean indicatorsEnabled = picasso.indicatorsEnabled;
    PicassoDrawable.setBitmap(target, context, result, from, noFade, indicatorsEnabled);

    if (callback != null) {
      callback.onSuccess();
    }
  }
图片最终通过PicassoDrawable.setBitmap()方法被设置到ImageView上.
这个PicassoDrawable提供了fade动画.
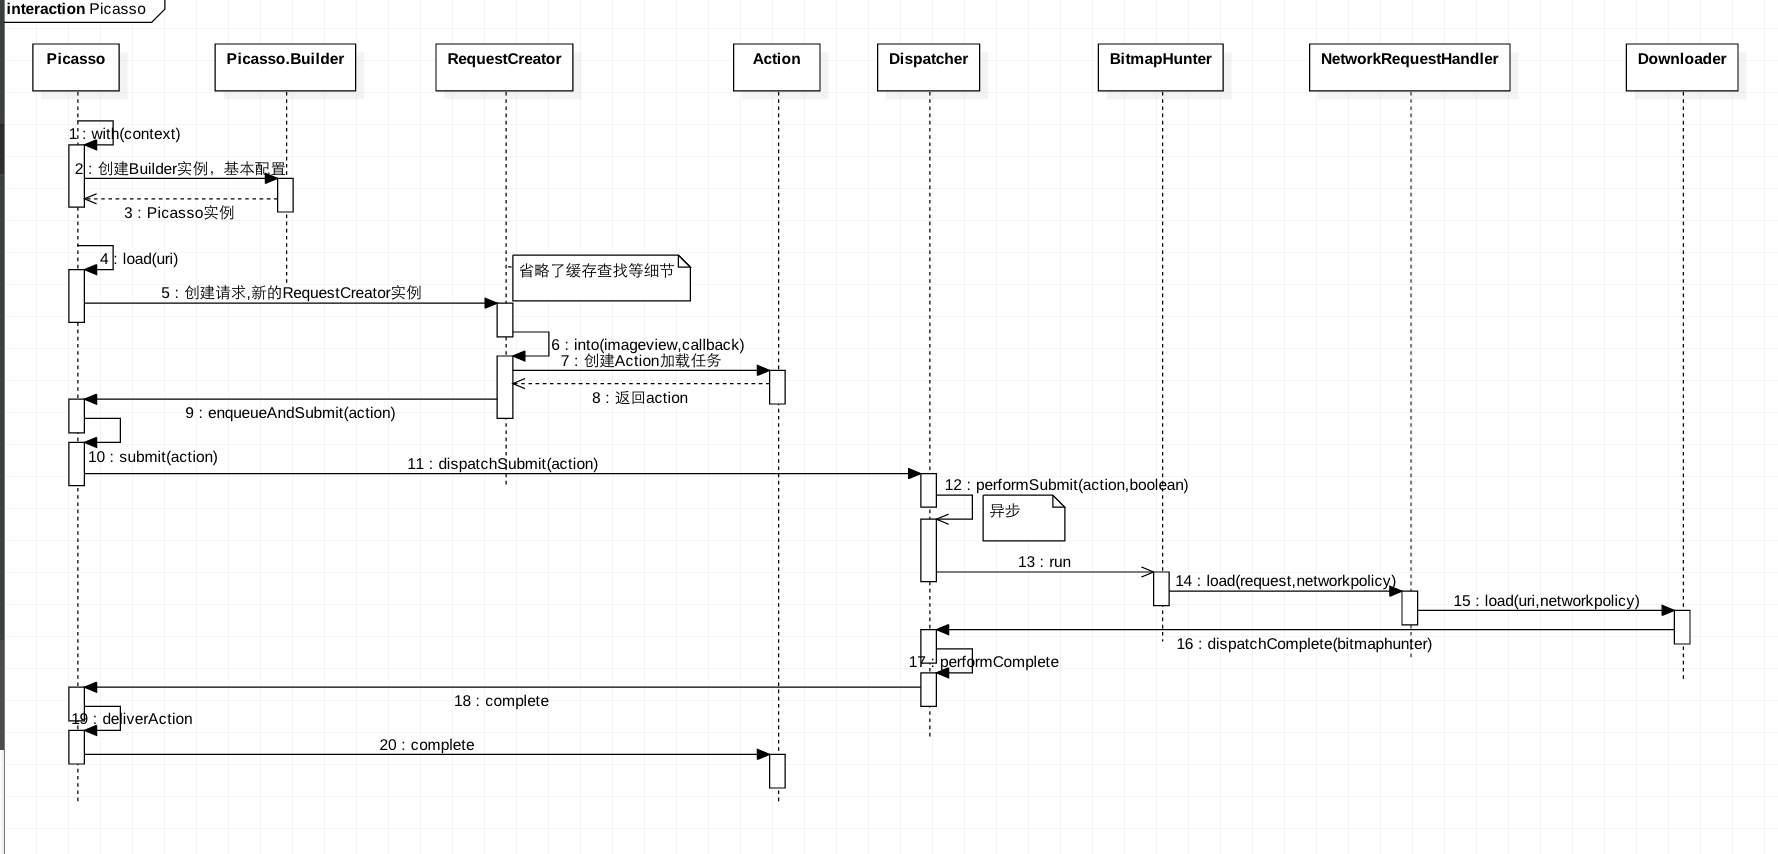
最终以一张时序图收尾
文章同步到github:Picasso源码分析
欢迎star o(^▽^)o


 7275
7275


 被折叠的 条评论
为什么被折叠?
被折叠的 条评论
为什么被折叠?
 到【灌水乐园】发言


