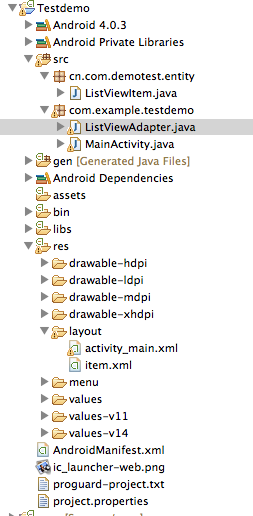
基本的思路是,在实体类中保存颜色的值或者是保存是否选中的状态(boolean),把实体的类的列表传入BaseAdapter然后调用listview实例的notifyDataSetChanged()方法进行动态更新数据。
包含两种方式(第二种是转的)
下面是一个实例:
ListViewItem:实体类
package cn.com.demotest.entity;

public class ListViewItem {
	private String name;
	private String result;
	private int colorData = 0;
	public ListViewItem(String name, String result, int colorData)
	{
		this.name = name;
		this.result = result;
		this.colorData = colorData;
	}
	public int getColorData() {
		return colorData;
	}
	public void setColorData(int colorData) {
		this.colorData = colorData;
	}
	public String getName() {
		return name;
	}
	public void setName(String name) {
		this.name = name;
	}
	public String getResult() {
		return result;
	}
	public void setResult(String result) {
		this.result = result;
	}
}
ListViewAdapter:BaseAdapter
package com.example.testdemo;

import java.util.List;

import cn.com.demotest.entity.ListViewItem;
import android.content.Context;
import android.graphics.Color;
import android.view.LayoutInflater;
import android.view.View;
import android.view.ViewGroup;
import android.widget.BaseAdapter;
import android.widget.LinearLayout;
import android.widget.TextView;

public class ListViewAdapter extends BaseAdapter {
	private Context context;
	private List<ListViewItem> data;
	private LayoutInflater inflater;
	private int colorPageId = 0;
	public ListViewAdapter(Context context,List<ListViewItem> data)
	{
		this.context = context;
		this.data = data;
		inflater = (LayoutInflater)context.getSystemService(context.LAYOUT_INFLATER_SERVICE);
	}
	@Override
	public int getCount() {
		// TODO Auto-generated method stub
		return this.data.size();
	}

	@Override
	public Object getItem(int position) {
		// TODO Auto-generated method stub
		return data.get(position);
	}

	@Override
	public long getItemId(int position) {
		// TODO Auto-generated method stub
		return position;
	}

	@Override
	public View getView(int position, View convertView, ViewGroup parent)
	{

		LinearLayout layout = (LinearLayout) inflater.inflate(R.layout.item,null);
		TextView name = (TextView) layout.findViewById(R.id.name);
		TextView result = (TextView) layout.findViewById(R.id.result);
		ListViewItem item = data.get(position);
		name.setText(item.getName());
		result.setText(item.getResult());
		int nameColor = 0;
		int resultColor = 0;
		if(colorPageId == 0)
		{
			nameColor = Color.BLUE;
			colorPageId = 1;
		}
		else if(colorPageId == 1)
		{
			nameColor = Color.GREEN;
			colorPageId = 0;
		}
		name.setTextColor(nameColor);//这里的颜色可以自己动态的设置,可以用Color对象里的颜色值,也可以用R.color里的颜色。
		result.setTextColor(item.getColorData());

		return layout;
	}
    public List<ListViewItem> getData() {
        return data;
    }
    public void setData(List<ListViewItem> data) {
        this.data = data;
    }

}
MainActivity:
package com.example.testdemo;

import java.util.ArrayList;
import java.util.HashMap;
import java.util.List;

import cn.com.demotest.entity.ListViewItem;
import android.os.Bundle;
import android.app.Activity;
import android.graphics.Color;
import android.view.Menu;
import android.view.View;
import android.view.View.OnClickListener;
import android.widget.BaseAdapter;
import android.widget.Button;
import android.widget.ListAdapter;
import android.widget.ListView;
import android.widget.SimpleAdapter;
import android.widget.TextView;

public class MainActivity extends Activity {

	private  ListView  listview;
	List<ListViewItem> data;
    @Override
    public void onCreate(Bundle savedInstanceState) {
        super.onCreate(savedInstanceState);
        setContentView(R.layout.activity_main);

      ArrayList<HashMap<String, Object>>  map=new ArrayList<HashMap<String,Object>>();

        listview=(ListView) findViewById(R.id.listview);
        data = new ArrayList<ListViewItem>();
        data.add(new ListViewItem(this.getResources().getString(R.string.name),
        		this.getResources().getString(R.string.result),Color.GREEN));
        data.add(new ListViewItem(this.getResources().getString(R.string.name),
        		this.getResources().getString(R.string.result),Color.BLUE));

        data.add(new ListViewItem(this.getResources().getString(R.string.name),
        		this.getResources().getString(R.string.result),Color.YELLOW));

        data.add(new ListViewItem(this.getResources().getString(R.string.name),
        		this.getResources().getString(R.string.result),Color.RED));

        data.add(new ListViewItem(this.getResources().getString(R.string.name),
        		this.getResources().getString(R.string.result),Color.CYAN));
        listview.setAdapter(new ListViewAdapter(MainActivity.this, data));

        Button button = (Button) findViewById(R.id.test);
        button.setOnClickListener(new OnClickListener() {

            @Override
            public void onClick(View v) {
                ListViewAdapter adapter = (ListViewAdapter) listview.getAdapter();
                ListViewItem listViewItem = data.get(0);
                listViewItem.setColorData(Color.RED);
                data.set(0,listViewItem);
                adapter.setData(data);
                adapter.notifyDataSetChanged();

            }
        });
    }
}
activity_main.xml
<LinearLayout xmlns:android="http://schemas.android.com/apk/res/android"
    xmlns:tools="http://schemas.android.com/tools"
    android:layout_width="match_parent"
    android:orientation="vertical"
    android:layout_height="match_parent" >

    <TextView
        android:layout_width="wrap_content"
        android:layout_height="wrap_content"
        android:text="@string/textView"
        android:textSize="20dp"
        />
  <ListView
      android:id="@+id/listview"
      android:layout_width="fill_parent"
      android:layout_height="wrap_content">

  </ListView>

    <Button
        android:id="@+id/test"
        android:layout_height="wrap_content"
        android:layout_width="wrap_content"
        android:text="hoadshfo"/>


</LinearLayout>
item.xml
<?xml version="1.0" encoding="utf-8"?>
<LinearLayout xmlns:android="http://schemas.android.com/apk/res/android"
    android:layout_width="fill_parent"
    android:layout_height="fill_parent"
    android:orientation="horizontal" >

    <TextView
        android:id="@+id/name"
        android:layout_width="0dp"
        android:layout_height="wrap_content"
        android:layout_weight="3"
        android:textSize="10dp" />

    <TextView
        android:id="@+id/result"
        android:layout_width="0dp"
        android:layout_height="wrap_content"
        android:layout_weight="7" />

</LinearLayout>
下面一种方法更加简便,我是转的:
最近项目ListView浏览时候用改变颜色来记录选中行,网上Baidu,Google了好久,最后结合网上资料和自己的实践,
终于成功实现了功能!效果图如下:

具体的代码如下:
1、ListView的代码:
- <?xml version="1.0" encoding="utf-8"?>
- <LinearLayout xmlns:android="http://schemas.android.com/apk/res/android"
- android:orientation=


 这篇博客介绍了如何在Android中实现ListView的触摸变色功能,当用户触摸列表项时,其颜色会改变,再次触摸时恢复。博主分享了一个实例,通过在实体类中保存颜色状态,并使用BaseAdapter动态更新数据。关键代码包括ListView布局设置、Adapter的getView方法以及监听点击事件来切换选中状态。

 最低0.47元/天 解锁文章


 被折叠的 条评论
为什么被折叠?


