


本文演示,Tread多线程安全问题,以及几种解决多线程安全方式(线程同步)。
1)一个线程不安全的Demo
2)线程同步(synchronized,函数同步,this锁,Class对象锁)
一、小Demo演示引出线程安全问题:
package thread.runable1.qdj;
//1.定义类实现Runnable接口
class RunDemo1 implements Runnable
{
	private int x = 5;
	//2.覆盖Runnable接口中的run方法
	//将线程代码存放在run中
	public void run()
	{
		while (true)
		{
			if (x > 0)
			{
				//添加sleep(),注意:sleep()会抛出异常
				try {
					Thread.sleep(10);  //让线程睡眠10ms
				} catch (Exception e) {
					e.printStackTrace();
				}
				System.out.println("Runnable:"+x);
				--x;
			}
		}
	}
}
public class CRunableDemo1 {

	public static void main(String[] args) {
		RunDemo1 r = new RunDemo1();
		//3.通过Thread类建立线程对象,并将Runnable接口的子类对象作为参数
		Thread t1 = new Thread(r);
		Thread t2 = new Thread(r);
		Thread t3 = new Thread(r);
		Thread t4 = new Thread(r);
		//4.使用start开启线程
		t1.start();
		t2.start();
		t3.start();
		t4.start();
	}
}
运行显示结果:
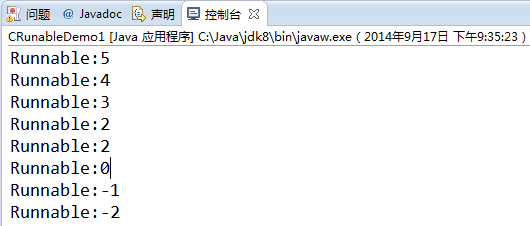
以上打印出了0,-1,-2等数字,发现没?(线程出问题了吧!!!)
问题:出问题的原因是什么呢?
解释:线程1进入,强制睡眠10ms;此时线程2进入,又强制睡眠10ms;线程3进入又强制睡眠10ms;线程4进入再强制睡眠10ms;
注意,以上4个线程睡眠时都已经进入了if语句,进入的时候x>0还是成立的;
好了,线程1醒来,开始打印打印5,4,3,2,这时候--x还没执行,线程2就醒来了,抢去了cpu的执行权.....................
二、线程同步
问题:对于上面的问题,我们是不是可以采取一个这样的措施?当线程1执行run代码段的时候,我们不让其他的线程来执行,直到线程1执行完,其他的线程才可以进入。
解决方案:好在Java里面本来就有这样的函数,将代码段包裹起来,就可以达到上面问题描述的效果。函数名:synchronized,需要一个参数,随便传个对象就ok了(具体参数区别分析,请往下拉见附录1)。
1)一个简单的解决方案:
package thread.runable1.qdj;
//1.定义类实现Runnable接口
class RunDemo1 implements Runnable
{
	private int x = 5;
	Object obj = new Object();
	//2.覆盖Runnable接口中的run方法
	//将线程代码存放在run中
	public void run()
	{
		while (true)
		{
			synchronized (obj)
			{
				if (x > 0)
				{
					//添加sleep(),注意:sleep()会抛出异常
					try {
						Thread.sleep(10);  //让线程睡眠10ms
					} catch (Exception e) {
						e.printStackTrace();
					}
					System.out.println("Runnable:"+x);
					--x;
				}
			}
		}
	}
}
public class CRunableDemo1 {

	public static void main(String[] args) {
		RunDemo1 r = new RunDemo1();
		//3.通过Thread类建立线程对象,并将Runnable接口的子类对象作为参数
		Thread t1 = new Thread(r);
		Thread t2 = new Thread(r);
		Thread t3 = new Thread(r);
		Thread t4 = new Thread(r);
		//4.使用start开启线程
		t1.start();
		t2.start();
		t3.start();
		t4.start();
	}
}
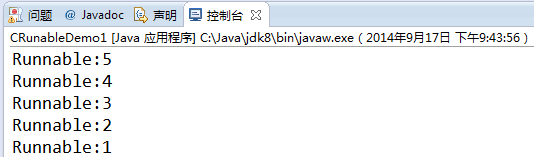
2)换一种更简单的解决方法:函数同步(将synchronized直接添加在函数前面)
说明:有没有发现,函数就是对多个语句的打包?但是,函数只是打包,而没有像上面的synchronized一样实现同步。但是有一种方法可以达到这个效果,看下面的小Demo就明白了。
package thread.runable1.qdj;
//同步函数
class SynFunc
{
	private int x = 5;
	public synchronized void aFunc()
	{
		while (true)
		{
			if (x > 0)
			{
				//添加sleep(),注意:sleep()会抛出异常
				try {
					Thread.sleep(10);  //让线程睡眠10ms
				} catch (Exception e) {
					e.printStackTrace();
				}
				System.out.println("Runnable:"+x);
				--x;
			}
		}
	}
}
//1.定义类实现Runnable接口
class RunDemo1 implements Runnable
{
	private SynFunc syn = new SynFunc();
	//2.覆盖Runnable接口中的run方法
	//将线程代码存放在run中
	public void run()
	{
		syn.aFunc();
	}
}
public class CRunableDemo1 {

	public static void main(String[] args) {
		RunDemo1 r = new RunDemo1();
		//3.通过Thread类建立线程对象,并将Runnable接口的子类对象作为参数
		Thread t1 = new Thread(r);
		Thread t2 = new Thread(r);
		Thread t3 = new Thread(r);
		Thread t4 = new Thread(r);
		//4.使用start开启线程
		t1.start();
		t2.start();
		t3.start();
		t4.start();
	}
}
附录1:对于函数锁中synchronized中的参数的解释分析(我们先看一下下面这个小Demo)
package thread.runable1.qdj;

//1.定义类实现Runnable接口
class RunDemo1 implements Runnable
{
	private int x = 100;
	Object obj = new Object();
	boolean flag = true;
	//2.覆盖Runnable接口中的run方法
	//将线程代码存放在run中
	public void run()
	{
		if (flag)
		{
			while (true)
			{
				synchronized(obj)
				{
					if (x > 0)
					{
						//添加sleep(),注意:sleep()会抛出异常
						try {
							Thread.sleep(10);  //让线程睡眠10ms
						} catch (Exception e) {
							e.printStackTrace();
						}
						System.out.println("Runnable:"+x);
						--x;
					}
				}
			}
		}
		else
		{
			while (true)
				aFunc();
		}
	}
	public synchronized void aFunc()
	{
		while (true)
		{
			if (x > 0)
			{
				//添加sleep(),注意:sleep()会抛出异常
				try {
					Thread.sleep(10);  //让线程睡眠10ms
				} catch (Exception e) {
					e.printStackTrace();
				}
				System.out.println("Runnable:"+x);
				--x;
			}
		}
	}
}
public class CRunableDemo1 {

	public static void main(String[] args) {
		RunDemo1 r = new RunDemo1();
		//3.通过Thread类建立线程对象,并将Runnable接口的子类对象作为参数
		Thread t1 = new Thread(r);
		Thread t2 = new Thread(r);
		//4.使用start开启线程
		t1.start();
		//添加sleep(),注意:sleep()会抛出异常
		try {
			Thread.sleep(10);  //让线程睡眠10ms
		} catch (Exception e) {
			e.printStackTrace();
		}
		r.flag = false;
		t2.start();
	}
}
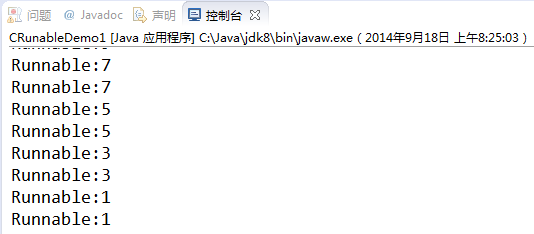
郁闷吧,又出现线程安全问题了,可是我们分明都加了锁的呀?这是什么原因导致的呢?其实,问题就出在了,synchronized里面的参数上。
函数同步锁定的是this,而上面的小Demo里面,一个是函数同步锁(this),另外一个是obj锁,发现没?解决方案:将obj锁改为this锁就没问题了。
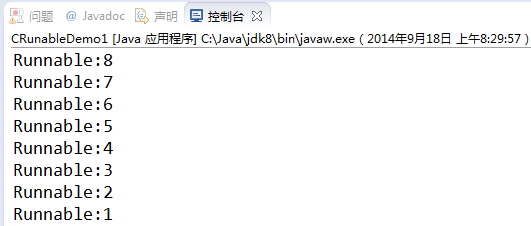
解决后的小Demo:
package thread.runable1.qdj;

//1.定义类实现Runnable接口
class RunDemo1 implements Runnable
{
	private int x = 100;
	Object obj = new Object();
	boolean flag = true;
	//2.覆盖Runnable接口中的run方法
	//将线程代码存放在run中
	public void run()
	{
		if (flag)
		{
			while (true)
			{
				synchronized(this)
				{
					if (x > 0)
					{
						//添加sleep(),注意:sleep()会抛出异常
						try {
							Thread.sleep(10);  //让线程睡眠10ms
						} catch (Exception e) {
							e.printStackTrace();
						}
						System.out.println("Runnable:"+x);
						--x;
					}
				}
			}
		}
		else
		{
			while (true)
				aFunc();
		}
	}
	public synchronized void aFunc()
	{
		while (true)
		{
			if (x > 0)
			{
				//添加sleep(),注意:sleep()会抛出异常
				try {
					Thread.sleep(10);  //让线程睡眠10ms
				} catch (Exception e) {
					e.printStackTrace();
				}
				System.out.println("Runnable:"+x);
				--x;
			}
		}
	}
}
public class CRunableDemo1 {

	public static void main(String[] args) {
		RunDemo1 r = new RunDemo1();
		//3.通过Thread类建立线程对象,并将Runnable接口的子类对象作为参数
		Thread t1 = new Thread(r);
		Thread t2 = new Thread(r);
		//4.使用start开启线程
		t1.start();
		//添加sleep(),注意:sleep()会抛出异常
		try {
			Thread.sleep(10);  //让线程睡眠10ms
		} catch (Exception e) {
			e.printStackTrace();
		}
		r.flag = false;
		t2.start();
	}
}
附录2:提出另外一个问题,既然函数同步锁定的是this,那么如下的这个函数要如何解释?静态函数没有this,如何锁定?
public static synchronized void aFunc()
	{
		while (true)
		{
			if (x > 0)
			{
				//添加sleep(),注意:sleep()会抛出异常
				try {
					Thread.sleep(10);  //让线程睡眠10ms
				} catch (Exception e) {
					e.printStackTrace();
				}
				System.out.println("Runnable:"+x);
				--x;
			}
		}
}解决后的小Demo:
package thread.runable1.qdj;

//1.定义类实现Runnable接口
class RunDemo1 implements Runnable
{
	private static int x = 100;
	boolean flag = true;
	//2.覆盖Runnable接口中的run方法
	//将线程代码存放在run中
	public void run()
	{
		if (flag)
		{
			while (true)
			{
				synchronized(RunDemo1.class)
				{
					if (x > 0)
					{
						//添加sleep(),注意:sleep()会抛出异常
						try {
							Thread.sleep(10);  //让线程睡眠10ms
						} catch (Exception e) {
							e.printStackTrace();
						}
						System.out.println("Runnable:"+x);
						--x;
					}
				}
			}
		}
		else
		{
			while (true)
				aFunc();
		}
	}
	public static synchronized void aFunc()
	{
		while (true)
		{
			if (x > 0)
			{
				//添加sleep(),注意:sleep()会抛出异常
				try {
					Thread.sleep(10);  //让线程睡眠10ms
				} catch (Exception e) {
					e.printStackTrace();
				}
				System.out.println("Runnable:"+x);
				--x;
			}
		}
	}
}
public class CRunableDemo1 {

	public static void main(String[] args) {
		RunDemo1 r = new RunDemo1();
		//3.通过Thread类建立线程对象,并将Runnable接口的子类对象作为参数
		Thread t1 = new Thread(r);
		Thread t2 = new Thread(r);
		//4.使用start开启线程
		t1.start();
		//添加sleep(),注意:sleep()会抛出异常
		try {
			Thread.sleep(10);  //让线程睡眠10ms
		} catch (Exception e) {
			e.printStackTrace();
		}
		r.flag = false;
		t2.start();
	}
}
运行显示结果:(同上)


 551
551

 被折叠的 条评论
为什么被折叠?
被折叠的 条评论
为什么被折叠?
 到【灌水乐园】发言


