


SportsStore: Administration
SportsStore:管理
In this final chapter onbuilding the SportsStore application, we will give the site administrator a wayof managing the product catalog. We will add support for creating, editing, andremoving items from the product repository, as well as for uploading anddisplaying images alongside products in the catalog. And, since these areadministrative functions, we’ll show you how to use authentication and filtersto secure access to controllers and action methods, and to prompt users forcredentials when needed.
在这建立SportsStore应用程序的最后一章,我们将为此网站的管理员提供一个管理产品目录的方法。我们将添加对产品存储库条目的生成、编辑、和删除、以及上传目录中产品的图片并在产品旁边显示图片的支持功能。另外,由于这些是管理功能,我们将演示如何对控制器和动作方法的安全进行认证和过滤,并在需要时提示用户提供他的凭据。
Adding Catalog Management
添加目录管理
The convention formanaging collections of items is to present the user with two types of pages: alist page and an edit page, as shown in Figure 9-1.
对条目集合进行管理的惯例是向用户显示两种形式的页面:一个列表页面和一个编辑页面,如图9-1所示。
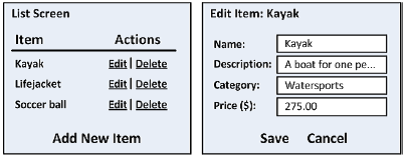
Figure 9-1. Sketch ofa CRUD UI for the product catalog
图9-1. 用于产品目录的CRUD界面略图
Together, these pagesallow a user to create, read, update, and delete items in the collection. Asnoted in Chapter 7, collectively, these actions are known as CRUD. Developersneed to implement CRUD so often that Visual Studio tries to help by offering togenerate MVC controllers that have action methods for CRUD operations and viewtemplates that support them.
这些页面合起来允许用户生成、读取、更新、和删除集合中的条目。正如第7章所说明的,合起来,这些动作称为CRUD。开发人员往往需要实现CRUD,Visual Studio试图通过提供生成具有CRUD操作的动作方法的控制器、以及支持这些动作方法的视图模板为开发人员提供帮助。
Creating a CRUD Controller
生成一个CRUD控制器
We will create a newcontroller to handle our administration functions. Right-click the Controllersfolder of the SportsStore.WebUI project and select Add † Controller from thepop-up menu. Set the name of the controller to AdminController and selectController with empty read/write actions from the Template drop-down list, asshown in Figure 9-2.
我们将生成一个新控制器来处理我们的管理功能。右击SportsStore.WebUI项目的Controllers文件夹,并从弹出菜单选择“添加控制器”。将该控制器名设为AdminController,并在模板下拉列表中选择“Controller with empty read/write actions(带有空读/写动作的控制器)”,如图9-2所示。
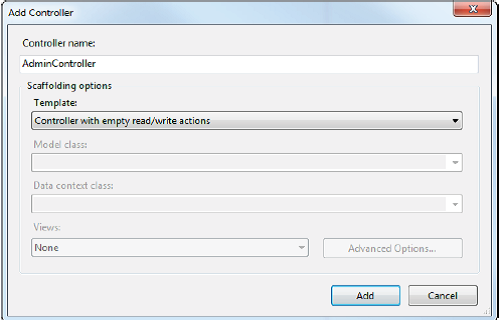
Figure 9-2. Creating acontroller using the Add Controller dialog box
图9-2. 用添加控制器对话框生成一个控制器
Click the Add button tocreate the controller. You can see the code that the template produces inListing 9-1.
点击“添加”以生成这个控制器。你可以在清单9-1中看到该模板生成的代码。
Listing 9-1. The VisualStudio CRUD Template
using System.Web.Mvc;

namespace SportsStore.WebUI.Controllers{
    publicclass AdminController : Controller {
        publicActionResult Index() { return View(); }
        publicActionResult Details(int id) { return View();}
        publicActionResult Create() { return View();}

        [HttpPost]
        publicActionResult Create(FormCollection collection) {
            try {
                //TODO: Add insert logic here
                returnRedirectToAction("Index");
            }catch {
                returnView();
            }
        }

        publicActionResult Edit(int id) { return View();}

        [HttpPost]
        publicActionResult Edit(int id, FormCollection collection) {
            try{
                //TODO: Add update logic here
                returnRedirectToAction("Index");
            }catch {
                returnView();
            }
        }

        publicActionResult Delete(int id) { return View();}
        [HttpPost]
        publicActionResult Delete(int id, FormCollection collection) {
            try {
                // TODO: Add delete logic here
                returnRedirectToAction("Index");
            }catch {
                returnView();
            }
        }
    }
}
This is Visual Studio’sdefault CRUD template. However, we aren’t going to use it for our SportsStoreapplication because it isn’t ideal for our purposes. We want to demonstrate howto build up the controller and explain each step as we go. So, remove all ofthe methods in the controller and edit the code so that it matches Listing 9-2.
这是VisualStudio的默认CRUD模板。然而,我们不打算把它用于我们的SportsStore应用程序,因为它对我们的目标不很理想。我们想要演示如何建立此控制器并对我们所做的每一个步骤进行解释。因此,删掉此控制器中的所有动作方法,并编辑代码使之与清单9-2吻合。
Listing 9-2. Starting Overwith the AdminController Class
using System.Web.Mvc;
usingSportsStore.Domain.Abstract;

namespaceSportsStore.WebUI.Controllers {
    publicclass AdminController : Controller {
        privateIProductRepository repository;
        publicAdminController(IProductRepository repo) {
            repository= repo;
        }
    }
}
Rendering a Grid of Products in the Repository
渲染存储库中产品的网格
To support the list pageshown in Figure 9-1, we need to add an action method that will display all ofthe products in the repository. Following the MVC Framework conventions, we’llcall this method Index. Add the action method to the controller, as shown inListing 9-3.
为了支持图9-1中的列表页面,我们需要添加一个显示存储库中所有产品的动作方法。根据MVC框架惯例,我们称这个方法为Index。把这个动作方法添加到控制器,如清单9-3所示。
Listing 9-3. The IndexAction Method
using System.Web.Mvc;
usingSportsStore.Domain.Abstract;

namespaceSportsStore.WebUI.Controllers {
    publicclass AdminController : Controller {
        privateIProductRepository repository;
        publicAdminController(IProductRepository repo) {
            repository= repo;
        }

         public ViewResult Index() {
             return View(repository.Products);
        }
    }
}
UNIT TEST: THE INDEX ACTION
单元测试INDEX动作
The behavior that we careabout for the Index method is that it correctly returns the Product objectsthat are in the repository. We can test this by creating a mock repositoryimplementation and comparing the test data with the data returned by the actionmethod. Here is the unit test:
对Index方法,我们所关心的行为是它正确地返回了存储库中的Product对象。我们可以通过生成一个模仿存储库的实现并把测试数据与该动作方法返回的数据进行比较。以下是该单元测试:
[TestMethod]
public voidIndex_Contains_All_Products() {
    //Arrange - create the mock repository
    Mock<IProductRepository>mock = new Mock<IProductRepository>();
    mock.Setup(m=> m.Products).Returns(new Product[] {
        newProduct {ProductID = 1, Name = "P1"},
        newProduct {ProductID = 2, Name = "P2"},
        newProduct {ProductID = 3, Name = "P3"},
    }.AsQueryable());

    //Arrange - create a controller
    AdminControllertarget = new AdminController(mock.Object);

    //Action
    Product[]result = ((IEnumerable<Product>)target.Index().ViewData.Model).ToArray();

    //Assert
    Assert.AreEqual(result.Length,3);
    Assert.AreEqual("P1",result[0].Name);
    Assert.AreEqual("P2",result[1].Name);
    Assert.AreEqual("P3",result[2].Name);
}
Creating a New Layout
生成一个新的布局
We are going to create anew Razor layout to use with the SportsStore administration views. This will bea simple layout that provides a single point where we can apply changes to allof the administration views.
我们打算生成一个新的Razor布局用于SportsStore的管理视图。这是一个简单的布局,它提供了一个单一的点,我们可以运用这个点,把它变成所有的管理视图。
To create the layout,right-click the Views/Shared folder in the SportsStore.WebUI project and selectAdd † New Item. Select the MVC 3 Layout Page (Razor) template and set the nameto _AdminLayout.cshtml, as shown in Figure 9-3. Click the Add button to createthe new file.
为了生成这个布局,右击SportsStore.WebUI项目的Views/Shared文件夹,并选择“添加新项目”。选择“MVC 3 Layout Page(Razor)”模板,并设置其名字为_AdminLayout.cshtml,如图9-3所示。点击“添加”按钮以生成这个新文件。
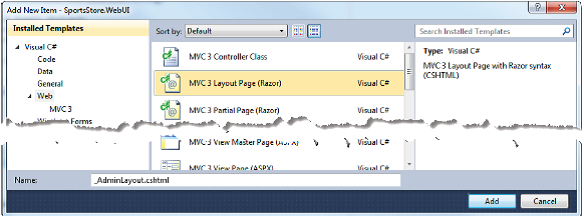
Figure 9-3. Creating anew Razor layout
图9-3. 生成一个新的Razor布局
The convention is to startthe layout name with an underscore (_). Razor is also used by another Microsofttechnology called WebMatrix, which uses the underscore to prevent layout pagesfrom being served to browsers. MVC doesn’t need this protection, but theconvention for naming layouts is carried over to MVC applications anyway.
惯例是用一个下划线字符(_)作为布局名。微软的另一个叫做WebMatrix的技术也使用Razor,它利用下划线来阻止浏览器请求布局页面。MVC不需要这种防护,但这一惯例被延续到了MVC应用程序。
We want to create areference to a CSS file in the layout, as shown in Listing 9-4.
在这个布局中,我们想要生成一个对CSS文件的引用,如清单9-4所示。
Listing 9-4. The_AdminLayout.cshtml File
<!DOCTYPE html>
<html>
<head>
    <title>@ViewBag.Title</title>
    <linkhref="@Url.Content("~/Content/Admin.css")"rel="stylesheet" type="text/css" />
</head>
<body>
<div>
    @RenderBody()
</div>
</body>
</html>
The addition (shown in bold)is a reference to a CSS file called Admin.css in the Content folder. To createthe Admin.css file, right-click the Content folder, select Add † New Item,select the Style Sheet template, and set the name to Admin.css, as shown inFigure 9-4.
添加的内容(黑体)引用了Content文件夹中一个名为Admin.css的CSS文件。要生成这个Admin.css文件,右击Content文件夹,选择“添加新项目”,选择“样式表”模板,将名字设置为Admin.css,如图9-4所示。
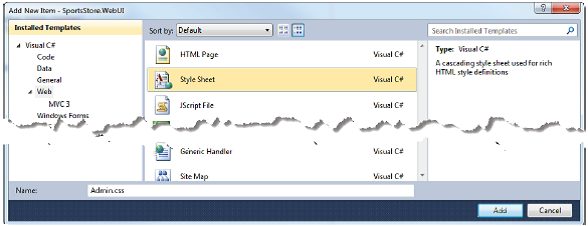
Figure 9-4. Creatingthe Admin.css file
图9-4. 生成Admin.css文件
Replace the contents ofthe Admin.css file with the styles shown in Listing 9-5.
以清单9-5所示的样式替换Admin.css文件的内容。
Listing 9-5. The CSSStyles for the Admin Views
BODY, TD { font-family:Segoe UI, Verdana }
H1 { padding: .5em;padding-top: 0; font-weight: bold;
font-size: 1.5em; border-bottom: 2px solidgray; }
DIV#content { padding:.9em; }
TABLE.Grid TD, TABLE.GridTH { border-bottom: 1px dotted gray; text-align:left; }
TABLE.Grid {border-collapse: collapse; width:100%; }
TABLE.Grid TH.NumericCol,Table.Grid TD.NumericCol {
text-align: right; padding-right: 1em; }
FORM {margin-bottom: 0px;}
DIV.Message { background:gray; color:White; padding: .2em; margin-top:.25em; }
.field-validation-error {color: red; display: block; }
.field-validation-valid {display: none; }
.input-validation-error {border: 1px solid red; background-color: #ffeeee; }
.validation-summary-errors{ font-weight: bold; color: red; }
.validation-summary-valid{ display: none; }
Implementing the List View
实现List视图
Now that we have createdthe new layout, we can add a view to the project for the Index action method ofthe Admin controller. Right-click inside the Index method and select Add Viewfrom the pop-up menu. Set the name of the view to Index, as shown in Figure9-5.
现在,我们已经生成了一个新布局,我们可以把一个用于Admin控制器的Index动作方法的视图添加到项目中。在Index方法中右击,并从弹出菜单选择“添加视图”。将视图名设为Index,如图9-5所示。
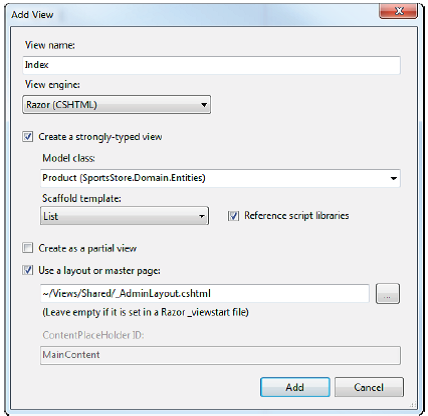
Figure 9-5. Creatingthe Index view
图9-5. 生成Index视图
We are going to use ascaffold view, which is where Visual Studio looks at the class we select for astrongly typed view and creates a view containing markup tailored for thatmodel type. To do this, select Product from the list of model classes and Listfor the scaffold template, as shown in Figure 9-5.
我们打算使用一个支架(scaffold)视图,在这里,Visual Studio会考查我们对强类型视图所选择的类,并生成一个包含了对该模型类型量身定制的标记的视图。为此,从模型列表中选择Product,并在支架模板中选择List,如图9-5所示。
n Note When using the List scaffold, Visual Studio assumes you areworking with an IEnumerable sequence of the model view type, so you can justselect the singular form of the class from the list.
注:当使用List支架时,Visual Studio假设你是与模型视图类型的IEnumaerable序列进行工作,因此,你只可以选择从该列表中选择一个单一的格式。
We want to apply our newlycreated layout, so check the option to use a layout for the view and select the_AdminLayout.cshtml file from the Views/Shared folder. Click the Add button tocreate the view. The scaffold view that Visual Studio creates is shown inListing 9-6.
我们希望运用我们新生成的布局,因此为此视图选中“使用布局”复选框,并选择Views/Shared文件夹中的_AdminLayout.cshtml文件。点击“添加”按钮以生成该视图。Visual Studio所生成的这个支架视图如清单9-6所示。
Listing 9-6. The Scaffoldfor List Views
@modelIEnumerable<SportsStore.Domain.Entities.Product>
@{
ViewBag.Title = "Index";
Layout ="~/Views/Shared/_AdminLayout.cshtml";
}
<h2>Index</h2>
<p>
@Html.ActionLink("Create New","Create")
</p>
<table>
<tr>
<th></th>
<th>Name</th>
<th>Description</th>
<th>Price</th>
<th>Category</th>
</tr>
@foreach (var item inModel) {
<tr>
<td>
@Html.ActionLink("Edit","Edit", new { id=item.ProductID }) |
@Html.ActionLink("Details","Details", new { id=item.ProductID }) |
@Html.ActionLink("Delete","Delete", new { id=item.ProductID })
</td>
<td>@item.Name</td>
<td>@item.Description</td>
<td>@String.Format("{0:F}", item.Price)</td>
<td>@item.Category</td>
</tr>
}
</table>
You can see how this viewis rendered by requesting the Admin/Index URL from the application, as shown inFigure 9-6.
你可以通过请求应用程序的Admin/Index地址看到该视图是如何渲染的,如图9-6所示。
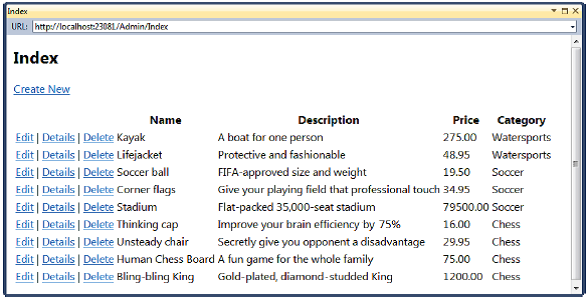
Figure 9-6. Renderingthe scaffold List view
图9-6. 渲染支架List视图
The scaffold view does apretty good job of setting things up for us. We have columns for each of theproperties in the Product class and links for other CRUD operations that referto action methods in the same controller. That said, the markup is a littleverbose. Also, we want something that ties in with the CSS we created earlier.Edit your Index.cshtml file to match Listing 9-7.
支架视图为我们做了很好的设置工作。我们有了Product类中每个属性的列、有了进行CRUD操作的连接,它们指向同一控制器中的动作方法。这个标记有点冗长。而且我们希望有些东西与我们先前生成的CSS联系起来。编辑你的Index.cshtml文件使之吻合清单9-7。
Listing 9-7. Modifyingthe Index.cshtml View
@modelIEnumerable<SportsStore.Domain.Entities.Product>
@{
ViewBag.Title= "Admin: All Products";
Layout= "~/Views/Shared/_AdminLayout.cshtml";
}
<h1>AllProducts</h1>
<tableclass="Grid">
<tr>
<th>ID</th>
<th>Name</th>
<thclass="NumericCol">Price</th>
<th>Actions</th>
</tr>
@foreach(var item in Model) {
<tr>
<td>@item.ProductID</td>
<td>@Html.ActionLink(item.Name,"Edit", new { item.ProductID })</td>
<tdclass="NumericCol">@item.Price.ToString("c")</td>
<td>
@using(Html.BeginForm("Delete", "Admin")) {
@Html.Hidden("ProductID",item.ProductID)
<inputtype="submit" value="Delete"/>
}
</td>
</tr>
}
</table>
<p>@Html.ActionLink("Adda new product", "Create")</p>
This view presents theinformation in a more compact form, omitting some of the properties from theProduct class and using a different approach to lay out the links to specificproducts. You can see how this view renders in Figure 9-7.
这个视图以一种更紧凑的形式表现相关信息,忽略了Product类的一个属性,并用一种不同的办法展示了指向产品的连接。你可以从图9-7看到这个视图是如何渲染的。
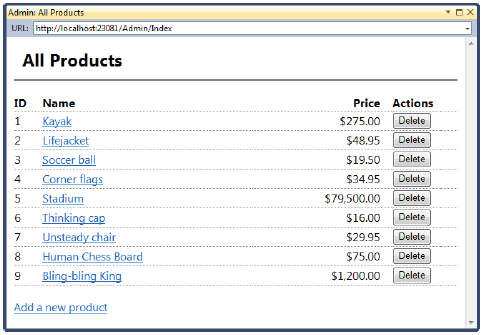
Figure 9-7. Renderingthe modified Index view
图9-7. 渲染修改后的Index视图
Now we have a nice listpage. The administrator can see the products in the catalog, and there arelinks or buttons to add, delete, and inspect items. In the following sections,we’ll add the functionality to support each of these features.
现在,我们有了一个很好的列表页面。管理员可以看到目录中的产品,并有了进行添加、删除、以及查看条目的连接或按钮。在以下章节,我们将添加对每个特性进行支持的功能。
Editing Products
编辑产品
To provide create andupdate features, we will add a product-editing page similar to the one shown inFigure 9-1. There are two halves to this job:
为了提供生成和更新特性,我们将添加一个类似于图9-1所示的产品编辑页面。做此工作有两个部分:
- Display a page that will allow the administrator to change valuesfor the properties of a product.
显示一个允许管理员修改产品属性值的页面。 - Add an action method that can process those changes when they aresubmitted.
添加一个在递交时能够处理这些修改的动作方法。
Creating the Edit Action Method
生成Edit动作方法
Listing 9-8 shows the Editmethod we have added to the AdminController class. This is the action method wespecified in the calls to the Html.ActionLink helper method in the Index view.
清单9-8显示了我们已经添加到AdminController类中的Edit方法。这是我们在Index视图的调用Html.ActionLink辅助方法中所指定的动作方法。
Listing 9-8. The EditMethod
public ViewResult Edit(intproductId) {
    Productproduct = repository.Products.FirstOrDefault(p => p.ProductID == productId);
    returnView(product);
}
This simple method findsthe product with the ID that corresponds to the productId parameter and passesit as a view model object.
这个简单的方法找到与productId参数对应的ID的产品,并把它作为一个视图模型对象进行传递。
UNIT TEST: THE EDIT ACTION METHOD
单元测试:EDIT动作方法
We want to test for twobehaviors in the Edit action method. The first is that we get the product weask for when we provide a valid ID value. Obviously, we want to make sure thatwe are editing the product we expected. The second behavior is that we don’tget any product at all when we request an ID value that is not in therepository. Here are the test methods:
我们想要测试Edit动作方法中的两个行为。第一个是当我们提供一个有效的ID值时获取我们所查找的产品。显然,我们希望确保我们编辑的是我们预期的产品。第二个行为是当我们请求一个不在存储库中的ID值时,我们根本得不到任何产品。以下是测试方法:
[TestMethod]
public voidCan_Edit_Product() {
    //Arrange - create the mock repository
    Mock<IProductRepository>mock = new Mock<IProductRepository>();
    mock.Setup(m=> m.Products).Returns(new Product[] {
        newProduct {ProductID = 1, Name = "P1"},
        newProduct {ProductID = 2, Name = "P2"},
        newProduct {ProductID = 3, Name = "P3"},
    }.AsQueryable());

    //Arrange - create the controller
    AdminControllertarget = new AdminController(mock.Object);

    //Act
    Productp1 = target.Edit(1).ViewData.Model as Product;
    Productp2 = target.Edit(2).ViewData.Model as Product;
    Productp3 = target.Edit(3).ViewData.Model as Product;

    //Assert
    Assert.AreEqual(1,p1.ProductID);
    Assert.AreEqual(2,p2.ProductID);
    Assert.AreEqual(3,p3.ProductID);
}

[TestMethod]
public voidCannot_Edit_Nonexistent_Product() {
    //Arrange - create the mock repository
    Mock<IProductRepository>mock = new Mock<IProductRepository>();
    mock.Setup(m=> m.Products).Returns(new Product[] {
        newProduct {ProductID = 1, Name = "P1"},
        newProduct {ProductID = 2, Name = "P2"},
        newProduct {ProductID = 3, Name = "P3"},
    }.AsQueryable());

    // Arrange - create the controller
    AdminControllertarget = new AdminController(mock.Object);

    //Act
    Productresult = (Product)target.Edit(4).ViewData.Model;

    //Assert
    Assert.IsNull(result);
}
Creating the Edit View
生成Edit视图
Now that we have an actionmethod, we can create a view for it to render. Right-click in the Edit actionmethod and select Add View. Leave the view name as Edit, check the option for astrongly typed view, and ensure that the Product class is selected as the modelclass, as shown in Figure 9-8.
现在我们有了一个动作方法,我们可以为它生成一个视图以便渲染。右击Edit动作方法并选择“添加视图”。保留视图名为Edit,选中“强类型视图”复选框,并确保选择了Product类作为模型类,如图9-8所示。
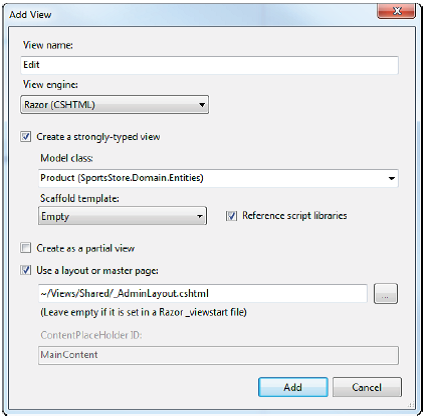
Figure 9-8. Creatingthe Edit view
图9-8. 生成Edit视图
There is a scaffold viewfor the Edit CRUD operation, which you can select if you are interested in seeingwhat Visual Studio creates. We will use our own markup again, so we haveselected Empty from the list of scaffold options. Don’t forget to check theoption to apply a layout to the view and select _AdminLayout.cshtml as the viewto use. Click the Add button to create the view, which will be placed in theViews/Admin folder. Edit the view so that the content matches Listing 9-9.
有一个用于Edit的CRUD操作的支架视图,如果你有兴趣要看看Visual Studio会生成什么,你可以选择它。我们仍要采用我们自己的标记,因此,我们在支架选择中选择Empty。不要忘记对此视图选中“运用布局”复选框,并选择_AdminLayout.cshtml用于该视图。点击“添加”以生成该视图,它将被放置在Views/Admin文件夹中。编辑此视图以使其内容与清单9-9吻合。
Listing 9-9. The EditView
@modelSportsStore.Domain.Entities.Product
@{
ViewBag.Title= "Admin: Edit " + @Model.Name;
Layout= "~/Views/Shared/_AdminLayout.cshtml";
}
<h1>Edit@Model.Name</h1>
@using (Html.BeginForm()){
@Html.EditorForModel()
<inputtype="submit" value="Save" />
@Html.ActionLink("Canceland return to List", "Index")
}
Instead of writing outmarkup for each of the labels and inputs by hand, we have called theHtml.EditorForModel helper method. This method asks the MVC Framework to createthe editing interface for us, which it does by inspecting the model type—inthis case, the Product class.
代替手工地为每个标签和输入项书写标记,我们调用了Html.EditorForModel辅助方法。这个方法要求MVC框架为我们生成编辑接口,这是通过探测其模型类型来完成的 — 这里是Product类。
To see the page that isgenerated from the Edit view, run the application and navigate to /Admin/Index.Click one of the product names, and you will see the page shown in Figure 9-9.
要看看这个Edit视图所生成的页面,运行应用程序并导航到/Admin/Index。点击一个产品名,于是你将看到如图9-9所示的页面。

Figure 9-9. The pagegenerated using the EditorForModel helper method
图9-9. 用EditorForModel辅助方法生成的页面
Let’s be honest—theEditorForModel method is convenient, but it doesn’t produce the most attractiveresults. In addition, we don’t want the administrator to be able to see or editthe ProductID attribute, and the text box for the Description property is fartoo small.
我们得承认 — EditorForModel方法是很方便的,但它产生最引人的结果。此外,我们不希望管理员编辑ProductID属性,而且用于Description的文本框太小了。
We can give the MVCFramework directions about how to create editors for properties by using modelmetadata,. This allows us to apply attributes to the properties of the newmodel class to influence the output of the Html.EditorForModel method. Listing9-10 shows how to use metadata on the Product class in the SportsStore.Domainproject.
我们可以通过使用模型元数据的办法向MVC框架给出如何生成属性编辑器的指示。这允许我们把属性运用于这个新模型类的属性以影响Html.EditorForModel方法的输出。清单9-10演示了如何在SportsStore.Domain项目中的Product类上使用元数据。
Listing 9-10. Using ModelMetadata
usingSystem.ComponentModel.DataAnnotations;
using System.Web.Mvc;

namespaceSportsStore.Domain.Entities {
    public class Product {
        [HiddenInput(DisplayValue=false)]
        public int ProductID { get; set; }
        public string Name { get; set; }

        [DataType(DataType.MultilineText)]
        public string Description { get; set; }
        public decimal Price { get; set; }
        publicstring Category { get; set; }
    }
}
The HiddenInput attributetells the MVC Framework to render the property as a hidden form element, andthe DataType attribute allows us to specify how a value is presented andedited. In this case, we have selected the MultilineText option. TheHiddenInput attribute is part of the System.Web.Mvc namespace, which means thatwe must add a reference to the System.Web.Mvc assembly in theSportsStore.Domain project. The other attributes are contained in the System.ComponentModel.DataAnnotationsnamespace, whose containing assembly is included in an MVC application projectby default.
HiddenInput属性告诉MVC框架将该属性渲染为隐藏的表单元素,而DataType属性允许我们指定一个值如何表现和编辑。这里,我们已经选择了MultilineText选项。HiddenInput是System.Web.Mvc命名空间的一部分,意即,我们必须在SportsStore.Domain项目中添加对System.Web.Mvc程序集的引用。其它属性包含在System.ComponentModel.DataAnnotations命名空间中,包有此命名空间的程序集默认地已经包括在MVC应用程序项目中了。
Figure 9-10 shows the Editpage once the metadata has been applied. You can no longer see or edit theProductId property, and you have a multiline text box for entering thedescription. However, the UI still looks pretty poor.
图9-10再次显示了已经运用了元数据的Edit页面。你不再能看到或编辑ProductId属性了,并且,你有一个多行文本框来输入description。然而,这个UI看上去还是很差。
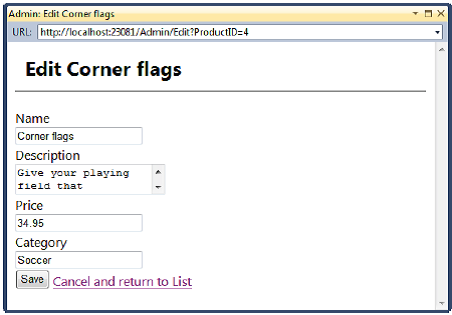
Figure 9-10. Theeffect of applying metadata
图9-10. 运用元数据的效果
We can make some simpleimprovements using CSS. When the MVC Framework creates the input fields foreach property, it assigns different CSS classes to them. When you look at thesource for the page shown in Figure 9-10, you can see that the textarea elementthat has been created for the product description has been assigned the"text-box-multi-line" CSS class:
我们可以用CSS作一些简单的改善。当MVC框架生成为每个属性生成input字段时,它给这些input赋予不同的CSS的class值。当你查看图9-10页面的源代码时,你可以看到为产品的description生成的文本框元素被赋予了“text-box-multi-line”CSS的class值:
...
<divclass="editor-field">
<textarea class="text-box multi-line"id="Description" name="Description">...descriptiontext...</textarea>
...
To improve the appearanceof the Edit view, add the styles shown in Listing 9-11 to the Admin.css file inthe Content folder of the SportsStore.WebUI project.
为了改善Edit视图的外观,把清单9-11所示的样式添加到SportsStore.WebUI 项目的Content文件夹中的Admin.css文件。
Listing 9-11. CSS Stylesfor the Editor Elements
.editor-field {margin-bottom: .8em; }
.editor-label {font-weight: bold; }
.editor-label:after {content: ":" }
.text-box { width: 25em; }
.multi-line { height: 5em;font-family: Segoe UI, Verdana; }
Figure 9-11 shows the effectthese styles have on the Edit view.
图9-11显示了把这些样式运用于Edit视图的效果。
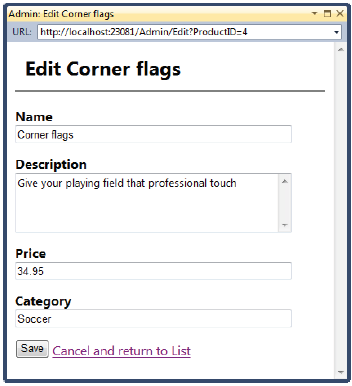
Figure 9-11. ApplyingCSS to the editor elements
图9-11. 将CSS运用于编辑元素
The rendered view is stillpretty basic, but it is functional and will do for our administration needs.
所渲染的视图仍然是很基本的,但它的功能具备了我们的管理需要。
As you saw in this example,the page a template view helper like EditorForModel creates won’t always meetyour requirements. We’ll discuss using and customizing template view helpers indetail in Chapter 16.
正如你在这个例子中看到折,像EditorForModel这样的模板视图辅助器所生成的页面并不总能满足我们的需求。我们将在第16章详细讨论模板视图辅助器的使用和定制。
Updating the Product Repository
更新产品存储库
Before we can processedits, we need to enhance the product repository so that we can save changes.First, we will add a new method to the IProductRepository interface, as shownin Listing 9-12.
在我们能够处理编辑之前,我们需要增强产品存储库,以使我们能够保存修改。首先,我们将把一个新的方法添加到IProductRepository接口,如清单9-12所示。
Listing 9-12. Adding aMethod to the Repository Interface
using System.Linq;
usingSportsStore.Domain.Entities;

namespaceSportsStore.Domain.Abstract {
    publicinterface IProductRepository {
        IQueryable<Product>Products { get; }
        void SaveProduct(Product product);
    }
}
We can then add thismethod to our Entity Framework implementation of the repository, theEFProductRepository class, as shown in Listing 9-13.
然后我们可以把这个方法添加到我们的存储库的实体框架实现上,EFProductRepository类,如清单9-13所示。
Listing 9-13.Implementing the SaveProduct Method
using System.Linq;
usingSportsStore.Domain.Abstract;
usingSportsStore.Domain.Entities;

namespaceSportsStore.Domain.Concrete {
    publicclass EFProductRepository : IProductRepository {
        privateEFDbContext context = new EFDbContext();
        publicIQueryable<Product> Products {
            get {return context.Products; }
        }

        public void SaveProduct(Product product) {
            if (product.ProductID == 0) {
                context.Products.Add(product);
            }
            context.SaveChanges();
        }
    }
}
The implementation of theSaveChanges method adds a product to the repository if the ProductID is 0; otherwise,it applies any changes to the existing product.
这个SaveChanges方法的实现在ProductID为0时把一个产品加入存储库,否则,它把任何修改运用于这个已经存在的产品。
Handling Edit POST Requests
处理Edit的POST请求
At this point, we areready to implement an overload of the Edit action method that will handle POSTrequests when the administrator clicks the Save button. The new method is shownin Listing 9-14.
到了这里,我们已经做好了实现一个过载的Edit动作方法的准备,它在管理员点击Save按钮时处理POST请求。这个新方法如清单9-14所示。
Listing 9-14. Adding thePOST-Handling Edit Action Method
[HttpPost]
public ActionResultEdit(Product product) {
    if(ModelState.IsValid) {
        repository.SaveProduct(product);
        TempData["message"]= string.Format("{0} has been saved", product.Name);
        returnRedirectToAction("Index");
    }else {
        //there is something wrong with the data values
        returnView(product);
    }
}
We check that the modelbinder has been able to validate the data submitted to the user. If everythingis OK, we save the changes to the repository, and then invoke the Index actionmethod to return the user to the list of products. If there is a problem withthe data, we render the Edit view again so that the user can make corrections.
我们检查模型绑定器已经能够校验递交给用户的数据。如果所有事情都OK了,我们把这些修改保存到存储库,然后请求Index动作方法把用户返回到产品列表。如果数据有问题,我们再次渲染Edit视图以使用户作出修正。
After we have saved thechanges in the repository, we store a message using the Temp Data feature. Thisis a key/value dictionary, similar to the session data and View Bag features wehave used previously. The key difference is that TempData is deleted at the endof the HTTP request.
在存储库中保存了这些修改之后,我们用Temp Data(临时数据)特性存储了一条消息。这是一个键/值字典,它类似于我们之前已经用过的会话数据和View Bag(视图包)特性。关键差别是TempData在HTTP请求的结尾被删掉了。
Notice that we return theActionResult type from the Edit method. We’ve been using the ViewResult type untilnow. ViewResult is derived from ActionResult, and it is used when you want theframework to render a view. However, other types of ActionResults areavailable, and one of them is returned by the RedirectToAction method. We usethat in the Edit action method to invoke the Index action method.
注意,我们从这个Edit方法返回的是ActionResult类型。我们到目前为止一直用ViewResult类型。ViewResult派生于ActionResult,而且它被用于在你希望框架去渲染一个视图时。然而,另一种类型的ActionResults也是可用的,其中之一由RedirectToAction方法所返回。我们在Edit动作方法中使用它去请求Index动作方法。
We can’t use ViewBag inthis situation because the user is being redirected. ViewBag passes databetween the controller and view, and it can’t hold data for longer than thecurrent HTTP request. We could have used the session data feature, but then themessage would be persistent until we explicitly removed it, which we wouldrather not have to do. So, the Temp Data feature is the perfect fit. The datais restricted to a single user’s session (so that users don’t see each other’sTempData) and will persist until we have read it. We will read the data in theview rendered by the action method to which we have redirected the user.
我们不能在这种情况下使用ViewBag,因为用户被重定向了。ViewBag在控制器与视图之间传递数据,但它不能保持数据比当前HTTP请求还长的时间。我们或许可以使用会话数据特性,但另一方面,消息会是持久的,直到我们明确地删除它,那我们还不如不用它。因此,Temp Data特性是十分合适的。数据被限制到一个单一用户的会话(于是用户不会看到相互的TempData),并且将保持到我们已经读取了它。我们在视图被动作方法渲染过程中把这些数据读给我们已经重定向的用户。
UNIT TEST: EDIT SUBMISSIONS
单元测试:EDIT递交
For the POST-processingEdit action method, we need to make sure that valid updates to the Productobject that the model binder has created are passed to the product repositoryto be saved. We also want to check that invalid updates—where a model errorexists—are not passed to the repository. Here are the test methods:
对POST处理的Edit动作方法,我们需要确保,对模型绑定器已经生成的Product对象所作的有效更新,被传递给产品存储库进行保存。我们也想检查非法更新 — 在存在模型错误的地方 — 不会被传递给存储库。以下是相应的测试方法:
[TestMethod]
public voidCan_Save_Valid_Changes() {
    // Arrange - create mock repository
    Mock<IProductRepository> mock = newMock<IProductRepository>();
    // Arrange - create the controller
    AdminController target = newAdminController(mock.Object);
    // Arrange - create a product
    Product product = new Product {Name ="Test"};

    // Act - try to save the product
    ActionResult result = target.Edit(product);

    // Assert - check that the repository wascalled
    mock.Verify(m => m.SaveProduct(product));

    // Assert - check the method result type
    Assert.IsNotInstanceOfType(result,typeof(ViewResult));
}

[TestMethod]
public voidCannot_Save_Invalid_Changes() {
    // Arrange - create mock repository
    Mock<IProductRepository> mock = newMock<IProductRepository>();
    // Arrange - create the controller
    AdminController target = newAdminController(mock.Object);
    // Arrange - create a product
    Product product = new Product { Name ="Test" };
    // Arrange - add an error to the modelstate
    target.ModelState.AddModelError("error","error");

    // Act - try to save the product
    ActionResult result = target.Edit(product);

    // Assert - check that the repository wasnot called
    mock.Verify(m =>m.SaveProduct(It.IsAny<Product>()), Times.Never());
    // Assert - check the method result type
    Assert.IsInstanceOfType(result,typeof(ViewResult));
}
Displaying a Confirmation Message
显示一条确认消息
We are going to deal withthe message we stored using TempData in the _AdminLayout.cshtml layout file. Byhandling the message in the template, we can create messages in any view thatuses the template, without needing to create additional Razor blocks. Listing9-15 shows the change to the file.
我们打算在_AdminLayout.cshtml布局文件中处理我们用TempData存储的消息。通过在模板中处理消息,我们可以在任何使用此模板的视图中生成消息,而不需要生成附加的Razor块。清单9-15显示了对此文件的修改。
Listing 9-15. Handlingthe ViewBag Message in the Layout
<!DOCTYPE html>
<html>
<head>
<title>@ViewBag.Title</title>
<linkhref="@Url.Content("~/Content/Admin.css")"rel="stylesheet" type="text/css" />
</head>
<body>
<div>
@if (TempData["message"] != null){
<divclass="Message">@TempData["message"]</div>
}
@RenderBody()
</div>
</body>
</html>
n Tip The benefit of dealing with the message in the template likethis is that users will see it displayed on whatever page is rendered afterthey have saved a change. At the moment, we return them to the list ofproducts, but we could change the workflow to render some other view, and theusers will still see the message (as long as the next view also uses the samelayout).
提示:像这样在模板中处理消息的好处是,在用户保存了修改后,他们可以看到它显示在任何渲染页面上。这里,我们把它们返回给了产品列表,但我们可以改变此工作流以渲染一些其它视图,而用户将仍然能看到此消息
We how now have all theelements we need to test editing products. Run the application, navigate to theAdmin/Index URL, and make some edits. Click the Save button. You will bereturned to the list view, and the TempData message will be displayed, as shownin Figure 9-12.
我们现在有了对编辑产品进行测试的所有元素。运行应用程序,导航到Admin/Index,作一些编辑。点击“Save”按钮。你将被返回到列表视图,而TempData消息将被显示出来,如图9-12所示。
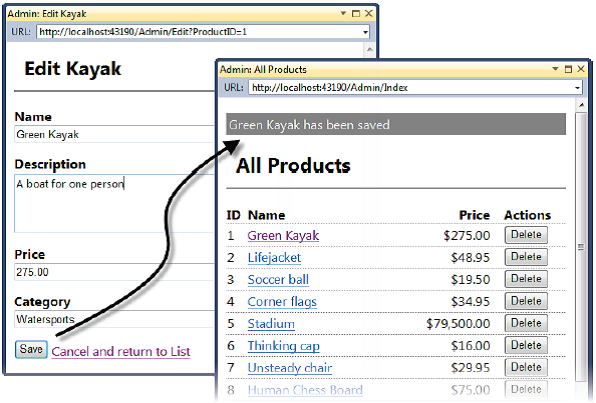
Figure 9-12. Editing aproduct and seeing the TempData message
图9-12. 编辑一个产品并看到TempData消息
The message will disappearif you reload the product list screen, because TempData is deleted when it isread. That is very convenient, since we don’t want old messages hanging around.
如果你重载产品列表屏幕,这条消息将会出现,因为TempData在读取它时才会被删除。这是很方便的,因为我们不想旧消息还会留下来。
Adding Model Validation
添加模型校验
As is always the case, weneed to add validation rules to our model entity. At the moment, theadministrator could enter negative prices or blank descriptions, andSportsStore would happily store that data in the database. Listing 9-16 showshow we have applied data annotations attributes to the Product class, just aswe did for the ShippingDetails class in the previous chapter.
情况总是这样,我们需要把校验规则添加到我们的模型实体。此刻,管理员要是能够输入负数价格或空白的产品描述,那末SportsStore也将会愉快地把这个数据存储在数据库中(这当然不行,所以要添加校验规则— 译者注)。清单9-16演示了我们把数据注解(DataAnnotation)属性运用到Product类,就像我们上一章对ShippingDetails类所做的那样。
Listing 9-16. ApplyingValidation Attributes to the Product Class
usingSystem.ComponentModel.DataAnnotations;
using System.Web.Mvc;

namespaceSportsStore.Domain.Entities {
    public class Product {
        [HiddenInput(DisplayValue=false)]
        public int ProductID { get; set; }

        [Required(ErrorMessage= "Please enter a product name")]
        public string Name { get; set; }

        [Required(ErrorMessage= "Please enter a description")]
        [DataType(DataType.MultilineText)]
        public string Description { get; set; }

        [Required]
        [Range(0.01,double.MaxValue, ErrorMessage = "Please enter a positive price")]
        public decimal Price { get; set; }

        [Required(ErrorMessage= "Please specify a category")]
        public string Category { get; set; }
    }
}
n Note We have reached the point with the Product class where thereare more attributes than properties. Don’t worry if you feel that theattributes make the class unreadable. You can move the attributes into adifferent class and tell MVC where to find them. We’ll show you how to do thisin Chapter 16.
注:到了这里,我们已经让Product类的注解属性比产品属性还多了。如果你感觉这些注解属性影响了类的可读性,不必担心。你可以把这些注解移到一个不同的类中去,并告诉MVC到哪里去找它们。我们将在第16章向你演示如何做这件事。
When we used theHtml.EditorForModel helper method to create the form elements to edit aProduct, the MVC Framework added all the markup and CSS needed to displayvalidation errors inline. Figure 9-13 shows how this appears when you edit aproduct and enter data that breaks the validation rules we applied in Listing9-16.
当我们使用Html.EditorForModel辅助方法来生成编辑Product的表单元素时,MVC框架添加了所有显示校验错误的所有内联的标记和CSS。图9-13演示了当你编辑一个产品并输入了打断我们在清单9-16中运用的校验规则的数据时,界面是如何显示的。
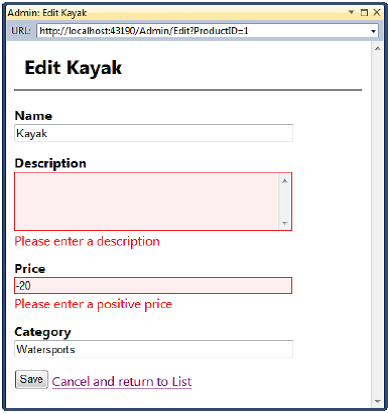
Figure 9-13. Datavalidation when editing products
图9-13. 编辑产品时的数据校验
Enabling Client-Side Validation
使客户端能够校验
At present, our datavalidation is applied only when the administrator submits edits to the server.Most web users expect immediate feedback if there are problems with the datathey have entered. This is why web developers often want to perform client-sidevalidation, where the data is checked in the browser using JavaScript. The MVCFramework can perform client-side validation based on the data annotations weapplied to the domain model class.
现在,我们的数据校验只当管理员把编辑递交给服务器时才会运用。大多数web用户期望如果他们输入的数据有问题时会立即反馈。这就是web开发人员经常希望执行客户端校验的原因,在这里,数据在浏览器中用JavaScript进行校验。MVC框架可以基于我们运用于域模型类的数据注解来执行客户端校验。
This feature is enabled bydefault, but it hasn’t been working because we have not added links to therequired JavaScript libraries. The simplest place to add these links is in the_AdminLayout.cshtml file, so that client validation can work on any page thatuses this layout. Listing 9-17 shows the changes to the layout. The MVCclient-side validation feature is based on the jQuery JavaScript library, whichcan be deduced from the name of the script files.
这一特性是默认可用的,但它并不会起作用,因为我们还没有添加对所需的JavaScript库的连接。添加这些连接最简单的地方是在_AdminLayout.cshtml文件中,以使客户端校验能够在使用这个布局的任何页面上起作用。清单9-17显示了对布局的修改。MVC客户端校验特性基于JQuery的JavaScript库,我们可以根据脚本文件名来推断JQuery库。
Listing 9-17. ImportingJavaScript Files for Client-Side Validation
<!DOCTYPE html>
<html>
<head>
<title>@ViewBag.Title</title>
<linkhref="@Url.Content("~/Content/Admin.css")"rel="stylesheet" type="text/css" />
<scriptsrc="@Url.Content("~/Scripts/jquery-1.4.4.min.js")"
type="text/javascript"></script>
 <scriptsrc="@Url.Content("~/Scripts/jquery.validate.min.js")"
 type="text/javascript"></script>
 <scriptsrc="@Url.Content("~/Scripts/jquery.validate.unobtrusive.min.js")"
 type="text/javascript"></script>
</head>
<body>
<div>
@if (TempData["message"] != null) {
<divclass="Message">@TempData["message"]</div>
}
@RenderBody()
</div>
</body>
</html>
With these additions,client-side validation will work for our administration views. The appearance oferror messages to the user is the same, because the CSS classes that are usedby the server validation are also used by the client-side validation. But the response isimmediate and doesn’t require a request to be sent to the server.
利用这些附件,客户端校验将为我们的管理视图工作。显示给用户的错误消息的外观是相同的,因为由服务校验所使用的CSS的class也由客户端校验所使用。但响应是快速的,而且不需要把一个请求发送到服务器。
In most situations,client-side validation is a useful feature, but if, for some reason, you don’twant to validate at the client, you need to use the following statements:
在大多数情况下,客户端校验是一个有用的特性,但如果,出于某种原因,你不想在客户端校验,你需要使用以下语句:
HtmlHelper.ClientValidationEnabled= false;
HtmlHelper.UnobtrusiveJavaScriptEnabled= false;
If you put thesestatements in a view or in a controller, then client-side validation is disabledonly for the current action. You can disable client-side validation for theentire application by using those statements in the Application_Start method ofGlobal.asax or by adding values to the Web.config file, like this:
如果你把这些语句放在一个视图中或一个控制器中,那末客户端校验只对当前动作失效。你可以通过把这些语句运用于Global.asax的Application_Start方法中的办法对整个应用程序的客户端校验失效,或者把一些值添加到Web.config文件,像这样:
<configuration>
<appSettings>
<addkey="ClientValidationEnabled" value="false"/>
<addkey="UnobtrusiveJavaScriptEnabled" value="false"/>
</appSettings>
</configuration>
Creating New Products
生成新产品
Next, we will implementthe Create action method, which is the one specified in the Add a new productlink in the product list page. This will allow the administrator to add newitems to the product catalog. Adding the ability to create new products willrequire only one small addition and one small change to our application. Thisis a great example of the power and flexibility of a well-thought-out MVCapplication.
下一步,我们将实现Create动作方法,这是在产品列表页中“Add a new product”连接所指定的方法。它将允许管理员把一个新条目添加到产品目录。添加生成新产品的能力将只需要一个小的附件,并对我拉的应用程序作一个小的修改即可。这是一个精心构思MVC应用程序功能强大和适应性的很好的例子。
First, add the Createmethod, shown in Listing 9-18, to the AdminController class.
首先,把Create方法加到AdminController类,如清单9-18所示。
Listing 9-18. Adding theCreate Action Method to the Admin Controller
public ViewResult Create(){
    returnView("Edit", new Product());
}
The Create method doesn’trender its default view. Instead, it specifies that the Edit view should beused. It is perfectly acceptable for one action method to use a view that isusually associated with another view. In this case, we inject a new Productobject as the view model so that the Edit view is populated with empty fields.
Create方法并不渲染它的默认视图。而是,它指定了应该用Edit视图。让一个动作方法去使用一个通常与另一个视图关联的视图是一件很完美的事情。在这里,我们注入一个新的Product对象作为视图模型,以便Edit视图用空字段进行组装。
This leads us to themodification. We would usually expect a form to postback to the action thatrendered it, and this is what the Html.BeginForm assumes by default when itgenerates an HTML form. However, this doesn’t work for our Create method,because we want the form to be posted back to the Edit action so that we cansave the newly created product data. To fix this, we can use an overloaded versionof the Html.BeginForm helper method to specify that the target of the formgenerated in the Edit view is the Edit action method of the Admin controller,as shown in Listing 9-19.
这导致我们进行修改操作。我们通常期望一个表单回递给渲染它的动作,而这正是Html.BeginForm在生成一个HTML表单时所假设的默认情况。然而,这对我们的Create方法并不工作,因为我们希望此表单被回递给Edit动作,以便我们可以保存这个新生成的产品数据。为了修正之,我们可以用一个过载的Html.BeginForm辅助方法来指明:在Edit视图中生成的目标表单是Admin控制器的Edit动作方法,如清单9-19所示。
Listing 9-19. ExplicitlySpecifying an Action Method and Controller for a Form
@modelSportsStore.Domain.Entities.Product

@{
    ViewBag.Title= "Admin: Edit " + @Model.Name;
    Layout= "~/Views/Shared/_AdminLayout.cshtml";
}

<h1>Edit@Model.Name</h1>
@using (Html.BeginForm("Edit", "Admin")){
    @Html.EditorForModel()
    <inputtype="submit" value="Save" />
    @Html.ActionLink("Canceland return to List", "Index")
}
Now the form will alwaysbe posted to the Edit action, regardless of which action rendered it. We cancreate products by clicking the Add a new product link and filling in thedetails, as shown in Figure 9-14.
现在,此表单将总是被递交给Edit动作,而不管哪个动作渲染它。我们可以通过点击“Add a newproduct”连接,并进行详细填充来生成产品,如图9-14所示。
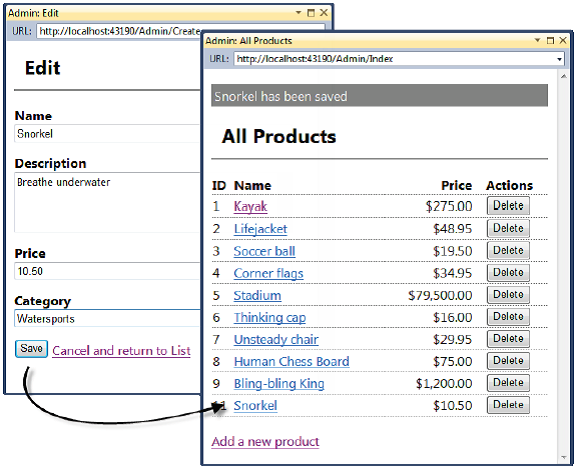
Figure 9-14. Adding anew product to the catalog
图9-14. 将一个新产品添加到目录
Deleting Products
删除产品
Adding support fordeleting items is fairly simple. First, we add a new method to theIProductRepository interface, as shown in Listing 9-20.
添加对删除条目的支持相当简单。首先,我们把一个新方法添加到IProductRepository接口,如清单9-20所示。
Listing 9-20. Adding aMethod to Delete Products
using System.Linq;
usingSportsStore.Domain.Entities;

namespaceSportsStore.Domain.Abstract {
    publicinterface IProductRepository {
        IQueryable<Product>Products { get; }

        voidSaveProduct(Product product);

        void DeleteProduct(Product product);
    }
}
Next, we implement thismethod in our Entity Framework repository class, EFProductRepository, as shownin Listing 9-21.
下一步,我们实现在我们的EntityFramework存储库类EFProductRepository中实现这个方法,如清单9-21所示。
Listing 9-21.Implementing Deletion Support in the Entity Framework Repository Class
...
public voidDeleteProduct(Product product) {
    context.Products.Remove(product);
    context.SaveChanges();
}
...
The final step is to implement a Delete actionmethod in the Admin controller. This action method should support only POSTrequests, because deleting objects is not an idempotent operation. As we’llexplain in Chapter 11, browsers and caches are free to make GET requestswithout the user’s explicit consent, so we must be careful to avoid makingchanges as a consequence of GET requests. Listing 9-22 shows the new actionmethod.
最后一步是在Admin控制器中实现一个Delete动作方法。这个动作方法应当只支持POST请求,因为删除对象不是一个等幂(idempotent)操作。正如我们将在第11章要解释的那样,浏览器和缓存会随意地形成GET请求而不要用户明确的同意,因此,我们必须小心地避免形成GET请求的结果。清单9-22演示了这个新方法。
Listing 9-22. The DeleteAction Method
[HttpPost]
public ActionResultDelete(int productId) {
    Productprod = repository.Products.FirstOrDefault(p => p.ProductID == productId);
    if(prod != null) {
        repository.DeleteProduct(prod);
        TempData["message"]= string.Format("{0} was deleted", prod.Name);
    }
    returnRedirectToAction("Index");
}
UNIT TEST: DELETING PRODUCTS
单元测试:删除产品
We want to test twobehaviors of the Delete action method. The first is that when a valid ProductIDis passed as a parameter, the action method calls the DeleteProduct method ofthe repository and passes the correct Product object to be deleted. Here is thetest:
我们想要测试Delete动作方法的两个行为。第一是当一个有效的ProductID作为参数传递时,该动作方法调用存储库的DeleteProduct方法并把正确的Product对象删除。以下是该测试:
[TestMethod]
public voidCan_Delete_Valid_Products() {
    Productprod = new Product { ProductID = 2, Name = "Test" };

    //Arrange - create the mock repository
    Mock<IProductRepository>mock = new Mock<IProductRepository>();
    mock.Setup(m=> m.Products).Returns(new Product[] {
        newProduct {ProductID = 1, Name = "P1"},
        prod,
        new Product {ProductID = 3, Name ="P3"},
    }.AsQueryable());

    //Arrange - create the controller
    AdminControllertarget = new AdminController(mock.Object);

    //Act - delete the product
    target.Delete(prod.ProductID);

    //Assert - ensure that the repository delete method was
    //called with the correct Product
    mock.Verify(m=> m.DeleteProduct(prod));
}
The second test is toensure that if the parameter value passed to the Delete method does notcorrespond to a valid product in the repository, the repository DeleteProductmethod is not called. Here is the test:
第二个测试是,如果传递给Delete方法的参数值不对应于存储库中的一个有效的产品,确保存储库的DeleteProduct方法不被调用。以下是该测试:
[TestMethod]
public voidCannot_Delete_Invalid_Products() {
    //Arrange - create the mock repository
    Mock<IProductRepository>mock = new Mock<IProductRepository>();
    mock.Setup(m=> m.Products).Returns(new Product[] {
        newProduct {ProductID = 1, Name = "P1"},
        newProduct {ProductID = 2, Name = "P2"},
        newProduct {ProductID = 3, Name = "P3"},
    }.AsQueryable());

    //Arrange - create the controller
    AdminControllertarget = new AdminController(mock.Object);

    //Act - delete using an ID that doesn't exist
    target.Delete(100);

    //Assert - ensure that the repository delete method was
    //called with the correct Product
    mock.Verify(m=> m.DeleteProduct(It.IsAny<Product>()), Times.Never());
}
You can see the newfunction at work simply by clicking one of the Delete buttons in the productlist page, as shown in Figure 9-15. As shown in the figure, we have takenadvantage of the TempData variable to display a message when a product isdeleted from the catalog.
你可以简单地通过点击产品列表页面中的一个Delete按钮,看到这个新功能在工作,如图9-15所示。正如图中所显示的那样,当产品从目录是被删除时,我们利用了TempData变量显示了一条消息。
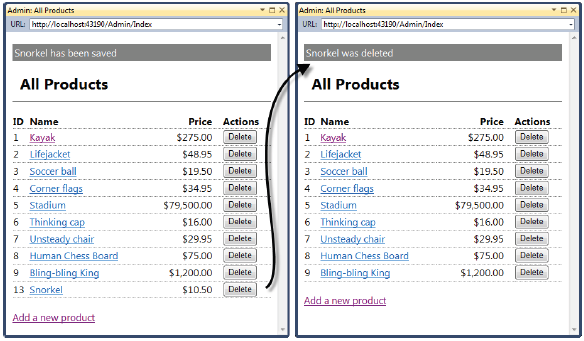
Figure 9-15. Deletinga product from the catalog
图9-15. 从目录删除一个产品
And at this point, we’veimplemented all of the CRUD operations. We can now create, read, update, anddelete products.
到了这里,我们已经完成了所有CRUD操作。我们现在可以生成、读取、更新、及删除产品了。
Securing the Administration Features
使管理特性安全
It won’t have escaped yourattention that anyone would be able to modify the product catalog if wedeployed the application right now. All someone would need to know is that theadministration features are available using the Admin/Index URL. To preventrandom people from wreaking havoc, we are going to password-protect access tothe entire Admin controller.
如果我们现在部署此应用程序,你不可避免地会注意到,任何人都可以修改产品目录。现在一个人所要知道的是,只要用Admin/Index网址,就可以使用管理特性。为了阻止任意人的恶意破坏,我们打算对整个Admin控制器进行口令保护。
Setting Up Forms Authentication
建立表单认证
Since ASP.NET MVC is builton the core ASP.NET platform, we have access to the ASP.NET FormsAuthentication facility, which is a general-purpose system for keeping track ofwho is logged in. We’ll cover forms authentication in more detail in Chapter22. For now, we’ll simply show you how to set up the most basic ofconfigurations.
由于ASP.NET MVC建立在核心的ASP.NET平台上,我们可以访问ASP.NET表单认证工具,它是对已登录人员保持跟踪的一个通用系统。我们将在第22章更详细地涉及表单认证。现在,我们将简单地向你演示如何建立最基本的配置。
If you open the Web.configfile, you will be able to find a section entitled authentication, like thisone:
如果你打开Web.config文件,你将能够找到一个以authentication为标题的小节,像这样:
<authenticationmode="Forms">
<forms loginUrl="~/Account/LogOn"timeout="2880"/>
</authentication>
As you can see, formsauthentication is enabled automatically in an MVC application created with theEmpty or Internet Application template. The loginUrl attribute tells ASP.NETwhich URL users should be directed to when they need to authenticatethemselves—in this case, the /Account/Logon page. The timeout attributespecifies how long a user is authenticated after logging in. By default, thisis 48 hours (2,880 minutes). We’ll explain some of the other configurationoptions in Chapter 22.
正如你所看到的,表单认证在一个用Empty或Internet应用程序模板生成的MVC应用程序中是自动可用的。LoginUrl属性告诉ASP.NET,当用户需要对他们自己进行认证时,他们应该被定向到哪个URL — 这里是/Account/Logon页面。Timeout属性指明一个被认证的用户登录之后的时间有多长。默认地,是48小时(2880分钟)。我们将在第22章解释一些其它配置选项。
n Note The main alternative to forms authentication is Windowsauthentication, where the operating system credentials are used to identifyusers. This is a great facility if you are deploying intranet applications andall of your users are in the same Windows domain. However, it’s not applicablefor Internet applications.
注:形成认证的另一个主要选项是Windows认证,这里以操作系统凭据用于标识用户。如果你部署一个企业内部网(intranet)应用程序,而你的所有用户都在同一个Windows域中,这是一个很好的工具。然而,它不适用于互联网(Internet)应用程序。
If we had selected the MVCInternet Application template when we created the SportsStore project, VisualStudio would have created the AccountController class and its LogOn actionmethod for us. The implementation of this method would have used the coreASP.NET membership feature to manage accounts and passwords, which we’ll coverin Chapter 22. Here, the membership system would be overkill for ourapplication, so we will use a simpler approach. We will create the controllerourselves.
如果我们在生成SportsStore项目时已经选择了“MVC Internet Application(MVC网络应用程序)”模板,Visual Studio将会为我们生成AccountController类及其LogOn动作方法。这个方法的实现将使用核心ASP.NET的成员特性来管理帐号和口令,这些将在第22章涉及。这里,对我们的应用程序而言,成员系统是不必要的过度行为,因此我们将使用一种更简单一点的办法。我们将生成一个我们自己的控制器。
To start, we will create ausername and password that will grant access to the SportsStore administrationfeatures. Listing 9-23 shows the changes to apply to the authentication sectionof the Web.config file.
为了开始工作,我们将生成一个允许访问SportsStore管理特性的用户名和口令。清单9-23显示了运用于Web.config文件的认证小节的修改。
Listing 9-23. Defining aUsername and Password
<authenticationmode="Forms">
<formsloginUrl="~/Account/LogOn" timeout="2880">
<credentialspasswordFormat="Clear">
<user name="admin"password="secret" />
</credentials>
</forms>
</authentication>
We have decided to keepthings very simple and hard-code a username (admin) and password (secret) inthe Web.config file. Most web applications using forms authentication storeuser credentials in a database, which we show you how to do in Chapter 22. Ourfocus in this chapter is applying basic security to an MVC application, sohard-coded credentials suit us just fine.
我们决定让事情保持简单,并且在Web.config文件中硬编码了一个用户名(admin)和口令(secret)。大多数使用表单认证的web应用程序会把用户凭据存储在一个数据库中,我们将在第22章演示如何做。我们本章中的焦点是把基本的安全性运用于一个MVC应用程序,因此硬编码的凭据正好是合适的。
Applying Authorization with Filters
运用带有过滤器授权
The MVC Framework has apowerful feature called filters. These are .NET attributes that you can applyto an action method or a controller class. They introduce additional logic whena request is processed. Different kinds of filters are available, and you cancreate your own custom filters, too, as we’ll explain in Chapter 13. The filterthat interests us at the moment is the default authorization filter, Authorize.We will apply it to the AdminController class, as shown in Listing 9-24.
MVC框架有一个功能强大的特性叫做过滤器。这些是你可以运用于一个动作方法或一个控制器类的.NET属性。它们在一个请求被处理时,引入一些附加的逻辑。各种不同的过滤都是可用的,而且你也可以生成你自己的过滤器,就像我们在第13章所解释的那样。此刻我们感兴趣的过滤器是默认的授权过滤器,Authorize。我们将把它运用于AdminController类,如清单9-24所示。
Listing 9-24. Adding theAuthorize Attribute to the Controller Class
using System.Web.Mvc;
usingSportsStore.Domain.Abstract;
usingSportsStore.Domain.Entities;
using System.Linq;

namespaceSportsStore.WebUI.Controllers {
    [Authorize]
    publicclass AdminController : Controller {
        privateIProductRepository repository;
        publicAdminController(IProductRepository repo) {
            repository= repo;
        }
...
When applied without anyparameters, the Authorize attribute grants access to the controller actionmethods if the user is authenticated. This means that if you are authenticated,you are automatically authorized to use the administration features. This isfine for SportsStore, where there is only one set of restricted action methods andonly one user. In Chapters 13 and 22, you’ll see how to apply the Authorizefilter more selectively to separate the notions of authentication (beingidentified by the system) and authorized (being allowed to access a givenaction method).
当不带任何参数地运用时,Authorize属性允许被认证的用户对控制器动作方法的访问。这意味着,如果你被认证了,你就被自动地授权使用管理特性。这对SportsStore是很好的,在这里只有一组受限的动作方法并只有一个用户。在第13章和第22章中,你将看到如何更有选择性地运用Authorize过滤器,来分隔认证概念(由系统标识)和进行授权(允许访问给定的动作方法)。
n Note You can apply filters to an individual action method or to acontroller. When you apply a filter to a controller, it works as though you hadapplied it to every action method in the controller class. In Listing 9-24, weapplied the Authorize filter to the class, so all of the action methods in theAdmin controller are available only to authenticated users.
注:你可以把过滤器运用于个别的运用方法或控制器。当你把一个过滤器运用于一个控制器时,它就象你把它运用于该控制器中的每一个动作方法一样进行工作。在清单9-24中,我们把Authorize过滤器运用于这个类,因此,在Admin控制器中的所有动作方法都只对已认证用户是可用的。
You can see the effectthat the Authorize filter has by running the application and navigating to the/Admin/Index URL. You will see an error similar to the one shown in Figure9-16.
你可以通过运行应用程序,并导航到/Admin/Index网址,便可以看到Authorize过滤器所具有的效果。你将看到类似于图9-16所显示的错误。
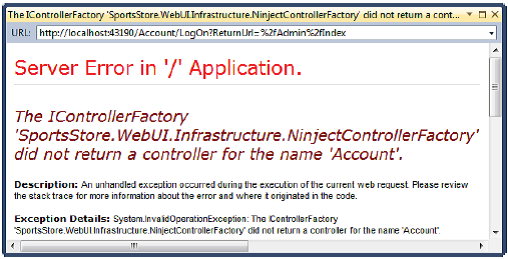
Figure 9-16. Theeffect of the Authorize filter
图9-16. Authorize过滤器的效果
When you try to access theIndex action method of the Admin controller, the MVC Framework detects theAuthorize filter. Since you have not been authenticated, you are redirected tothe URL specified in the Web.config forms authentication section:Account/LogOn. We have not created the Account controller yet, but you canstill see that the authentication is working, although it doesn’t prompt us toauthenticate ourselves.
当你试图访问Admin控制器的Index动作方法时,MVC框架检测Authorize过滤器。由于你还没有被认证,你被重定向到Web.config表单认证小节所指定的URL:Account/LogOn。我们还没有生成Account控制器,但你仍然可以看到认证已在工作,虽然它没有提示对我们自己进行认证。
Creating the Authentication Provider
生成认证提供器
Using the formsauthentication feature requires us to call two static methods of theSystem.Web.Security.FormsAuthentication class:
使用表单认证特性需要我们调用System.Web.Security.FormsAuthentication类的两个静态方法:
- The Authenticate method lets us validate credentials supplied by theuser.
Authenticate方法让我们校验由用户提供的凭据。 - The SetAuthCookie method adds a cookie to the response to thebrowser, so that users don’t need to authenticate every time they make arequest.
SetAuthCookie方法把一个cookie添加到对浏览器的响应,这样,用户在发出请求时不需要每次都要认证。
The problem with callingstatic methods in action methods is that it makes unit testing the controllerdifficult. Mocking frameworks such as Moq can mock only instance members. Thisproblem arises because the FormsAuthentication class predates theunit-testing-friendly design of MVC. The best way to address this is todecouple the controller from the class with the static methods using aninterface. An additional benefit is that this fits in with the broader MVCdesign pattern and makes it easier to switch to a different authenticationsystem later.
在动作方法中调用静态方法伴随的问题是它会形成控制器单元测试困难。像Moq这样的模仿框架只能模仿实例成员。之所以会出现这一问题是因为FormsAuthentication先于MVC的友好单元测试。解决这一问题最好的办法是用一个接口去掉控制器与带有这种静态方法的类之间的耦合。一个附带的好处是这样符合更广泛的MVC设计模式,并且使它更容易切换到不同的认证系统。
We start by defining theauthentication provider interface. Create a new folder called Abstract in theInfrastructure folder of the SportsStore.WebUI project and add a new interfacecalled IAuthProvider. The contents of this interface are shown in Listing 9-25.
我们从定义认证提供器接口开始。在SportsStore.WebUI项目的Infrastructure文件夹中生成一个名为Abstract的新文件夹,并添加一个名为IAuthProvider的新接口。该接口的内容如清单9-25所示。
Listing 9-25. TheIAuthProvider Interface
namespaceSportsStore.WebUI.Infrastructure.Abstract {
    publicinterface IAuthProvider {
        boolAuthenticate(string username, string password);
    }
}
We can now create animplementation of this interface that acts as a wrapper around the staticmethods of the FormsAuthentication class. Create another new folder inInfrastructure—this time called Concrete—and create a new class calledFormsAuthProvider. The contents of this class are shown in Listing 9-26.
我们现在可以生成该接口的一个实现,以起到FormsAuthentication类的静态方法封装程序的作用。在Infrastructure文件夹中生成另一个新文件夹— 这次叫做Concrete — 并生成一个名为FormsAuthProvider的新类。这个类的内容如清单9-26所示。
Listing 9-26. TheFormsAuthProvider Class
using System.Web.Security;
usingSportsStore.WebUI.Infrastructure.Abstract;

namespaceSportsStore.WebUI.Infrastructure.Concrete {
    publicclass FormsAuthProvider : IAuthProvider {
        publicbool Authenticate(string username, string password) {
            boolresult = FormsAuthentication.Authenticate(username, password);
            if(result) {
                FormsAuthentication.SetAuthCookie(username,false);
            }
            returnresult;
        }
    }
}
The implementation of theAuthenticate model calls the static methods that we wanted to keep out of thecontroller. The final step is to register the FormsAuthProvider in theAddBindings method of the NinjectControllerFactory class, as shown in Listing9-27 (the addition is shown in bold).
这个认证模型的实现调用了我们希望放在控制器之外的静态方法。最后一步是把这个FormsAuthProvider在NinjectControllerFactory类的AddBindings方法中进行注册,如清单9-27所示。
Listing 9-27. Adding theAuthentication Provider Ninject Binding
private void AddBindings(){
    //put additional bindings here
    ninjectKernel.Bind<IProductRepository>().To<EFProductRepository>();
    //create the email settings object
    EmailSettingsemailSettings = new EmailSettings {
        WriteAsFile
                =bool.Parse(ConfigurationManager.AppSettings["Email.WriteAsFile"] ??"false")
    };

    ninjectKernel.Bind<IOrderProcessor>()
        .To<EmailOrderProcessor>()
        .WithConstructorArgument("settings",emailSettings);

    ninjectKernel.Bind<IAuthProvider>().To<FormsAuthProvider>();
}
Creating the Account Controller
生成账号控制器
The next task is to createthe Account controller and the LogOn action method. In fact, we will create twoversions of the LogOn method. The first will render a view that contains alogin prompt, and the other will handle the POST request when users submittheir credentials.
接下来的任务是生成Account控制器和LogOn动作方法。事实上,我们将生成两个版本的LogOn方法。第一个将渲染一个登录提示的视图,另一个将在用户递交他们的凭据时处理POST请求。
To get started, we willcreate a view model class that we will pass between the controller and theview. Add a new class to the Models folder of the SportsStore.WebUI projectcalled LogOnViewModel and edit the content so that it matches Listing 9-28.
为了开始工作,我们将生成一个我们将在控制器和动作方法之间进行传递的视图模型类。把一个新类添加到SportsStore.WebUI项目的Models文件夹,名为LogOnViewModel,并编辑其内容,使之与清单9-28吻合。
Listing 9-28. TheLogOnViewModel Class
usingSystem.ComponentModel.DataAnnotations;

namespaceSportsStore.WebUI.Models {
    publicclass LogOnViewModel {
        [Required]
        publicstring UserName { get; set; }

        [Required]
        [DataType(DataType.Password)]
        publicstring Password { get; set; }
    }
}
This class containsproperties for the username and password, and uses the data annotations tospecify that both are required. In addition, we use the DataType attribute totell the MVC Framework how we want the editor for the Password propertydisplayed.
这个类含有用户名和口令的属性,并且使用数据注解来指定两者都是必须的。此外,我们使用DataType属性来告诉MVC框架,我们希望如何显示Password属性的编辑器。
Given that there are onlytwo properties, you might be tempted to do without a view model and rely on theViewBag to pass data to the view. However, it is good practice to define viewmodels so that the data passed from the controller to the view and from the modelbinder to the action method is typed consistently. This allows us to usetemplate view helpers more easily.
所给定的只有两个属性,这也许会引诱你不用一个视图模型而依靠ViewBag来把数据传递给视图。然而,定义视图模型是一种很好的实践,因为,把数据从控制器传递给视图以及从模型绑定器传递给运用方法是十分典型的。这让我们更容易地使用模板视图辅助器。
Next, create a new controllercalled AccountController, as shown in Listing 9-29.
接下来,生成一个名为AccountController的新控制器,如清单9-29所示。
Listing 9-29. TheAccountController Class
using System.Web.Mvc;
usingSportsStore.WebUI.Infrastructure.Abstract;
usingSportsStore.WebUI.Models;

namespaceSportsStore.WebUI.Controllers {
    publicclass AccountController : Controller {
        IAuthProviderauthProvider;
        publicAccountController(IAuthProvider auth) {
            authProvider= auth;
        }

        publicViewResult LogOn() {
            return View();
        }

        [HttpPost]
        publicActionResult LogOn(LogOnViewModel model, string returnUrl) {
            if(ModelState.IsValid) {
                if(authProvider.Authenticate(model.UserName, model.Password)) {
                    returnRedirect(returnUrl ?? Url.Action("Index", "Admin"));
                }else {
                    ModelState.AddModelError("","Incorrect username or password");
                    returnView();
                }
            }else {
                returnView();
            }
        }
    }
}
Creating the View
生成视图
Right-click in one of theaction methods in the Account controller class and select Add View from thepop-up menu. Create a strongly typed view called LogOn that uses LogOnViewModelas the view model type, as shown in Figure 9-17. Check the option to use aRazor layout and select _AdminLayout.cshtml.
右击Account控制器类中的一个动作方法,并从弹出菜单选择“添加视图”。生成一个名为LogOn的强类型视图,用LogOnViewModel作为该视图的模型类型,如图9-17所示。选中“use a Razor layout”选项,并选择_AdminLayout.cshtml。
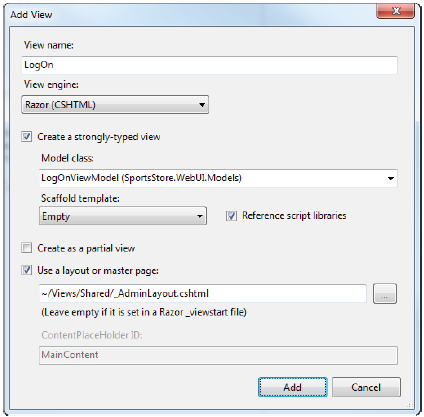
Figure 9-17. Addingthe LogOn view
图9-17. 添加LogOn视图
Click the Add button tocreate the view and edit the markup so that it matches Listing 9-30.
点击“添加”按钮以生成这个视图并编辑其标记使之与清单9-30吻合。
Listing 9-30. The LogOnView
@modelSportsStore.WebUI.Models.LogOnViewModel
@{
ViewBag.Title= "Admin: Log In";
Layout= "~/Views/Shared/_AdminLayout.cshtml";
}
<h1>LogIn</h1>
<p>Please log in toaccess the administrative area:</p>
@using(Html.BeginForm()) {
@Html.ValidationSummary(true)
@Html.EditorForModel()
<p><inputtype="submit" value="Log in" /></p>
}
You can see how the viewlooks in Figure 9-18.
你可以在图9-18所致该视图是如何显示的。
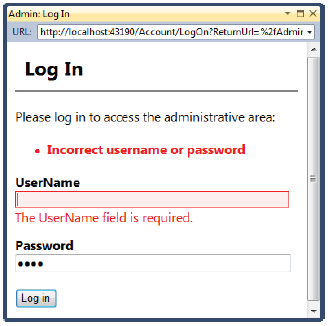
Figure 9-18. The LogOnview
图9-18. LogOn视图
The DataType attribute hasled the MVC Framework to render the editor for the Password property as an HTMLpassword-input element, which means that the characters in the password are notvisible. The Required attribute that we applied to the properties of the viewmodel are enforced using client-side validation (the required JavaScriptlibraries are included in the layout). Users can submit the form only afterthey have provided both a username and password, and the authentication isperformed at the server when we call the FormsAuthentication.Authenticatemethod.
DataType属性让MVC框架把Password属性的编辑器渲染成一个HTML的口令输入元素,意即,在口令中的字符是不可见的。我们运用于视图模型属性的Required属性强制使用客户端校验(所需要的JavaScript库被包含在布局中)。用户只可以在他们提供了用户和口令之后才能递交这个表单,而且当我们调用FormsAuthentication.Authenticate方法时,认证在服务器执行。
n Caution In general, using client-side data validation is a goodidea. It off-loads some of the work from your server and gives users immediatefeedback about the data they are providing. However, you should not be temptedto perform authentication at the client, since this would typically involvesending valid credentials to the client so they can be used to check theusername and password that the user has entered, or at least trusting theclient’s report of whether they have successfully authenticated. Authenticationmust always be done at the server.
注意:一般地,使用客户端校验是一种很好的思想。它卸载了服务器的一些工作,并对用户提供的数据给出了快速的反馈。然而,你不应该试图在客户端进行认证,因为这将典型地要涉及到把有效的凭据发送到客户端,以便能够用它来检查用户已经输入的用户名和口令,或者至少相信他们是否已成功验证的客户端报告。认证必须永远在服务器完成。
When we receive bad credentials, we add an error to the ModelStateand rerender the view. This causes our message to be displayed in thevalidation summary area, which we have created by calling theHtml.ValidationSummary helper method in the view.
当我们接收到一个坏的凭据时,我们把一条错误消息加到了ModelState并渲染这个视图。这会导致我们的消息被显示在校验摘要区域,这是我们在视图中通过调用Html.ValidationSummary辅助方法已经生成的区域。
n Note Notice that we call the Html.ValidationSummary helper methodwith a bool parameter value of true in Listing 9-27. Doing so excludes anyproperty validation messages from being displayed. If we had not done this, anyproperty validation errors would be duplicated in the summary area and next tothe corresponding input element.
注:注意,在清单9-27中,我们调用了带有一个true的布尔参数值的Html.ValidationSummary辅助方法。这样做便排除了显示任何属性校验消息。如果我们不这么做,任何属性校验错误将被复制到摘要区和相应的输入元素之后。
UNIT TEST: AUTHENTICATION
单元测试:认证
Testing the Accountcontroller requires us to check two behaviors: a user should be authenticatedwhen valid credentials are supplied, and a user should not be authenticatedwhen invalid credentials are supplied. We can perform these tests by creatingmock implementations of the IAuthProvider interface and checking the type andnature of the result of the controller LogOn method, like this:
测试Account控制器需要我们检查两个行为:在提供了有效凭据时,用户应该被认证;而在提供非法凭据时,用户不应该被认证。我们可以通过生成IAuthProvider接口的模仿实现并检查控制器LogOn方法结果的类型和性质来执行这些测试,像这样:
[TestMethod]
public voidCan_Login_With_Valid_Credentials() {
    //Arrange - create a mock authentication provider
    Mock<IAuthProvider>mock = new Mock<IAuthProvider>();
    mock.Setup(m=> m.Authenticate("admin", "secret")).Returns(true);

    //Arrange - create the view model
    LogOnViewModelmodel = new LogOnViewModel {
        UserName= "admin",
        Password= "secret"
    };

    //Arrange - create the controller
    AccountControllertarget = new AccountController(mock.Object);

    //Act - authenticate using valid credentials
    ActionResultresult = target.LogOn(model, "/MyURL");

    //Assert
    Assert.IsInstanceOfType(result,typeof(RedirectResult));
    Assert.AreEqual("/MyURL",((RedirectResult)result).Url);
}

[TestMethod]
public voidCannot_Login_With_Invalid_Credentials() {
    //Arrange - create a mock authentication provider
    Mock<IAuthProvider>mock = new Mock<IAuthProvider>();
    mock.Setup(m=> m.Authenticate("badUser", "badPass")).Returns(false);

    //Arrange - create the view model
    LogOnViewModelmodel = new LogOnViewModel {
        UserName= "badUser",
        Password= "badPass"
    };

    //Arrange - create the controller
    AccountControllertarget = new AccountController(mock.Object);

    //Act - authenticate using valid credentials
    ActionResultresult = target.LogOn(model, "/MyURL");

    //Assert
    Assert.IsInstanceOfType(result,typeof(ViewResult));
    Assert.IsFalse(((ViewResult)result).ViewData.ModelState.IsValid);
}
This takes care ofprotecting the SportsStore administration functions. Users will be allowed toaccess these features only after they have supplied valid credentials andreceived a cookie, which will be attached to subsequent requests. We’ll comeback to authentication in Chapters 13 and 22.
这保护着SprotsStore的管理功能。只当用户提供了有效的凭据并接收一个cookie之后,才允许用户访问这些功能,在客户端所生成的cookie将被附加到后继的请求中。我们将在第13和22章返回到认证上来。
n Tip It is best to use Secure Sockets Layer (SSL) for applicationsthat require authentication so that the credentials and the authenticationcookie (which is used to subsequently identify the user, as we’ll describe inChapter 22) are transmitted over a secure connection. Setting this up is worthdoing. See the IIS documentation for details.
提示:对需要认证的应用程序最好使用安全套接字层(SSL),以使得凭据和认证cookie(用于后继地标识该用户,正如我们将在第22章描述的那样)通过一个安全连接进行传输。建立SSL是有价值的事情。详细请参阅IIS文档。
Image Uploads
图象上载
We are going to completethe SportsStore application with something a little more sophisticated, We willadd the ability for the administrator to upload product images and store themin the database so that they are displayed in the product catalog.
我们打算用一些更具技巧东西来完成这个SportsStore应用程序,我们将为管理添加上载产品图象,并把它们存储到数据库中去的能力,以使这些图象能够显示在产品目录中。
Extending the Database
扩展数据库
Open the Visual StudioServer Explorer window and navigate to the Products table in the database wecreated in Chapter 7. Right-click the table and select Open Table Definitionfrom the pop-up menu. Add the two new columns that are shown in Figure 9-19.
打开VisualStudio的服务器浏览器窗口,并导航到我们在第7章生成的数据库中的Products表。右击此表并从弹出菜单选择“打开表定义”。添加如图9-19所示的两个新列。
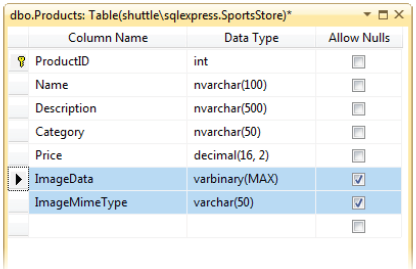
Figure 9-19. Addingnew columns to the Products table
图9-19. 把新列加到Products表
Select Save Products fromthe File menu (or press Control+S) to save the changes to the table.
从文件菜单选择“保存Products”(或按Ctrl + S)来保存对此表的修改。
Enhancing the Domain Model
增强域模型
We need to add two new fieldsto the Products class in the SportsStore.Domain project that correspond to thecolumns we added to the database. The additions are shown in bold in Listing9-31.
我们需要把两个新字段加到SportsStore.Domain项目的Products类,这两个字段对应于我们添加到数据库的列。所添加的内容在清单9-31中以黑体显示。
Listing 9-31. AddingProperties to the Product Class
usingSystem.ComponentModel.DataAnnotations;
using System.Web.Mvc;

namespaceSportsStore.Domain.Entities {
    public class Product {
        [HiddenInput(DisplayValue=false)]
        public int ProductID { get; set; }

        [Required(ErrorMessage = "Please entera product name")]
        public string Name { get; set; }

        [Required(ErrorMessage = "Please entera description")]
        [DataType(DataType.MultilineText)]
        public string Description { get; set; }

        [Required]
        [Range(0.01, double.MaxValue, ErrorMessage ="Please enter a positive price")]
        public decimal Price { get; set; }

        [Required(ErrorMessage = "Pleasespecify a category")]
        public string Category { get; set; }
        public byte ImageData{ get; set; }

        [HiddenInput(DisplayValue= false)]
        public stringImageMimeType { get; set; }
    }
}
We don’t want either ofthese new properties to be visible when the MVC Framework renders an editor forus. To that end, we use the HiddenInput attribute on the ImageMimeTypeproperty. We don’t need to do anything with the ImageData property, because theframework doesn’t render an editor for byte arrays. It does this only for“simple” types, such as int, string, DateTime, and so on.
在MVC框架为我们渲染编辑器时,我们不希望这两个新属性是可见的。在最后,我们对ImageMimeType属性使用了HiddenInput属性。我们不需要对ImageData属性做任何事情,因为框架不会为一个字节数组渲染一个编辑器。这一规则只对“简单”类型起作用,如int、string、DateTime等等。
n Caution Make sure that the names of the properties that you add tothe Product class exactly match the names you gave to the new columns in thedatabase.
注意:要确保你添加到Product类的属性名与你在数据库中所给定的新列严格匹配。
Updating the Entity Framework Conceptual Model
更新实体框架概念模型
We have created the newcolumns in the database and the corresponding properties in the Product class.Now we must update the Entity Framework conceptual model so that the two aremapped together properly. This is a quick- and-easy process. Open theSportsStore.edmx file in the Concrete/ORM folder of the SportsStore.Domainproject. You will see the current conceptual representation of the Productclass as it is known by the Entity Framework, shown in the left panel of Figure9-20.
我们已经在数据库中生成了新列,以及Product类中相应的属性。现在,我们必须更新实体框架概念模型,以使这两个字段被适当地一起映射。这是一个快而容易的过程。打开SportsStore.Domain项目的Concrete/ORM文件夹中的SportsStore.edmx文件。你将看到Product类的当前的概念表示,因为实体框架是知道这个Product的,如图9-20左边的面板所示。
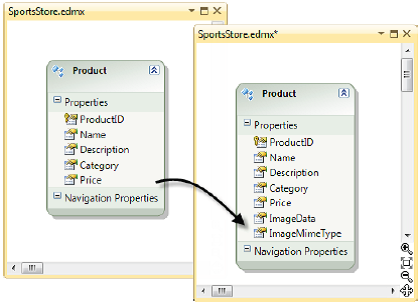
Figure 9-20. Updatingthe conceptual model
图9-20. 更新概念模型
Right-click in the spacethat surrounds the Product object and select Update Model from Database fromthe pop-up menu. The Update Wizard dialog box appears and begins to query thedatabase. Without making any changes, click the Finish button. This causes theEntity Framework to refresh its understanding of the parts of the database itis already aware of. After a moment, you will see that the ImageData andImageMimeType properties have been added to the conceptual Product, as shown inthe right panel of Figure 9-20.
右击Product对象周围的空白处,并从弹出菜单选择“Update Model fromDatabase(从数据库更新模型)”。更新向导对话会出现,并开始查询数据库。不用进行任何修改,点击“Finish(完成)”按钮。这会导致实体框刷新它已经感知的数据部件的理解。一会儿之后,你将看到ImageData和ImageMimeType属性已经被添加到Product概念模型,如图9-29右侧的面板所示。
Creating the Upload User Interface Elements
生成Upload用户接口元素
Our next step is to addsupport for handling file uploads. This involves creating a UI that theadministrator can use to upload an image. Modify the Views/Admin/Edit.cshtmlview so that it matches Listing 9-32 (the additions are in bold).
我们的下一步是添加对处理文件上载的支持。这包括生成一个管理员可以用来上载图象的UI。修改Views/Admin/Edit.cshtml视图,以使它与清单9-32匹配(黑体部分)。
Listing 9-32. AddingSupport for Images
@modelSportsStore.Domain.Entities.Product
@{
ViewBag.Title= "Admin: Edit " + @Model.Name;
Layout= "~/Views/Shared/_AdminLayout.cshtml";
}

<h1>Edit@Model.Name</h1>
@using(Html.BeginForm("Edit", "Admin",
FormMethod.Post,new { enctype = "multipart/form-data" })) {

@Html.EditorForModel()

<divclass="editor-label">Image</div>
<div class="editor-field">
@if (Model.ImageData == null) {
@:None
} else {
<imgwidth="150" height="150"
src="@Url.Action("GetImage","Product", new { Model.ProductID })" />
}

<div>Upload new image: <inputtype="file" name="Image" /></div>
</div>

<inputtype="submit" value="Save" />
@Html.ActionLink("Canceland return to List", "Index")
}
You may not be aware thatweb browsers will upload files properly only when the HTML form element definesan enctype value of multipart/form-data. In other words, for a successfulupload, the form element must look like this:
你也许没有意识到,web浏览器只当HTML的form元素定义了一个enctype的multipart/form-data值时才会适当地上载文件。换句话说,要进行成功的上载,form元素必须看上去像这样:
<formaction="/Admin/Edit" enctype="multipart/form-data"method="post">
...
</form>
Without the enctypeattribute, the browser will transmit only the name of the file and not itscontent, which is no use to us at all. To ensure that the enctype attributeappears, we must use an overload of the Html.BeginForm helper method that letsus specify HTML attributes, like this:
没有enctype属性,浏览器将只传递该文件的名字,而不是它的内容,这对我们根据没用。为了确保enctype属性出现,我们必须用一个过载的Html.BeginForm辅助方法,让我们指定HTML属性,像这样:
@using(Html.BeginForm("Edit", "Admin",
FormMethod.Post, new { enctype ="multipart/form-data" })) {
Also notice that if theProduct being displayed has a non-null ImageData property value, we add an imgelement and set its source to be the result of calling the GetImage actionmethod of the Product controller. We’ll implement this shortly.
还要注意到,如果被显示的的Product有一个非空的ImageData属性值,我们添加了一个img元素,并把它的源设置为调用Product控制器的GetImage动作方法的结果。我们很快就实现它。
Saving Images to the Database
将图像保存到数据库
We need to enhance thePOST version of the Edit action method in the AdminController class so that wetake the image data that has been uploaded to us and save it in the database. Listing9-33 shows the changes that are required.
我们需要增强AdminController类中POST版本的Edit动作方法,以使我们取得上传给我们的图像数据,并把它保存到数据库中。清单9-33显示了所需要的修改。
Listing 9-33. HandlingImage Data in the AdminController Class
[HttpPost]
public ActionResultEdit(Product product, HttpPostedFileBaseimage) {
    if(ModelState.IsValid) {
        if (image != null) {
            product.ImageMimeType = image.ContentType;
            product.ImageData = newbyte[image.ContentLength];
            image.InputStream.Read(product.ImageData, 0, image.ContentLength);
        }

        //save the product
        repository.SaveProduct(product);
        //add a message to the viewbag
        TempData["message"]= string.Format("{0} has been saved", product.Name);
        //return the user to the list
        returnRedirectToAction("Index");
    }else {
        //there is something wrong with the data values
        returnView(product);
    }
}
We have added a newparameter to the Edit method, which the MVC Framework uses to pass the uploadedfile data to us. We check to see if the parameter value is null; if it is not,we copy the data and the MIME type from the parameter to the Product object sothat it is saved to the database.
我们已经把一个新参数添加到Edit方法,MVC框架用它把上载文件的数据传递给我们。我们查看该参数的值是否为空;如果非空,我们便把该数据和该参数的MIME类型拷贝到Product对象,以使保存到数据库。
n Note You’ll need to update your unit tests to reflect the newparameter in Listing 9-33. Providing a null parameter value will satisfy thecompiler.
注:你将需要更新你的单元测试以便反映清单9-33中的新参数。提供一个空参数值将会满足编译器。
Implementing the GetImage Action Method
实现GetImage动作方法
In Listing 9-32, we addedan img element whose content was obtained through a GetImage action method. Weare going to implement this so that we can display images contained in thedatabase. Listing 9-34 shows the method we added to the ProductControllerclass.
在清单9-32中,我们添加了一个img元素,它的内容是通过GetImage动作方法获得的。我们打算实现它,以使我们能够显示包含在数据库中的图像。清单9-34显示了我们添加到ProductController类中的这个方法。
Listing 9-34. TheGetImage Action Method
public FileContentResultGetImage(int productId) {
    Productprod = repository.Products.FirstOrDefault(p => p.ProductID == productId);
    if(prod != null) {
        returnFile(prod.ImageData, prod.ImageMimeType);
    }else {
        returnnull;
    }
}
This method tries to finda product that matches the ID specified by the parameter. The FileContentResultclass is returned from an action method when we want to return a file to theclient browser, and instances are created using the File method of the basecontroller class. We’ll discuss the different types of results you can returnfrom action methods in Chapter 12.
此方法试图找到一个由参数指定的ID匹配的产品。当我们想把一个文件返回给客户端浏览器时,FileContentResult是从一个动作方法返回的,实例是用controller基类的File方法生成的。我们将在第12章讨论你可以从动作方法返回的不同的结果类型。
UNIT TEST: RETRIEVING IMAGES
单元测试:获取图像
We want to make sure thatthe GetImage method returns the correct MIME type from the repository and makesure that no data is returned when we request a product ID that doesn’t exist. Hereare the test methods we created:
我们希望确保GetImage方法返回存储库中正确的MIME类型,并确保在我们请求一个不存在的产品ID时没有数据被返回。以下是我们生成的测试方法:
[TestMethod]
public voidCan_Retrieve_Image_Data() {
    //Arrange - create a Product with image data
    Productprod = new Product {
        ProductID= 2,
        Name= "Test",
        ImageData= new byte[] {},
        ImageMimeType= "image/png" };

        //Arrange - create the mock repository
        Mock<IProductRepository>mock = new Mock<IProductRepository>();
        mock.Setup(m=> m.Products).Returns(new Product[] {
            newProduct {ProductID = 1, Name = "P1"},
            prod,
            newProduct {ProductID = 3, Name = "P3"}
        }.AsQueryable());

        //Arrange - create the controller
        ProductControllertarget = new ProductController(mock.Object);

        //Act - call the GetImage action method
        ActionResultresult = target.GetImage(2);

        // Assert
        Assert.IsNotNull(result);
        Assert.IsInstanceOfType(result,typeof(FileResult));
        Assert.AreEqual(prod.ImageMimeType,((FileResult)result).ContentType);
    }

    [TestMethod]
    public voidCannot_Retrieve_Image_Data_For_Invalid_ID() {
        // Arrange- create the mock repository
        Mock<IProductRepository>mock = new Mock<IProductRepository>();
        mock.Setup(m=> m.Products).Returns(new Product[] {
        newProduct {ProductID = 1, Name = "P1"},
        newProduct {ProductID = 2, Name = "P2"}
    }.AsQueryable());

    //Arrange - create the controller
    ProductControllertarget = new ProductController(mock.Object);

    //Act - call the GetImage action method
    ActionResultresult = target.GetImage(100);

    //Assert
    Assert.IsNull(result);
}
When dealing with a validproduct ID, we check that we get a FileResult result from the action method andthat the content type matches the type in our mock data. The FileResult classdoesn’t let us access the binary contents of the file, so we must be satisfiedwith a less-than-perfect test. When we request an invalid product ID, we simplycheck to ensure that the result is null.
当处理一个有效的产品ID时,我们检查,我们从该动作方法得到了一个FileResult结果,而且,该内容的类型与我们模仿数据的类型匹配。FileResult类并不让我们访问二进制的文件内容,因此我们必须对一个不太完美的测试感到满意。当我们请求一个非法的产品ID时,我们简单地检查,以确认其结果为空。
The administrator can nowupload images for products. You can try this yourself by editing one of theproducts. Figure 9-21 shows an example.
管理员现在可以上载产品的图像了。你可以通过编辑一个产品自己试一下。图9-21显示了一个例子。
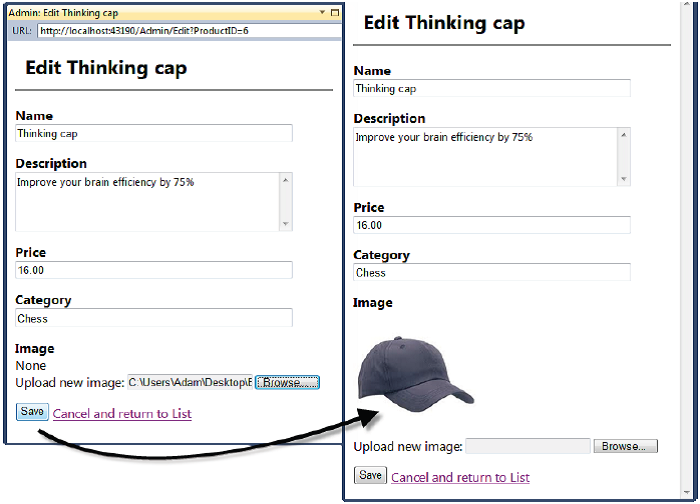
Figure 9-21. Adding animage to a product listing
图9-21. 把一个图像添加到一个产品列表
Displaying Product Images
显示产品图像
All that remains is todisplay the images alongside the product description in the product catalog.Edit the Views/Shared/ProductSummary.cshtml view to reflect the changes shown inbold in Listing 9-35.
所剩下的工作是在产品目录的产品描述旁边显示图像。编辑Views/Shared/ProductSummary.cshtml视图,以反映出清单9-35的黑体所显示的修改。
Listing 9-35. DisplayingImages in the Product Catalog
@modelSportsStore.Domain.Entities.Product
<divclass="item">

@if (Model.ImageData != null) {
 <divstyle="float:left;margin-right:20px">
 <img width="75"height="75" src="@Url.Action("GetImage","Product",
 new { Model.ProductID })" />
 </div>
}

<h3>@Model.Name</h3>
@Model.Description

<divclass="item">

@using(Html.BeginForm("AddToCart","Cart")) {
 @Html.HiddenFor(x=> x.ProductID)
 @Html.Hidden("returnUrl",Request.Url.PathAndQuery)
 <inputtype="submit" value="+ Add to cart" />
}

</div>
<h4>@Model.Price.ToString("c")</h4>
</div>
With these changes in place,the customers will see images displayed as part of the product description whenthey browse the catalog, as shown in Figure 9-22.
通过这些适当的修改,当客户浏览目录时,他们将看到作为产品描述的一部分所显示的图像,如图9-22所示。
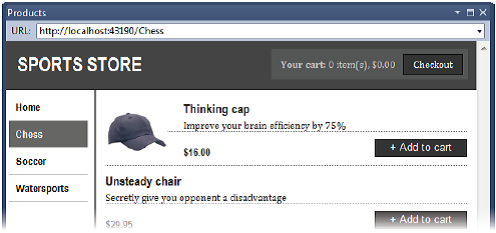
Figure 9-22.Displaying product images
图9-22. 显示产品图像
Summary
概要
In this and the previoustwo chapters, we have demonstrated how the ASP.NET MVC Framework can be used tocreate a realistic e-commerce application. This extended example has introducedmany of the framework’s key features: controllers, action methods, routing,views, model binding, metadata, validation, layouts, authentication, and more.You have also seen how some of the key technologies related to MVC can be used.These included the Entity Framework, Ninject, Moq, and the Visual Studiosupport for unit testing.
在本章以及上一章这两章中,我们已经演示了能够如何用ASP.NET MVC框架来生成真实的电子商务应用程序。这个扩展了的例子已经介绍了框架的许多关键特性:控制器、动作方法、路由、视图、模型绑定、元数据、校验、布局、认证等等。你也已经看到了如何使用与MVC相关的一些关键技术。这些包括实体框架、Ninject、Moq、以及VisualStudio对单元测试的支持。
We have ended up with anapplication that has a clean, component-oriented architecture that separatesout the various concerns, leaving us with a code base that will be easy toextend and maintain. The second part of this book digs deep into each MVCFramework component to give you a complete guide to its capabilities.
我们完成了一个应用程序,它具有整洁的、各种关注分离的面向组件的体系结构,给我们留下了将易于扩展和维护的代码基础(意即我们可以在现有应用程序的基础上开发其它各种应用程序— 译者注)。本书的第二部分将深入到每个MVC框架组件,以对它的能力给出完整指南。


 1061
1061

 被折叠的 条评论
为什么被折叠?
被折叠的 条评论
为什么被折叠?
 到【灌水乐园】发言


