


目录
前言
在APP中启动相册选择器或者拍照上传图片这些功能是非常常见的。对于Ionic2,我们只能通过cordova插件实现调用原生的功能。下面将简单的封装一个选择相册或拍照上传图片的ImgService服务。具体如下。
Cordova准备
下载安装所需的Cordovar插件:
Image Picker(相册选择)
ionic plugin add https://github.com/Telerik-Verified-Plugins/ImagePickerCamera(拍照)
ionic plugin add cordova-plugin-cameraTransfer(上传文件)
ionic plugin add cordova-plugin-file-transferImgService服务的实现
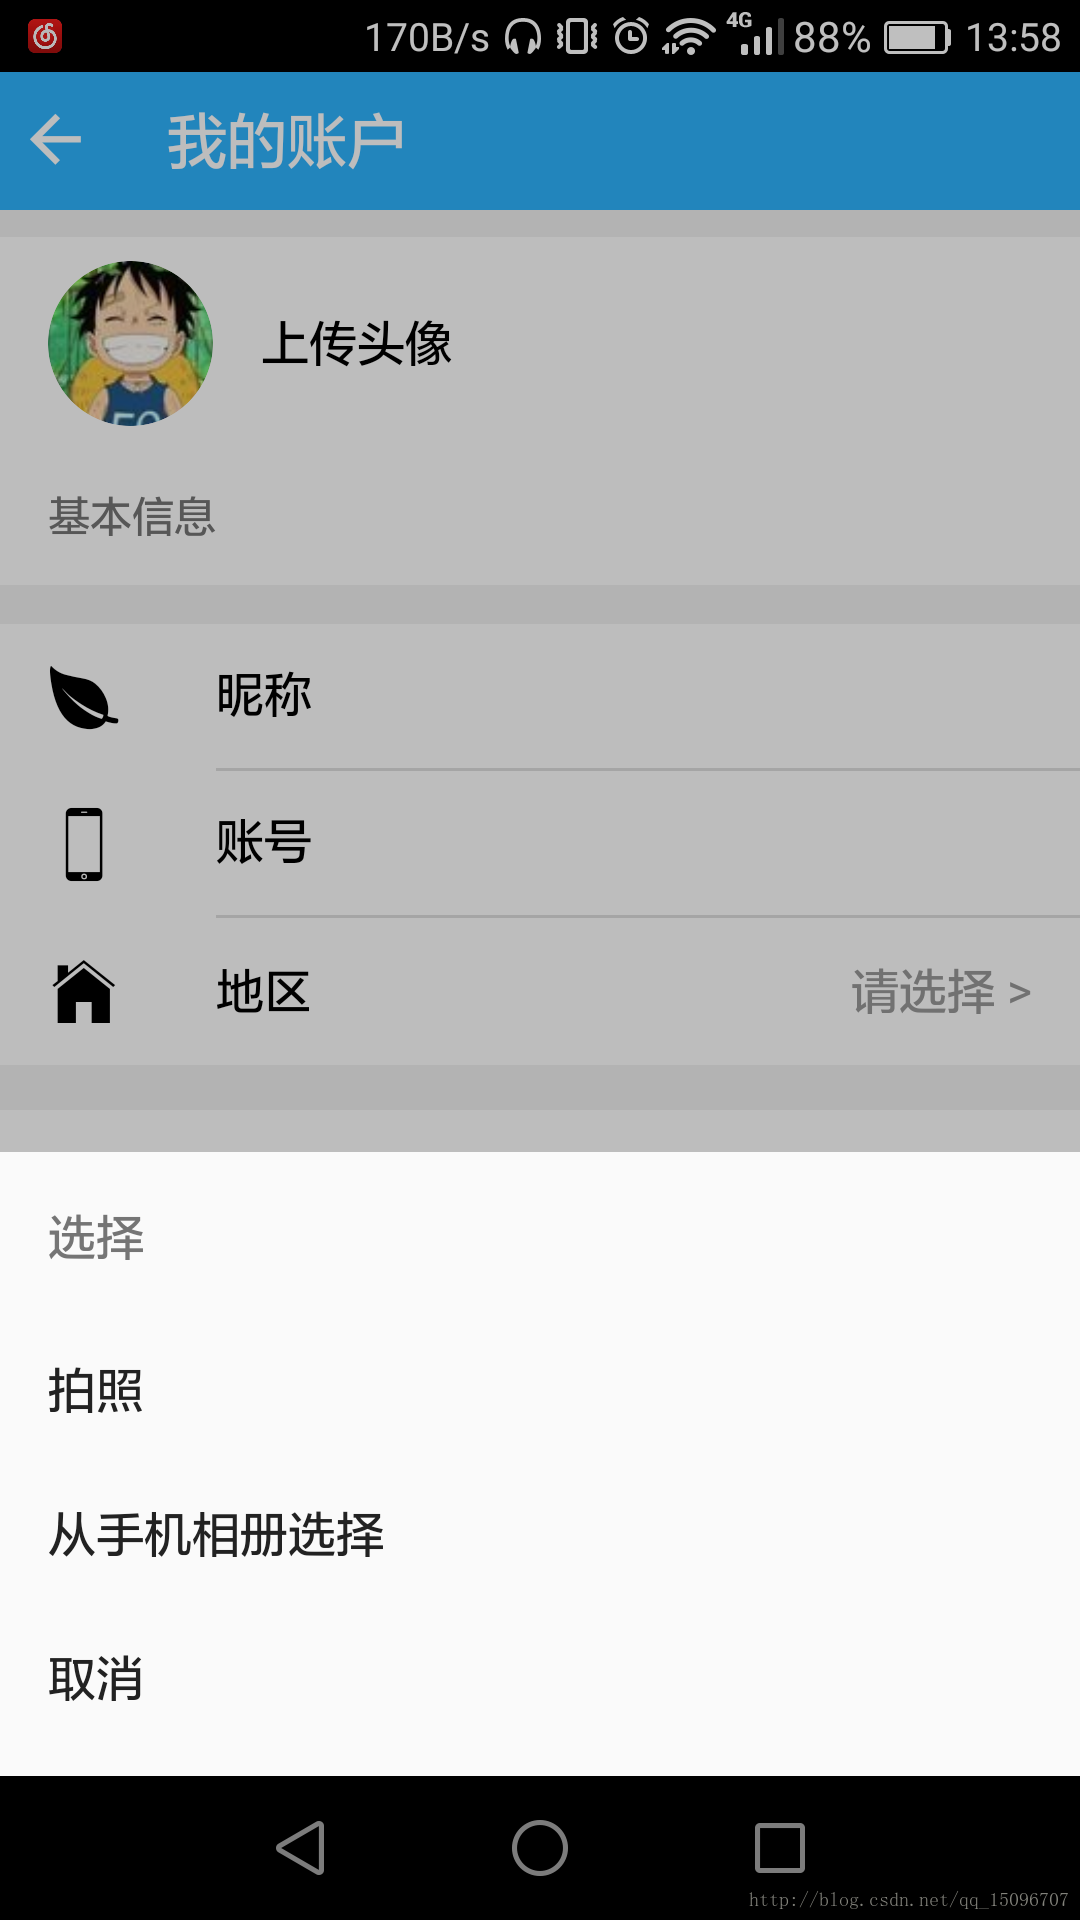
通过显示ActionSheet组件,让用户选择上传图片的方式,如从相册选择或者拍照。具体如下:
/**
 * Created by admin on 2016/10/21.
 */
import { Injectable } from "@angular/core";
import { ActionSheetController } from "ionic-angular";
import { Camera, ImagePicker, Transfer } from "ionic-native";
import { NoticeService } from "./notice.service";

@Injectable()
export class ImgService {

  // 参考:https://github.com/driftyco/ionic-native/blob/master/src/plugins/camera.ts
  // 调用相机时传入的参数
  private cameraOpt = {
    quality: 50,
    destinationType: 1, // Camera.DestinationType.FILE_URI,
    sourceType: 1, // Camera.PictureSourceType.CAMERA,
    encodingType: 0, // Camera.EncodingType.JPEG,
    mediaType: 0, // Camera.MediaType.PICTURE,
    allowEdit: true,
    correctOrientation: true
  };
  // 调用相册时传入的参数
  private imagePickerOpt = {
    maximumImagesCount: 1,//选择一张图片
    width: 800,
    height: 800,
    quality: 80
  };

  //imgPath: string = ''; //图片路径

  fileTransfer: Transfer;
  upload: any = {
    url: 'http://xxx/',           //接收图片的url
    fileKey: 'image',  //接收图片时的key
    headers: {
      'Accept': 'text/html,application/xhtml+xml,application/xml;q=0.9,image/webp,*/*;q=0.8' //不加入 发生错误!!
    },
    params: {},        //需要额外上传的参数
    success: (data) => {}, //图片上传成功后的回调
    error: (err) => {},   //图片上传失败后的回调
    listen: () => {}   //监听上传过程
  };

  constructor(private actionSheetCtrl: ActionSheetController,
              private noticeSer: NoticeService) {

  }


  showPicActionSheet() {
    this.useASComponent();
  }

  // 使用ionic中的ActionSheet组件
  private useASComponent() {
    let actionSheet = this.actionSheetCtrl.create({
      title: '选择',
      buttons: [
        {
          text: '拍照',
          handler: () => {
            this.startCamera();
          }
        },
        {
          text: '从手机相册选择',
          handler: () => {
            this.openImgPicker();
          }
        },
        {
          text: '取消',
          role: 'cancel',
          handler: () => {

          }
        }
      ]
    });
    actionSheet.present();
  }

  // 使用原生的ActionSheet组件
  /*private useNativeAS() {
    let buttonLabels = ['拍照', '从手机相册选择'];
    ActionSheet.show({
      'title': '选择',
      'buttonLabels': buttonLabels,
      'addCancelButtonWithLabel': 'Cancel',
      //'addDestructiveButtonWithLabel' : 'Delete'
    }).then((buttonIndex: number) => {
      if(buttonIndex == 1) {
        this.startCamera();
      } else if(buttonIndex == 2) {
        this.openImgPicker();
      }
    });
  }*/


  // 启动拍照功能
  private startCamera() {
    Camera.getPicture(this.cameraOpt).then((imageData) => {

      this.uploadImg(imageData);

    }, (err) => {
      this.noticeSer.showToast('ERROR:' + err); //错误:无法使用拍照功能!
    });
  }

  // 打开手机相册
  private openImgPicker() {
    let temp = '';
    ImagePicker.getPictures(this.imagePickerOpt)
      .then((results) => {
        for (var i = 0; i < results.length; i++) {
          temp = results[i];
        }

        this.uploadImg(temp);

      }, (err) => {
        this.noticeSer.showToast('ERROR:' + err); //错误:无法从手机相册中选择图片!
      });

    /*let str = '{"status":1,"msg":"提示:图片上传成功!","data":"http:\/\/192.168.1.20\/image\/580af6bcc4d40580af6bcc4d45.jpg"}';
    let res = JSON.parse(str);
    this.upload.success(res);*/
  }


  // 上传图片
  private uploadImg(path: string) {
    if(!path) {
      return;
    }

    this.fileTransfer = new Transfer();

    let options: any;
    options = {
      fileKey: this.upload.fileKey,
      headers: this.upload.headers,
      params: this.upload.params
    };
    this.fileTransfer.upload(path, this.upload.url, options)
      .then((data) => {

        if(this.upload.success) {
          this.upload.success(JSON.parse(data.response));
        }

      }, (err) => {
        if(this.upload.error) {
          this.upload.error(err);
        } else {
          this.noticeSer.showToast('错误:上传失败!');
        }
      });
  }

  // 停止上传
  stopUpload() {
    if(this.fileTransfer) {
      this.fileTransfer.abort();
    }
  }
}
注:这里自定义了一个NoticeService服务,主要用于统一toast的显示。如下:
/**
 * Created by Administrator on 2016/10/10 0010.
 */
import { Injectable }     from '@angular/core';
import { ToastController } from 'ionic-angular';

@Injectable()
export class NoticeService {
  static TOAST_POS_BOTTOM: string = 'bottom';
  static TOAST_POS_MIDDLE: string = 'middle';

  constructor(private toastCtrl: ToastController) {
  }

  // 显示 toast提示
  showToast(message: string, position: string = NoticeService.TOAST_POS_BOTTOM) {
    let toast = this.toastCtrl.create({
      message: message,
      duration: 1500,
      position: position
    });
    toast.present();

    return toast;
  }

  /*showNoticeByToast(code: Number, msg: string) {
    let m = '';
    if(code == 1) {
      m = '提示:' + msg + '!';
    } else {
      m = '错误' + code + ':' + msg + '!';
    }

    return this.showToast(m);
  }*/

  showNoticeByToast(code: Number, msg: string) {
    let m = '';

    if(msg && msg.length > 0) {
      if(msg.charAt(msg.length - 1) == '!' || msg.charAt(msg.length - 1) == '!') {
        msg = msg.substr(0, msg.length - 1);
      }
    }

    if(code == 1) {
      m = '提示:' + msg + '!';
    } else {
      m = '错误' + code + ':' + msg + '!';
    }

    return this.showToast(m);
  }
}
ImgService服务的使用
使用ImgService服务,需要在对应的Page页面中的构造方法中进行注入。如:
constructor(private notiSer: NotiService,
              private imgSer: ImgService) {
              }
使用ImgService服务,需要我们先进行初始化,如:
// 初始化上传图片的服务
  private initImgSer() {
    this.imgSer.upload.url = ''; // 上传图片的url,如果同默认配置的url一致,那无须再设置
    this.imgSer.upload.success = (data) => {
      //上传成功后的回调处理
    };
    this.imgSer.upload.error = (err) => {
      this.noticeSer.showToast('错误:头像上传失败!');
    };
  }
正式使用:
this.initImgSer();
this.imgSer.showPicActionSheet();
示例效果
Android显示效果如下:
相册选择器的汉化
在打开相册选择器的过程中,我们可能会发现其相册选择器的“取消”或“确定”按钮是英文显示的。但是BOSS可能会要求我们修改为中文,这时又要伤一下脑筋咯。
解决(针对Anroid来说,ios应该也是一样滴):在项目的plugins目录下找到com.synconset.imagepicker文件夹,进入src/android/Library/res目录,创建values-zh文件夹,在values-zh文件夹中创建multiimagechooser_strings_zh.xml文件,内容如下:
<?xml version="1.0" encoding="utf-8"?>
<resources>
    <string name="multi_app_name">图片选择器</string>
    <string name="free_version_label">免费版本 - 剩余图片: %d</string>
    <string name="error_database">打开相册出现错误.</string>
    <string name="requesting_thumbnails">请稍后...</string>
    <string name="processing_images_header">图像选择</string>
    <string name="processing_images_message">这可能是一个短暂的瞬间的时间.</string>
    <string name="maximum_selection_count_error_header">Auswahllimit erreicht</string>
    <string name="maximum_selection_count_error_message">Sie können maximal %d Bilder auf einmal auswählen.</string>
    <string name="discard">取消</string>
    <string name="done">确定</string>
</resources>
修改plugins/com.synconset.imagepicker/plugin.xml文件,找到android区域,增加如下语句:
<source-file src="src/android/Library/res/values-zh/multiimagechooser_strings_zh.xml" target-dir="res/values-zh"/>删除项目platforms文件夹下的android平台,重新添加平台打包运行即可。


 763
763

 被折叠的 条评论
为什么被折叠?
被折叠的 条评论
为什么被折叠?
 到【灌水乐园】发言


