


Spring和Jedis结合配置:
Jedis连接池的配置:
<!-- 连接池配置 -->
	<bean id="jedisPoolConfig" class="redis.clients.jedis.JedisPoolConfig">
		<!-- 最大连接数 -->
		<property name="maxTotal" value="30" />
		<!-- 最大空闲连接数 -->
		<property name="maxIdle" value="10" />
		<!-- 每次释放连接的最大数目 -->
		<property name="numTestsPerEvictionRun" value="1024" />
		<!-- 释放连接的扫描间隔(毫秒) -->
		<property name="timeBetweenEvictionRunsMillis" value="30000" />
		<!-- 连接最小空闲时间 -->
		<property name="minEvictableIdleTimeMillis" value="1800000" />
		<!-- 连接空闲多久后释放, 当空闲时间>该值 且 空闲连接>最大空闲连接数 时直接释放 -->
		<property name="softMinEvictableIdleTimeMillis" value="10000" />
		<!-- 获取连接时的最大等待毫秒数,小于零:阻塞不确定的时间,默认-1 -->
		<property name="maxWaitMillis" value="1500" />
		<!-- 在获取连接的时候检查有效性, 默认false -->
		<property name="testOnBorrow" value="true" />
		<!-- 在空闲时检查有效性, 默认false -->
		<property name="testWhileIdle" value="true" />
		<!-- 连接耗尽时是否阻塞, false报异常,ture阻塞直到超时, 默认true -->
		<property name="blockWhenExhausted" value="false" />
	</bean>
对于单机版的配置:
<!--     jedis单机版-->
	<bean id="redisClient" class="redis.clients.jedis.JedisPool">
		<constructor-arg name="host" value="192.168.59.129"></constructor-arg>
		<constructor-arg name="port" value="6379"></constructor-arg>
		<constructor-arg name="poolConfig" ref="jedisPoolConfig"></constructor-arg>
	</bean>

		<bean id="jedisClient" class="com.newstyles.rest.dao.Impl.JedisClientSingle">
	</bean>
集群版的配置:
<!-- 	jedis集群版 -->
	<bean id="redisClient" class="redis.clients.jedis.JedisCluster">
		<constructor-arg name="nodes">
			<set>
				<bean  id="redis01" class="redis.clients.jedis.HostAndPort">
					<constructor-arg  name="host" value="192.168.59.129"></constructor-arg>
					<constructor-arg name="port" value="7001"></constructor-arg>
				</bean>
				<bean  id="redis02" class="redis.clients.jedis.HostAndPort">
					<constructor-arg  name="host" value="192.168.59.129"></constructor-arg>
					<constructor-arg name="port" value="7002"></constructor-arg>
				</bean>
				<bean  id="redis03" class="redis.clients.jedis.HostAndPort">
					<constructor-arg  name="host" value="192.168.59.129"></constructor-arg>
					<constructor-arg name="port" value="7003"></constructor-arg>
				</bean>
				<bean  id="redis04" class="redis.clients.jedis.HostAndPort">
					<constructor-arg  name="host" value="192.168.59.129"></constructor-arg>
					<constructor-arg name="port" value="7004"></constructor-arg>
				</bean>
				<bean  id="redis05" class="redis.clients.jedis.HostAndPort">
					<constructor-arg  name="host" value="192.168.59.129"></constructor-arg>
					<constructor-arg name="port" value="7005"></constructor-arg>
				</bean>
				<bean  id="redis06" class="redis.clients.jedis.HostAndPort">
					<constructor-arg  name="host" value="192.168.59.129"></constructor-arg>
					<constructor-arg name="port" value="7006"></constructor-arg>
				</bean>
			</set>
		</constructor-arg>
		<constructor-arg name="poolConfig" ref="jedisPoolConfig"></constructor-arg>
	</bean>

		<bean id="jedisClientCluster" class="com.newstyles.rest.dao.Impl.JedisClientCluster">
	</bean>
当然,上述两种方式只能有一种存在,但是连接池时必须保留的,其规定了Jedis运行时候的相关的设置,在这个测试实例中,我们采用了Jedis单机版的方式完成这个工程,所以,应该讲集群版的注释掉。
单机版测试案例:
	public void testSpringJedisSingle() {
		ApplicationContext applicationContext = new ClassPathXmlApplicationContext("classpath:spring/applicationContext-*.xml");
		JedisPool pool = (JedisPool) applicationContext.getBean("redisClient");
		Jedis jedis = pool.getResource();
		String string = jedis.get("key1");
		System.out.println(string);
		jedis.close();
		pool.close();
	}
集群版测试案例:
	public void testSpringJedisCluster() {
		ApplicationContext applicationContext = new ClassPathXmlApplicationContext("classpath:spring/applicationContext-*.xml");
		JedisCluster jedisCluster =  (JedisCluster) applicationContext.getBean("redisClient");
		String string = jedisCluster.get("key1");
		System.out.println(string);
		jedisCluster.close();
	}
在这里我们测试过后,以Jedis单机版为例,整合到Spring框架中:
Dao层:
首先定义了一个接口,虽说以Jedis单机版为例子,但是我们同时也实现了Redis的集群版的实例的完成:
首先在JedisClient接口中定义了Jedis客户端常用到的操作:
public interface JedisClient {

	String get(String key);
	String set(String key, String value);
	String hget(String hkey,String key);
	long hset(String hkey,String key,String value);
	long incr(String key);
	long expire(String key,int second);
	long ttl(String key);
	long del(String key);
	long hdel(String hkey ,String key);
}
首先,单机版的Jedis客户端的实现:
/**
 * 单机版
 * @author ***********
 *
 */
public class JedisClientSingle implements JedisClient {

	//需要JedisPool这个类型的对象来进行操作
	@Autowired
	private JedisPool jedisPool;
	@Override
	public String get(String key) {
		Jedis jedis = jedisPool.getResource();
		String string = jedis.get(key);
		jedis.close();
		return string;
	}

	@Override
	public String set(String key, String value) {
		Jedis jedis = jedisPool.getResource();
		String string = jedis.set(key,value);
		jedis.close();
		return string;
	}

	@Override
	public String hget(String hkey, String key) {
		Jedis jedis = jedisPool.getResource();
		String string = jedis.hget(hkey,key);
		jedis.close();
		return string;
	}

	@Override
	public long hset(String hkey, String key, String value) {
		Jedis jedis = jedisPool.getResource();
		long result = jedis.hset(hkey,key,value);
		jedis.close();
		return result;
	}

	@Override
	public long incr(String key) {
		Jedis jedis = jedisPool.getResource();
		long result = jedis.incr(key);
		jedis.close();
		return result;
	}

	@Override
	public long expire(String key, int second) {
		Jedis jedis = jedisPool.getResource();
		long result = jedis.expire(key, second);
		jedis.close();
		return result;
	}

	@Override
	public long ttl(String key) {
		Jedis jedis = jedisPool.getResource();
		long result = jedis.ttl(key);
		jedis.close();
		return result;
	}

	@Override
	public long del(String key) {
		Jedis jedis = jedisPool.getResource();
		long result = jedis.del(key);
		jedis.close();
		return result;
	}

	@Override
	public long hdel(String hkey, String key) {
		Jedis jedis = jedisPool.getResource();
		long result = jedis.hdel(hkey,key);
		jedis.close();
		return result;
	}
}
集群版Redis客户端的实现:
/**
 * 集群版
 * @author ***************
 *
 */
public class JedisClientCluster implements JedisClient{

	@Autowired
	private JedisCluster jedisCluster;

	@Override
	public String get(String key) {
		return jedisCluster.get(key);
	}

	@Override
	public String set(String key, String value) {
		return jedisCluster.set(key, value);
	}

	@Override
	public String hget(String hkey, String key) {
		return jedisCluster.hget(hkey, key);
	}

	@Override
	public long hset(String hkey, String key, String value) {
		return jedisCluster.hset(hkey, key, value);
	}

	@Override
	public long incr(String key) {
		return jedisCluster.incr(key);
	}

	@Override
	public long expire(String key, int second) {
		return jedisCluster.expire(key, second);
	}

	@Override
	public long ttl(String key) {
		return jedisCluster.ttl(key);
	}

	@Override
	public long del(String key) {
		return jedisCluster.del(key);
	}

	@Override
	public long hdel(String hkey, String key) {
		return jedisCluster.hdel(hkey, key);
	}


}
两者实现的最主要的区别在于单机版利用的是JedisPool来获取Jedis客户端的实例,而集群版则是利用JedisCluster来获取,获取使用的实例,其方法的包装和调用东较为相似,虽然实现原理不同,但是对于Jedis的使用,使用上述接口定义的操作,则能够满足呀大部分的操作。
Service层:
定义一个接口ContentService接口,其中定义了获取ContentList的操作:
public interface ContentService {
	List<TbContent> getContentList(long contentCid);
}
随后实现这个接口:
@Service
public class ContentServiceImpl implements ContentService {

	@Autowired
	private JedisClient jedisClient;
	@Autowired
	private TbContentMapper contentMapper;

	@Value("${INDEX_CONTENT_REDIS_KEY}")
	private String INDEX_CONTENT_REDIS_KEY;

	@Override
	public List<TbContent> getContentList(long contentCid) {
		//缓存的添加不能影响正常的业务逻辑
		//1.从缓存中取内容
		try{
			String reslut = jedisClient.hget(INDEX_CONTENT_REDIS_KEY,contentCid+"");
			if(!StringUtils.isBlank(reslut)){
				List<TbContent> resultList = JsonUtils.jsonToList(reslut, TbContent.class);
				return resultList;
			}
		}catch(Exception e){
			e.printStackTrace();
		}

		//根据内容分类id查询列表
		TbContentExample example = new TbContentExample();
		Criteria criteria = example.createCriteria();
		criteria.andCategoryIdEqualTo(contentCid);
		List<TbContent> list = contentMapper.selectByExample(example);

		//2.向缓存中添加内容
		try{
			//将list转换成字符串
			String cacheString = JsonUtils.objectToJson(list);
			jedisClient.hset(INDEX_CONTENT_REDIS_KEY, contentCid+"", cacheString);
		}catch(Exception e){
			e.printStackTrace();
		}
		return list;
	}

}
其中那些使用Value获取的值都统一定义在一个properties文件中:
#首页内容信息在redis中存储保存的key
INDEX_CONTENT_REDIS_KEY = INDEX_CONTENT_REDIS_KEY
Controller层:
@Controller
@RequestMapping("/content")
public class ContentController {

	@Autowired
	private ContentService contentService;

	@RequestMapping("/list/{contentCategoryId}")
	@ResponseBody
	public NewstylesResult getContentList(@PathVariable long contentCategoryId){
		try{
			List<TbContent> list = contentService.getContentList(contentCategoryId);
			return NewstylesResult.ok(list);
		}catch(Exception e){
			e.printStackTrace();
			return NewstylesResult.build(500, ExceptionUtil.getStackTrace(e));
		}
	}
}
测试一下:

可以看到,发布的rest服务能够正常的调用。
缓存同步:
先观察下面的流程图:
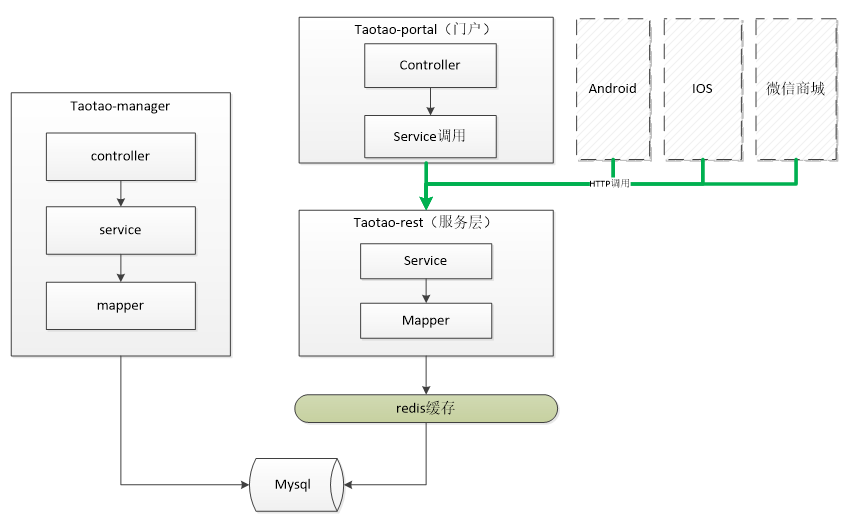
可以看到,我们所调用的服务都经过rest层,那么如何才能够实现在整个工程中既不影响正常的业务逻辑,又能够很好的进行同步更新,也是实说,在taotao-rest工程中发布一个服务。当后台管理系统修改内容后,调用此服务,同步缓存。要求是当后台中对某些有关于redis缓存中的内容进行更新时,也要更新redis缓存。
Dao层:
使用上一步实现的JedisClient来实现(以单机版Jedis为例)。
Service层:
接收内容分类id,调用dao删除redis中对应的hash中key为分类id的项。
参数:内容分类id
返回值:NewstylesResult
定义一个RedisService接口,定义一个同步的操作:
public interface RedisService {

	NewstylesResult syncContent(long contentCid);
}
实现这个接口:
@Service
public class RedisServiceImpl implements RedisService {

	@Autowired
	private JedisClient jedisClient;

	@Value("${INDEX_CONTENT_REDIS_KEY}")
	private String INDEX_CONTENT_REDIS_KEY;

	@Override
	public NewstylesResult syncContent(long contentCid) {
		try{
			jedisClient.hdel(INDEX_CONTENT_REDIS_KEY, contentCid+"");
		}catch(Exception e){
			e.printStackTrace();
			return NewstylesResult.build(500, ExceptionUtil.getStackTrace(e));
		}
		return NewstylesResult.ok();
	}
}
Controller层:
/**
 * 缓存同步Controller
 * @author ***********
 *
 */
@Controller
@RequestMapping("/cache/sync")
public class RedisController {

	@Autowired
	private RedisService redisService;

	@RequestMapping("/content/{contentCid}")
	@ResponseBody
	public NewstylesResult contentCacheSync(@PathVariable long contentCid ){
		NewstylesResult result = redisService.syncContent(contentCid);
		return result;
	}
}
测试后,发现服务可以进行,但是我们还需要我们的后台当发生适应的条件时进行调用此服务,所以我们还需要在后台的工程中添加一个调用的服务,此服务的调用则是在后台的插入的方法中添加的:所以当有变化的时候删除原来的缓存,添加变化后的新元素,删除的时候也会调用,删除原来的缓存。newstyles-manager-web工程Service层中的有关缓存的修改:
首先插入:
	@Override
	public NewstylesResult insertContent(TbContent content) {
		//补全POJO的内容
		content.setCreated(new Date());
		content.setUpdated(new Date());
		contentMapper.insert(content);
		//添加同步缓存逻辑
		try{
			HttpClientUtil.doGet(REST_BASE_URL+REST_CONTENT_SYNC_URL + content.getCategoryId());
		}catch(Exception e){
			e.printStackTrace();
		}

		return NewstylesResult.ok();
} @Override
public NewstylesResult deleteContentById(String ids){
String a[] =ids.split(",");
if(a.length != 0){
for(int i=0;i<a.length;i++){
TbContent tbContent = contentMapper.selectByPrimaryKey(Long.parseLong(a[i].trim()));
try {
pictureService.deleteFilesPic(tbContent.getPic());
pictureService.deleteFilesPic(tbContent.getPic2());
HttpClientUtil.doGet(REST_BASE_URL+REST_CONTENT_SYNC_URL + tbContent.getCategoryId());
} catch (Exception e) {
e.printStackTrace();
}
contentMapper.deleteByPrimaryKey(Long.parseLong(a[i].trim()));
}
}else{
return NewstylesResult.build(500,"Misserror");
}
return NewstylesResult.ok();
}


 4539
4539


 被折叠的 条评论
为什么被折叠?
被折叠的 条评论
为什么被折叠?
 到【灌水乐园】发言


