


转载链接:http://412887952-qq-com.iteye.com/blog/2303121
使用IDEA进行开发的:
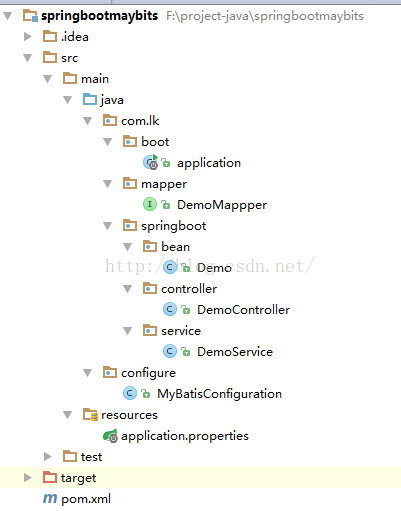
项目结构:
第一步中在pom.xml加入相关的jar包。
<?xml version="1.0" encoding="UTF-8"?> <project xmlns="http://maven.apache.org/POM/4.0.0" xmlns:xsi="http://www.w3.org/2001/XMLSchema-instance" xsi:schemaLocation="http://maven.apache.org/POM/4.0.0 http://maven.apache.org/xsd/maven-4.0.0.xsd"> <modelVersion>4.0.0</modelVersion> <groupId>com.lk</groupId> <artifactId>springbootmybatis</artifactId> <version>1.0-SNAPSHOT</version> <properties> <project.build.sourceEncoding>UTF-8</project.build.sourceEncoding> </properties> <!-- spring boot 基本环境 --> <parent> <groupId>org.springframework.boot</groupId> <artifactId>spring-boot-starter-parent</artifactId> <version>1.4.1.RELEASE</version> </parent> <!--web应用基本环境配置 --> <dependencies> <dependency> <groupId>org.springframework.boot</groupId> <artifactId>spring-boot-starter-web</artifactId> </dependency> <!--数据库驱动--> <dependency> <groupId>mysql</groupId> <artifactId>mysql-connector-java</artifactId> </dependency><dependency> <groupId>org.mybatis.spring.boot</groupId> <artifactId>mybatis-spring-boot-starter</artifactId> </dependency> <!-- 分页 --> <dependency> <groupId>com.github.pagehelper</groupId> <artifactId>pagehelper</artifactId> <version>4.1.1</version> </dependency> </dependencies> <!-- 打包spring boot应用 --> <build> <plugins> <plugin> <groupId>org.springframework.boot</groupId> <artifactId>spring-boot-maven-plugin</artifactId> </plugin> </plugins> </build></project> 第二步:生成application,作用是生成application context (应用上下文)<!--mybatis-spring结合-->第三步:在数据库中生成表给程序使用。package com.lk.boot; import org.mybatis.spring.annotation.MapperScan; import org.springframework.boot.SpringApplication; import org.springframework.boot.autoconfigure.EnableAutoConfiguration; import org.springframework.context.annotation.ComponentScan; import org.springframework.context.annotation.Configuration; /** * Created by LK on 2016/11/13. */ @Configuration @EnableAutoConfiguration @ComponentScan("com.lk.springboot") //扫描下面的包@service @controller 等 @MapperScan("com.lk.mapper") //扫面下面的mapper类 public class application { public static void main(String[] args) { SpringApplication.run(application .class, args); } }
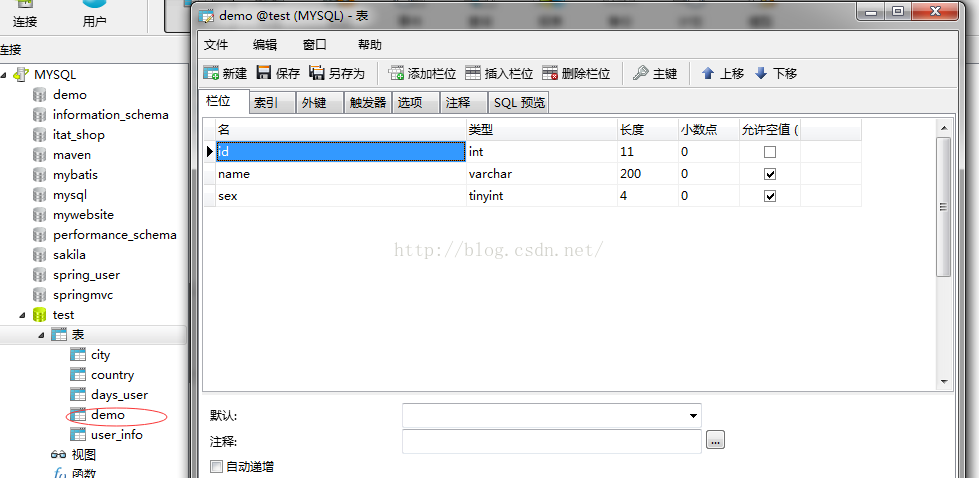
第四步:配置datasource,在application.properties中第五步:配置表类和对应mapper######################################################## ###datasource ######################################################## spring.datasource.url = jdbc:mysql://localhost:3306/test spring.datasource.username = root spring.datasource.password = root spring.datasource.driverClassName = com.mysql.jdbc.Driver spring.datasource.max-active=20 spring.datasource.max-idle=8 spring.datasource.min-idle=8 spring.datasource.initial-size=10package com.lk.springboot.bean; /** * Created by LK on 2016/11/13. */ public class Demo { private long id; private String name; private int sex; public long getId() { return id; } public void setId(long id) { this.id = id; } public String getName() { return name; } public void setName(String name) { this.name = name; } public int getSex() { return sex; } public void setSex(int sex) { this.sex = sex; } }第六步配置controller 和 servicepackage com.lk.mapper; import com.lk.springboot.bean.Demo; import org.apache.ibatis.annotations.Select; import java.util.List; /** * Created by LK on 2016/11/13. */ public interface DemoMappper { @Select("select *from Demo where name = #{name}") public List<Demo> likeName(String name); @Select("select *from Demo where id = #{id}") public Demo getById(long id); @Select("select name from Demo where id = #{id}") public String getNameById(long id); }package com.lk.springboot.service; import com.lk.mapper.DemoMappper; import com.lk.springboot.bean.Demo; import org.springframework.beans.factory.annotation.Autowired; import org.springframework.stereotype.Service; import java.util.List; /** * Created by LK on 2016/11/13. */ @Service public class DemoService { @Autowired private DemoMappper demoMappper; public List<Demo> likeName(String name){ return demoMappper.likeName(name); } }第7步加一个分页package com.lk.springboot.controller; import com.github.pagehelper.PageHelper; import com.lk.springboot.bean.Demo; import com.lk.springboot.service.DemoService; import org.springframework.beans.factory.annotation.Autowired; import org.springframework.web.bind.annotation.RequestMapping; import org.springframework.web.bind.annotation.RestController; import java.util.List; /** * Created by LK on 2016/11/13. */ @RestController public class DemoController { @Autowired private DemoService demoService; /*@RequestMapping("/likeName") public List<Demo> likeName(String name){ return demoService.likeName(name); }*/ @RequestMapping("/likeName") public List<Demo> likeName(String name) { PageHelper.startPage(1, 1); return demoService.likeName(name); } }测试结果:package configure; import com.github.pagehelper.PageHelper; import org.springframework.context.annotation.Bean; import org.springframework.context.annotation.Configuration; import java.util.Properties; /** * Created by LK on 2016/11/13. */ @Configuration public class MyBatisConfiguration { @Bean public PageHelper pageHelper() { System.out.println("MyBatisConfiguration.pageHelper()"); PageHelper pageHelper = new PageHelper(); Properties p = new Properties(); p.setProperty("offsetAsPageNum", "true"); p.setProperty("rowBoundsWithCount", "true"); p.setProperty("reasonable", "true"); pageHelper.setProperties(p); return pageHelper; } }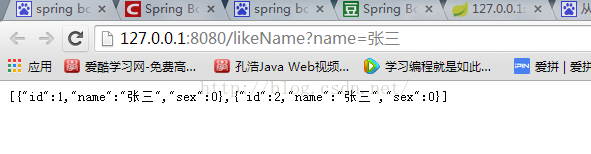


 455
455


 被折叠的 条评论
为什么被折叠?
被折叠的 条评论
为什么被折叠?
 到【灌水乐园】发言


