


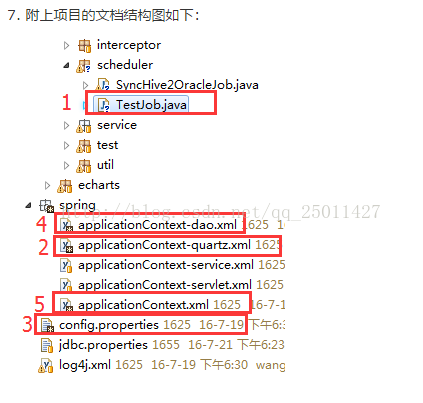
使用的版本Spring4.04+Quartz2.2.3,关于jar包自行下载。
详细需要以下几个步骤来完成:
1. 定义要执行的Job类
2. 定义quartz的配置文件applicationContext-quartz.xml
2.1 定义要调用的对象和对象的方法
2.2 在触发器中配置使用该方法的时间
2.3 在总管类中添加该任务
3. 定义执行的任务的时间配置文件
4. 在拦截器中添加要扫描的包
5. 将quartz配置文件添加到我们的spring容器的配置文件applicationContext.xml中
6. 启动tomcat
下面以具体实例来演示:
1. 定义要执行的Job类 TestJob.java
注意加上注解标记该类为Component组件,这样方便自动装配到spring容器中管理。
package com.crm.scheduler;

import java.text.SimpleDateFormat;
import java.util.Date;

import org.springframework.beans.factory.annotation.Value;
import org.springframework.stereotype.Component;

@Component("testJobComponent")
public class TestJob {

    //定义是否
    @Value("${crmbi.cronExpression.isDoTestJob}")
    private boolean isDoTestJob = false;
    public void execute(){

        if(!isDoTestJob){
            return ;
        }

        SimpleDateFormat sdf = new SimpleDateFormat("yyyy-MM-dd HH:mm:ss");
        System.out.println("我是定时任务类,现在的执行时间是" + sdf.format(new Date()));

    }
}
2. 定义quartz的配置文件
2.1 定义要调用的对象和对象的方法,在这里对象就是上面的新建的testJobComponnent。
    <!-- 定时器2:测试quartz类的使用方法 -->
    <!-- 定义调用的对象及对象中的方法 -->
    <bean id="defTestJob" class="org.springframework.scheduling.quartz.MethodInvokingJobDetailFactoryBean">
        <property name="targetObject" ref="testJobComponent" />
        <property name="targetMethod" value="execute" />
        <property name="concurrent" value="false" /> <!-- 是否支持并发 -->
    </bean>
2.2 定义触发器并配置定时任务执行的时间
    <!-- 触发器:定义出发器执行的脚本的时间  -->
    <bean id="triggerTestJob" class="org.springframework.scheduling.quartz.CronTriggerFactoryBean">
        <property name="jobDetail" ref="defTestJob" />
        <property name="cronExpression">
            <value>${crmbi.cronExpression.testJob}</value>
        </property>
    </bean>
2.3 在总管理中添加该任务
    <!-- 总管理类,启动触发器的配置, 如果将lazy-init='false'那么容器启动就会执行调度程序 -->
    <bean id="startQuartz" lazy-init='false' autowire="no"
            class="org.springframework.scheduling.quartz.SchedulerFactoryBean">
        <property name="triggers">
            <list>
                <ref bean="triggerTestjob" />
            </list>
        </property>
        <property name="autoStartup" value="true" />
        <property name="startupDelay" value="30"/>
    </bean>
最后展示下完成的配置文件applicationContext-quartz.xml如下,其中包含了2个定时任务类,triggerTestJob为我们新增的任务信息:
<?xml version="1.0" encoding="UTF-8"?>
<beans xmlns="http://www.springframework.org/schema/beans"
    xmlns:xsi="http://www.w3.org/2001/XMLSchema-instance" xmlns:aop="http://www.springframework.org/schema/aop"
    xmlns:tx="http://www.springframework.org/schema/tx" xmlns:context="http://www.springframework.org/schema/context"
    xmlns:task="http://www.springframework.org/schema/task" xmlns:util="http://www.springframework.org/schema/util"
    xsi:schemaLocation="http://www.springframework.org/schema/beans http://www.springframework.org/schema/beans/spring-beans-3.0.xsd
    http://www.springframework.org/schema/tx http://www.springframework.org/schema/tx/spring-tx-3.0.xsd
    http://www.springframework.org/schema/aop http://www.springframework.org/schema/aop/spring-aop-3.0.xsd
    http://www.springframework.org/schema/context http://www.springframework.org/schema/context/spring-context-3.0.xsd
    http://www.springframework.org/schema/task http://www.springframework.org/schema/task/spring-task-3.0.xsd
    http://www.springframework.org/schema/util http://www.springframework.org/schema/util/spring-util-3.0.xsd">

    <!-- Quartz common config-->

    <!-- 总管理类,启动触发器的配置, 如果将lazy-init='false'那么容器启动就会执行调度程序 -->
    <bean id="startQuartz" lazy-init='false' autowire="no"
            class="org.springframework.scheduling.quartz.SchedulerFactoryBean">
        <property name="triggers">
            <list>
                <ref bean="runSyncHive2OracleJob" />
                <ref bean="triggerTestjob" />
            </list>
        </property>
        <property name="autoStartup" value="true" />
        <property name="startupDelay" value="30"/>
    </bean>

    <!-- 定时器1: 同步hive数据到oracle -->
    <!-- 定义执行的对象及对象中的方法 -->
    <bean id="defineSyncHive2OracleJob" class="org.springframework.scheduling.quartz.MethodInvokingJobDetailFactoryBean">
        <property name="targetObject" ref="syncHive2OracleComponent" />
        <property name="targetMethod" value="execute" />
        <property name="concurrent" value="false" /> <!-- 指是否并行执行 -->
    </bean>
    <!-- 定义触发器的时间 -->
    <bean id="runSyncHive2OracleJob" class="org.springframework.scheduling.quartz.CronTriggerFactoryBean">
        <property name="jobDetail" ref="defineSyncHive2OracleJob" />
        <property name="cronExpression">
            <value>${crmbi.cronExpression.syncHive2OracleJob}</value>
        </property>
    </bean>


    <!-- 定时器2:测试quartz类的使用方法 -->
    <!-- 定义调用的对象及对象中的方法 -->
    <bean id="defTestJob" class="org.springframework.scheduling.quartz.MethodInvokingJobDetailFactoryBean">
        <property name="targetObject" ref="testJobComponent" />
        <property name="targetMethod" value="execute" />
        <property name="concurrent" value="false" /> <!-- 是否支持并发 -->
    </bean>
    <!-- 触发器:定义出发器执行的脚本的时间  -->
    <bean id="triggerTestJob" class="org.springframework.scheduling.quartz.CronTriggerFactoryBean">
        <property name="jobDetail" ref="defTestJob" />
        <property name="cronExpression">
            <value>${crmbi.cronExpression.testJob}</value>
        </property>
    </bean>

</beans>
3. 定义执行任务的时间配置文件config.properties.
注意这里的crmbi.cronExpression.isDotestJob用来控制是否执行任务的开关
# 3:00 every day
crmbi.cronExpression.syncHive2OracleJob=0 0 3 * * ?
crmbi.cronExpression.isDoSyncHive2Oracle=true

# each 5 minuts
crmbi.cronExpression.testJob=0 0/5 * * * ?
crmbi.cronExpression.isDoTestJob=true
4. 在拦截器中添加要扫描的包,这里加入了com.crm.scheduler包和config.properties文件的扫描。
<!----这个applicationContext-dao.xml文件中---->
    <context:component-scan base-package="com.crm.dao"/>
     <context:component-scan base-package="com.crm.scheduler"/>

    <context:property-placeholder location="classpath:jdbc.properties"  ignore-unresolvable="true"/>
    <context:property-placeholder location="classpath:config.properties"  ignore-unresolvable="true" /
5.将quartz的配置文件引入到spring容器中。
<?xml version="1.0" encoding="UTF-8" ?>
<beans xmlns="http://www.springframework.org/schema/beans"
    xmlns:xsi="http://www.w3.org/2001/XMLSchema-instance"
        xmlns:context="http://www.springframework.org/schema/context"
    xsi:schemaLocation="http://www.springframework.org/schema/beans http://www.springframework.org/schema/beans/spring-beans-3.0.xsd
    http://www.springframework.org/schema/context http://www.springframework.org/schema/context/spring-context-3.0.xsd">

    <!-- 数据访问层配置 -->
     <import resource="classpath:spring/applicationContext-dao.xml" />

    <!--服务层配置 -->
    <import resource="classpath:spring/applicationContext-service.xml" />

    <!-- 定时任务配置文件 -->
    <import resource="classpath:spring/applicationContext-quartz.xml" />

</beans>
6. 最后启动tomcat, 等待一段时间后,可以看到控制台输出如下:
[BI-CONSOLE] 2016-08-11 18:03:44.939 INFO RequestMappingHandlerMapping.registerHandlerMethod(197) | Mapped "{[/user/showUser],methods=[],params=[],headers=[],consumes=[],produces=[],custom=[]}" onto public java.lang.String com.crm.action.system.UserController.showUser(org.springframework.ui.Model,java.lang.String,java.lang.String)
[BI-CONSOLE] 2016-08-11 18:03:44.940 INFO RequestMappingHandlerMapping.registerHandlerMethod(197) | Mapped "{[/user/updateUserPwd],methods=[GET],params=[],headers=[],consumes=[],produces=[],custom=[]}" onto public java.util.Map<java.lang.String, java.lang.Object> com.crm.action.system.UserController.updateUserPwd(java.lang.String,javax.servlet.http.HttpServletRequest,javax.servlet.http.HttpServletResponse)
[BI-CONSOLE] 2016-08-11 18:03:44.940 INFO RequestMappingHandlerMapping.registerHandlerMethod(197) | Mapped "{[/user/userSave],methods=[POST],params=[],headers=[],consumes=[],produces=[],custom=[]}" onto public java.util.Map<java.lang.String, java.lang.Object> com.crm.action.system.UserController.saveUser(org.springframework.ui.Model,com.crm.entity.system.MUser)
[BI-CONSOLE] 2016-08-11 18:03:45.533 INFO SimpleUrlHandlerMapping.registerHandler(302) | Root mapping to handler of type [class org.springframework.web.servlet.mvc.ParameterizableViewController]
[BI-CONSOLE] 2016-08-11 18:03:45.540 INFO SimpleUrlHandlerMapping.registerHandler(315) | Mapped URL path [/**] onto handler 'org.springframework.web.servlet.resource.DefaultServletHttpRequestHandler#0'
[BI-CONSOLE] 2016-08-11 18:03:45.581 INFO SimpleUrlHandlerMapping.registerHandler(315) | Mapped URL path [/resources/**] onto handler 'org.springframework.web.servlet.resource.ResourceHttpRequestHandler#0'
[BI-CONSOLE] 2016-08-11 18:03:45.863 INFO DispatcherServlet.initServletBean(498) | FrameworkServlet 'crmbi': initialization completed in 1255 ms
八月 11, 2016 6:03:45 下午 org.apache.coyote.AbstractProtocol start
信息: Starting ProtocolHandler ["http-bio-8080"]
八月 11, 2016 6:03:45 下午 org.apache.coyote.AbstractProtocol start
信息: Starting ProtocolHandler ["ajp-bio-8009"]
八月 11, 2016 6:03:45 下午 org.apache.catalina.startup.Catalina start
信息: Server startup in 14949 ms
[BI-CONSOLE] 2016-08-11 18:04:14.583 INFO SchedulerFactoryBean.run(667) | Starting Quartz Scheduler now, after delay of 30 seconds
[BI-CONSOLE] 2016-08-11 18:04:14.584 INFO QuartzScheduler.start(575) | Scheduler startQuartz_$_NON_CLUSTERED started.
我是定时任务类,现在的执行时间是2016-08-11 18:05:00
我是定时任务类,现在的执行时间是2016-08-11 18:10:00

8、表达式举例
"0 0 12 * * ?" 每天中午12点触发
"0 15 10 ? * *" 每天上午10:15触发
"0 15 10 * * ?" 每天上午10:15触发
"0 15 10 * * ? *" 每天上午10:15触发
"0 15 10 * * ? 2005" 2005年的每天上午10:15触发
"0 * 14 * * ?" 在每天下午2点到下午2:59期间的每1分钟触发
"0 0/5 14 * * ?" 在每天下午2点到下午2:55期间的每5分钟触发
"0 0/5 14,18 * * ?" 在每天下午2点到2:55期间和下午6点到6:55期间的每5分钟触发
"0 0-5 14 * * ?" 在每天下午2点到下午2:05期间的每1分钟触发
"0 10,44 14 ? 3 WED" 每年三月的星期三的下午2:10和2:44触发
"0 15 10 ? * MON-FRI" 周一至周五的上午10:15触发
"0 15 10 15 * ?" 每月15日上午10:15触发
"0 15 10 L * ?" 每月最后一日的上午10:15触发
"0 15 10 ? * 6L" 每月的最后一个星期五上午10:15触发
"0 15 10 ? * 6L 2002-2005" 2002年至2005年的每月的最后一个星期五上午10:15触发
"0 15 10 ? * 6#3" 每月的第三个星期五上午10:15触发


 3734
3734


 被折叠的 条评论
为什么被折叠?
被折叠的 条评论
为什么被折叠?
 到【灌水乐园】发言


