


- 1.隐藏导航栏上的返回字体
//Swift
UIBarButtonItem.appearance().setBackButtonTitlePositionAdjustment(UIOffsetMake(0, -60), forBarMetrics: .Default)
//OC
[[UIBarButtonItem appearance] setBackButtonTitlePositionAdjustment:UIOffsetMake(0, -60) forBarMetrics:UIBarMetricsDefault];- 2.去掉tableView多余的线条
//Swift
self.tableView?.tableFooterView = UIView()
//OC
self.tableView.tableFooterView = [UIView new];- 3.去掉tableView的线条
//Swift
self.tableView?.separatorStyle = .None
//OC
self.tableView.separatorStyle = UITableViewCellSeparatorStyleNone;- 4.去掉cell的选中效果
//Swift
cell.selectionStyle = .None
//OC
cell.selectionStyle = UITableViewCellSelectionStyleNone;- 5.解决tableview的分割线短一截
-(void)viewDidLayoutSubviews

{
    if ([self.tableView respondsToSelector:@selector(setSeparatorInset:)]) {
        [self.tableView setSeparatorInset:UIEdgeInsetsMake(0,0,0,0)];
    }

    if ([self.tableView respondsToSelector:@selector(setLayoutMargins:)]) {
        [self.tableView setLayoutMargins:UIEdgeInsetsMake(0,0,0,0)];
    }
}

-(void)tableView:(UITableView *)tableView willDisplayCell:(UITableViewCell *)cell forRowAtIndexPath:(NSIndexPath *)indexPath
{
    if ([cell respondsToSelector:@selector(setSeparatorInset:)]) {
        [cell setSeparatorInset:UIEdgeInsetsZero];
    }

    if ([cell respondsToSelector:@selector(setLayoutMargins:)]) {
        [cell setLayoutMargins:UIEdgeInsetsZero];
    }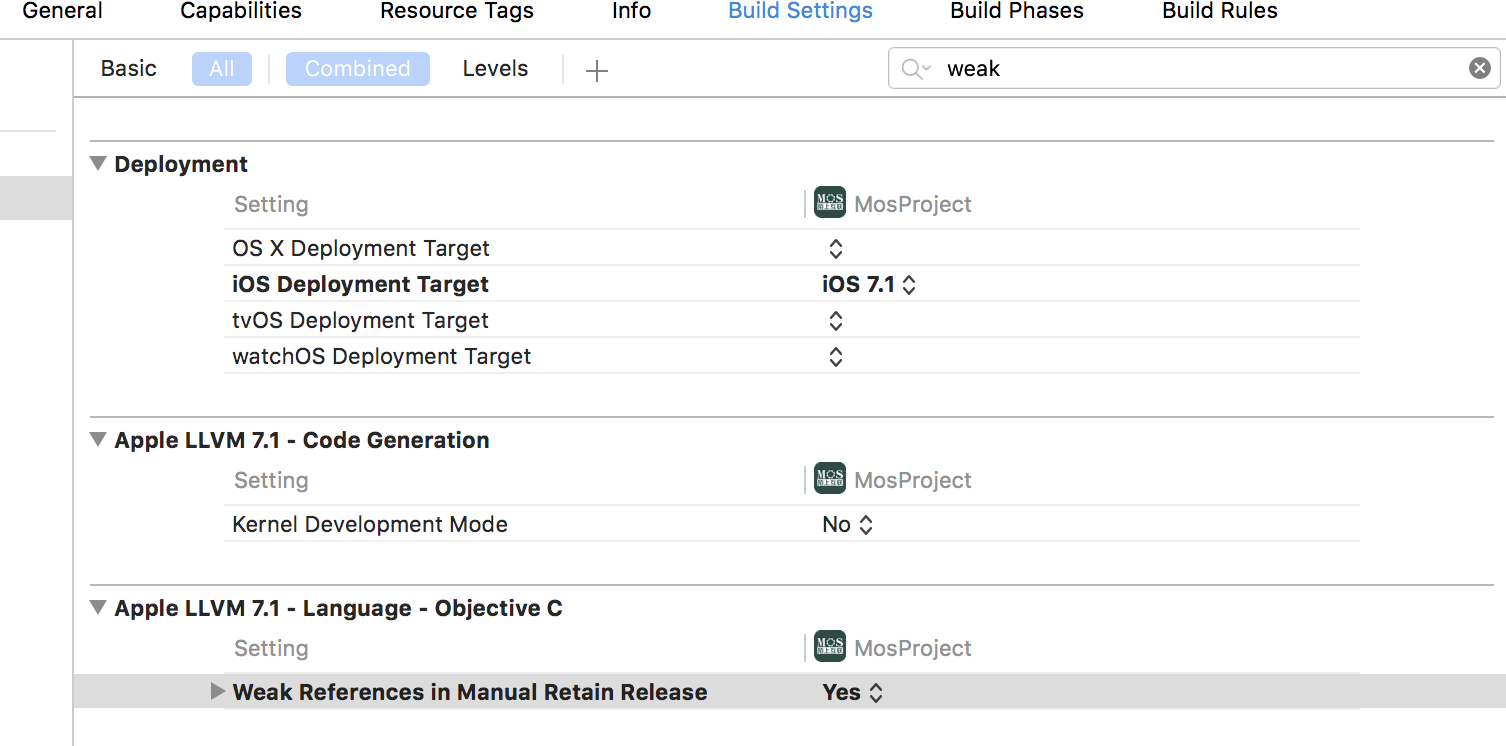
}- 6.在swift中定义协议的时候,如果使用如下方法定义,需要在声明时,使用weak来修饰以防止循环引用
@objc protocol BookTabBarDelegate{
    func commet()
    func commetnController()
    func likeBook()
    func shareAction()
}
weak var delegate:BookTabBarDelegate?- 7.如果使用swift语法声明一个协议时,不用使用weak进行修饰,否则会报错
protocol BookTabBarDelegate{
    func commet()
    func commetnController()
    func likeBook()
    func shareAction()
}
var delegate:BookTabBarDelegate?- 8.动态隐藏NavigationBar
//1.当我们的手离开屏幕时候隐藏
- (void)scrollViewWillEndDragging:(UIScrollView *)scrollView withVelocity:(CGPoint)velocity targetContentOffset:(inout CGPoint *)targetContentOffset{
NSLog(@"======== %lf", velocity.y);
if(velocity.y > 0) {
[self.navigationController setNavigationBarHidden:YES animated:YES];
}
else {
[self.navigationController setNavigationBarHidden:NO animated:YES];
}
}
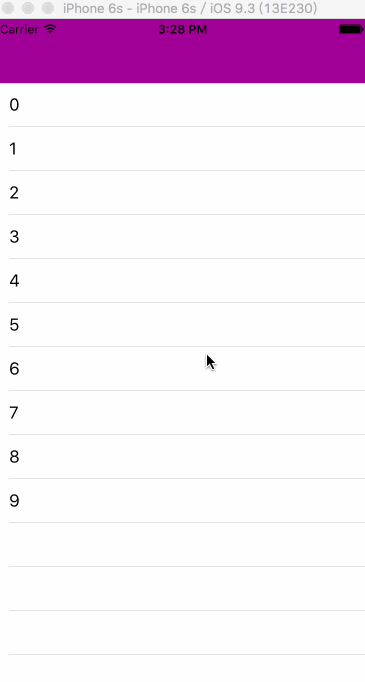
velocity.y这个量,在上滑和下滑时,变化极小(小数),但是因为方向不同,有正负之分,这就很好处理了。效果图:
//2.在滑动过程中隐藏
//像safari
(1) self.navigationController.hidesBarsOnSwipe = YES;
(2)- (void)scrollViewDidScroll:(UIScrollView *)scrollView
{
CGFloat offsetY = scrollView.contentOffset.y + _familyTableView.contentInset.top;//注意
CGFloat panTranslationY = [scrollView.panGestureRecognizer translationInView:self.familyTableView].y;
if (offsetY > 64) {
if (panTranslationY > 0) { //下滑趋势,显示
[self.navigationController setNavigationBarHidden:NO animated:YES];
}
else { //上滑趋势,隐藏
[self.navigationController setNavigationBarHidden:YES animated:YES];
}
}
else {
[self.navigationController setNavigationBarHidden:NO animated:YES];
}
}
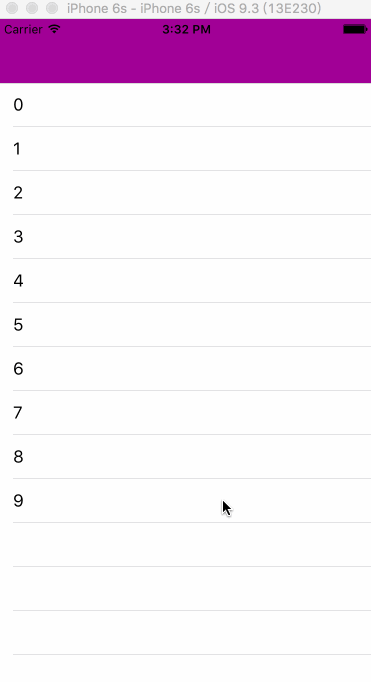
这里的offsetY > 64只是为了在视图滑过navigationBar的高度之后才开始处理,防止影响展示效果。
panTranslationY是scrollView的pan手势的手指位置的y值,可能不是太好,因为panTranslationY这个值在较小幅度上下滑动时,可能都为正或都为负,这就使得这一方式不太灵敏.效果图:
- 9.设置导航栏透明
//方法一:设置透明度
  [[[self.navigationController.navigationBar subviews]objectAtIndex:0] setAlpha:0.1];
//方法二:设置背景图片
/**
 *  设置导航栏,使其透明
 *
*/
- (void)setNavigationBarColor:(UIColor *)color targetController:(UIViewController *)targetViewController
{

  //导航条的颜色 以及隐藏导航条的颜色
targetViewController.navigationController.navigationBar.shadowImage = [[UIImage alloc]init];
    CGRect rect=CGRectMake(0.0f, 0.0f, 1.0f, 1.0f);
    UIGraphicsBeginImageContext(rect.size);
    CGContextRef context = UIGraphicsGetCurrentContext();
    CGContextSetFillColorWithColor(context, [color CGColor]);
    CGContextFillRect(context, rect);
    UIImage *theImage = UIGraphicsGetImageFromCurrentImageContext();
    UIGraphicsEndImageContext();
    [targetViewController.navigationController.navigationBar setBackgroundImage:theImage forBarMetrics:UIBarMetricsDefault];
}- 10.设置字体和行间距
//字体
NSFontAttributeName
//段落格式
NSParagraphStyleAttributeName
//字体颜色
NSForegroundColorAttributeName
//背景颜色
NSBackgroundColorAttributeName
//删除线格式
NSStrikethroughStyleAttributeName
//下划线格式
NSUnderlineStyleAttributeName
//删除线颜色
NSStrokeColorAttributeName
//删除线宽度
NSStrokeWidthAttributeName
//阴影
NSShadowAttributeName
//设置字体和行间距
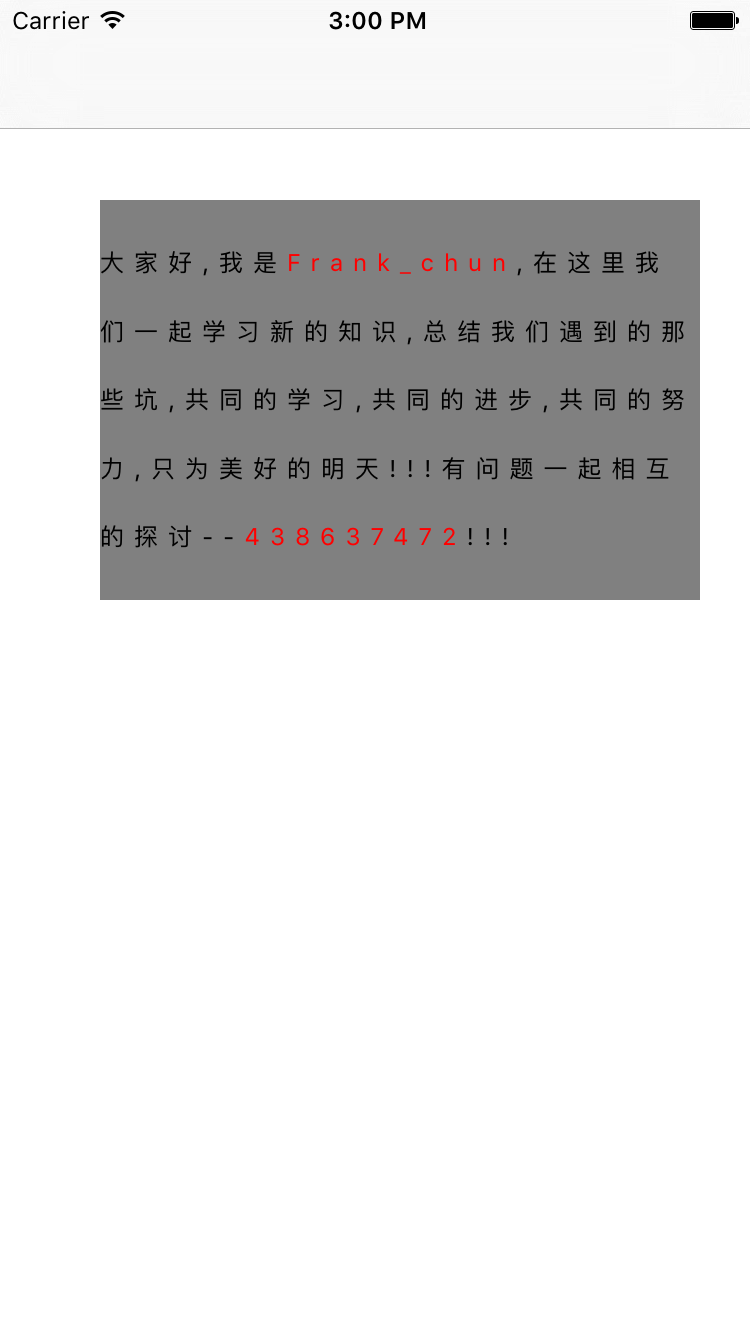
UILabel * lable = [[UILabel alloc]initWithFrame:CGRectMake(50, 100, 300, 200)];
lable.text = @"大家好,我是Frank_chun,在这里我们一起学习新的知识,总结我们遇到的那些坑,共同的学习,共同的进步,共同的努力,只为美好的明天!!!有问题一起相互的探讨--438637472!!!";
lable.numberOfLines = 0;
lable.font = [UIFont systemFontOfSize:12];
lable.backgroundColor = [UIColor grayColor];
[self.view addSubview:lable];
//设置每个字体之间的间距
//NSKernAttributeName 这个对象所对应的值是一个NSNumber对象(包含小数),作用是修改默认字体之间的距离调整,值为0的话表示字距调整是禁用的;
NSMutableAttributedString * str = [[NSMutableAttributedString alloc]initWithString:lable.text attributes:@{NSKernAttributeName:@(5.0)}];
//设置某写字体的颜色
//NSForegroundColorAttributeName 设置字体颜色
NSRange blueRange = NSMakeRange([[str string] rangeOfString:@"Frank_chun"].location, [[str string] rangeOfString:@"Frank_chun"].length);
[str addAttribute:NSForegroundColorAttributeName value:[UIColor redColor] range:blueRange];
NSRange blueRange1 = NSMakeRange([[str string] rangeOfString:@"438637472"].location, [[str string] rangeOfString:@"438637472"].length);
[str addAttribute:NSForegroundColorAttributeName value:[UIColor redColor] range:blueRange1];
//设置每行之间的间距
//NSParagraphStyleAttributeName 设置段落的样式
NSMutableParagraphStyle * par = [[NSMutableParagraphStyle alloc]init];
[par setLineSpacing:20];
//为某一范围内文字添加某个属性
//NSMakeRange表示所要的范围,从0到整个文本的长度
[str addAttribute:NSParagraphStyleAttributeName value:par range:NSMakeRange(0, lable.text.length)];
[lable setAttributedText:str];效果图:
- 11.点击button倒计时
//第一种方法
//点击button倒计时
#import "ViewController.h"
@interface ViewController ()
@property (nonatomic, strong) UIButton * timeButton;
@property (nonatomic, strong) NSTimer * timer;
@property (nonatomic, strong)UIButton * btn;
@end
@implementation ViewController
{
NSInteger _time;
}
- (void)viewDidLoad {
[super viewDidLoad];
_time = 5;
self.btn = [UIButton buttonWithType:UIButtonTypeCustom];
_btn.backgroundColor = [UIColor orangeColor];
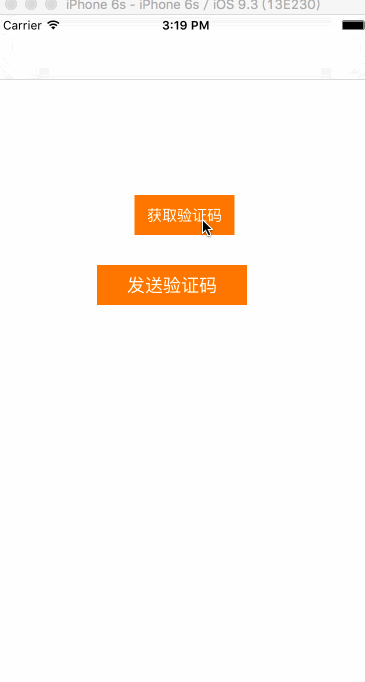
[_btn setTitle:@"获取验证码" forState:UIControlStateNormal];
_btn.titleLabel.font = [UIFont systemFontOfSize:15];
[_timeButton setTitleColor:[UIColor blackColor] forState:UIControlStateNormal];
[_btn addTarget:self action:@selector(btnAction:) forControlEvents:UIControlEventTouchUpInside];
[self refreshButtonWidth];
[self.view addSubview:self.btn];
}
- (void)refreshButtonWidth
{
CGFloat width = 0;
if (_btn.enabled) {
width = 100;
}
else {
width = 200;
}
_btn.center = CGPointMake(self.view.frame.size.width/2, 200);
_btn.bounds = CGRectMake(0, 0, width, 40);
//每次刷新,保证区域正确
[_btn setBackgroundImage:[self imageWithColor:[UIColor orangeColor] andSize:_btn.frame.size] forState:UIControlStateNormal];
[_btn setBackgroundImage:[self imageWithColor:[UIColor lightGrayColor] andSize:_btn.frame.size] forState:UIControlStateDisabled];
}
- (UIImage *)imageWithColor:(UIColor *)color andSize:(CGSize)aSize
{
CGRect rect = CGRectMake(0.0f, 0.0f, aSize.width, aSize.height);
UIGraphicsBeginImageContext(rect.size);
CGContextRef context = UIGraphicsGetCurrentContext();
CGContextSetFillColorWithColor(context, [color CGColor]);
CGContextFillRect(context, rect);
UIImage *image = UIGraphicsGetImageFromCurrentImageContext();
UIGraphicsEndImageContext();
return image;
}
- (void)btnAction:(UIButton *)sender
{
sender.enabled = NO;
[self refreshButtonWidth];
[sender setTitle:[NSString stringWithFormat:@"获取验证码(%zi)", _time] forState:UIControlStateNormal];
_timer = [NSTimer scheduledTimerWithTimeInterval:0.1 target:self selector:@selector(timeDown) userInfo:nil repeats:YES];
}
- (void)timeDown
{
_time --;
if (_time == 0) {
[_btn setTitle:@"重新获取" forState:UIControlStateNormal];
_btn.enabled = YES;
[self refreshButtonWidth];
[_timer invalidate];
_timer = nil;
_time = 5 ;
return;
}
[_btn setTitle:[NSString stringWithFormat:@"获取验证码(%zi)", _time] forState:UIControlStateNormal];
}//第二种方法
#pragma mark -点击发送验证码
- (void)sendMessage:(UIButton *)btn
{
if (self.phoneField.text.length == 0) {
[self remindMessage:@"请输入正确的手机号"];
}else{
__block int timeout=60; //倒计时时间
dispatch_queue_t queue = dispatch_get_global_queue(DISPATCH_QUEUE_PRIORITY_DEFAULT, 0);
dispatch_source_t _timer = dispatch_source_create(DISPATCH_SOURCE_TYPE_TIMER, 0, 0,queue);
dispatch_source_set_timer(_timer,dispatch_walltime(NULL, 0),1.0*NSEC_PER_SEC, 0); //每秒执行
dispatch_source_set_event_handler(_timer, ^{
if(timeout<=0){ //倒计时结束,关闭
dispatch_source_cancel(_timer);
dispatch_async(dispatch_get_main_queue(), ^{
// 设置界面的按钮显示 根据自己需求设置
[btn setTitle:@"发送验证码" forState:UIControlStateNormal];
btn.userInteractionEnabled = YES;
});
}else{
int seconds = timeout % 60;
NSString *strTime = [NSString stringWithFormat:@"%d", seconds];
if ([strTime isEqualToString:@"0"]) {
strTime = [NSString stringWithFormat:@"%d",60];
}
dispatch_async(dispatch_get_main_queue(), ^{
//设置界面的按钮显示 根据自己需求设置
//NSLog(@"____%@",strTime);
[UIView beginAnimations:nil context:nil];
[UIView setAnimationDuration:1];
[btn setTitle:[NSString stringWithFormat:@"%@秒后重新发送",strTime] forState:UIControlStateNormal];
[UIView commitAnimations];
btn.userInteractionEnabled = NO;
});
timeout--;
}
});
dispatch_resume(_timer);
}效果图:
-
- UITextField默认占位符是居中显示,让其居上显示
textField.contentVerticalAlignment = UIControlContentVerticalAlignmentTop;- 13.拍照,获取相机的相册,并自定义相机界面
#import "ViewController.h"

@interface ViewController ()<UIImagePickerControllerDelegate,UINavigationControllerDelegate>
@property (nonatomic, strong)UIImagePickerController * picker;
@property (nonatomic, strong)UIImageView * imageView;

@end

@implementation ViewController

- (void)viewDidLoad {
    [super viewDidLoad];
    // Do any additional setup after loading the view, typically from a nib.

    self.imageView = [[UIImageView alloc]initWithFrame:CGRectMake(50, 50, 250, 250)];
    _imageView.backgroundColor = [UIColor grayColor];
    [self.view addSubview:self.imageView];

    UIButton * btn = [UIButton buttonWithType:UIButtonTypeCustom];
    btn.frame = CGRectMake(100, 350, 100, 50);
    btn.backgroundColor = [UIColor greenColor];
    [btn setTitle:@"保存图片" forState:UIControlStateNormal];
    [btn addTarget:self action:@selector(doClick:) forControlEvents:UIControlEventTouchUpInside];
    [self.view addSubview:btn];
}
- (void)doClick:(UIButton *)sender
{
    //创建图片选择控制器对象
    self.picker = [[UIImagePickerController alloc]init];
    //设置代理
    _picker.delegate = self;
    //设置样式
    /**
     *   UIImagePickerControllerSourceTypePhotoLibrary,//从相册打开照片
     UIImagePickerControllerSourceTypeCamera,//启动摄像头拍照
     UIImagePickerControllerSourceTypeSavedPhotosAlbum//直接打开保存的照片列表,如果有摄像头,则打开相册
     */
    UIImagePickerControllerSourceType type = UIImagePickerControllerSourceTypeCamera;
    _picker.sourceType = type;
    //允许编辑(选择好图片或者拍摄好之后允许用户拖动缩放等操作)
    _picker.allowsEditing = YES;
    //弹出相机
    [self presentViewController:self.picker animated:YES completion:^{

    }];

    //自定义相机界面
    _picker.showsCameraControls = NO;

    UIToolbar * tool = [[UIToolbar  alloc]initWithFrame:CGRectMake(0, self.view.frame.size.height - 40, self.view.frame.size.width, 40)];
    tool.barStyle = UIBarStyleBlackTranslucent;
    tool.barTintColor = [UIColor greenColor];

    UIBarButtonItem * cancel = [[UIBarButtonItem alloc]initWithTitle:@"取消" style:UIBarButtonItemStylePlain target:self action:@selector(touchCancel)];
    cancel.width = self.view.frame.size.width/2;

    UIBarButtonItem * ok = [[UIBarButtonItem alloc]initWithTitle:@"确定" style:UIBarButtonItemStylePlain target:self action:@selector(touchOk)];
    ok.width = self.view.frame.size.width/2;

    [tool setItems:@[cancel,ok]];
    //把自定义的view添加到UIImagePickerController的layView上
    _picker.cameraOverlayView = tool;


}
#pragma mark - UIImagePickerControllerDelegate
- (void)imagePickerController:(UIImagePickerController *)picker didFinishPickingMediaWithInfo:(NSDictionary<NSString *,id> *)info
{
    //从字典中取出照片
    /*
     UIImagePickerControllerEditedImage 编辑之后的图片
     UIImagePickerControllerOriginalImage 原来的图片
    */
    UIImage * image = [info objectForKey:UIImagePickerControllerOriginalImage];
    self.imageView.image = image;
    //相机消失
    [self dismissViewControllerAnimated:YES completion:^{

    }];


}
#pragma mark - 取消按钮和确定按钮
- (void)touchCancel
{
    [self.picker dismissViewControllerAnimated:YES completion:^{

    }];
}
- (void)touchOk
{
    [self.picker takePicture];
}- 14.Xcode 7.3版本编译不提示自定义类名
- 15.Xcode文件路径
//插件的安装路径
~/Library/Application Support/Developer/Shared/Xcode/Plug-ins

 //描述文件的安装路径
~/Library/MobileDevice/Provisioning Profiles

 //模拟器的位置
/Applications/Xcode.app/Contents/Developer/Platforms/iPhoneSimulator.platform/Developer/SDKs

 //文档安装位置
/Applications/Xcode.app/Contents/Developer/Documentation/DocSets

 //自定义代码段的保存路径
~/Library/Developer/Xcode/UserData/CodeSnippets/
如果找不到CodeSnippets文件夹,可以自己新建一个CodeSnippets文件夹。

 //获取家目录路径的函数
NSString *homeDir = NSHomeDirectory();

 //获取Documents目录路径的方法
NSArray *paths = NSSearchPathForDirectoriesInDomains(NSDocumentDirectory, NSUserDomainMask, YES);
NSString *docDir = [paths objectAtIndex:0];

 //获取Documents目录路径的方法
NSArray *paths = NSSearchPathForDirectoriesInDomains(NSCachesDirectory, NSUserDomainMask, YES);
NSString *cachesDir = [paths objectAtIndex:0];

 //获取tmp目录路径的方法
NSString *tmpDir = NSTemporaryDirectory();- 16.点击cell上面的button,直接删除cell;
- (void)doDeleteBtn:(UIButton *)sender
{
    SSTableViewCell *cell = (SSCTouZhuTableViewCell *)[[[sender superview] superview]superview];
    NSIndexPath *indexPath1 = [self.tableView indexPathForCell:cell];

    [self.dataAry removeObjectAtIndex:indexPath1.row];

     [self.tableView deleteRowsAtIndexPaths:[NSArray arrayWithObjects:[NSIndexPath indexPathForRow:indexPath1.row inSection:0], nil] withRowAnimation:UITableViewRowAnimationFade];

}


 385
385

 被折叠的 条评论
为什么被折叠?
被折叠的 条评论
为什么被折叠?
 到【灌水乐园】发言


