


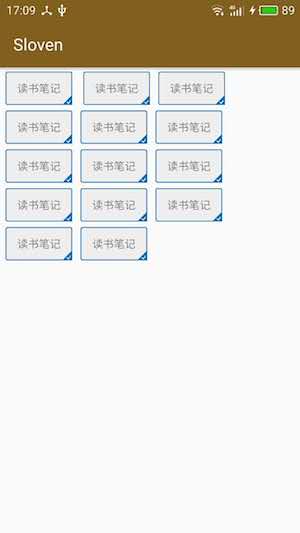
1.效果图
!
2.问题
效果途中的效果用LinearLayout也能实现,但是需要嵌套一个LinearLayout,明显加深层级,像这种需求很多,自定义View继承ViewGroup实现。
3.步骤
自定义ViewGroup需要实现onLayout,onMeasure方法,在onLayout中遍历循环子view实现子View的布局,onMeasure方法中遍历子view并调用子view的measure方法,从而实现布局,而实现上述效果的关键就在这两个方法中,其实想LinearLayout和RelativeLayout的实现原理相似,都是通过遍历子view,调用子view的measure方法,然后进行布局。
4.自定义实现代码
public class AutoNextLineLayout extends ViewGroup {
    private static final int PADDING_HOR = 10;//水平方向padding
    private static final int PADDING_VERTICAL = 5;//垂直方向padding
    private static final int SIDE_MARGIN = 10;//左右间距
    private static final int TEXT_MARGIN = 10;
    /**
     * @param context
     */
    public AutoNextLineLayout(Context context) {
        super(context);
    }

    /**
     * @param context
     * @param attrs
     * @param defStyle
     */
    public AutoNextLineLayout(Context context, AttributeSet attrs, int defStyle) {
        super(context, attrs, defStyle);
    }


    /**
     * @param context
     * @param attrs
     */
    public AutoNextLineLayout(Context context, AttributeSet attrs) {
        super(context, attrs);
    }


    @Override
    protected void onLayout(boolean changed, int l, int t, int r, int b) {
        int childCount = getChildCount();
        int autualWidth = r - l;
        int x = SIDE_MARGIN;// 横坐标开始
        int y = 0;//纵坐标开始
        int rows = 1;
        for(int i=0;i<childCount;i++){
            View view = getChildAt(i);
//            view.setBackgroundColor(Color.GREEN);
            int width = view.getMeasuredWidth();
            int height = view.getMeasuredHeight();
            x += width+TEXT_MARGIN;
            if(x>autualWidth){
                //如果超出宽度,则需要另起一行
                x = width+SIDE_MARGIN;
                //行数+1
                rows++;
            }
            //高度就是行数*(view的高+行距)
            y = rows*(height+TEXT_MARGIN);

            //算出子view的位置,算法比较简单,琢磨一下
            if(i==0){
                //起始位置特殊,需要特殊对待
                view.layout(x-width-TEXT_MARGIN, y-height, x-TEXT_MARGIN, y);
            }else{
                view.layout(x-width, y-height, x, y);
            }
        }
    };

    @Override
    protected void onMeasure(int widthMeasureSpec, int heightMeasureSpec) {
        int x = 0;//横坐标
        int y = 0;//纵坐标
        int rows = 1;//总行数
        int specWidth = MeasureSpec.getSize(widthMeasureSpec);
        int actualWidth = specWidth - SIDE_MARGIN * 2;//实际宽度
        int childCount = getChildCount();
        //遍历子view,并调用子view的measure方法,然后通过setMeaSureDimension设置给子View测量后的宽高
        for(int index = 0;index<childCount;index++){
            View child = getChildAt(index);
            child.setPadding(PADDING_HOR, PADDING_VERTICAL, PADDING_HOR, PADDING_VERTICAL);
            child.measure(MeasureSpec.UNSPECIFIED, MeasureSpec.UNSPECIFIED);
            int width = child.getMeasuredWidth();
            int height = child.getMeasuredHeight();
            x += width+TEXT_MARGIN;
            if(x>actualWidth){//换行
                x = width;
                rows++;
            }
            y = rows*(height+TEXT_MARGIN);
        }
        setMeasuredDimension(actualWidth, y);
    }

}
4.在布局中使用
<com.sloven.customview.AutoNextLineLayout
        android:id="@+id/custom_layout"
        android:layout_width="wrap_content"
        android:layout_height="wrap_content">


        <include layout="@layout/next_line_view_item"
            android:layout_width="wrap_content"
            android:layout_height="wrap_content"/>

        //代码略。。。


    </com.sloven.customview.AutoNextLineLayout>
后续将代码上传到github。


 1209
1209

 被折叠的 条评论
为什么被折叠?
被折叠的 条评论
为什么被折叠?
 到【灌水乐园】发言


