


 本文分享了iOS开发过程中实用技巧,包括获取UITabBarController选中项位置、监听Home键与锁屏事件、实现定时器功能、配置DatePicker与ToolBar、调用系统拨号及短信功能、从通讯录选择联系人电话等。
iOS实战——开发实战过程中的点点滴滴
一、获取UITabBarController选中Item的位置
在开发项目中,UITabBarController下有3个页面,需要对不同的页面进行不同的操作,所以需要知道用户此时在哪个页面上
1、在UITabBarController中声明并使用下面这个代理
//声明代理
@interface TBC_SendPassword ()<UITabBarControllerDelegate>
@end

@implementation TBC_SendPassword
- (void)viewDidLoad {
    [super viewDidLoad];
    //使用
    self.delegate = self;
}
2、使用其代理方法
-(void)tabBarController:(UITabBarController *)tabBarController didSelectViewController:(UIViewController *)viewController{
    //当前UITabBarController的位置,从0开始
    selectIndex = (int)tabBarController.selectedIndex;
    NSLog(@"selectIndex:%d",selectIndex);
}
二、监听用户按下Home键
在开发项目中,需要对用户按下Home键时做出不同的操作
1、直接在代码中使用系统提供的广播监听Home键
//监听是否触发home键挂起程序,(把程序放在后台执行其他操作)
[[NSNotificationCenter defaultCenter] addObserver:self
                                         selector:@selector(applicationWillResignActive:)
                                             name:UIApplicationWillResignActiveNotification
                                           object:nil];
//监听是否重新进入程序程序.(回到程序)
[[NSNotificationCenter defaultCenter] addObserver:self
                                         selector:@selector(applicationDidBecomeActive:)
                                             name:UIApplicationDidBecomeActiveNotification
                                           object:nil];
2、在回调方法中做出逻辑处理
-(void)applicationWillResignActive:(NSNotification *)notification{
    NSLog(@"触发home按下,在该区域书写点击home键的逻辑");
}
-(void)applicationDidBecomeActive:(NSNotification *)notification{
    NSLog(@"重新进来后响应,该区域编写重新进入页面的逻辑");
}
这里需要注意的是:
- 锁屏也会调用按下Home的逻辑,重新唤醒屏幕也会调用Home键返回界面的逻辑,也就是说锁屏键也是Home键,个人项目亲自测试过
- 该监听可以重复添加多次,如果添加多次,那么它会执行多次Home键的回调
三、监听锁屏和唤醒屏幕
1、声明变量
//锁屏监听
#import <notify.h>
#define NotificationLock CFSTR("com.apple.springboard.lockcomplete")
#define NotificationChange CFSTR("com.apple.springboard.lockstate")
#define NotificationPwdUI CFSTR("com.apple.springboard.hasBlankedScreen")
2、在代码中监听锁屏操作
//监听锁屏
CFNotificationCenterAddObserver(CFNotificationCenterGetDarwinNotifyCenter(), NULL,
 screenLockStateChanged, NotificationLock, NULL, CFNotificationSuspensionBehaviorDeliverImmediately);

CFNotificationCenterAddObserver(CFNotificationCenterGetDarwinNotifyCenter(), NULL,
 screenLockStateChanged, NotificationChange, NULL, CFNotificationSuspensionBehaviorDeliverImmediately);
3、在回调中做出自己的逻辑
#pragma 监听锁屏回调
static void screenLockStateChanged(CFNotificationCenterRef center,void* observer,CFStringRef name,const void* object,CFDictionaryRef userInfo){

    NSString* lockstate = (__bridge NSString*)name;
    if ([lockstate isEqualToString:(__bridge  NSString*)NotificationLock]) {
        NSLog(@"锁屏操作");
    } else if([lockstate isEqualToString:(__bridge NSString*)NotificationChange]){
        NSLog(@"屏幕状态改变");
    }
}
这里需要注意的是:
- 不管锁屏和唤醒屏幕都会执行屏幕状态改变
- 暂时我没有找出如何监听唤醒屏幕的方法
四、构建定时器
1、定义NSTimer
//定时器
@property (strong,nonatomic)NSTimer *timer;
2、开启定时器
//延时5分钟执行delayMethod
_timer = [NSTimer scheduledTimerWithTimeInterval:300 target:self selector:@selector(delayMethod) userInfo:nil repeats:NO];
3、定义延时操作方法
#pragma 延时操作
-(void)delayMethod{

}
4、取消计定时器
//取消延时器
[_timer invalidate];
五、DataPicker与ToolBar
在项目开发中,如果是UITextFiled弹出DataPicker,那就很好处理ToolBar,直接将ToolBar绑定在UITextFiled,但是,项目需求是在UITableView中的某个静态Item中弹出,这个时候将ToolBar绑定到UITextFiled就没有什么作用了,这个时候只能将UITextFiled和ToolBar同时绑定在主View,而且还要对ToolBar的按钮做另外处理,这里个人亲测,找到这个不错的方法,而且用到现在没有什么问题
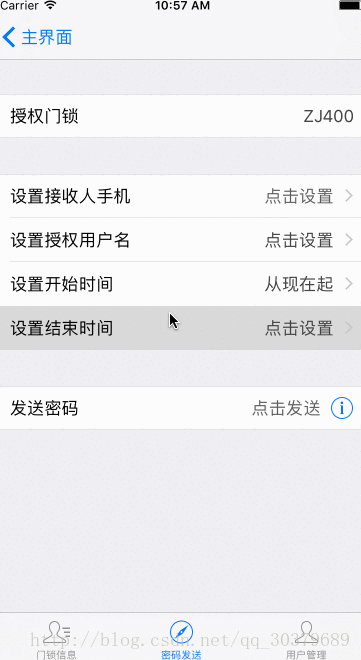
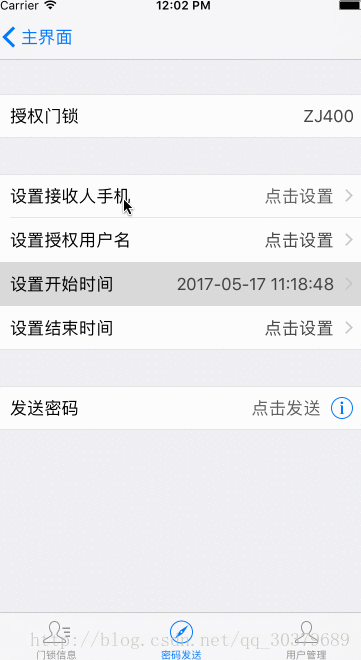
这里需要注意的是,该方案适配的是UITabBarController一起使用,如效果图所示那样,如果需要适配其他地方,请改变弹出的位置即可,由于项目中同时用到两个时间选择,那么可以用个type区别一下,具体看代码
先看下效果图
1、定义控件和变量
//屏幕宽高,后面会用到
#define mScreenHeight ([UIScreen mainScreen].bounds.size.height)
#define mScreenWidth ([UIScreen mainScreen].bounds.size.width)
//控件
@property (strong,nonatomic)UIDatePicker *dataPicker;
@property (strong,nonatomic)UIToolbar *toolbar;
//当前日期操作栏是否在显示
@property (assign,nonatomic)BOOL isShow;
//用于区别各种操作:开始时间(0) 结束时间(1) 无操作(-1)
@property (assign,nonatomic)int type;
2、初始化控件
这里将UIDataPicker和ToolBar都放在屏幕的底部,也就是刚好超过屏幕的底部边缘,手机看不到的地方
-(void)initDatePicker{
    if(nil == _dataPicker){
        //日期操作栏
        _dataPicker = [[UIDatePicker alloc]init];
        _dataPicker.frame = CGRectMake(0, mScreenHeight, mScreenWidth, 260);
        _dataPicker.contentMode = UIDatePickerModeDate;
        _dataPicker.minimumDate = [NSDate date];
        _dataPicker.backgroundColor = [UIColor lightGrayColor];
        _dataPicker.locale = [NSLocale localeWithLocaleIdentifier:@"zh"];
        //操作条
        _toolbar = [[UIToolbar alloc] init];
        _toolbar.frame = CGRectMake(0, mScreenHeight, mScreenWidth, 44);
        _toolbar.backgroundColor = [UIColor lightTextColor];
        UIBarButtonItem *cancel = [[UIBarButtonItem alloc] initWithTitle:@"取消" style:UIBarButtonItemStylePlain target:self action:@selector(closeTimeWithNoResult)];
        UIBarButtonItem *flexSpace = [[UIBarButtonItem alloc] initWithBarButtonSystemItem:UIBarButtonSystemItemFlexibleSpace target:nil action:nil];
        UIBarButtonItem *sure = [[UIBarButtonItem alloc] initWithTitle:@"确定" style:UIBarButtonItemStylePlain target:self action:@selector(toggleTimeWithResult)];
        _toolbar.items = @[cancel, flexSpace, sure];
        [self.view addSubview:_toolbar];
        [self.view addSubview:_dataPicker];
    }
}
3、开始时间和结束时间的点击事件
case 2:
    _type = 0;
    [self toggleTimeWithResult];
    break;
case 3:
    _type = 1;
    [self toggleTimeWithResult];
    break;
4、取消按钮的点击事件
#pragma 关闭日期操作栏
-(void)closeTimeWithNoResult{
    _type = -1;
    [self toggleTimeWithResult];
}
5、开启日期操作栏方法
现在所有的焦点都到了toggleTimeWithResult这个方法中了,它是开启日期操作栏的中间枢纽,直接通过计算高度,通过动画,从底部边缘弹出到我们需要的位置即可,关闭则返回到我们的屏幕底部去
#pragma 打开日期操作栏
-(void)toggleTimeWithResult{
    if(!_isShow){
        CGContextRef context = UIGraphicsGetCurrentContext();
        [UIView beginAnimations:nil context:context];
        [UIView setAnimationCurve:UIViewAnimationCurveEaseInOut];
        [UIView setAnimationDuration:0.6];
        self.dataPicker.frame = CGRectMake(0, mScreenHeight - 260 -64 -49, mScreenWidth, 260);
        self.toolbar.frame = CGRectMake(0, mScreenHeight-260-64-49-44, mScreenWidth, 44);
        [UIView setAnimationDelegate:self];
        [UIView setAnimationDidStopSelector:@selector(animationFinished)];
        [UIView commitAnimations];
    }else{
        CGContextRef context = UIGraphicsGetCurrentContext();
        [UIView beginAnimations:nil context:context];
        [UIView setAnimationCurve:UIViewAnimationCurveEaseInOut];
        [UIView setAnimationDuration:0.6];
        self.dataPicker.frame = CGRectMake(0, mScreenHeight, mScreenWidth, 260);
        self.toolbar.frame = CGRectMake(0, mScreenHeight, mScreenWidth, 44);
        [UIView setAnimationDelegate:self];
        [UIView setAnimationDidStopSelector:@selector(animationFinished)];
        [UIView commitAnimations];
    }
}
6、动画结束处理
#pragma 时间操作栏消失回调
-(void)animationFinished{
    //改变状态
    _isShow = !_isShow;
    //如果已经关闭了,就应该处理了,除非type=-1
    if(!_isShow){
        //获取DataPicker值,并赋值
        NSDate *date = self.dataPicker.date;
        NSDateFormatter *formatter = [[NSDateFormatter alloc]init];
        formatter.dateFormat = @"yyyy-MM-dd HH:mm:ss";
        if(_type == 0){
            _text_startTime = [formatter stringFromDate:date];
            _startTime.detailTextLabel.text = _text_startTime;
        }else if(_type == 1){
            _text_endTime = [formatter stringFromDate:date];
            _endtime.detailTextLabel.text = _text_endTime;
        }
    }
}
六、调用系统打电话
[[UIApplication sharedApplication]openURL:[NSURL URLWithString:@"tel://0753-18814383235" ]];七、调用系统发短信
系统发短信有两种方法,一种不可以自定义消息内容的,一种可以自定义消息内容的,这里介绍可以自定义消息内容的
1、导入库
#import <MessageUI/MessageUI.h>2、声明代理
@interface TC_SendPassword2 ()<MFMessageComposeViewControllerDelegate>3、实现代理方法
#pragma 发送短信的回调
-(void)messageComposeViewController:(MFMessageComposeViewController *)controller didFinishWithResult:(MessageComposeResult)result{
    [self dismissViewControllerAnimated:YES completion:nil];
    switch (result) {
        case MessageComposeResultSent:
            //信息传送成功
            break;
        case MessageComposeResultFailed:
            //信息传送失败
            break;
        case MessageComposeResultCancelled:
            //信息被用户取消传送
            break;
        default:
            break;
    }
}
4、提供发送短信的方法
#pragma mark - 发送短信方法
-(void)showMessageView:(NSArray *)phones title:(NSString *)title body:(NSString *)body
{
    if( [MFMessageComposeViewController canSendText] )
    {
        MFMessageComposeViewController * controller = [[MFMessageComposeViewController alloc] init];
        controller.recipients = phones;
        controller.navigationBar.tintColor = [UIColor redColor];
        controller.body = body;
        controller.messageComposeDelegate = self;
        [self presentViewController:controller animated:YES completion:nil];
        //修改短信界面标题
        [[[[controller viewControllers] lastObject] navigationItem] setTitle:title];

    }
    else
    {
        //弹窗
        UIAlertController *alert = [UIAlertController alertControllerWithTitle:@"提示信息" message:@"该设备不支持短信功能" preferredStyle: UIAlertControllerStyleAlert];
        UIAlertAction *sure = [UIAlertAction actionWithTitle:@"确定" style:UIAlertActionStyleDefault handler:nil];
        [alert addAction:sure];
        [self presentViewController:alert animated:YES completion:nil];
    }
}
5、发送短信
[self showMessageView:[NSArray arrayWithObjects:@"11位手机号码", nil] title:@"你好" body:@"你们好啊"];八、通过通讯录选择电话
1、导入库
#import <Contacts/Contacts.h>
#import <ContactsUI/ContactsUI.h>
2、声明代理
@interface TC_SendPassword2 ()<CNContactPickerDelegate>3、开启通讯录
CNContactPickerViewController * con = [[CNContactPickerViewController alloc]init];
con.delegate = self;
[self presentViewController:con animated:YES completion:nil];
4、选择通讯录后的回调
这里有通讯录中存在2个电话或者3个电话情况,存在这种情况的时候,我们通过弹窗,将其显示出来,供用户选择
#pragma 选择联系人回调
- (void)contactPicker:(CNContactPickerViewController *)picker didSelectContact:(CNContact *)contact{
    if(contact.phoneNumbers.count >1){
        //用户拥有两个号码以上
        //延时弹窗,这里必须延时,否则会报错
        dispatch_after(dispatch_time(DISPATCH_TIME_NOW, (int64_t)(1 * NSEC_PER_SEC)), dispatch_get_main_queue(), ^{
            [self alertSelectPhoneNumber:contact];
        });
    }else if(contact.phoneNumbers.count <= 0){
        //处理该用户没有存储电话号码的情况

    }else{
        //用户只有一个手机号码
        _phoneNumber = contact.phoneNumbers[0].value; // 电话号码
    }
}
5、两个号码或者三个号码的处理
#pragma 选择用户电话号码
-(void)alertSelectPhoneNumber:(CNContact *)contact{
    UIAlertController *alert = [UIAlertController alertControllerWithTitle:@"提醒" message:@"选择其中一个手机号" preferredStyle: UIAlertControllerStyleAlert];
    for (int i=0; i<contact.phoneNumbers.count; i++) {
        NSMutableString *message = [NSMutableString stringWithFormat:@"%@:%@",contact.phoneNumbers[i].label,contact.phoneNumbers[i].value.stringValue ];
        //changeStr是替代字符串的方法,常用的几个中文替代一下
        [self changeStr:message :@"_$!<" :@""];
        [self changeStr:message :@">!$_" :@""];
        //可以处理下英文,让用户更知道是什么意思
        //[self changeStr:message :@"Home" :@"住宅"];
        //[self changeStr:message :@"Work" :@"工作"];
        //[self changeStr:message :@"Mobile" :@"手机"];

        UIAlertAction *sure1 = [UIAlertAction actionWithTitle:message style:UIAlertActionStyleDefault handler:^(UIAlertAction * _Nonnull action) {
            //获取我们需要的电话号码
            _phoneNumber = contact.phoneNumbers[i].value;
        }];
        [alert addAction:sure1];
    }
    UIAlertAction *cancel = [UIAlertAction actionWithTitle:@"取消" style:UIAlertActionStyleDestructive handler:nil];
    [alert addAction:cancel];
    [self presentViewController:alert animated:YES completion:nil];
}

#pragma 替换字符串
-(NSMutableString *)changeStr:(NSMutableString *)mstr :(NSString *)search :(NSString *)replace{
    NSRange str = [mstr rangeOfString:search];
    while (str.location != NSNotFound) {
        [mstr replaceCharactersInRange:str withString:replace];
        str = [mstr rangeOfString:search];
    }
    return mstr;
}
6、效果展示
九、UITableViewController中的下拉刷新
UITableViewController自带了一个下拉刷新库,用起来十分简单
1、初始化
//下拉刷新
self.refreshControl = [[UIRefreshControl alloc]init];
self.refreshControl.attributedTitle = [[NSAttributedString alloc]initWithString:@"下拉刷新"];
//当调用ViewWillAppear时,取消当前选中条目的状态
self.clearsSelectionOnViewWillAppear = YES;
[self.refreshControl addTarget:self action:@selector(change) forControlEvents:UIControlEventValueChanged];
2、下拉刷新处理事件
#pragma 下拉刷新
-(void)change{
    self.refreshControl.attributedTitle =[[NSAttributedString alloc]initWithString:@"正在刷新中"];
    //下面是你们的处理事件逻辑

}
3、当下拉刷新结束时,取消下拉刷新
//取消下拉刷新
if([self.refreshControl isRefreshing]){
    [self.refreshControl endRefreshing];
    //改回文字
    self.refreshControl.attributedTitle = [[NSAttributedString alloc]initWithString:@"下拉刷新"];
}
4、效果图


 被折叠的 条评论
为什么被折叠?
被折叠的 条评论
为什么被折叠?
 到【灌水乐园】发言


