原文:http://blog.csdn.net/tyk0910/article/details/51355026
感觉本文写的不错。主要为了做个笔记。欢迎大家访问原文链接
这篇博客主要是从BaseActivity与BaseFragment的封装开始,总结自己在实战开发中关于Fragment的注意事项以及心得体会。先看以下效果图:
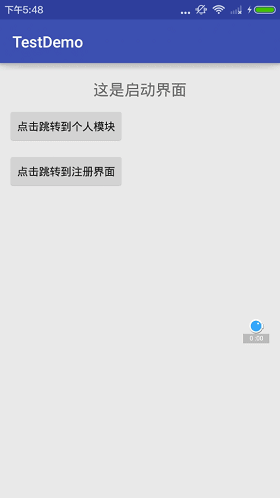
这里模拟的是用户登录模块,你可能会说,很普通的效果嘛,这有啥。嘿嘿,那我要告诉你的是,这么多模块仅仅由两个Activity构成的。等你从头到尾看完这篇博客,你就会惊叹其中的奥秘了。废话不多说,开始。
多模块Activity+多Fragment
开发APP非常适合的架构,相对于多Activity,这种架构APP占用内存降低,性能提升;相对于单Activity+多Fragment,这种开发起来逻辑相对简单,不容易出错。
对于多模块Activity+多Fragment,这里有两个概念需要我们了解一下
同级式Fragment: 比如QQ的主界面,消息,联系人,动态,这三个Fragment就属于同级关系,我们平时项目中主界面的Fragment也是属于同级Fragment
流程式Fragment: 比如我这个示例Demo,可以理解为用户账户流程,可以包括:登录/注册模块—-忘记/找回密码模块—-用户协议模块,这些Fragent就是属于流程式Fragment
我的示例Demo使用的是流程式Fragment,结合今天的主题—-BaseActivity与BaseFragment的封装,我们一探究竟。
1.BaseActivity的封装:
public abstract class BaseActivity extends AppCompatActivity {
protected abstract int getContentViewId();
protected abstract int getFragmentContentId();
protected void addFragment(BaseFragment fragment) {
if (fragment != null) {
getSupportFragmentManager().beginTransaction()
.replace(getFragmentContentId(), fragment, fragment.getClass().getSimpleName())
.addToBackStack(fragment.getClass().getSimpleName())
.commitAllowingStateLoss();
}
}
protected void removeFragment() {
if (getSupportFragmentManager().getBackStackEntryCount() > 1) {
getSupportFragmentManager().popBackStack();
} else {
finish();
}
}
@Override
public boolean onKeyDown(int keyCode, KeyEvent event) {
if (KeyEvent.KEYCODE_BACK == keyCode) {
if (getSupportFragmentManager().getBackStackEntryCount() == 1) {
finish();
return true;
}
}
return super.onKeyDown(keyCode, event);
}
}
- 1
- 2
- 3
- 4
- 5
- 6
- 7
- 8
- 9
- 10
- 11
- 12
- 13
- 14
- 15
- 16
- 17
- 18
- 19
- 20
- 21
- 22
- 23
- 24
- 25
- 26
- 27
- 28
- 29
- 30
- 31
- 32
- 33
- 34
- 35
- 36
- 37
- 38
- 39
- 1
- 2
- 3
- 4
- 5
- 6
- 7
- 8
- 9
- 10
- 11
- 12
- 13
- 14
- 15
- 16
- 17
- 18
- 19
- 20
- 21
- 22
- 23
- 24
- 25
- 26
- 27
- 28
- 29
- 30
- 31
- 32
- 33
- 34
- 35
- 36
- 37
- 38
- 39
(1)两个必须实现的抽象方法,获取布局文件Layout的resource ID,获取布局文件中Fragment的ID
(2)添加fragment:开启一个事物,替换了当前layout容器中的由getFragmentContentId()标识的fragment。通过调用 addToBackStack(String tag), replace事务被保存到back stack, 因此用户可以回退事务,并通过按下BACK按键带回前一个fragment,如果没有调用 addToBackStack(String tag), 那么当事务提交后, 那个fragment会被销毁,并且用户不能导航回到它。其中参数tag将作为本次加入BackStack的Transaction的标志。commitAllowingStateLoss(),这种提交是允许发生异常时状态值丢失的情况下也能正常提交事物。
(3)移除fragment:与addToBackStack()相对应的接口方法是popBackStack(),调用该方法后会将事务操作插入到FragmentManager的操作队列,轮询到该事务时开始执行。这里进行了一下判断,获取回退栈中所有事务数量,大于1的时候,执行回退操作,等于1的时候,代表当前Activity只剩下一个Fragment,直接finish()当前Activity即可
(4)监听返回键的返回事件,当事务数量等于1的时候,直接finish()
2.BaseActivity的进一步封装—-AppActivity:
/**
* Created by tangyangkai on 16/5/4.
*/
public abstract class AppActivity extends BaseActivity {
protected abstract BaseFragment getFirstFragment();
protected void handleIntent(Intent intent) {
}
@Override
protected void onCreate(Bundle savedInstanceState) {
super.onCreate(savedInstanceState);
setContentView(getContentViewId());
if (null != getIntent()) {
handleIntent(getIntent());
}
if (null == getSupportFragmentManager().getFragments()) {
BaseFragment firstFragment = getFirstFragment();
if (null != firstFragment) {
addFragment(firstFragment);
}
}
}
@Override
protected int getContentViewId() {
return R.layout.activity_base;
}
@Override
protected int getFragmentContentId() {
return R.id.fragment_container;
}
}
- 1
- 2
- 3
- 4
- 5
- 6
- 7
- 8
- 9
- 10
- 11
- 12
- 13
- 14
- 15
- 16
- 17
- 18
- 19
- 20
- 21
- 22
- 23
- 24
- 25
- 26
- 27
- 28
- 29
- 30
- 31
- 32
- 33
- 34
- 35
- 36
- 37
- 38
- 39
- 40
- 1
- 2
- 3
- 4
- 5
- 6
- 7
- 8
- 9
- 10
- 11
- 12
- 13
- 14
- 15
- 16
- 17
- 18
- 19
- 20
- 21
- 22
- 23
- 24
- 25
- 26
- 27
- 28
- 29
- 30
- 31
- 32
- 33
- 34
- 35
- 36
- 37
- 38
- 39
- 40
(1)一个必须实现的抽象方法来获取当前Activity应该显示的第一个Fragment
(2)获取intent的方法,在需要传递或者接受数据的中Activity实现
(3)在Activity的onCreate()方法中拿到intent,并且添加第一个fragment作为Activity的主界面进行显示
最后贴一下activity_base.xml布局文件代码:
<?xml version="1.0" encoding="utf-8"?>
<RelativeLayout xmlns:android="http://schemas.android.com/apk/res/android"
    xmlns:tools="http://schemas.android.com/tools"
    android:id="@+id/fragment_container"
    android:layout_width="match_parent"
    android:layout_height="match_parent"
    tools:context=".BaseActivity">
</RelativeLayout>
3.BaseFragment的封装:
/**
* Created by tangyangkai on 16/5/4.
*/
public abstract class BaseFragment extends Fragment {
protected BaseActivity mActivity;
protected abstract void initView(View view, Bundle savedInstanceState);
protected abstract int getLayoutId();
protected BaseActivity getHoldingActivity() {
return mActivity;
}
@Override
public void onAttach(Activity activity) {
super.onAttach(activity);
this.mActivity = (BaseActivity) activity;
}
protected void addFragment(BaseFragment fragment) {
if (null != fragment) {
getHoldingActivity().addFragment(fragment);
}
}
protected void removeFragment() {
getHoldingActivity().removeFragment();
}
@Override
public View onCreateView(LayoutInflater inflater, ViewGroup container, Bundle savedInstanceState) {
View view = inflater.inflate(getLayoutId(), container, false);
initView(view, savedInstanceState);
return view;
}
}
- 1
- 2
- 3
- 4
- 5
- 6
- 7
- 8
- 9
- 10
- 11
- 12
- 13
- 14
- 15
- 16
- 17
- 18
- 19
- 20
- 21
- 22
- 23
- 24
- 25
- 26
- 27
- 28
- 29
- 30
- 31
- 32
- 33
- 34
- 35
- 36
- 37
- 38
- 39
- 40
- 41
- 42
- 43
- 1
- 2
- 3
- 4
- 5
- 6
- 7
- 8
- 9
- 10
- 11
- 12
- 13
- 14
- 15
- 16
- 17
- 18
- 19
- 20
- 21
- 22
- 23
- 24
- 25
- 26
- 27
- 28
- 29
- 30
- 31
- 32
- 33
- 34
- 35
- 36
- 37
- 38
- 39
- 40
- 41
- 42
- 43
为了方便后面文章的介绍,先补充一种情况:
安卓有一种特殊情况,就是在APP运行在后台的时候,系统资源紧张的时候会把APP的资源全部回收(杀死APP的进程),这时候把APP再从后台返回到前台的时候,APP会重启。
鸿洋大哥的博客有相关记录: Android Fragment 你应该知道的一切
这种内存不足的情况会导致许多问题,其中之一就是Fragment调用getActivity()的地方却返回null,报了空指针异常。解决办法就是在Fragment基类里设置一个Activity mActivity的全局变量,在onAttach(Activity activity)里赋值,使用mActivity代替getActivity()。其他的代码注释很详细,大家一看便懂。
4.Activity与Fragment的使用:
BaseActivity与BaseFragment的封装都已经完成,接下来就是具体在项目中的使用了,这里分两种情况。
第一种情况:不接收数据的Activity
/**
 * Created by tangyangkai on 16/5/10.
 */
public class MainActivity extends AppActivity {

    @Override
    protected BaseFragment getFirstFragment() {
        return MainFragment.newInstance();
    }
}
示例Demo中的主界面MainActivity,没有接收其他界面传递过来的数据。可以看到代码相当的精简,对应的MainFragment代码如下:
public class MainFragment extends BaseFragment {

    private Button mainBtn, mainSecondBtn;

    public static MainFragment newInstance() {
        return new MainFragment();
    }


    @Override
    protected void initView(View view, Bundle savedInstanceState) {
        mainBtn = (Button) view.findViewById(R.id.main_btn);
        mainBtn.setOnClickListener(new View.OnClickListener() {
            @Override
            public void onClick(View v) {
                Bundle data = new Bundle();
                data.putString("username", "tangyankai");
                Intent intent = new Intent(getActivity(), LoginActivity.class);
                intent.putExtras(data);
                startActivity(intent);

            }
        });

        mainSecondBtn = (Button) view.findViewById(R.id.main_second_btn);
        mainSecondBtn.setOnClickListener(new View.OnClickListener() {
            @Override
            public void onClick(View v) {
                addFragment(SecondFragment.newInstance("从首界面跳转过来的"));
            }
        });
    }

    @Override
    protected int getLayoutId() {
        return R.layout.fragment_main;
    }
}
- 1
- 2
- 3
- 4
- 5
- 6
- 7
- 8
- 9
- 10
- 11
- 12
- 13
- 14
- 15
- 16
- 17
- 18
- 19
- 20
- 21
- 22
- 23
- 24
- 25
- 26
- 27
- 28
- 29
- 30
- 31
- 32
- 33
- 34
- 35
- 36
- 37
- 38
- 1
- 2
- 3
- 4
- 5
- 6
- 7
- 8
- 9
- 10
- 11
- 12
- 13
- 14
- 15
- 16
- 17
- 18
- 19
- 20
- 21
- 22
- 23
- 24
- 25
- 26
- 27
- 28
- 29
- 30
- 31
- 32
- 33
- 34
- 35
- 36
- 37
- 38
很简单的业务逻辑,点击第一个按钮,携带数据,跳转到LoginActivity;点击第二个按钮,跳转到注册模块,这里故意添加了一个参数,这里后面会说到。
第二种情况:接收数据的Activity
/**
 * Created by tangyangkai on 16/5/10.
 */
public class LoginActivity extends AppActivity {

    private String username;
    @Override
    protected void handleIntent(Intent intent) {
        super.handleIntent(intent);
        Bundle bundle = intent.getExtras();
        if (null != bundle) {
            username = bundle.getString("username");
        }
    }

    @Override
    protected BaseFragment getFirstFragment() {
        return FirstFragment.newInstance(username);
    }

}
- 1
- 2
- 3
- 4
- 5
- 6
- 7
- 8
- 9
- 10
- 11
- 12
- 13
- 14
- 15
- 16
- 17
- 18
- 19
- 20
- 21
- 1
- 2
- 3
- 4
- 5
- 6
- 7
- 8
- 9
- 10
- 11
- 12
- 13
- 14
- 15
- 16
- 17
- 18
- 19
- 20
- 21
可以看到,LoginActivity与MainActivity不一样的是,重写了handleIntent()这个方法来获取传递过来的数据,更加重要的一点,创建Fragment的时候传递了一个参数 这是为什么呢,先来看看fragment的代码你就知道了
/**
 * Created by tangyangkai on 16/5/10.
 */
public class FirstFragment extends BaseFragment {
    @Override
    protected int getLayoutId() {
        return R.layout.fragment_first;
    }

    public static String FIRST_FRAGMENT = "first_fragment";
    private String msg;
    private EditText usernameEdt;
    private TextView registerTxt, promiseTxt;
    private ImageView backImg;

    public static FirstFragment newInstance(String msg) {
        FirstFragment fragment = new FirstFragment();
        Bundle bundle = new Bundle();
        bundle.putSerializable(FIRST_FRAGMENT, msg);
        fragment.setArguments(bundle);
        return fragment;
    }

    @Override
    public void onCreate(Bundle savedInstanceState) {
        super.onCreate(savedInstanceState);
        if (null != getArguments()) {
            msg = (String) getArguments().getSerializable(FIRST_FRAGMENT);
        }
    }

    @Override
    protected void initView(View view, Bundle savedInstanceState) {
        usernameEdt = (EditText) view.findViewById(R.id.username_edt);
        usernameEdt.setText(msg);
        registerTxt = (TextView) view.findViewById(R.id.register_txt);
        registerTxt.setOnClickListener(new View.OnClickListener() {
            @Override
            public void onClick(View v) {
                addFragment(SecondFragment.newInstance("从登录界面跳转过来的"));
            }
        });

        backImg = (ImageView) view.findViewById(R.id.first_back);
        backImg.setOnClickListener(new View.OnClickListener() {
            @Override
            public void onClick(View v) {
                removeFragment();
            }
        });

        promiseTxt = (TextView) view.findViewById(R.id.promise_txt);
        promiseTxt.setOnClickListener(new View.OnClickListener() {
            @Override
            public void onClick(View v) {
                addFragment(ThirdFragment.newInstance());
            }
        });

    }


}
- 1
- 2
- 3
- 4
- 5
- 6
- 7
- 8
- 9
- 10
- 11
- 12
- 13
- 14
- 15
- 16
- 17
- 18
- 19
- 20
- 21
- 22
- 23
- 24
- 25
- 26
- 27
- 28
- 29
- 30
- 31
- 32
- 33
- 34
- 35
- 36
- 37
- 38
- 39
- 40
- 41
- 42
- 43
- 44
- 45
- 46
- 47
- 48
- 49
- 50
- 51
- 52
- 53
- 54
- 55
- 56
- 57
- 58
- 59
- 60
- 61
- 62
- 63
代码不少,我们先挑重点讲:
    public static FirstFragment newInstance(String msg) {
        FirstFragment fragment = new FirstFragment();
        Bundle bundle = new Bundle();
        bundle.putSerializable(FIRST_FRAGMENT, msg);
        fragment.setArguments(bundle);
        return fragment;
    }

    @Override
    public void onCreate(Bundle savedInstanceState) {
        super.onCreate(savedInstanceState);
        if (null != getArguments()) {
            msg = (String) getArguments().getSerializable(FIRST_FRAGMENT);
        }
    }
给Fragment添加newInstance方法,将需要的参数传入,设置到bundle中,然后setArguments(bundle),最后在onCreate中进行获取。
这种使用arguments来创建Fragment的方法,强烈推荐使用:
(1)这样就完成了Fragment和Activity间的解耦,使用Fragment的一个很大的原因,就是为了复用。这一点在我主界面点击第二个按钮跳转到注册界面有所体现
(2)对Fragment传递数据,建议使用setArguments(Bundle args),而后在onCreate中使用getArguments()取出,在 内存不足导致异常时,系统会帮你保存数据,不会造成数据的丢失。和Activity的Intent原理一致。
(3)使用newInstance(参数) 创建Fragment对象,优点是调用者只需要关系传递的哪些数据,而无需关心传递数据的Key是什么。
参考资料:
鸿洋大哥: Android Fragment 你应该知道的一切
Fragment系列: Fragment全解析系列(二):正确的使用姿势
然后就是业务逻辑:
(1)点击注册按钮,跳转到注册模块,注意这里我传递了一个和主界面不一样的参数,为了区分,并且都在注册模块进行了显示。你会发现,示例Demo中,点击登录模块的注册按钮与点击首界面的注册按钮跳转到注册模块时候,显示的文字不一样。这里纯属演示,实际项目中,我们可以根据传递的不同参数,对Fragment进行不一样的操作,显示不一样的数据。达到最大程度的Fragment复用!
(2)点击返回按钮,一句话就帮你搞定,轻松返回上一个界面:
当然,点击手机返回键效果也是一样的
(3)点击用户协议按钮,跳转到用户协议模块。
至于其他的界面大同小异,你可以加上 忘记密码/修改密码 等模块,完全没问题。关于流程式Fragment,就先到这里,看看同级式Fragment应该注意的问题。
5.hide()与show()导致的Fragment重叠:
同级式Fragment在内存不足导致的异常情况下,会出现重叠现象,处理方法是在基类Activity的onCreate函数,先去判断savedInstanceState是否为null,如果不为null,则表示里面有保存这个fragment。则不再重新去add这个fragment,而是通过Tag从前保存的数据中直接去读取,看一下代码:
在add的时候,加上一个tab参数
transaction.add(R.id.content, IndexFragment,”fg1″)
public void onCreate(Bundle savedInstanceState) {
    fManager = getFragmentManager();
    if (savedInstanceState != null) {
        fg1 = (AllOfficialAccountFragment) fManager.findFragmentByTag("fg1");
        fg2 = (MovieOfficialAccountFragment) fManager.findFragmentByTag("fg2");
        fg3 = (NewsOfficialAccountFragment) fManager.findFragmentByTag("fg3");
        fg4 = (OtherOfficialAccountFragment) fManager.findFragmentByTag("fg4");
    }
    super.onCreate(savedInstanceState);
}
到这里,BaseActivity与BaseFragment的封装已经结束了,这只是最最最基础的封装,大家可以把一些常用的方法封装到基类当中,让基类Activity与Fragment发挥最大程度的作用。
当然,业务逻辑简单的界面,一个Activity就可以搞定的那种,那就没必要使用这种方法了。这里把自己封装过程中关于Fragment的一些心得记录下来。关于Fragment的深度解析与其他注意事项,大家可以参考刚才给出的资料。
源码下载


 848
848


 被折叠的 条评论
为什么被折叠?
被折叠的 条评论
为什么被折叠?
 到【灌水乐园】发言


