


原文地址,转载请注明出处: http://blog.csdn.net/qq_34021712/article/details/72770223 ©王赛超
本地安装Maven:参考博客《本地Maven安装教程》
搭建过程
①下载最新版 Nexus(本教程使用的是:nexus-2.11.2-03-bundle.tar.gz),下载地址:http://www.sonatype.org/nexus/go/# wget https://sonatype-download.global.ssl.fastly.net/nexus/oss/nexus-2.11.2-03-bundle.tar.gz
②解压
# mkdir nexus
# tar -zxvf nexus-2.11.2-03-bundle.tar.gz -C nexus
# cd nexus
# ls
nexus-2.11.2-03 sonatype-work
(一个 nexus 服务,一个私有库目录)
③编辑 Nexus 的 nexus.properties 文件,配置端口和 work 目录信息(保留默认)
# cd nexus-2.11.2-03
# ls
bin conf lib LICENSE.txt logs nexus NOTICE.txt tmp
查看目录结构,jetty 运行
# cd conf
# vi nexus.properties
# Jetty section
application-port=8081
application-host=0.0.0.0
nexus-webapp=${bundleBasedir}/nexus
nexus-webapp-context-path=/nexus
# Nexus section
nexus-work=${bundleBasedir}/../sonatype-work/nexus
runtime=${bundleBasedir}/nexus/WEB-INF
④编辑 nexus 脚本, 配置 RUN_AS_USER 参数(不改启动报错)
# vi /root/nexus/nexus-2.11.2-03/bin/nexus
#RUN_AS_USER=
改为:
RUN_AS_USER=root
⑤防火墙中打开 8081 端口
# vi /etc/sysconfig/iptables
添加:
-A INPUT -m state --state NEW -m tcp -p tcp --dport 8081 -j ACCEPT
保存后重启防火墙
# service iptables restart
⑥启动 nexus
# /root/nexus/nexus-2.11.2-03/bin/nexus start
****************************************
WARNING - NOT RECOMMENDED TO RUN AS ROOT
****************************************
Starting Nexus OSS...
Started Nexus OSS.
⑦浏览器中打开:http://192.168.17.168:8081/nexus/

⑧登录,默认用户名 admin,默认密码 admin123:

到此,Nexus 已安装完成,接下来是 Nexus 的配置
Nexus 配 置 (登录 后)
①如果忘记密码,可以以下方式找回密码停止nexus服务,修改/root/nexus/sonatype-work/nexus/conf/security.xml
id为admin的账号密码为f865b53623b121fd34ee5426c792e5c33af8c227
②用户修改密码

③仓库类型介绍

group 仓库组:Nexus 通过仓库组的概念统一管理多个仓库,这样我们在项目中直接请求仓库组即可请求到仓库组管理的多个仓库;
hosted : 宿主仓库:主要用于发布内部项目构件或第三方的项目构件(如购买商业的构件)以及无法从公共仓库获取的构件(如 oracle 的 JDBC 驱动)
proxy 代理仓库:代理公共的远程仓库;
virtual 虚拟仓库:用于适配 Maven 1;
一般用到的仓库种类是 hosted、proxy
Hosted 仓库常 用类 型 说明:
releases 内部的模块中 release 模块的发布仓库
snapshots 发布内部的 SNAPSHOT 模块的仓库
3rd party 第三方依赖的仓库,这个数据通常是由内部人员自行下载之后发布上去
如果构建的 Maven 项目本地仓库没有对应的依赖包,那么就会去 Nexus 私服去下载,
如果 Nexus 私服也没有此依赖包,就回去远程中央仓库下载依赖,这些中央仓库就是 proxy 。
Nexus 私服下载成功后再下载至本地 Maven 库供项目引用。
④设置 proxy 代理仓库(Apache Snapshots/Central/Codehaus Snapshots)准许远程下载(三个proxy都需要设置)

⑤Maven本地库的安装与配置,然后修改settings.xml
<?xml version="1.0" encoding="UTF-8"?>


<settings xmlns="http://maven.apache.org/SETTINGS/1.0.0"
          xmlns:xsi="http://www.w3.org/2001/XMLSchema-instance"
          xsi:schemaLocation="http://maven.apache.org/SETTINGS/1.0.0 http://maven.apache.org/xsd/settings-1.0.0.xsd">
	<!--本地仓库位置-->
	<localRepository>D:\maven\repository</localRepository>
	<interactiveMode>true</interactiveMode>
    <offline>false</offline>
    <pluginGroups>
        <pluginGroup>org.mortbay.jetty</pluginGroup>
        <pluginGroup>org.jenkins-ci.tools</pluginGroup>
    </pluginGroups>

	<!--配置权限,使用默认用户-->
	<servers>
		<server>
			<id>nexus-releases</id>
			<username>deployment</username>
			<password>deployment123</password>
		</server>
		<server>
			<id>nexus-snapshots</id>
			<username>deployment</username>
			<password>deployment123</password>
		</server>
	</servers>


    <mirrors>


    </mirrors>


	<profiles>
		<profile>
		   <id>test</id>
			    <activation>
                    <activeByDefault>false</activeByDefault>
                    <jdk>1.7</jdk>
                </activation>
			    <repositories>
					<!-- 私有库地址-->
				    <repository>
						<id>nexus</id>
						<url>http://192.168.17.168:8081/nexus/content/groups/public/</url>
						<releases>
							<enabled>true</enabled>
						</releases>
						<snapshots>
							<enabled>true</enabled>
						</snapshots>
					</repository>
				</repositories>
				<pluginRepositories>
					<!--插件库地址-->
					<pluginRepository>
						<id>nexus</id>
						<url>http://192.168.17.168:8081/nexus/content/groups/public/</url>
						<releases>
							<enabled>true</enabled>
						</releases>
						<snapshots>
							<enabled>true</enabled>
					   </snapshots>
					</pluginRepository>
				</pluginRepositories>
			</profile>
	</profiles>

	<!--激活profile-->
	<activeProfiles>
		<activeProfile>test</activeProfile>
	</activeProfiles>
</settings>
⑥在myeclipse中,配置settings.xml 如果没有用旧的settings.xml 新建了一个,还需要点击下面那个Update Settings按钮

⑦项目的构建与发布,修改项目的 pom.xml 中的私有库地址
<!-- 定义私有库位置 -->
<distributionManagement>
	<repository>
		<id>nexus-releases</id>
		<name>Nexus Release Repository</name>
		<url>http://192.168.17.168:8081/nexus/content/repositories/releases/</url>
	</repository>
	<snapshotRepository>
		<id>nexus-snapshots</id>
		<name>Nexus Snapshot Repository</name>
		<url>http://192.168.17.168:8081/nexus/content/repositories/snapshots/</url>
	</snapshotRepository>
</distributionManagement>
⑧项目的构建与发布演示


执行上图操作,报下面的错误.
-Dmaven.multiModuleProjectDirectory system propery is not set. Check $M2_HOME environment variable and mvn script match.
原因是maven与我的myeclipse不兼容,我使用myeclipse自带的maven版本

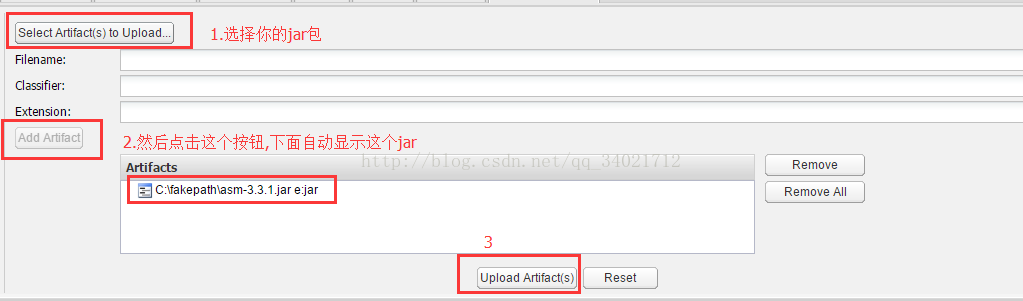
⑨上传第三方jar包
随便拿一个jar包,假装中央仓库没有这个jar,要把它上传到私有仓库。


 85
85


 被折叠的 条评论
为什么被折叠?
被折叠的 条评论
为什么被折叠?
 到【灌水乐园】发言


