


转载请注明出处:(http://blog.csdn.net/qq_35071078/article/details/72859905)
我们都知道,android最上层的view是一个DecorView,它下面又会有多种不同的ViewGroup(具体是一个什么样子的View,那是activity根据我们定义的属性来自动加载布局的),而我们写的布局就会加载到DecorView的某个子View下。刚好最近闲着,准备自己看一看android的view层次,于是乎,我用递归打印出了一个activity中的View层次。发现DecorView下总是会有一个ViewStub,
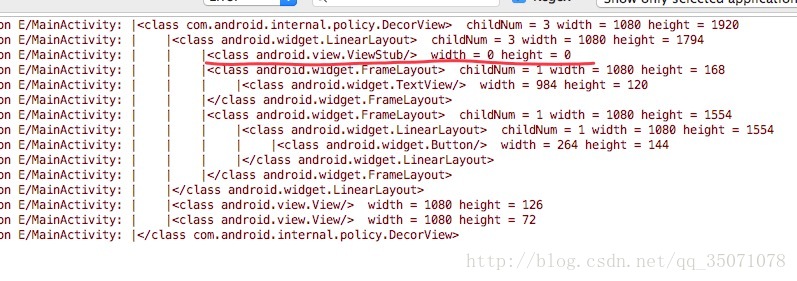
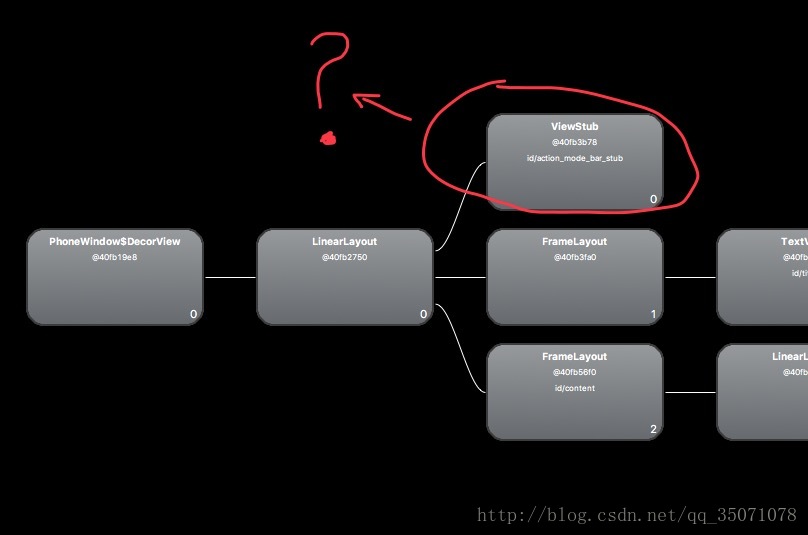
第一反应这个ViewStub应该是加载ActionBar的,但是发现ActionBar有它自己的布局,那么这个ViewStub到底是干嘛的?在翻阅各大论坛和博客以及stackoverflow之后,终于知道这里的ViewStub是干啥的了,所以写一篇博客总结一下。
大家如果想了解view是怎么加载出来的可以看看泓洋大神的 Android 源码解析 之 setContentView写的很清晰的
ActionMode 是什么?
官方的解释是:表示用户界面的上下文模式。动作模式可用于提供替代交互模式和取代正常的UI部件直到完成。良好的动作模式的实例包括文本选择和上下文动作。
通俗点讲,它就是android里一种menu的方式,方式有很多,其他的我就不说了,我只说ActionMode,ActionMode是临时占据了ActionBar的位置的一个menu。这样就知道这个ViewStub是干啥的了,就是用来加载我们的菜单的。
ActionMode 怎么用?
只需要在activity里调用 startActionMode(Callback callback)这个方法就可以了。
例如我这里实例化了一个Callback:
private ActionMode.Callback mCallback = new ActionMode.Callback() {

        @Override
        public boolean onPrepareActionMode(ActionMode mode, Menu menu) {
            return false;
        }

        @Override
        public void onDestroyActionMode(ActionMode mode) {
            // TODO Auto-generated method stub
        }

        @Override
        public boolean onCreateActionMode(ActionMode mode, Menu menu) {
            MenuInflater inflater = mode.getMenuInflater();
            inflater.inflate(R.menu.actionmode, menu);
            return true;
        }

        @Override
        public boolean onActionItemClicked(ActionMode mode, MenuItem item) {
            boolean ret = false;
            if (item.getItemId() == R.id.actionmode_cancel) {
                mode.finish();
                ret = true;
            }
            return ret;
        }
    };
然后在需要的地方调用:
startActionMode(mCallback)就ok了,activity会在适当的时候回调一个方法:
    @Nullable
    @Override
    public ActionMode onWindowStartingActionMode(ActionMode.Callback callback) {
        return super.onWindowStartingActionMode(callback);
    }
类似这样:
startActionMode的实现过程
首先,我是在API 23上进行分析的,而且我查看的源码不是supportv7下的源码。就是普通的activity。关于如何查看源码,大家可以查看这篇博客源码查看方法
我们进入到activity中的startActionMode这个方法:
    @Nullable
    public ActionMode startActionMode(ActionMode.Callback callback) {
        return mWindow.getDecorView().startActionMode(callback);
    }
发现它是调用了DecorView的startActionMode,我们进入到这个方法:
@Override
    public ActionMode startActionModeForChild(View originalView,
            ActionMode.Callback callback) {
        return startActionModeForChild(originalView, callback, ActionMode.TYPE_PRIMARY);
    }
    @Override
    public ActionMode startActionModeForChild(
            View child, ActionMode.Callback callback, int type) {
        return startActionMode(child, callback, type);
    }
    @Override
    public ActionMode startActionMode(ActionMode.Callback callback) {
        return startActionMode(callback, ActionMode.TYPE_PRIMARY);
    }
    @Override
    public ActionMode startActionMode(ActionMode.Callback callback, int type) {
        return startActionMode(this, callback, type);
    }
    private ActionMode startActionMode(
            View originatingView, ActionMode.Callback callback, int type) {
            //最终会调用这个方法
        ActionMode.Callback2 wrappedCallback = new ActionModeCallback2Wrapper(callback);
        ActionMode mode = null;
        if (mWindow.getCallback() != null && !mWindow.isDestroyed()) {
            try {
                mode = mWindow.getCallback().onWindowStartingActionMode(wrappedCallback, type);
            } catch (AbstractMethodError ame) {
                // Older apps might not implement the typed version of this method.
                if (type == ActionMode.TYPE_PRIMARY) {
                    try {
                        mode = mWindow.getCallback().onWindowStartingActionMode(
                                wrappedCallback);
                    } catch (AbstractMethodError ame2) {
                        // Older apps might not implement this callback method at all.
                    }
                }
            }
        }
        if (mode != null) {
            if (mode.getType() == ActionMode.TYPE_PRIMARY) {
                cleanupPrimaryActionMode();
                mPrimaryActionMode = mode;
            } else if (mode.getType() == ActionMode.TYPE_FLOATING) {
                if (mFloatingActionMode != null) {
                    mFloatingActionMode.finish();
                }
                mFloatingActionMode = mode;
            }
        } else {
            mode = createActionMode(type, wrappedCallback, originatingView);
            if (mode != null && wrappedCallback.onCreateActionMode(mode, mode.getMenu())) {
                setHandledActionMode(mode);
            } else {
                mode = null;
            }
        }
        if (mode != null && mWindow.getCallback() != null && !mWindow.isDestroyed()) {
            try {
                mWindow.getCallback().onActionModeStarted(mode);
            } catch (AbstractMethodError ame) {
                // Older apps might not implement this callback method.
            }
        }
        return mode;
    }
其他的不用管,看这一句:
mode = mWindow.getCallback().onWindowStartingActionMode(wrappedCallback, type);这里的mWindow.getCallback()实际上就是activity,因为activity实现了这个接口,所以这个地方就会执行到了前面说的activity里面的onWindowStartingActionMode(wrappedCallback, type)。那么再在activity中来查看这个方法:
    @Nullable
    @Override
    public ActionMode onWindowStartingActionMode(ActionMode.Callback callback) {
        // Only Primary ActionModes are represented in the ActionBar.
        if (mActionModeTypeStarting == ActionMode.TYPE_PRIMARY) {
            initWindowDecorActionBar();
            if (mActionBar != null) {
                return mActionBar.startActionMode(callback);
            }
        }
        return null;
    }
这里有 initWindowDecorActionBar(),看名字就知道大致的意思了,是用来初始化DecorActionBar的。
    private void initWindowDecorActionBar() {
        Window window = getWindow();

        // Initializing the window decor can change window feature flags.
        // Make sure that we have the correct set before performing the test below.
        window.getDecorView();

        if (isChild() || !window.hasFeature(Window.FEATURE_ACTION_BAR) || mActionBar != null) {
            return;
        }

        mActionBar = new WindowDecorActionBar(this);
        mActionBar.setDefaultDisplayHomeAsUpEnabled(mEnableDefaultActionBarUp);

        mWindow.setDefaultIcon(mActivityInfo.getIconResource());
        mWindow.setDefaultLogo(mActivityInfo.getLogoResource());
    }
在initWindowDecorActionBar()方法之后,activity会调用mActionBar.startActionMode(callback),那么刚好这里有实例化了mActionBar.
mActionBar = new WindowDecorActionBar(this);所以说最终就是通过WindowDecorActionBar来完成相应的操作了。那么在去看看这个类里的方法:
    public ActionMode startActionMode(ActionMode.Callback callback) {
        if (mActionMode != null) {
            mActionMode.finish();
        }
        mOverlayLayout.setHideOnContentScrollEnabled(false);
        mContextView.killMode();
        ActionModeImpl mode = new ActionModeImpl(mContextView.getContext(), callback);
        if (mode.dispatchOnCreate()) {
            // This needs to be set before invalidate() so that it calls
            // onPrepareActionMode()
            mActionMode = mode;
            mode.invalidate();
            mContextView.initForMode(mode);
            animateToMode(true);
            if (mSplitView != null && mContextDisplayMode == CONTEXT_DISPLAY_SPLIT) {
                // TODO animate this
                if (mSplitView.getVisibility() != View.VISIBLE) {
                    mSplitView.setVisibility(View.VISIBLE);
                    if (mOverlayLayout != null) {
                        mOverlayLayout.requestApplyInsets();
                    }
                }
            }
            mContextView.sendAccessibilityEvent(AccessibilityEvent.TYPE_WINDOW_STATE_CHANGED);
            return mode;
        }
        return null;
    }
这里有个方法 animateToMode(true);肯定是对布局进行一些操作,进去看看:
    void animateToMode(boolean toActionMode) {
        if (toActionMode) {
            showForActionMode();
        } else {
            hideForActionMode();
        }
        if (shouldAnimateContextView()) {
            Animator fadeIn, fadeOut;
            if (toActionMode) {
                fadeOut = mDecorToolbar.setupAnimatorToVisibility(View.GONE,
                        FADE_OUT_DURATION_MS);
                fadeIn = mContextView.setupAnimatorToVisibility(View.VISIBLE,
                        FADE_IN_DURATION_MS);
            } else {
                fadeIn = mDecorToolbar.setupAnimatorToVisibility(View.VISIBLE,
                        FADE_IN_DURATION_MS);
                fadeOut = mContextView.setupAnimatorToVisibility(View.GONE,
                        FADE_OUT_DURATION_MS);
            }
            AnimatorSet set = new AnimatorSet();
            set.playSequentially(fadeOut, fadeIn);
            set.start();
        } else {
            if (toActionMode) {
                mDecorToolbar.setVisibility(View.GONE);
                mContextView.setVisibility(View.VISIBLE);
            } else {
                mDecorToolbar.setVisibility(View.VISIBLE);
                mContextView.setVisibility(View.GONE);
            }
        }
        // mTabScrollView's visibility is not affected by action mode.
    }
这里有两个方法:showForActionMode(); hideForActionMode();一看就是用来隐藏或者显示布局的
    private void showForActionMode() {
        if (!mShowingForMode) {
            mShowingForMode = true;
            if (mOverlayLayout != null) {
                mOverlayLayout.setShowingForActionMode(true);
            }
            updateVisibility(false);
        }
    }
    private void hideForActionMode() {
        if (mShowingForMode) {
            mShowingForMode = false;
            if (mOverlayLayout != null) {
                mOverlayLayout.setShowingForActionMode(false);
            }
            updateVisibility(false);
        }
    }
他们最终会调用updateVisibility()这个方法:
    private void updateVisibility(boolean fromSystem) {
        // Based on the current state, should we be hidden or shown?
        final boolean shown = checkShowingFlags(mHiddenByApp, mHiddenBySystem,
                mShowingForMode);
        if (shown) {
            if (!mNowShowing) {
                mNowShowing = true;
                doShow(fromSystem);
            }
        } else {
            if (mNowShowing) {
                mNowShowing = false;
                doHide(fromSystem);
            }
        }
    }
updateVisibility()紧接着会调用doShow(fromSystem);doHide(fromSystem);
public void doShow(boolean fromSystem) {
        if (mCurrentShowAnim != null) {
            mCurrentShowAnim.end();
        }
        mContainerView.setVisibility(View.VISIBLE);
        if (mCurWindowVisibility == View.VISIBLE && (mShowHideAnimationEnabled
                || fromSystem)) {
            mContainerView.setTranslationY(0); // because we're about to ask its window loc
            float startingY = -mContainerView.getHeight();
            if (fromSystem) {
                int topLeft[] = {0, 0};
                mContainerView.getLocationInWindow(topLeft);
                startingY -= topLeft[1];
            }
            mContainerView.setTranslationY(startingY);
            AnimatorSet anim = new AnimatorSet();
            ObjectAnimator a = ObjectAnimator.ofFloat(mContainerView, View.TRANSLATION_Y, 0);
            a.addUpdateListener(mUpdateListener);
            AnimatorSet.Builder b = anim.play(a);
            if (mContentAnimations && mContentView != null) {
                b.with(ObjectAnimator.ofFloat(mContentView, View.TRANSLATION_Y,
                        startingY, 0));
            }
            if (mSplitView != null && mContextDisplayMode == CONTEXT_DISPLAY_SPLIT) {
                mSplitView.setTranslationY(mSplitView.getHeight());
                mSplitView.setVisibility(View.VISIBLE);
                b.with(ObjectAnimator.ofFloat(mSplitView, View.TRANSLATION_Y, 0));
            }
            anim.setInterpolator(AnimationUtils.loadInterpolator(mContext,
                    com.android.internal.R.interpolator.decelerate_cubic));
            anim.setDuration(250);
            // If this is being shown from the system, add a small delay.
            // This is because we will also be animating in the status bar,
            // and these two elements can't be done in lock-step.  So we give
            // a little time for the status bar to start its animation before
            // the action bar animates.  (This corresponds to the corresponding
            // case when hiding, where the status bar has a small delay before
            // starting.)
            anim.addListener(mShowListener);
            mCurrentShowAnim = anim;
            anim.start();
        } else {
            mContainerView.setAlpha(1);
            mContainerView.setTranslationY(0);
            if (mContentAnimations && mContentView != null) {
                mContentView.setTranslationY(0);
            }
            if (mSplitView != null && mContextDisplayMode == CONTEXT_DISPLAY_SPLIT) {
                mSplitView.setAlpha(1);
                mSplitView.setTranslationY(0);
                mSplitView.setVisibility(View.VISIBLE);
            }
            mShowListener.onAnimationEnd(null);
        }
        if (mOverlayLayout != null) {
            mOverlayLayout.requestApplyInsets();
        }
    }
    public void doHide(boolean fromSystem) {
        if (mCurrentShowAnim != null) {
            mCurrentShowAnim.end();
        }
        if (mCurWindowVisibility == View.VISIBLE && (mShowHideAnimationEnabled
                || fromSystem)) {
            mContainerView.setAlpha(1);
            mContainerView.setTransitioning(true);
            AnimatorSet anim = new AnimatorSet();
            float endingY = -mContainerView.getHeight();
            if (fromSystem) {
                int topLeft[] = {0, 0};
                mContainerView.getLocationInWindow(topLeft);
                endingY -= topLeft[1];
            }
            ObjectAnimator a = ObjectAnimator.ofFloat(mContainerView, View.TRANSLATION_Y, endingY);
            a.addUpdateListener(mUpdateListener);
            AnimatorSet.Builder b = anim.play(a);
            if (mContentAnimations && mContentView != null) {
                b.with(ObjectAnimator.ofFloat(mContentView, View.TRANSLATION_Y,
                        0, endingY));
            }
            if (mSplitView != null && mSplitView.getVisibility() == View.VISIBLE) {
                mSplitView.setAlpha(1);
                b.with(ObjectAnimator.ofFloat(mSplitView, View.TRANSLATION_Y,
                        mSplitView.getHeight()));
            }
            anim.setInterpolator(AnimationUtils.loadInterpolator(mContext,
                    com.android.internal.R.interpolator.accelerate_cubic));
            anim.setDuration(250);
            anim.addListener(mHideListener);
            mCurrentShowAnim = anim;
            anim.start();
        } else {
            mHideListener.onAnimationEnd(null);
        }
    }
这里面就是各种动画了。
另外总结一下
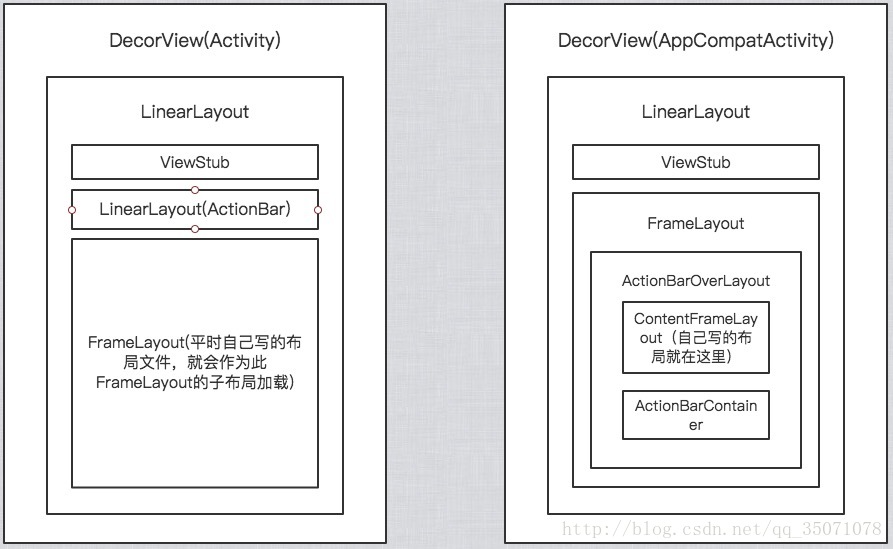
这是我画的一个view层次图,左边的是普通的Activity的,右边的是supportv7下的Activity也就是AppCompatActivity的。但是会发现,在Appcompatctivity中使用startActionMode,并不会将布局加载到ViewStub中去,而是会在ActionBarLayout下创建一个布局。
这个图的层次也不是绝对的,到底是什么样的根布局,都是由于activity根据我们自己设定的某些属性或者参数来决定的。比如说style里面的很多属性,我随便列举几个:
<item name="windowNoTitle">false</item>//这个是针对activity的
<item name="android:windowNoTitle">false</item>//这个是针对AppCompatActivity的
到底加载什么布局大家可以去网上搜搜android布局到底是如何加载出来的,或者是搜索setContentView到底干了啥。


 371
371


 被折叠的 条评论
为什么被折叠?
被折叠的 条评论
为什么被折叠?
 到【灌水乐园】发言


