


spring data jpa
Spring 的一个子项目。用于简化数据库访问,支持NoSQL 和 关系数据存储。其主要目标是使数据库的访问变得方便快捷。
致力于减少数据访问层 (DAO) 的开发量. 开发者唯一要做的,就只是声明持久层的接口,其他都交给 Spring Data JPA 来帮你完成。
第一个spring data jpa程序
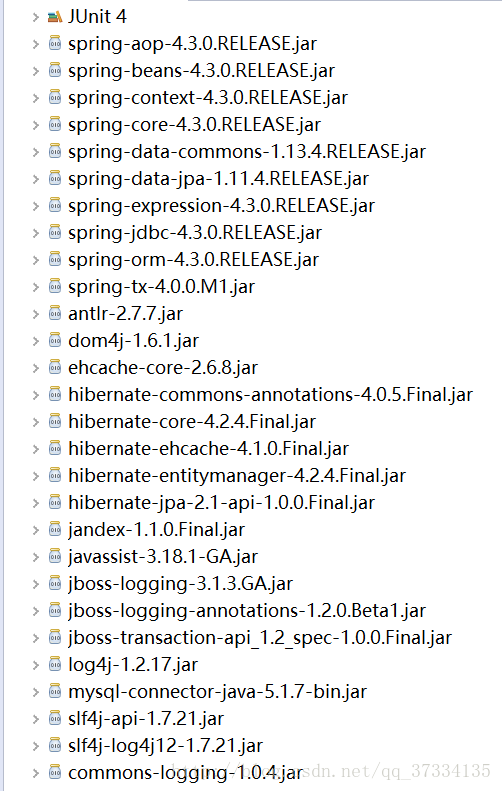
1、创建项目,导入需要的jar包
2、引入spring配置文件(applicationContext.xml)以及数据库连接配置文件(db.properties)。
db.properties中:
jdbc.user=root
jdbc.password=123456
jdbc.driverClass=com.mysql.jdbc.Driver
jdbc.jdbcUrl=jdbc:mysql:///spring-data-jpa
applicationContext.xml中:
<!-- 1.配置c3p0数据源 -->
    <context:property-placeholder location="classpath:db.properties"/>
    <bean id="dataSource" class="com.mchange.v2.c3p0.ComboPooledDataSource">
        <property name="user" value="${jdbc.user}"/>
        <property name="password" value="${jdbc.password}"/>
        <property name="driverClass" value="${jdbc.driverClass}"/>
        <property name="jdbcUrl" value="${jdbc.jdbcUrl}"/>
    </bean>

    <!-- 2.配置EntityManagerFactory -->
    <bean id="entityManagerFactory" class="org.springframework.orm.jpa.LocalContainerEntityManagerFactoryBean">
        <property name="dataSource" ref="dataSource"/>
        <!-- 配置JPA提供商的适配器 ,可以通过内部bean的方式来配置-->
        <property name="jpaVendorAdapter">
            <bean class="org.springframework.orm.jpa.vendor.HibernateJpaVendorAdapter"></bean>
        </property>
        <!-- 配置实体类所在的包 -->
        <property name="packagesToScan" value="com.itheima.entity"></property>
        <!-- 配置jpa的基本属性.例如JPA实现产品的属性 -->
        <property name="jpaProperties">
            <props>
                <prop key="hibernate.show_sql">true</prop>
                <prop key="hibernate.format_sql">true</prop>
                <prop key="hibernate.hbm2ddl.auto">update</prop>
            </props>
        </property>
    </bean>
    <!-- 3.配置jpa使用的事务管理器 -->
    <bean id="transactionManager" class="org.springframework.orm.jpa.JpaTransactionManager">
        <property name="entityManagerFactory" ref="entityManagerFactory"/>
    </bean>
    <!-- 4.配置支持基于注解事务方式 -->
    <tx:annotation-driven transaction-manager="transactionManager"/>

    <!-- 配置自动扫描的包 -->
    <context:component-scan base-package="com.itheima"></context:component-scan>

    <!-- 配置spring data -->
    <!-- 加入jpa的命名空间 -->
    <!--
        base-package:用于扫描Repository Bean 所在的package
     -->
    <jpa:repositories base-package="com.itheima" entity-manager-factory-ref="entityManagerFactory"/>
添加实体类:User
@Entity
@Table(name = "t_user")
public class User {
@Id
@GeneratedValue(strategy=GenerationType.IDENTITY)
private Long id;
@Column(name="user_name")
private String userName;
private String password;
private String telephone;
private String email;
@Column(name="create_time")
private Date createTime;
@Column(name="modified_time")
private Date modifiedTime = new Date();
//映射必须定义个空构造器
public User() {
}
public User(String userName, String password, String telephone, String email, Date createTime) {
this.userName = userName;
this.password = password;
this.telephone = telephone;
this.email = email;
this.createTime = createTime;
}
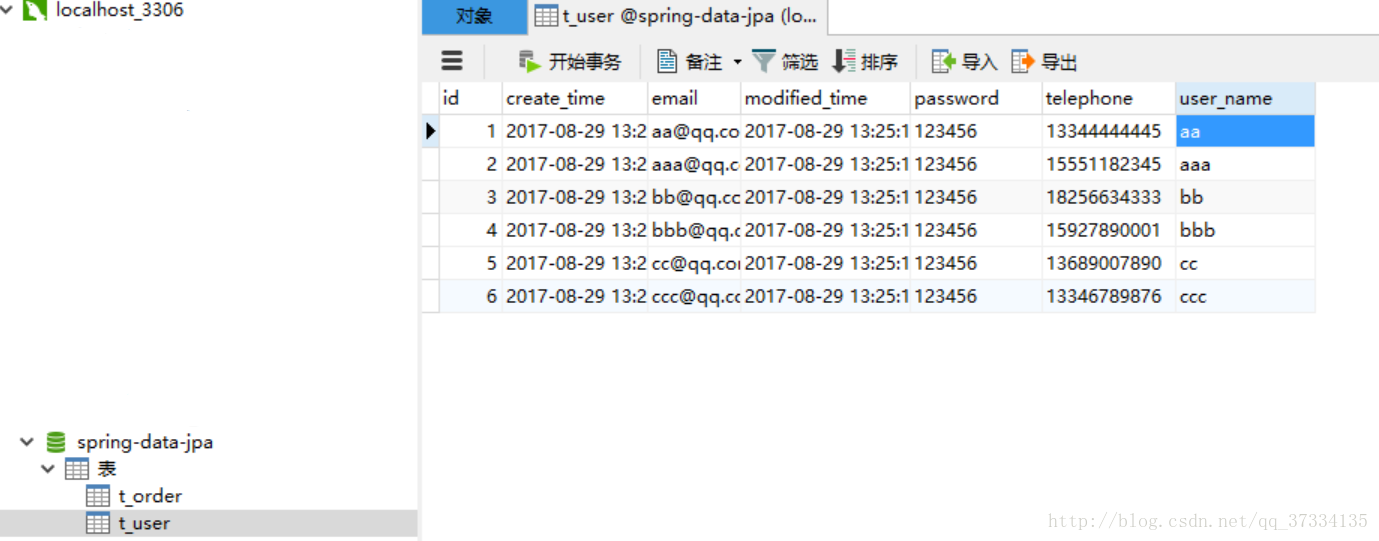
get、set、toString方法
}数据库表如下:
3、创建UserRepository接口继承Repository接口
public interface UserRepository extends Repository<User, Long>{
    User findById(long id);
    User findByUserName(String username);
}
Repository接口是一个标识,只要继承了该接口的接口都会被纳入spring容器管理。其中findById(findByUserName)该方法,顾名思义是根据id(用户名)查询用户。很奇妙的是,只要这样写确实就跟根据id(用户名)查出用户信息,而不需要我们做任何处理,这一切是因为spring data给我们命名做了规范。
4、测试
public class TestSpringDateJpa {

    ApplicationContext applicationContext ;
    @Before
    public void before(){
        applicationContext =
                new ClassPathXmlApplicationContext("classpath:applicationContext.xml");
    }
    /*
     * findById()
     */
    @Test
    public void test1(){
        UserRepository userRepository = applicationContext.getBean(UserRepository.class);
        User user = userRepository.findById(1l);
        System.out.println(user);
    }
    /*
     * findByName()
     */
    @Test
    public void test2(){
        UserRepository userRepository = applicationContext.getBean(UserRepository.class);
        User user = userRepository.findByUserName("aaa");
        System.out.println(user);
    }
}
结果:
Hibernate:
    select
        user0_.id as id1_1_,
        user0_.create_time as create_t2_1_,
        user0_.email as email3_1_,
        user0_.modified_time as modified4_1_,
        user0_.password as password5_1_,
        user0_.telephone as telephon6_1_,
        user0_.user_name as user_nam7_1_
    from
        t_user user0_
    where
        user0_.id=?
User [id=1, userName=aa, password=123456, telephone=13344444445, email=aa@qq.com]
根据id查询用户信息的输出,可以看到发送的sql就是根据id查询用户信息。
再来看其它的查询命名规范:
(1)
    List<User> findByUserNameStartingWithAndIdLessThan(String username,long id);
    该方法相当于查询sql:WHERE userName LIKE ?% AND id<?
测试:
    /*
     * findByUserNameStartingWithAndIdLessThan();
     */
    @Test
    public void test3(){
        UserRepository userRepository = applicationContext.getBean(UserRepository.class);
        List<User> users = userRepository.findByUserNameStartingWithAndIdLessThan("aa", 3);
        for (User user : users) {
            System.out.println(user);
        }
    }
结果:
Hibernate:
    select
        user0_.id as id1_1_,
        user0_.create_time as create_t2_1_,
        user0_.email as email3_1_,
        user0_.modified_time as modified4_1_,
        user0_.password as password5_1_,
        user0_.telephone as telephon6_1_,
        user0_.user_name as user_nam7_1_
    from
        t_user user0_
    where
        (
            user0_.user_name like ?
        )
        and user0_.id<?
User [id=1, userName=aa, password=123456, telephone=13344444445, email=aa@qq.com]
User [id=2, userName=aaa, password=123456, telephone=15551182345, email=aaa@qq.com]
(2)
    List<User> getByTelephoneInOrIdGreaterThan(List<String> teles,long id);
    该方法相当域查询sql:WHERE telephone IN (?,?...?) OR id<?
测试:
/*
     * getByTelephoneInOrIdGreaterThan();
     */
    @Test
    public void test4(){
        UserRepository userRepository = applicationContext.getBean(UserRepository.class);
        List<String> teles = new ArrayList<String>();
        teles.add("13344444445");
        teles.add("15551182345");
        long id = 5l;
        List<User> users = userRepository.getByTelephoneInOrIdGreaterThan(teles, id);
        for (User user : users) {
            System.out.println(user);
        }
    }
结果:
Hibernate:
    select
        user0_.id as id1_1_,
        user0_.create_time as create_t2_1_,
        user0_.email as email3_1_,
        user0_.modified_time as modified4_1_,
        user0_.password as password5_1_,
        user0_.telephone as telephon6_1_,
        user0_.user_name as user_nam7_1_
    from
        t_user user0_
    where
        user0_.telephone in (
            ? , ?
        )
        or user0_.id>?
User [id=1, userName=aa, password=123456, telephone=13344444445, email=aa@qq.com]
User [id=2, userName=aaa, password=123456, telephone=15551182345, email=aaa@qq.com]
User [id=6, userName=ccc, password=123456, telephone=13346789876, email=ccc@qq.com]
(3)
    List<User> getByEmailStartingWithOrderByIdDesc(String email);
    该方法相当于查询sql:WHERE email like ?% ORDER BY id DESC
测试:
/*
     * getByEmailStartingWithOrderByIdDesc();
     */
    @Test
    public void test5(){
        UserRepository userRepository = applicationContext.getBean(UserRepository.class);
        List<User> users = userRepository.getByEmailStartingWithOrderByIdDesc("aa");
        for (User user : users) {
            System.out.println(user);
        }
    }
结果:
Hibernate:
    select
        user0_.id as id1_1_,
        user0_.create_time as create_t2_1_,
        user0_.email as email3_1_,
        user0_.modified_time as modified4_1_,
        user0_.password as password5_1_,
        user0_.telephone as telephon6_1_,
        user0_.user_name as user_nam7_1_
    from
        t_user user0_
    where
        user0_.email like ?
    order by
        user0_.id desc
User [id=2, userName=aaa, password=123456, telephone=15551182345, email=aaa@qq.com]
User [id=1, userName=aa, password=123456, telephone=13344444445, email=aa@qq.com]
还支持其它的关键字:
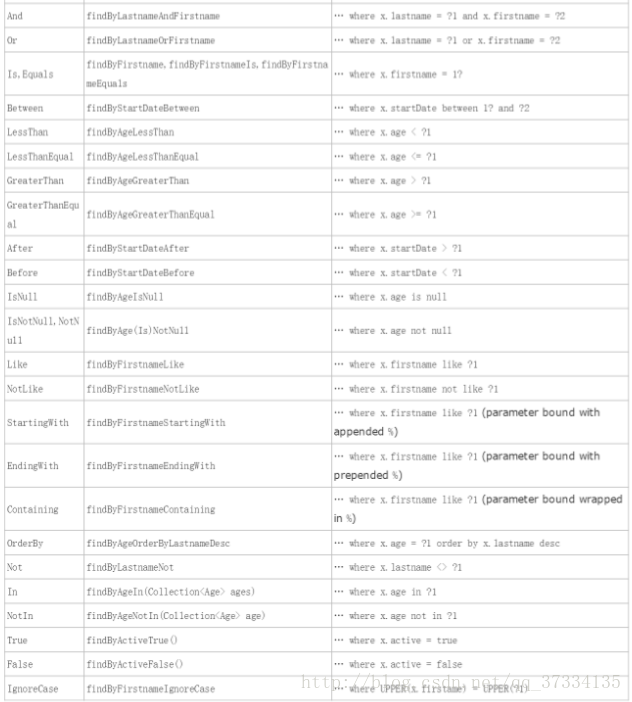
如果不想去记这些,当然这些也不一定满足我们的查询需求的时候,我们可以自己写查询条件而不去理会这些关键字,关键字是为了方便,其实完全可以不使用,这时候使用spring data提供的注解@Query。
@Query
@Query允许我们手写sql,根据传入的形参,将查询结果封装到声明的返回的实体类型中。
比如查询id最大的用户信息
@Query(value="SELECT u FROM User u WHERE u.id=(SELECT max(t.id) FROM User t)")
    User findUserWithMaxId();
测试:
    @Test
    public void test1(){
        UserRepository userRepository = applicationContext.getBean(UserRepository.class);
        User user = userRepository.findUserWithMaxId();
        System.out.println(user);
    }
结果:
Hibernate:
    select
        user0_.id as id1_1_,
        user0_.create_time as create_t2_1_,
        user0_.email as email3_1_,
        user0_.modified_time as modified4_1_,
        user0_.password as password5_1_,
        user0_.telephone as telephon6_1_,
        user0_.user_name as user_nam7_1_
    from
        t_user user0_
    where
        user0_.id=(
            select
                max(user1_.id)
            from
                t_user user1_
        )
User [id=6, userName=ccc, password=123456, telephone=13346789876, email=ccc@qq.com]
注:这里的查询语句是面向对象查询是jpa独有的jpql查询,jpa是支持原生sql查询的,在这里当然也是支持的,在不熟悉jpql查询或者较复杂查询的时候建议就使用原生sql查询。需要设置属性:nativeQuery=true
使用原生sql查询
比如:查询密码,要求不重复
@Query(value="SELECT DISTINCT(password) FROM t_user",nativeQuery=true)
    String findPassword();
测试:略
参数传递
1、使用占位符(推荐)
@Query(value="SELECT * FROM t_user u WHERE u.email LIKE ?1% AND id <?2",nativeQuery=true)
    List<User> findUserByemail(String email,long id);
测试:
    @Test
    public void test3(){
        UserRepository userRepository = applicationContext.getBean(UserRepository.class);
        List<User> list = userRepository.findUserByemail("aa", 2);
        for (User user : list) {
            System.out.println(user);
        }
    }
结果:
Hibernate:
    SELECT
        *
    FROM
        t_user u
    WHERE
        u.email LIKE ?
        AND id <?
User [id=1, userName=aa, password=123456, telephone=13344444445, email=aa@qq.com]
2、使用参数命名方式
    @Query(value="SELECT * FROM t_user u WHERE u.email LIKE :userEmail% AND id <:userId",nativeQuery=true)
    List<User> findUserByemail2(@Param("userId")long id,@Param("userEmail")String email);
测试:
Hibernate:
    SELECT
        *
    FROM
        t_user u
    WHERE
        u.email LIKE ?
        AND id <?
User [id=1, userName=aa, password=123456, telephone=13344444445, email=aa@qq.com]
使用参数命名方式虽然不需要管多个形参顺序,但是较麻烦,推荐使用占位符。
使用注解进行DML操作
前面使用的@Query注解来进行的都是查询操作,如果要进行数据更新,那么需要结合注解@Modifying来一起使用,注:不支持插入操作。
    @Modifying
    @Query(value="UPDATE t_user SET user_name = ?1 WHERE id=?2",nativeQuery=true)
    void updateUserNameById(String username,long id);
写到这里是不能进行测试的否则会抛出事务异常,Spring Data 提供了默认的事务处理方式,即所有的查询均声明为只读事务。所以进行增删改操作是行不通的。而通常事务都是加在了三层架构中的Service层,所以我们可以添加个Service,在该层调用Repository层方法,并添加注解(事务可读写而不仅仅是只读事务,对于自定义的方法,如需改变 Spring Data 提供的事务默认方式,可以在方法上注解 @Transactional 声明)测试的时候通过调用Service来进行修改操作。
Service实现类:
@Service(value=UserServiceImpl.SERVICE_NAME)
public class UserServiceImpl implements UserService{

    public static final String SERVICE_NAME="com.itheima.service.UserServiceImpl";
    @Autowired
    public UserRepository userRepository;
    @Transactional
    public void updateUser(String username, long id) {
        userRepository.updateUserNameById(username, id);
    }
}
测试:
    @Test
    public void test5(){//必须有@Transactional注解
        UserService userService = applicationContext.getBean(UserService.class);
        userService.updateUser("Lucene", 1l);
    }
结果:
Hibernate:
UPDATE
t_user
SET
user_name = ?
WHERE
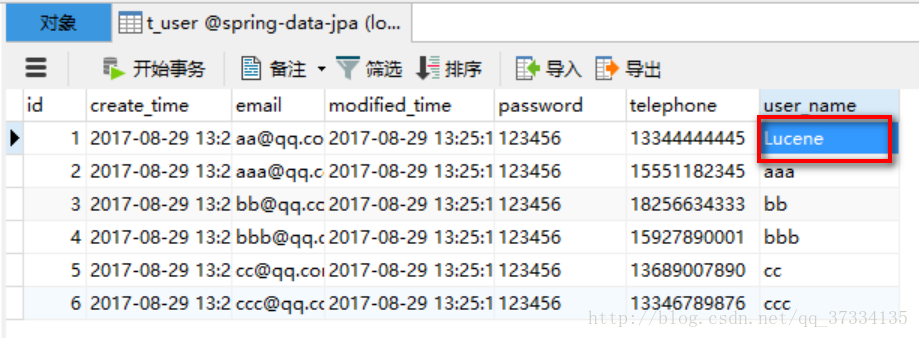
id=?查看数据库t_user表id为1的用户选择的用户名
注:在项目中用的话很有可能是spring boot项目,这个时候就不用写那一堆配置文件了。只需要导包(创建项目的时候勾选即可而不需要自己手动导入,用eclipse需要装STS插件),然后在spring boot的配置文件(application.properties)中配置一下即可,如下:
spring.datasource.url=jdbc:mysql://localhost:3306/logistic
spring.datasource.username=root
spring.datasource.password=123456
spring.datasource.driver-class-name=com.mysql.jdbc.Driver

spring.jpa.properties.hibernate.hbm2ddl.auto=update
spring.jpa.properties.hibernate.dialect=org.hibernate.dialect.MySQL5InnoDBDialect
spring.jpa.show-sql= true
spring.jpa.properties.hibernate.format_sql=true
然后启动项目配置就生效了,接下来便可以与数据库进行交互。


 107
107

 被折叠的 条评论
为什么被折叠?
被折叠的 条评论
为什么被折叠?
 到【灌水乐园】发言


