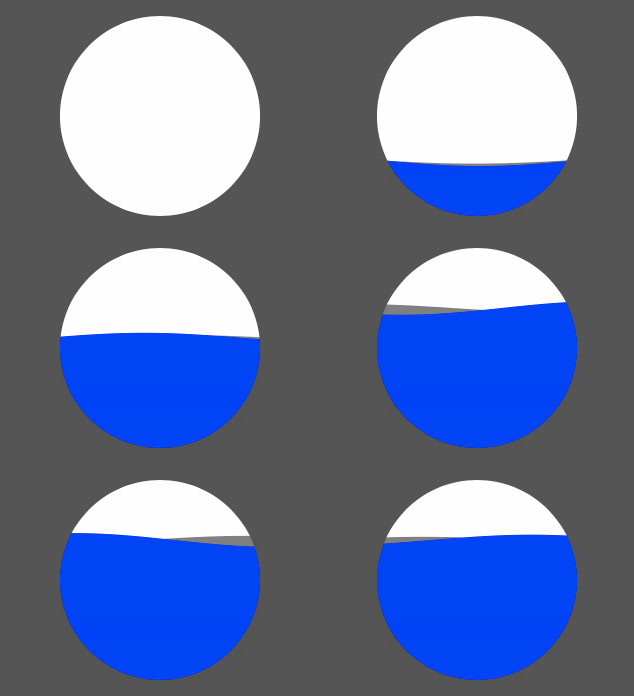
动画效果的进度球的效果如下图,水面会有上升动画、涌动动画效果:
(1)、进度球的大致实现原理是这样的:新建一个view并把它切割成圆形,在这个view 里面画两条sin曲线,并且将曲线下放部分填满色,然后新开两条线程分别做曲线上升的效果和曲线平移变动弧度的效果,这样就完成了带动画效果的进度球。项目代码可在下方链接下载:
http://download.csdn.net/download/shayneyeorg/8865895
(2)、具体代码抽取如下:
首先在viewController中初始化流量球并传递给它上升的高度和是否动画:
- (void)viewDidLoad {
    [super viewDidLoad];
    self.view.backgroundColor = [UIColor darkGrayColor];

    //定义圆形所对应的矩形的宽度
    CGFloat width = 200;
    //定义这个矩形的y点的值
    CGFloat originY = 140;

    //将进度图对象初始化在这个矩形上
    WaveGraph *wave = [[WaveGraph alloc]initWithFrame:CGRectMake((self.view.bounds.size.width-width)/2, originY, width, width)];

    //开始动作,第一个参数就是水面高度和圆形高度的百分比对应的小数数值
    [wave setProgress:0.7 animated:YES];

    [self.view addSubview:wave];
}
(3)、接下来看一看WaveGraph类的内容,它首先定义了以下的属性和方法:
@interface WaveGraph : UIView
@property (nonatomic, assign) CGFloat progress;//一个介于0到1的数字,表示流量剩余情况,决定水面的高度百分比

- (void)setProgress:(CGFloat)progress animated:(BOOL)animated;
@end

@interface WaveGraph() {
    float drawProgress; //画的高度,这个数值一直在增加,从0增加到进度球水量应有的高度
    BOOL isProgressing; //水面是否处在上升的过程
    float waveArc; //水面曲线的弧度
    float waveHorizMove; //水面曲线的水平偏移距离参数
    BOOL waveArcChange; //水面曲线弧度是否变动的标志
}

@property (nonatomic, strong) NSThread *progressThread; //水面上升的线程
@property (nonatomic, strong) NSThread *waveThread;  //水面涌动的线程
@end
(4)、在viewController中调用到了WaveGraph类的initWithFrame:方法:
#pragma mark - 初始化方法

-(instancetype)initWithFrame:(CGRect)frame{
    self = [super initWithFrame:frame];
    self.backgroundColor = [UIColor whiteColor];

    if (self) {
        waveArc = 1.5; //曲线的弧度
        waveHorizMove = 2; //曲线的水平偏移距离参数
    }
    return self;
}
(5)、在-initWithFrame:方法后会自动执行drawRect:方法,在动画过程中,画面每一次微小的变动,都是调用drawRect:方法重画,无数次重画最终呈现出动画的效果。drawRect:方法的代码如下:
#pragma mark - drawRect

-(void)drawRect:(CGRect)rect{
    //上下文
    CGContextRef context = UIGraphicsGetCurrentContext();

    //path句柄
    CGMutablePathRef path1 = CGPathCreateMutable();
    CGMutablePathRef path2 = CGPathCreateMutable();

    //线宽
    CGContextSetLineWidth(context, 1);

    //drwaProgress是画的高度百分比,这个变量会一直变动,直到增加到等于最终的高度百分比progress
    float waveHeight = rect.size.height*(1-drawProgress);

    //所以y就是上方空白部分的高度的百分比乘于页面高度,即是画线起点的y值
    float y = waveHeight;

    //设置起点
    CGPathMoveToPoint(path1, NULL, 0, y);
    CGPathMoveToPoint(path2, NULL, 0, y);

    if (y == 0 || y == rect.size.height) {
        //如果画线起点的y值为0或和页面高度一样,那么就直接从左到右画一条直线
        CGPathAddLineToPoint(path1, nil, rect.size.width, y);
        CGPathAddLineToPoint(path2, nil, rect.size.width, y);

    } else {
        //如果y值在页面之内
        for (float x=0; x<=rect.size.width; x++){
            //从左往右一个点一个点地画,画x条直线
            //使用sin函数画水面曲线
            y = waveArc * sin(x/rect.size.width*M_PI - 4*waveHorizMove/M_PI) * 3 + waveHeight;
            CGPathAddLineToPoint(path1, nil, x, y);
            y = waveArc * sin(x/rect.size.width*M_PI + 4*waveHorizMove/M_PI) * 5 + waveHeight;

            CGPathAddLineToPoint(path2, nil, x, y);
        }
    }

    //再画3条线,从曲线右端到底部绕一圈回到曲线左端
    CGPathAddLineToPoint(path1, nil, rect.size.width, rect.size.height);
    CGPathAddLineToPoint(path1, nil, 0, rect.size.height);
    CGPathAddLineToPoint(path1, nil, 0, waveHeight);

    //路径填色
    CGContextSetFillColorWithColor(context, [[UIColor grayColor] CGColor]);

    //将路径添加到上下文中
    CGContextAddPath(context, path1);

    //区域填色
    CGContextFillPath(context);

    //画出来
    CGContextDrawPath(context, kCGPathStroke);

    //和path1一样处理
    CGPathAddLineToPoint(path2, nil, rect.size.width, rect.size.height);
    CGPathAddLineToPoint(path2, nil, 0, rect.size.height);
    CGPathAddLineToPoint(path2, nil, 0, waveHeight);

    CGContextSetFillColorWithColor(context, [[UIColor blueColor] CGColor]);
    CGContextAddPath(context, path2);
    CGContextFillPath(context);
    CGContextDrawPath(context, kCGPathStroke);

    CGPathRelease(path1);
    CGPathRelease(path2);
}
(6)、在viewController中还调用到了WaveGraph类的setProgress: animated:方法,这个方法就是生成动画效果的方法了:
#pragma mark - 动画的主方法

//设置流量球高度并做动画,传进来的参数是水面最终的高度
- (void)setProgress:(CGFloat)progress animated:(BOOL)animated {
    //将矩形切成一个圆形。setShape:方法详见后方,而circleShape:方法是写在UIBezierPath分类里的自定义方法,由于离题较远,这里不敷述,详见代码
    [self setShape:[UIBezierPath circleShape:self.frame].CGPath];

    //处理progress小于0和大于1的情况
    CGFloat pinnedProgress = MIN(MAX(progress, 0.f), 1.f);

    int i = (int)(pinnedProgress*100);//将progress乘于100得到一个自然数i,后面会在0到i的递增的代码段里实现水面逐步上升的效果
    _progress = pinnedProgress;

if (animated) {
        //如果需要动画效果
        [self cancelProgressThread];
        isProgressing = YES;//水面是否处在上升的过程
        drawProgress = 0;//从0开始上升
        [self setNeedsDisplay];//调用drawRect:

        //另开一条线程,让水面上升
        self.progressThread = [[NSThread alloc] initWithTarget:self selector:@selector(animateProgress) object:nil];
        [self.progressThread start];

    } else {
        //不需要上升动作,水面高度就直接用最后高度
        isProgressing = NO;
        [self onMainChangeProgress:[NSNumber numberWithInt:i]];
    }
}
(7)、在(6)中的setProgress: animated:方法里,调用到了setShape:方法来切割出一个圆形,setShape:方法的内容如下:
#pragma mark - 设置圆形的方法

- (void)setShape:(CGPathRef)shape {
    //传进来的参数是一个圆形了
    if (shape == nil) {
        self.layer.mask = nil;
    }

    //设置遮罩层为圆形
    CAShapeLayer *maskLayer = [CAShapeLayer layer];
    maskLayer.path = shape;
    self.layer.mask = maskLayer;
}
(8)、在(6)中的setProgress: animated:方法里,在新开线程里调用了实现水面动画上升的animateProgress方法:
#pragma mark - 水面上升的线程方法

//水面上升的动画线程
- (void)animateProgress {
    //乘上一个100得到一个数字,用来计数
    int num = (int)(self.progress*100);
    int i = 0;

    //从i到num,水面逐步上升
    while (isProgressing) {
        if ([[NSThread currentThread] isCancelled]) {
            [NSThread exit];
        }
        if (i == num) {
            //高度到了就把上升标识去掉
            isProgressing = NO;
            [NSThread sleepForTimeInterval:0.03];
            [self performSelectorOnMainThread:@selector(onMainChangeProgress:) withObject:[NSNumber numberWithInteger:i] waitUntilDone:YES];
            break;

        } else {
            i ++;
        }

        [NSThread sleepForTimeInterval:0.03];
        [self performSelectorOnMainThread:@selector(onMainChangeProgress:) withObject:[NSNumber numberWithInt:i] waitUntilDone:NO];
    }
}

- (void)cancelProgressThread {
    if (self.progressThread && self.progressThread.isExecuting) {
        [self.progressThread cancel];
        self.progressThread = nil;
    }
}
(9)、可以看到,每一计算出水面的高度之后,都会调用onMainChangeProgress:方法重新画图,这个方法是最主要的画图方法。
其实在(6)中的setProgress: animated:方法里,不需动画的代码段里,就已经直接调用了onMainChangeProgress:方法了,忽略了上升过程的代码。
onMainChangeProgress:方法的代码如下:
//画的方法
- (void)onMainChangeProgress:(NSNumber *)number {
    @synchronized(self) {
        int i = [number intValue];
        //改一下高度百分比,然后让曲线重新画
        drawProgress = (float)i/100;
        [self setNeedsDisplay];

        //当波浪动作线程是空的或者波浪线程并非正在执行,就新开线程做涌动
        if (!self.waveThread || !self.waveThread.isExecuting) {
            //水面涌动的线程
            self.waveThread = [[NSThread alloc] initWithTarget:self selector:@selector(animateWave) object:nil];
            [self.waveThread start];
        }

        if (!isProgressing) {
            //这个方法决定了在水面达到最终高度之后还要涌动多久
            [self performSelector:@selector(cancelWaveThread) withObject:nil afterDelay:300.f];
        }
    }
}
(10)、水面涌动线程有关的方法如下:
#pragma mark - 水面涌动的线程方法

//波浪涌动
- (void)animateWave {
    while (TRUE) {
        if ([[NSThread currentThread] isCancelled]) {
            [NSThread exit];
        }

        //要回到主线程修改ui
        [self performSelectorOnMainThread:@selector(onMainWave) withObject:nil waitUntilDone:NO];

        //这个暂停时间决定了水面涌动的速度
        [NSThread sleepForTimeInterval:0.03];
    }
}

//每改动一次,就重新画一次,每次画完会暂停0.03秒(在animateWave方法里)
- (void)onMainWave {
    if (waveArcChange) {
        waveArc += 0.01;
    }else{

        waveArc -= 0.01;
    }

    if (waveArc<=1) {
        waveArcChange = YES;
    }

    if (waveArc>=1.5) {
        waveArcChange = NO;
    }

    waveHorizMove+=0.1;//让曲线水平移动,造成水涌动的效果

    [self setNeedsDisplay];
}

- (void)cancelWaveThread {
    if (self.waveThread && self.waveThread.isExecuting) {
        [self.waveThread cancel];
        self.waveThread = nil;
    }
}
(11)、至此就完成了带动画的进度球的功能。


 1491
1491


 被折叠的 条评论
为什么被折叠?


