


Service描述和实例
在系统开发中会涉及很多不同的服务,所谓的服务就是把逻辑进行封装后的业务模块,包括权限服务,信息服务,事件服务,状态持久性服务,业务自定义功能等方面的服务,所有这些服务有些是系统已经定义好基本接口的,有些却需要自行定义好接口,开发完这些服务以后可以通过SCSF提供IOC容器来进行加载并使用。
1. 创建Module项目:
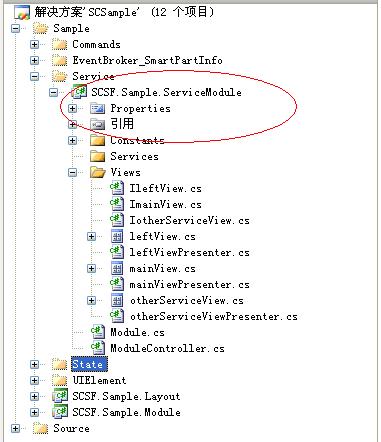
图2.9.1
2. 在Infrastructure.Interface项目中增加两个接口IroleData,IloginService,并输入如下代码:
| public interface IRoleData {
string RoleName{get;set;}
string[] Description { get;set;}
} public interface ILoginService { IRoleData getRole(); } |
添加两个类:RoleData,LoginService,分别继承并实现该两个接口;
| public class RoleData :IRoleData { private string _rolename; private string[] _description; #region IRoleData 成员 public string[] Description { get { return _description; } set { this._description = value; } } public string RoleName { get { return _rolename; } set { _rolename = value; } } #endregion } public class LoginService:ILoginService { #region ILoginService 成员 public IRoleData getRole() { LoginFrm login = new LoginFrm(); login.ShowDialog(); return login.RoleInfo(); } #endregion } |
在类SmartClientApplication中把对应的服务添加进去,以便能在系统启动时可以把对应的服务注入到容器中;
| protected override void AddServices() { 。。。 //增加登陆界面的服务 RootWorkItem.Services.AddNew<LoginService, ILoginService>(); RootWorkItem.Services.AddNew<RoleData, IRoleData>(); RootWorkItem.Services.Remove<IAuthenticationService>(); RootWorkItem.Services.AddNew<SimpleLoginAuthenticationService, IAuthenticationService>(); } |
由于涉及权限控制,于是创建类SimpleLoginAuthenticationService并实现系统提供的接口IauthenticationService;
| public class SimpleLoginAuthenticationService : IAuthenticationService { private ILoginService _login; [InjectionConstructor] public SimpleLoginAuthenticationService([ServiceDependency] ILoginService login) { _login = login; }
#region IAuthenticationService 成员
public void Authenticate() { IRoleData user=_login.getRole(); if (user != null) { GenericIdentity identity = new GenericIdentity(user.RoleName); GenericPrincipal principal = new GenericPrincipal(identity, user.Description); Thread.CurrentPrincipal = principal; } else { throw new AuthenticationException(Resources.NoUserProvidedForAuthentication); }
}
#endregion } |
其中方法Authenticate的作用就是把角色状态注入系统中并让后边启动的系统模块能使用。
3. 创建登陆界面;
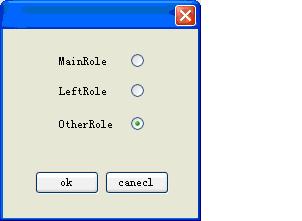
图2.9.2
添加以下代码:
| public partial class LoginFrm : Form { public LoginFrm() { InitializeComponent(); }
private RoleData _roledata;
public RoleData RoleInfo() { return _roledata; }
private void btnOk_Click(object sender, EventArgs e) { RoleData rd = new RoleData(); if (this.rbtnMain.Checked) { rd.RoleName = "Main"; rd.Description = new string[] { "this is Main region" }; this._roledata = rd; } if (this.rbtnLeft.Checked) { rd.RoleName = "Left"; rd.Description = new string[] { "this is Left region" }; this._roledata = rd; } if (this.rBtnOther.Checked) { rd.RoleName = "Other"; rd.Description = new string[] { "this is Other region" }; this._roledata = rd; } this.Close(); }
private void btnCancel_Click(object sender, EventArgs e) { this.Close(); }
} |
4. 运行程序选择MainRole权限后等到相应的信息;
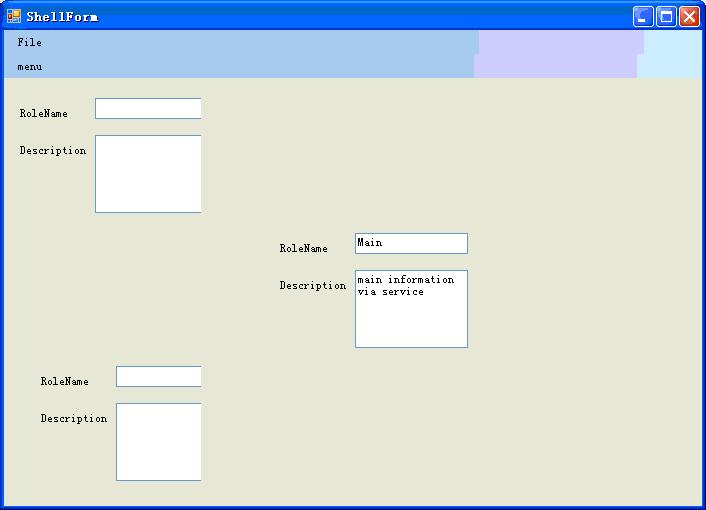
图2.9.3


 1966
1966

 被折叠的 条评论
为什么被折叠?
被折叠的 条评论
为什么被折叠?
 到【灌水乐园】发言


