


UIElement描述和实例
UIElement在SCSF中是只视图上的控件,包括MENU控件,TOOLBAR控件以及自定义控件等等,这里重点是说一说自定义控件部分,因为在Symphony中如果要统一视图风格,自定义控件是必不可少的技术,而制作自定义控件在SCSF中需要先分别继承并实现两个接口:UIElementAdapter,IUIElementAdapterFactory。这样才能在SCSF中进行加载和共享。
1. 利用SCSF创建一个Module并创建一个用户控件,同时创建两个类并分别继承UIElementAdapter,IUIElementAdapterFactory两个接口。
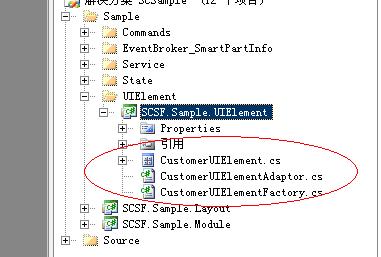
图 2.4.1
2. 在Adaptor和Factory两个类中分别加入如下代码:
| public class CustomerUIElementAdaptor : UIElementAdapter<String> { CustomerUIElement _uiObj; public CustomerUIElementAdaptor(CustomerUIElement uiobj) { this._uiObj = uiobj; } protected override string Add(string uiElement) { this._uiObj.Text = uiElement; return uiElement; }
protected override void Remove(string uiElement) { string ss = this._uiObj.Text; if (ss.Contains(uiElement)) { ss.Replace(uiElement, ""); } } } public class CustomerUIElementFactory : IUIElementAdapterFactory { #region IUIElementAdapterFactory 成员
public IUIElementAdapter GetAdapter(object uiElement) { if (uiElement is CustomerUIElement) { return new CustomerUIElementAdaptor(uiElement as CustomerUIElement); } throw new ArgumentException("uiElement");
}
public bool Supports(object uiElement) { return uiElement is CustomerUIElement; }
#endregion } |
剩下把控件视图设计好。这样一个自定义控件就已经完成,接下来就是如何在其他视图中使用该自定义控件了。
3. 在Module中的一个VIEW中添加该自定义控件:

图 2.4.2
增加一个类ModuleActions,并添加相关代码:
| public class ModuleActions { private WorkItem _workItem = null;
[ServiceDependency] public WorkItem WorkItem { get { return _workItem; } set { _workItem = value; } }
[Action(ActionNames.ShowCustomerUIElement)] public void showCustomerUiElement(object caller, object target) { UIExtensionSite site = WorkItem.UIExtensionSites[UIExtensionSiteNames.CustomerUiElement]; String ss = "test the customer uielement block"; site.Add(ss); } [Action(ActionNames.ViewCustomerUIElement)] public void addCustomerUiElement(object caller, object target) { UiElementView view = WorkItem.Items.AddNew<UiElementView>(); WorkItem.Workspaces[WorkspaceNames.LayoutUIElementView].Show(view); WorkItem.UIExtensionSites.RegisterSite(UIExtensionSiteNames.CustomerUiElement, view.customerView);
} } |
在类ModuleController中添加代码:
| WorkItem.Items.AddNew<ModuleActions>(); ActionCatalogService.Execute(ActionNames.ViewCustomerUIElement, WorkItem, this, null); ActionCatalogService.Execute(ActionNames.ShowCustomerUIElement, WorkItem, this, null); |
在类SmartClientApplication中增加相关服务代码:
| RootWorkItem.Services.AddOnDemand<ActionCatalogService, IActionCatalogService>(); IUIElementAdapterFactoryCatalog catalog = RootWorkItem.Services.Get<IUIElementAdapterFactoryCatalog>(); catalog.RegisterFactory(new CustomerUIElementFactory()); |
在配置文件中配置好后直接运行,就可得到如图 2.4.3 结果。

图 2.4.3


 1161
1161


 被折叠的 条评论
为什么被折叠?
被折叠的 条评论
为什么被折叠?
 到【灌水乐园】发言


