


Apache
简述
本文主要讲述在 vps 主机上部署 apache 服务器,首先需要购买 vps 主机,其次需要购买域名,再将域名解析到 vps 主机的 ip 地址上,以后就可以使用该域名访问我们的服务器了。
软件下载
进入 官网 ,点击 Download – 2.4.29 (released 2017-10-23) – Source: httpd-2.4.29.tar.gz [ PGP ] [ MD5 ] [ SHA1 ] [ SHA256 ] ,下载后,文件名为:httpd-2.4.29.tar.gz
软件安装
安装必要的库
yum -y install gcc gcc-c++ openssl-devel zlib-deve pcre pcre-devel将文件拷贝到 Linux ,解压缩
[root@host apache]# tar xf httpd-2.4.29.tar.gz
[root@host httpd-2.4.29]# ./configure --prefix=/opt/app/apache
configure:
configure: Configuring Apache Portable Runtime library...
configure:
checking for APR... no
configure: error: APR not found.  Please read the documentation.
安装 apr
到官网 下载 apr ,文件名为:apr-1.6.3.tar.gz ,解压缩
[root@host apache]# tar xf apr-1.6.3.tar.gz
[root@host apr-1.6.3]# ./configure --prefix=/opt/app/apr
[root@host apr-1.6.3]# make
[root@host apr-1.6.3]# make install
继续编译
configure: error: APR-util not found. Please read the documentation.安装apr-util
到官网 下载 apr-util ,文件名为:apr-util-1.6.1.tar.gz ,解压缩
[root@host apache]# tar xf apr-util-1.6.1.tar.gz
[root@host apr-util-1.6.1]# ./configure --prefix=/opt/app/apr-util --with-apr=/opt/app/apr/bin/apr-1-config
[root@host apr-util-1.6.1]# make
xml/apr_xml.c:35:19: error: expat.h: No such file or directory
[root@host apr-util-1.6.1]# yum install expat-devel
[root@host apr-util-1.6.1]# make
[root@host apr-util-1.6.1]# make install
继续…
[root@host httpd-2.4.29]# ./configure --prefix=/opt/app/apache --with-apr=/opt/app/apr/bin/apr-1-config --with-apr-util=/opt/app/apr-util/bin/apu-1-config --enable-so
[root@host httpd-2.4.29]# make
[root@host httpd-2.4.29]# make install
测试
[root@host apache]# /opt/app/apache/bin/apachectl -k start
AH00557: httpd: apr_sockaddr_info_get() failed for host.localdomain
AH00558: httpd: Could not reliably determine the server's fully qualified domain name, using 127.0.0.1. Set the 'ServerName' directive globally to suppress this message
配置
打开 httpd.conf ,对比源文件,修改为以下内容:
#LoadModule watchdog_module modules/mod_watchdog.so
#LoadModule xml2enc_module modules/mod_xml2enc.so

#
# DirectoryIndex: sets the file that Apache will serve if a directory
# is requested.
#
<IfModule dir_module>
    DirectoryIndex index.php index.html
</IfModule>

#
# DocumentRoot: The directory out of which you will serve your
# documents. By default, all requests are taken from this directory, but
# symbolic links and aliases may be used to point to other locations.
#
DocumentRoot "/home/sy/XGManager/home"
<Directory "/home/sy/XGManager/home">
PHP
软件下载
进入 官网 ,点击 Downloads ,找到标题:php-7.2.0.tar.gz (sig) [17,849Kb] 下载的文件名:
php-7.2.0.tar.gz
编译
安装编译环境
[root@host php-7.2.0]# yum groupinstall "Development tools"
[root@host php-7.2.0]# yum install libxml2-devel gd-devel libmcrypt-devel libcurl-devel openssl-devel
配置
[root@host php-7.2.0]# ./configure --prefix=/opt/app/php/php-7.2.0 --with-apxs2=/opt/app/apache/bin/apxs --disable-cli --enable-shared --with-libxml-dir --with-gd --with-openssl --enable-mbstring --with-mysqli --enable-opcache --enable-zip --with-zlib-dir --with-pdo-mysql --with-jpeg-dir --with-freetype-dir --with-curl --without-pdo-sqlite --without-sqlite3
[root@host php-7.2.0]# make
cc: Internal error: Killed (program cc1)
Please submit a full bug report.
See <http://bugzilla.redhat.com/bugzilla> for instructions.
make: *** [ext/fileinfo/libmagic/apprentice.lo] Error 1
原因是内存不足,需要使用交换分区,增加交换分区:
[root@host php-7.2.0]# sudo dd if=/dev/zero of=/swapfile bs=64M count=16
[root@host php-7.2.0]# sudo mkswap /swapfile
[root@host php-7.2.0]# sudo swapon /swapfile
[root@host php-7.2.0]# make install
编译完成,删除交换分区:
[root@host php-7.2.0]# sudo swapoff /swapfile
[root@host php-7.2.0]# sudo rm /swapfile
拷贝配置文件:
[root@host php-7.2.0]# cp php.ini-development /opt/app/php/php-7.2.0/php.ini关联 apache
打开 httpd.conf ,对比源文件,修改为以下内容:
#LoadModule rewrite_module modules/mod_rewrite.so
LoadModule php7_module        modules/libphp7.so
PHPIniDir "/opt/app/php/php-7.2.0/"
AddType application/x-httpd-php .php .html .htm
配置 php
修改 php.ini 为以下内容:
; Directory in which the loadable extensions (modules) reside.
; http://php.net/extension-dir
; extension_dir = "./"
; On windows:
; extension_dir = "ext"
extension_dir = "/opt/app/php/php-7.2.0/ext"

extension=curl
extension=gd2
extension=mbstring
extension=mysqli
extension=pdo_mysql
extension=xmlrpc

[Date]
; Defines the default timezone used by the date functions
; http://php.net/date.timezone
;date.timezone =
date.timezone = Asia/Shanghai

; where MODE is the octal representation of the mode. Note that this
; does not overwrite the process's umask.
; http://php.net/session.save-path
;session.save_path = "/tmp"
session.save_path = "/opt/app/php/PHPSessionTmp"

; Temporary directory for HTTP uploaded files (will use system default if not
; specified).
; http://php.net/upload-tmp-dir
;upload_tmp_dir =
upload_tmp_dir = "/opt/app/php/PHPFileUploadTmp"
重启 Apache
[root@host apache]# /opt/app/apache/bin/apachectl -k restart测试
首先 ,在目录/home/sy/XGManager/home 放置一个文件 index.php ,输入内容:
<?php
phpinfo();
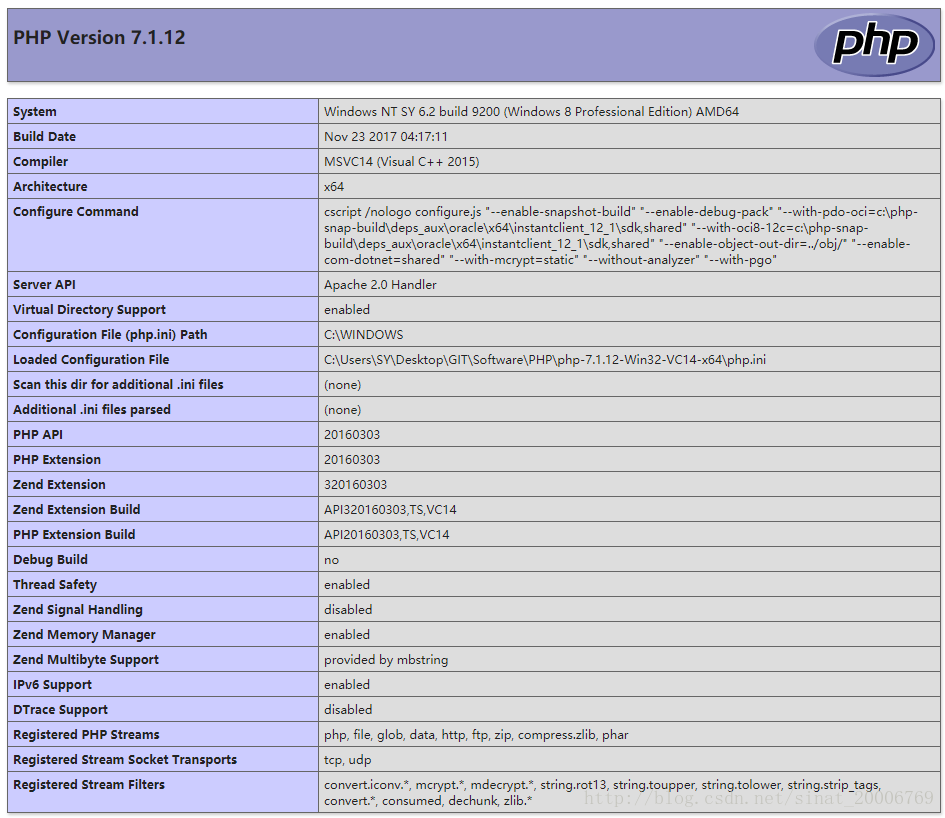
?>刷新网页,如果能够看到以下画面,说明 Apache 已经关联了 PHP 。
MySQL
软件安装
[root@host home]# yum install mysql
[root@host home]# yum install mysql-server
[root@host home]# yum install mysql-devel
[root@host home]# service mysqld restart

/usr/bin/mysqladmin -u root password 'new-password'
/usr/bin/mysqladmin -u root -h host.localdomain password 'new-password'

Alternatively you can run:
/usr/bin/mysql_secure_installation
Please report any problems with the /usr/bin/mysqlbug script!

                                                           [  OK  ]
Starting mysqld:                                           [  OK  ]
[root@host home]# mysql -uroot -p
Welcome to the MySQL monitor.  Commands end with ; or \g.
Your MySQL connection id is 8
Server version: 5.1.73 Source distribution

Copyright (c) 2000, 2013, Oracle and/or its affiliates. All rights reserved.

Oracle is a registered trademark of Oracle Corporation and/or its
affiliates. Other names may be trademarks of their respective
owners.

Type 'help;' or '\h' for help. Type '\c' to clear the current input statement.
插入用户:
mysql> insert into mysql.user(Host,User,Password) values('@','sy',password('********'));重启 Mysql
[root@host home]# service mysqld restart登录新用户
[root@host home]# mysql -u sy -pPHPMyAdmin
软件下载
进入官网 ,点击 download ,下载的文件名为:phpMyAdmin-4.7.5-all-languages.zip
软件安装
将解压后的文件夹重命名为 phpMyAdmin ,放到目录:C:\Users\SY\Desktop\GIT\Software\PHP\Apache_Workspace\PHP\HOME ,在浏览器输入:链接 即可访问。
测试
修改 index.php 内容:
<?php
    $connect=mysqli_connect("127.0.0.1","root","10929131");
    if (!$connect)
        echo "Mysql Connect Error!";
    else
        echo "MySQL OK!";
    mysqli_close($connect);
?>看到打印:MySQL OK! ,说明连接数据库成功!注意 PHP7 以后使用 mysqli 代替 mysql 。
搭建应用程序
apache 默认配置的用户为 daemon ,我们打开文件:/opt/app/apache/conf/httpd.conf
#
# If you wish httpd to run as a different user or group, you must run
# httpd as root initially and it will switch.
#
# User/Group: The name (or #number) of the user/group to run httpd as.
# It is usually good practice to create a dedicated user and group for
# running httpd, as with most system services.
#
User daemon
Group daemon我们修改为:sy ,重启 apache ,
 [root@host /]# /opt/app/apache/bin/apachectl -k restart
 [root@host /]# ps -ef | grep apache
  root     23485     1  0 03:03 ?        00:00:00 /opt/app/apache/bin/httpd -k start
  sy       25653 23485  0 04:02 ?        00:00:00 /opt/app/apache/bin/httpd -k start
  sy       25654 23485  0 04:02 ?        00:00:00 /opt/app/apache/bin/httpd -k start
  sy       25655 23485  0 04:02 ?        00:00:00 /opt/app/apache/bin/httpd -k start
  root     25746 20184  0 04:03 pts/0    00:00:00 grep apache
可以看到我们的 uid 变为了 sy 。
当我们向网站上传文件时,弹出:unknow:file created in the system's temporatory in Unknown on line 0 警告。
查看网站目录的所有者:
[root@host /]# ls -al /home/sy/XGManager/
total 32
drwxr-xr-x 5 root root 4096 Dec 30 08:35 .
drwxr-xr-x 6 root root 4096 Jan  1 09:17 ..
-rwxr-xr-x 1 root root  169 Dec 30 08:35 .buildpath
drwxr-xr-x 8 root root 4096 Dec 30 08:35 .git
drwxr-xr-x 9 root   root   4096 Jan  2 03:54 home
-rwxr-xr-x 1 root root  697 Dec 30 08:35 .project
-rwxr-xr-x 1 root root   49 Dec 30 08:35 README.md
drwxr-xr-x 2 root root 4096 Dec 30 08:35 .settings
可以看到所有者为 root ,而我们创建的 apache worker 进程的所有者为 sy ,权限不足,因此报错。
需要修改为以下内容:
[root@host app]# chown -R sy:sy /home/sy/XGManager/home/再次上传,遇到问题:Unknown: file created in the system's temporary directory in Unknown on line 0
由于我们配置 [root@host /]# vim /opt/app/php/php-7.2.0/php.ini
Temporary directory for HTTP uploaded files (will use system default if not
specified).
http://php.net/upload-tmp-dir
upload_tmp_dir =
upload_tmp_dir = "opt/app/php/PHPFileUploadTmp"
文件上传时,会临时存储到 upload_tmp_dir 指定的目录,因此,该目录的所有者也应该是 sy
[root@host app]# chown -R sy:sy /opt/app/php/PHPFileUploadTmp/再次测试,上传成功!
遇到问题:
Warning: session_start(): open(/opt/app/php/PHPSessionTmp/sess_qt1lthvdd2buesvglt0piji5l5, O_RDWR) failed: Permission denied (13) in /home/sy/XGManager/home/utils/head.php on line 39修改用户权限:
[root@host home]# chown sy:sy -R /opt/app/php/PHPSessionTmp/


 8216
8216


 被折叠的 条评论
为什么被折叠?
被折叠的 条评论
为什么被折叠?
 到【灌水乐园】发言


