


ZooKeeper伪分布式环境搭建及命令行使用
1.ZooKeeper简介
1.Zookeeper是Google的Chubby一个开源的实现,是Hadoop的分布式协调服务
它包含一个简单的原语集,分布式应用程序可以基于它实现同步服务,配置维护和命名服务等
2.为何使用ZooKeeper
①大部分分布式应用需要一个主控、协调器或控制器来管理物理分布的子进程(如资源、任务分配等)
②目前,大部分应用需要开发私有的协调程序,缺乏一个通用的机制
③协调程序的反复编写浪费,且难以形成通用、伸缩性好的协调器
ZooKeeper:提供通用的分布式锁服务,用以协调分布式应用
ZooKeeper的特性:是简单的、是富有表现力的、具有高可用性、采用松耦合交互方式、是一个资源库
3.ZooKeeper的安装
3.1下载ZooKeeper
下载ZooKeeper的最新稳定版本,也就是推荐的stable的版本。
将下载的当前稳定版本zookeeper-3.4.9.tar.gz拷贝到Linux系统/root/Downloads目录下,解压到/usr/local目录下tar -zxvf zookeeper-3.4.9.tar.gz -C /usr/local/
ZooKeeper要求JAVA的环境才能运行,可参考Linux下安装JDK
3.2集群
zk服务器集群规模不小于3个节点,要求各服务器之间系统时间要保持一致。
进入ZooKeeper的配置文件目录下cd /usr/local/zookeeper-3.4.9/conf/,将目录下的zoo_sample.cfg文件重命名为zoo.cfgmv zoo_sample.cfg zoo.cfg
由于是伪分布式安装,在一台机器上模拟3个zk server的集群安装,将解压后的ZooKeeper包重命名并复制为另外两个节点。
mv zookeeper-3.4.9/ zookeeper-3.4.9-1
cp zookeeper-3.4.9-1/ zookeeper-3.4.9-2
cp zookeeper-3.4.9-1/ zookeeper-3.4.9-3
此时/usr/local/目录下有三个目录
zookeeper-3.4.9-1
zookeeper-3.4.9-2
zookeeper-3.4.9-3
3.3配置每个zk server的zoo.cfg配置文件
①/usr/local/zookeeper-3.4.9-1/conf/zoo.cfg内容如下
# The number of milliseconds of each tick
tickTime=2000
# The number of ticks that the initial
# synchronization phase can take
initLimit=10
# The number of ticks that can pass between
# sending a request and getting an acknowledgement
syncLimit=5
# the directory where the snapshot is stored.
# do not use /tmp for storage, /tmp here is just
# example sakes.
dataDir=/usr/local/zookeeper-3.4.9-1/data
#the location of the log file
dataLogDir=/usr/local/zookeeper-3.4.9-1/logs
# the port at which the clients will connect
clientPort=2181

server.1=cyyun:2887:3887
server.2=cyyun:2888:3888
server.3=cyyun:2889:3889

# the maximum number of client connections.
# increase this if you need to handle more clients
#maxClientCnxns=60
#
# Be sure to read the maintenance section of the
# administrator guide before turning on autopurge.
#
# http://zookeeper.apache.org/doc/current/zookeeperAdmin.html#sc_maintenance
#
# The number of snapshots to retain in dataDir
#autopurge.snapRetainCount=3
# Purge task interval in hours
# Set to "0" to disable auto purge feature
#autopurge.purgeInterval=1
②/usr/local/zookeeper-3.4.9-2/conf/zoo.cfg内容如下
# The number of milliseconds of each tick
tickTime=2000
# The number of ticks that the initial
# synchronization phase can take
initLimit=10
# The number of ticks that can pass between
# sending a request and getting an acknowledgement
syncLimit=5
# the directory where the snapshot is stored.
# do not use /tmp for storage, /tmp here is just
# example sakes.
dataDir=/usr/local/zookeeper-3.4.9-2/data
#the location of the log file
dataLogDir=/usr/local/zookeeper-3.4.9-2/logs
# the port at which the clients will connect
clientPort=2182

server.1=cyyun:2887:3887
server.2=cyyun:2888:3888
server.3=cyyun:2889:3889

# the maximum number of client connections.
# increase this if you need to handle more clients
#maxClientCnxns=60
#
# Be sure to read the maintenance section of the
# administrator guide before turning on autopurge.
#
# http://zookeeper.apache.org/doc/current/zookeeperAdmin.html#sc_maintenance
#
# The number of snapshots to retain in dataDir
#autopurge.snapRetainCount=3
# Purge task interval in hours
# Set to "0" to disable auto purge feature
#autopurge.purgeInterval=1
③/usr/local/zookeeper-3.4.9-3/conf/zoo.cfg内容如下
# The number of milliseconds of each tick
tickTime=2000
# The number of ticks that the initial
# synchronization phase can take
initLimit=10
# The number of ticks that can pass between
# sending a request and getting an acknowledgement
syncLimit=5
# the directory where the snapshot is stored.
# do not use /tmp for storage, /tmp here is just
# example sakes.
dataDir=/usr/local/zookeeper-3.4.9-3/data
#the location of the log file
dataLogDir=/usr/local/zookeeper-3.4.9-3/logs
# the port at which the clients will connect
clientPort=2183

server.1=cyyun:2887:3887
server.2=cyyun:2888:3888
server.3=cyyun:2889:3889

# the maximum number of client connections.
# increase this if you need to handle more clients
#maxClientCnxns=60
#
# Be sure to read the maintenance section of the
# administrator guide before turning on autopurge.
#
# http://zookeeper.apache.org/doc/current/zookeeperAdmin.html#sc_maintenance
#
# The number of snapshots to retain in dataDir
#autopurge.snapRetainCount=3
# Purge task interval in hours
# Set to "0" to disable auto purge feature
#autopurge.purgeInterval=1
上述配置文件中的地址使用的是IP映射后的主机名配置。
注意:因为是在一台机器上模拟集群,所以端口不能重复,这里用2181~2183,2887~2889,以及3887~3889相互错开。另外每个zk的instance,都需要设置独立的数据存储目录、日志存储目录,所以dataDir、dataLogDir这二个参数对应的目录是不同的。
3.4创建myid文件
另外还有一个非常关键的设置,在每个zk server配置文件的dataDir所对应的目录下,必须创建一个名为myid的文件,其中的内容必须与zoo.cfg中server.x中的x相同,即:
/usr/local/zookeeper-3.4.9-1/data/myid 中的内容为1,对应server.1中的1
/usr/local/zookeeper-3.4.9-2/data/myid 中的内容为2,对应server.2中的2
/usr/local/zookeeper-3.4.9-3/data/myid 中的内容为3,对应server.3中的3
例:
①在/usr/local/zookeeper-3.4.9-1/data/目录下vi myid,输入内容1
或
②在/usr/local/zookeeper-3.4.9-1/data/目录下echo '1' > myid创建文件
如果不创建,zk server启动不成功。
生产环境中,分布式集群部署的步骤与上面基本相同,只不过因为各zk server分布在不同的机器,分布在不同的机器后,不存在端口冲突问题,可以让每个服务器的zk均采用相同的端口cyyun:2888:3888,这样管理起来比较方便。
3.5启动验证
分别在安装目录下执行zkServer.sh start
/usr/local/zookeeper-3.4.9-1/bin/zkServer.sh start
/usr/local/zookeeper-3.4.9-2/bin/zkServer.sh start
/usr/local/zookeeper-3.4.9-3/bin/zkServer.sh start
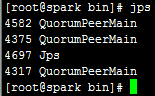
启动成功后,输入jps查看进程,发现新增了3个Java进程QuorumPeerMain。
注:由于ZooKeeper服务的每个实例都拥有全局的配置信息,它们在启动的时候需要随时地进行Leader选举操作。如果只启动了一个会有异常信息,因为此时第一个启动的ZooKeeper需要和另外两个ZooKeeper实例进行通信,但是另外两个ZooKeeper实例还没有启动起来,忽略异常信息,将另外两个zk server启动起来就行了。
停止命令zkServer.sh stop
3.6查看状态
分别在安装目录下执行zkServer.sh status
/usr/local/zookeeper-3.4.9-1/bin/zkServer.sh status
/usr/local/zookeeper-3.4.9-2/bin/zkServer.sh status
/usr/local/zookeeper-3.4.9-3/bin/zkServer.sh status
leader显示

follower显示

此时ZooKeeper伪分布式环境安装成功。
3.7配置ZooKeeper的系统环境变量
为了操作的方便(能快速使用ZooKeeper命令),可以对ZooKeeper的环境变量进行配置。
vi /etc/profile文件末尾配置如下的内容
export JAVA_HOME=/usr/local/jdk
export HADOOP_HOME=/usr/local/hadoop-2.6.4
export ZOOKEEPER_HOME=/usr/local/zookeeper-3.4.9-1
export PATH=.:$PATH:$JAVA_HOME/bin:$HADOOP_HOME/bin:$HADOOP_HOME/sbin:$ZOOKEEPER_HOME/bin
source /etc/profile使配置立即生效
可执行zkServer.sh help查看返回是否正常

4.ZooKeeper的命令行操作
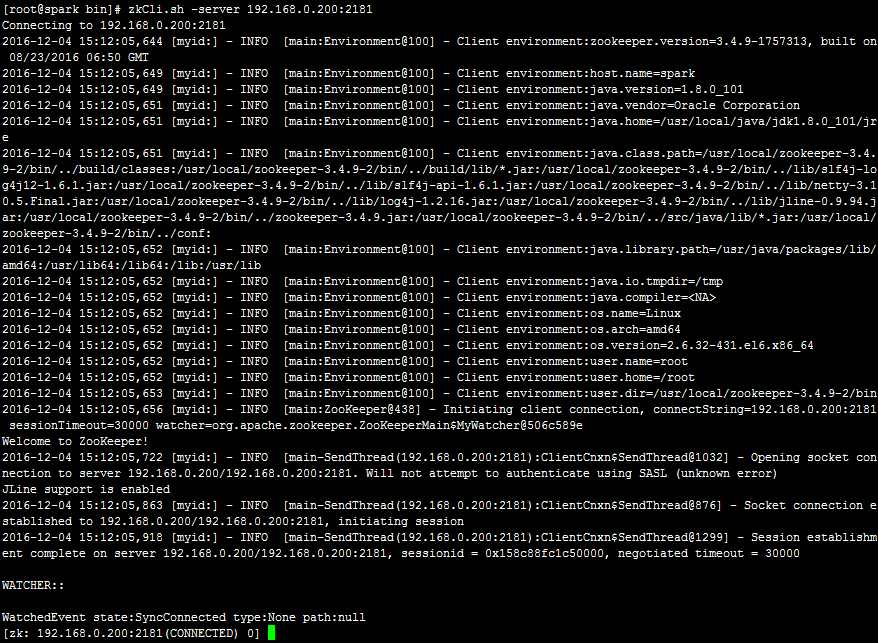
在ZooKeeper的bin目录下启动一个客户端进行测试zkCli.sh -server cyyun:2181
连接成功后,输出信息如下:
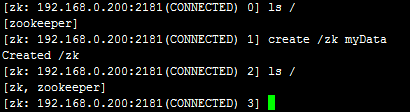
4.1使用ls命令查看当前ZooKeeper所包含的内容

4.2创建新的Znode节点create /zk myData
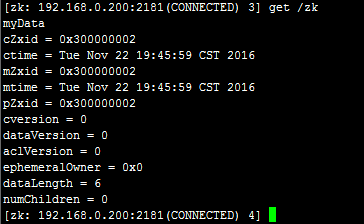
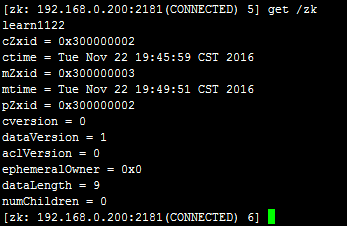
4.3使用get命令获取节点数据get /zk
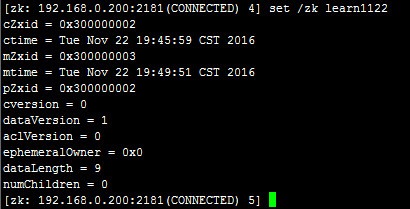
4.4使用set命令对节点数据覆盖操作set /zk learn1122
4.5删除节点delete /zk


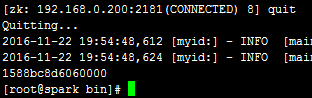
4.6退出quit
本文参考:
http://blog.csdn.net/shatelang/article/details/7596007
http://blog.csdn.net/huwei2003/article/details/49101269


 775
775


 被折叠的 条评论
为什么被折叠?
被折叠的 条评论
为什么被折叠?
 到【灌水乐园】发言


