


原文地址:https://www.raywenderlich.com/62699/reactivecocoa-tutorial-pt1
As an iOS developer, nearly every line of code you write is in reaction to some event; a button tap, a received network message, a property change (via Key Value Observing) or a change in user’s location via CoreLocation are all good examples. However, these events are all encoded in different ways; as actions, delegates, KVO, callbacks and others. ReactiveCocoa defines a standard interface for events, so they can be more easily chained, filtered and composed using a basic set of tools.
Sound confusing? Intriguing? … Mind blowing? Then read on :]
ReactiveCocoa combines a couple of programming styles:
- Functional Programming which makes use of higher order functions, i.e. functions which take other functions as their arguments
- Reactive Programming which focuses of data-flows and change propagation
For this reason, you might hear ReactiveCocoa described as a Functional Reactive Programming (or FRP) framework.
Rest assured, that is as academic as this tutorial is going to get! Programming paradigms are a fascinating subject, but the rest of this ReactiveCocoa tutorials focuses solely on the practical value, with work-through examples instead of academic theories.
The Reactive Playground
Throughout this ReactiveCocoa tutorial, you’ll be introducing reactive programming to a very simple example application, the ReactivePlayground. Download the starter project, then build and run to verify you have everything set up correctly.
ReactivePlayground is a very simple app that presents a sign-in screen to the user. Supply the correct credentials, which are, somewhat imaginatively, user for the username, and password for the password, and you’ll be greeted by a picture of a lovely little kitten.

Awww! How cute!
Right now it’s a good point to spend a little time looking through the code of this starter project. It is quite simple, so it shouldn’t take long.
Open RWViewController.m and take a look around. How quickly can you identify the condition that results in the enabling of the Sign In button? What are the rules for showing / hiding the signInFailure label? In this relatively simple example, it might take only a minute or two to answer these questions. For a more complex example, you should be able to see how this same type of analysis might take quite a bit longer.
With the use of ReactiveCocoa, the underlying intent of the application will become a lot clearer. It’s time to get started!
Adding the ReactiveCocoa Framework
The easiest way to add the ReactiveCocoa framework to your project is via CocoaPods. If you’ve never used CocoaPods before it might make sense to follow the Introduction To CocoaPods tutorial on this site, or at the very least run through the initial steps of that tutorial so you can install the prerequisites.
Note: If for some reason you don’t want to use CocoaPods you can still use ReactiveCocoa, just follow the Importing ReactiveCocoa steps in the documentation on GitHub.
If you still have the ReactivePlayground project open in Xcode, then close it now. CocoaPods will create an Xcode workspace, which you’ll want to use instead of the original project file.
Open Terminal. Navigate to the folder where your project is located and type the following:
touch Podfile
open -e Podfile
This creates an empty file called Podfile and opens it with TextEdit. Copy and paste the following lines into the TextEdit window:
platform :ios, '7.0'

pod 'ReactiveCocoa', '2.1.8'
This sets the platform to iOS, the minimum SDK version to 7.0, and adds the ReactiveCocoa framework as a dependency.
Once you’ve saved this file, go back to the Terminal window and issue the following command:
pod install
You should see an output similar to the following:
Analyzing dependencies
Downloading dependencies
Installing ReactiveCocoa (2.1.8)
Generating Pods project
Integrating client project

[!] From now on use `RWReactivePlayground.xcworkspace`.
This indicates that the ReactiveCocoa framework has been downloaded, and CocoaPods has created an Xcode workspace to integrate the framework into your existing application.
Open up the newly generated workspace, RWReactivePlayground.xcworkspace, and look at the structure CocoaPods created inside the Project Navigator:

You should see that CocoaPods created a new workspace and added the original project, RWReactivePlayground, together with a Pods project that includes ReactiveCocoa. CocoaPods really does make managing dependencies a breeze!
You’ll notice this project’s name is ReactivePlayground, so that must mean it’s time to play …
Time To Play
As mentioned in the introduction, ReactiveCocoa provides a standard interface for handling the disparate stream of events that occur within your application. In ReactiveCocoa terminology these are called signals, and are represented by the RACSignal class.
Open the initial view controller for this app, RWViewController.m, and import the ReactiveCocoa header by adding the following to the top of the file:
#import <ReactiveCocoa/ReactiveCocoa.h>
You aren’t going to replace any of the existing code just yet, for now you’re just going to play around a bit. Add the following code to the end of the viewDidLoad method:
[self.usernameTextField.rac_textSignal subscribeNext:^(id x) {
  NSLog(@"%@", x);
}];
Build and run the application and type some text into the username text field. Keep an eye on the console and look for an output similar to the following:
2013-12-24 14:48:50.359 RWReactivePlayground[9193:a0b] i
2013-12-24 14:48:50.436 RWReactivePlayground[9193:a0b] is
2013-12-24 14:48:50.541 RWReactivePlayground[9193:a0b] is
2013-12-24 14:48:50.695 RWReactivePlayground[9193:a0b] is t
2013-12-24 14:48:50.831 RWReactivePlayground[9193:a0b] is th
2013-12-24 14:48:50.878 RWReactivePlayground[9193:a0b] is thi
2013-12-24 14:48:50.901 RWReactivePlayground[9193:a0b] is this
2013-12-24 14:48:51.009 RWReactivePlayground[9193:a0b] is this
2013-12-24 14:48:51.142 RWReactivePlayground[9193:a0b] is this m
2013-12-24 14:48:51.236 RWReactivePlayground[9193:a0b] is this ma
2013-12-24 14:48:51.335 RWReactivePlayground[9193:a0b] is this mag
2013-12-24 14:48:51.439 RWReactivePlayground[9193:a0b] is this magi
2013-12-24 14:48:51.535 RWReactivePlayground[9193:a0b] is this magic
2013-12-24 14:48:51.774 RWReactivePlayground[9193:a0b] is this magic?
You can see that each time you change the text within the text field, the code within the block executes. No target-action, no delegates — just signals and blocks. That’s pretty exciting!
ReactiveCocoa signals (represented by RACSignal) send a stream of events to their subscribers. There are three types of events to know: next, error and completed. A signal may send any number of next events before it terminates after an error, or it completes. In this part of the tutorial you’ll focus on the next event. Be sure to read part two when it’s available to learn about error and completed events.
RACSignal has a number of methods you can use to subscribe to these different event types. Each method takes one or more blocks, with the logic in your block executing when an event occurs. In this case, you can see that the subscribeNext: method was used to supply a block that executes on each next event.
The ReactiveCocoa framework uses categories to add signals to many of the standard UIKit controls so you can add subscriptions to their events, which is where the rac_textSignal property on the text field came from.
But enough with the theory, it’s time to start making ReactiveCocoa do some work for you!
ReactiveCocoa has a large range of operators you can use to manipulate streams of events. For example, assume you’re only interested in a username if it’s more than three characters long. You can achieve this by using the filteroperator. Update the code you added previously in viewDidLoad to the following:
[[self.usernameTextField.rac_textSignal
  filter:^BOOL(id value) {
    NSString *text = value;
    return text.length > 3;
  }]
  subscribeNext:^(id x) {
    NSLog(@"%@", x);
  }];
If you build and run, then type some text into the text field, you should find that it only starts logging when the text field length is greater than three characters:
2013-12-26 08:17:51.335 RWReactivePlayground[9654:a0b] is t
2013-12-26 08:17:51.478 RWReactivePlayground[9654:a0b] is th
2013-12-26 08:17:51.526 RWReactivePlayground[9654:a0b] is thi
2013-12-26 08:17:51.548 RWReactivePlayground[9654:a0b] is this
2013-12-26 08:17:51.676 RWReactivePlayground[9654:a0b] is this
2013-12-26 08:17:51.798 RWReactivePlayground[9654:a0b] is this m
2013-12-26 08:17:51.926 RWReactivePlayground[9654:a0b] is this ma
2013-12-26 08:17:51.987 RWReactivePlayground[9654:a0b] is this mag
2013-12-26 08:17:52.141 RWReactivePlayground[9654:a0b] is this magi
2013-12-26 08:17:52.229 RWReactivePlayground[9654:a0b] is this magic
2013-12-26 08:17:52.486 RWReactivePlayground[9654:a0b] is this magic?
What you’ve created here is a very simple pipeline. It is the very essence of Reactive Programming, where you express your application’s functionality in terms of data flows.
It can help to picture these flows graphically:

In the above diagram you can see that the rac_textSignal is the initial source of events. The data flows through a filter that only allows events to pass if they contain a string with a length that is greater than three. The final step in the pipeline is subscribeNext: where your block logs the event value.
At this point it’s worth noting that the output of the filter operation is also an RACSignal. You could arrange the code as follows to show the discrete pipeline steps:
RACSignal *usernameSourceSignal =
    self.usernameTextField.rac_textSignal;

RACSignal *filteredUsername = [usernameSourceSignal
  filter:^BOOL(id value) {
    NSString *text = value;
    return text.length > 3;
  }];

[filteredUsername subscribeNext:^(id x) {
  NSLog(@"%@", x);
}];
Because each operation on an RACSignal also returns an RACSignal it’s termed a fluent interface. This feature allows you to construct pipelines without the need to reference each step using a local variable.
A Little Cast
If you updated your code to split it into the various RACSignal components, now is the time to revert it back to the fluent syntax:
[[self.usernameTextField.rac_textSignal
  filter:^BOOL(id value) {
    NSString *text = value; // implicit cast
    return text.length > 3;
  }]
  subscribeNext:^(id x) {
    NSLog(@"%@", x);
  }];
The implicit cast from id to NSString, at the indicated location in the code above, is less than elegant. Fortunately, since the value passed to this block is always going to be an NSString, you can change the parameter type itself. Update your code as follows:
[[self.usernameTextField.rac_textSignal
  filter:^BOOL(NSString *text) {
    return text.length > 3;
  }]
  subscribeNext:^(id x) {
    NSLog(@"%@", x);
  }];
Build and run to confirm this works just as it did previously.
What’s An Event?
So far this tutorial has described the different event types, but hasn’t detailed the structure of these events. What’s interesting is that an event can contain absolutely anything!
As an illustration of this point, you’re going to add another operation to the pipeline. Update the code you added to viewDidLoad as follows:
[[[self.usernameTextField.rac_textSignal
  map:^id(NSString *text) {
    return @(text.length);
  }]
  filter:^BOOL(NSNumber *length) {
    return [length integerValue] > 3;
  }]
  subscribeNext:^(id x) {
    NSLog(@"%@", x);
  }];
If you build and run you’ll find the app now logs the length of the text instead of the contents:
2013-12-26 12:06:54.566 RWReactivePlayground[10079:a0b] 4
2013-12-26 12:06:54.725 RWReactivePlayground[10079:a0b] 5
2013-12-26 12:06:54.853 RWReactivePlayground[10079:a0b] 6
2013-12-26 12:06:55.061 RWReactivePlayground[10079:a0b] 7
2013-12-26 12:06:55.197 RWReactivePlayground[10079:a0b] 8
2013-12-26 12:06:55.300 RWReactivePlayground[10079:a0b] 9
2013-12-26 12:06:55.462 RWReactivePlayground[10079:a0b] 10
2013-12-26 12:06:55.558 RWReactivePlayground[10079:a0b] 11
2013-12-26 12:06:55.646 RWReactivePlayground[10079:a0b] 12
The newly added map operation transforms the event data using the supplied block. For each next event it receives, it runs the given block and emits the return value as a next event. In the code above, the map takes the NSStringinput and takes its length, which results in an NSNumber being returned.
For a stunning graphic depiction of how this works, take a look at this image:
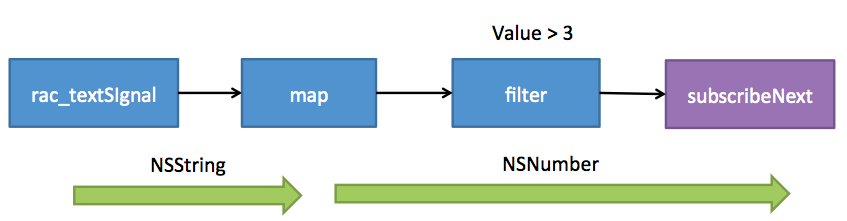
As you can see, all of the steps that follow the map operation now receive NSNumber instances. You can use the map operation to transform the received data into anything you like, as long as it’s an object.
text.length property returns an
NSUInteger, which is a primitive type. In order to use it as the contents of an event, it must be boxed. Fortunately the
Objective-C literal syntax provides and option to do this in a rather concise manner –
@(text.length).
That’s enough playing! It’s time to update the ReactivePlayground app to use the concepts you’ve learned so far. You may remove all of the code you’ve added since you started this tutorial.
Creating Valid State Signals
The first thing you need to do is create a couple of signals that indicate whether the username and password text fields are valid. Add the following to the end of viewDidLoad in RWViewController.m:
RACSignal *validUsernameSignal =
  [self.usernameTextField.rac_textSignal
    map:^id(NSString *text) {
      return @([self isValidUsername:text]);
    }];

RACSignal *validPasswordSignal =
  [self.passwordTextField.rac_textSignal
    map:^id(NSString *text) {
      return @([self isValidPassword:text]);
    }];
As you can see, the above code applies a map transform to the rac_textSignal from each text field. The output is a boolean value boxed as a NSNumber.
The next step is to transform these signals so that they provide a nice background color to the text fields. Basically, you subscribe to this signal and use the result to update the text field background color. One viable option is as follows:
[[validPasswordSignal
  map:^id(NSNumber *passwordValid) {
    return [passwordValid boolValue] ? [UIColor clearColor] : [UIColor yellowColor];
  }]
  subscribeNext:^(UIColor *color) {
    self.passwordTextField.backgroundColor = color;
  }];
(Please don’t add this code, there’s a much more elegant solution coming!)
Conceptually you’re assigning the output of this signal to the backgroundColor property of the text field. However, the code above is a poor expression of this; it’s all backwards!
Fortunately, ReactiveCocoa has a macro that allows you to express this with grace and elegance. Add the following code directly beneath the two signals you added to viewDidLoad:
RAC(self.passwordTextField, backgroundColor) =
  [validPasswordSignal
    map:^id(NSNumber *passwordValid) {
      return [passwordValid boolValue] ? [UIColor clearColor] : [UIColor yellowColor];
    }];

RAC(self.usernameTextField, backgroundColor) =
  [validUsernameSignal
    map:^id(NSNumber *passwordValid) {
     return [passwordValid boolValue] ? [UIColor clearColor] : [UIColor yellowColor];
    }];
The RAC macro allows you to assign the output of a signal to the property of an object. It takes two arguments, the first is the object that contains the property to set and the second is the property name. Each time the signal emits a next event, the value that passes is assigned to the given property.
This is a very elegant solution, don’t you think?
One last thing before you build and run. Locate the updateUIState method and remove the first two lines:
self.usernameTextField.backgroundColor = self.usernameIsValid ? [UIColor clearColor] : [UIColor yellowColor];
self.passwordTextField.backgroundColor = self.passwordIsValid ? [UIColor clearColor] : [UIColor yellowColor];
That will clean up the non-reactive code.
Build and run the application. You should find that the text fields look highlighted when invalid, and clear when valid.
Visuals are nice, so here is a way to visualize the current logic. Here you can see two simple pipelines that take the text signals, map them to validity-indicating booleans, and then follow with a second mapping to a UIColor which is the part that binds to the background color of the text field.

Are you wondering why you created separate validPasswordSignal and validUsernameSignal signals, as opposed to a single fluent pipeline for each text field? Patience dear reader, the method behind this madness will become clear shortly!
Combining signals
In the current app, the Sign In button only works when both the username and password text fields have valid input. It’s time to do this reactive-style!
The current code already has signals that emit a boolean value to indicate if the username and password fields are valid; validUsernameSignal and validPasswordSignal. Your task is to combine these two signals to determine when it is okay to enable the button.
At the end of viewDidLoad add the following:
RACSignal *signUpActiveSignal =
  [RACSignal combineLatest:@[validUsernameSignal, validPasswordSignal]
                    reduce:^id(NSNumber *usernameValid, NSNumber *passwordValid) {
                      return @([usernameValid boolValue] && [passwordValid boolValue]);
                    }];
The above code uses the combineLatest:reduce: method to combine the latest values emitted by validUsernameSignal and validPasswordSignal into a shiny new signal. Each time either of the two source signals emits a new value, the reduce block executes, and the value it returns is sent as the next value of the combined signal.
RACSignal combine methods can combine any number of signals, and the arguments of the reduce block correspond to each of the source signals. ReactiveCocoa has a cunning little utility class,
RACBlockTrampoline that handles the reduce block’s variable argument list internally. In fact, there are a lot of cunning tricks hidden within the ReactiveCocoa implementation, so it’s well worth pulling back the covers!
Now that you have a suitable signal, add the following to the end of viewDidLoad. This will wire it up to the enabled property on the button:
[signUpActiveSignal subscribeNext:^(NSNumber *signupActive) {
   self.signInButton.enabled = [signupActive boolValue];
 }];
Before running this code, it’s time to rip out the old implementation. Remove these two properties from the top of the file:
@property (nonatomic) BOOL passwordIsValid;
@property (nonatomic) BOOL usernameIsValid;
From near the top of viewDidLoad, remove the following:
// handle text changes for both text fields
[self.usernameTextField addTarget:self
                           action:@selector(usernameTextFieldChanged)
                 forControlEvents:UIControlEventEditingChanged];
[self.passwordTextField addTarget:self
                           action:@selector(passwordTextFieldChanged)
                 forControlEvents:UIControlEventEditingChanged];
Also remove the updateUIState, usernameTextFieldChanged and passwordTextFieldChanged methods. Whew! That’s a lot of non-reactive code you just disposed of! You’ll be thankful you did.
Finally, make sure to remove the call to updateUIState from viewDidLoad as well.
If you build and run, check the Sign In button. It should be enabled because the username and password text fields are valid, as they were before.
An update to the application logic diagram gives the following:

The above illustrates a couple of important concepts that allow you to perform some pretty powerful tasks with ReactiveCocoa;
- Splitting – signals can have multiple subscribers and serve as the source for more multiple subsequent pipeline steps. In the above diagram, note that the boolean signals that indicate password and username validity are split and used for a couple of different purposes.
- Combining – multiple signals may be combined to create new signals. In this case, two boolean signals were combined. However, you can combine signals that emit any value type.
The result of these changes is the application no longer has private properties that indicate the current valid state of the two text fields. This is one of the key differences you’ll find when you adopt a reactive style — you don’t need to use instance variables to track transient state.
Reactive Sign-in
The application currently uses the reactive pipelines illustrated above to manage the state of the text fields and button. However, the button press handling still uses actions, so the next step is to replace the remaining application logic in order to make it all reactive!
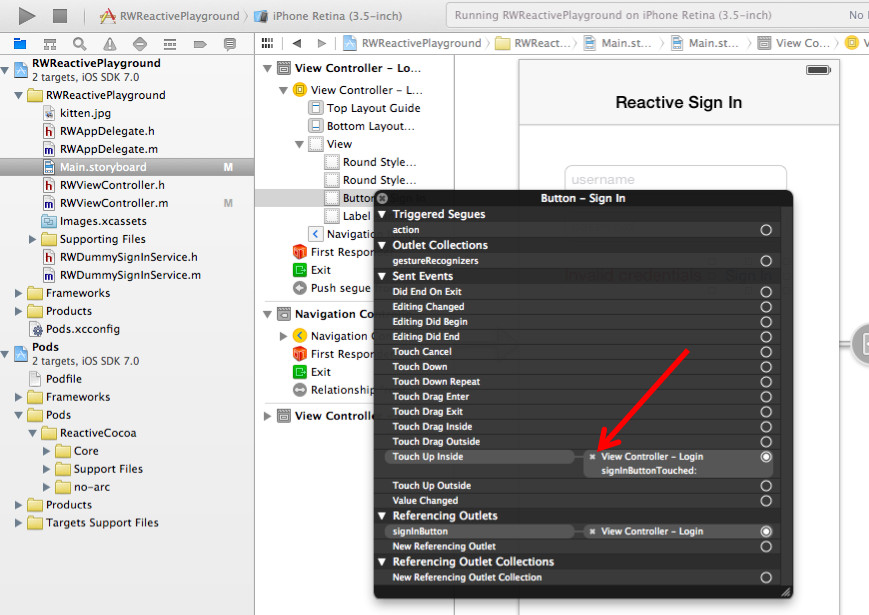
The Touch Up Inside event on the Sign In button is wired up to the signInButtonTouched method in RWViewController.m via a storyboard action. You’re going to replace this with the reactive equivalent, so you first need to disconnect the current storyboard action.
Open up Main.storyboard, locate the Sign In button, ctrl-click to bring up the outlet / action connections and click the x to remove the connection. If you feel a little lost, the diagram below kindly shows where to find the delete button:
You’ve already seen how the ReactiveCocoa framework adds properties and methods to the standard UIKit controls. So far you’ve used rac_textSignal, which emits events when the text changes. In order to handle events you need to use another of the methods that ReactiveCocoa adds to UIKit, rac_signalForControlEvents.
Returning to RWViewController.m, add the following to the end of viewDidLoad:
[[self.signInButton
   rac_signalForControlEvents:UIControlEventTouchUpInside]
   subscribeNext:^(id x) {
     NSLog(@"button clicked");
   }];
The above code creates a signal from the button’s UIControlEventTouchUpInside event and adds a subscription to make a log entry every time this event occurs.
Build and run to confirm the message actually logs. Bear in mind that the button will enable only when the username and password are valid, so be sure to type some text into both fields before tapping the button!
You should see messages in the Xcode console similar to the following:
2013-12-28 08:05:10.816 RWReactivePlayground[18203:a0b] button clicked
2013-12-28 08:05:11.675 RWReactivePlayground[18203:a0b] button clicked
2013-12-28 08:05:12.605 RWReactivePlayground[18203:a0b] button clicked
2013-12-28 08:05:12.766 RWReactivePlayground[18203:a0b] button clicked
2013-12-28 08:05:12.917 RWReactivePlayground[18203:a0b] button clicked
Now that the button has a signal for the touch event, the next step is to wire this up with the sign-in process itself. This presents something of a problem — but that’s good, you don’t mind a problem, right? Open up RWDummySignInService.h and take a look at the interface:
typedef void (^RWSignInResponse)(BOOL);

@interface RWDummySignInService : NSObject

- (void)signInWithUsername:(NSString *)username
                  password:(NSString *)password
                  complete:(RWSignInResponse)completeBlock;

@end
This service takes a username, a password and a completion block as parameters. The given block is run when the sign-in is successful or when it fails. You could use this interface directly within the subscribeNext: block that currently logs the button touch event, but why would you? This is the kind of asynchronous, event-based behavior that ReactiveCocoa eats for breakfast!
Creating Signals
Fortunately, it’s rather easy to adapt existing asynchronous APIs to be expressed as a signal. First, remove the current signInButtonTouched: method from the RWViewController.m. You don’t need this logic as it will be replaced with a reactive equivalent.
Stay in RWViewController.m and add the following method:
-(RACSignal *)signInSignal {
  return [RACSignal createSignal:^RACDisposable *(id<RACSubscriber> subscriber) {
    [self.signInService
     signInWithUsername:self.usernameTextField.text
     password:self.passwordTextField.text
     complete:^(BOOL success) {
       [subscriber sendNext:@(success)];
       [subscriber sendCompleted];
     }];
    return nil;
  }];
}
The above method creates a signal that signs in with the current username and password. Now for a breakdown of its component parts.
The above code uses the createSignal: method on RACSignal for signal creation. The block that describes this signal is a single argument, and is passed to this method. When this signal has a subscriber, the code within this block executes.
The block is passed a single subscriber instance that adopts the RACSubscriber protocol, which has methods you invoke in order to emit events; you may also send any number of next events, terminated with either an error or complete event. In this case, it sends a single next event to indicate whether the sign-in was a success, followed by a complete event.
The return type for this block is an RACDisposable object, and it allows you to perform any clean-up work that might be required when a subscription is cancelled or trashed. This signal does not have any clean-up requirements, hence nil is returned.
As you can see, it’s surprisingly simple to wrap an asynchronous API in a signal!
Now to make use of this new signal. Update the code you added to the end of viewDidLoad in the previous section as follows:
[[[self.signInButton
   rac_signalForControlEvents:UIControlEventTouchUpInside]
   map:^id(id x) {
     return [self signInSignal];
   }]
   subscribeNext:^(id x) {
     NSLog(@"Sign in result: %@", x);
   }];
The above code uses the map method used earlier to transform the button touch signal into the sign-in signal. The subscriber simply logs the result.
If you build and run, then tap the Sign In button, and take a look at the Xcode console, you’ll see the result of the above code …
… and the result isn’t quite what you might have expected!
2014-01-08 21:00:25.919 RWReactivePlayground[33818:a0b] Sign in result:
                                   <RACDynamicSignal: 0xa068a00> name: +createSignal:
The subscribeNext: block has been passed a signal all right, but not the result of the sign-in signal!
Time to illustrate this pipeline so you can see what’s going on:

The rac_signalForControlEvents emits a next event (with the source UIButton as its event data) when you tap the button. The map step creates and returns the sign-in signal, which means the following pipeline steps now receive a RACSignal. That is what you’re observing at the subscribeNext: step.
The situation above is sometimes called the signal of signals; in other words an outer signal that contains an inner signal. If you really wanted to, you could subscribe to the inner signal within the outer signal’s subscribeNext: block. However it would result in a nested mess! Fortunately, it’s a common problem, and ReactiveCocoa is ready for this scenario.
Signal of Signals
The solution to this problem is straightforward, just change the map step to a flattenMap step as shown below:
[[[self.signInButton
   rac_signalForControlEvents:UIControlEventTouchUpInside]
   flattenMap:^id(id x) {
     return [self signInSignal];
   }]
   subscribeNext:^(id x) {
     NSLog(@"Sign in result: %@", x);
   }];
This maps the button touch event to a sign-in signal as before, but also flattens it by sending the events from the inner signal to the outer signal.
Build and run, and keep an eye on the console. It should now log whether the sign-in was successful or not:
2013-12-28 18:20:08.156 RWReactivePlayground[22993:a0b] Sign in result: 0
2013-12-28 18:25:50.927 RWReactivePlayground[22993:a0b] Sign in result: 1
Exciting stuff!
Now that the pipeline is doing what you want, the final step is to add the logic to the subscribeNext step to perform the required navigation upon successful sign-in. Replace the pipeline with the following:
[[[self.signInButton
  rac_signalForControlEvents:UIControlEventTouchUpInside]
  flattenMap:^id(id x) {
    return [self signInSignal];
  }]
  subscribeNext:^(NSNumber *signedIn) {
    BOOL success = [signedIn boolValue];
    self.signInFailureText.hidden = success;
    if (success) {
      [self performSegueWithIdentifier:@"signInSuccess" sender:self];
    }
  }];
The subscribeNext: block takes the result from the sign-in signal, updates the visibility of the signInFailureTexttext field accordingly, and performs the navigation segue if required.
Build and run to enjoy the kitten once more! Meow!
Did you notice there is one small user experience issue with the current application? When the sign-in service validates the supplied credentials, is should disable the Sign In button. This prevents the user from repeating the same sign-in. Furthermore, if a failed sign-in attempt occurred, the error message should be hidden when the user tries to sign-in once again.
But how should you add this logic to the current pipeline? Changing the button’s enabled state isn’t a transformation, filter or any of the other concepts you’ve encountered so far. Instead, it’s what is known as a side-effect; or logic you want to execute within a pipeline when a next event occurs, but it does not actually change the nature of the event itself.
Adding side-effects
Replace the current pipeline with the following:
[[[[self.signInButton
   rac_signalForControlEvents:UIControlEventTouchUpInside]
   doNext:^(id x) {
     self.signInButton.enabled = NO;
     self.signInFailureText.hidden = YES;
   }]
   flattenMap:^id(id x) {
     return [self signInSignal];
   }]
   subscribeNext:^(NSNumber *signedIn) {
     self.signInButton.enabled = YES;
     BOOL success = [signedIn boolValue];
     self.signInFailureText.hidden = success;
     if (success) {
       [self performSegueWithIdentifier:@"signInSuccess" sender:self];
     }
   }];
You can see how the above adds a doNext: step to the pipeline immediately after button touch event creation. Notice that the doNext: block does not return a value, because it’s a side-effect; it leaves the event itself unchanged.
The doNext: block above sets the button enabled property to NO, and hides the failure text. Whilst the subscribeNext: block re-enables the button, and either displays or hides the failure text based on the result of the sign-in.
It’s time to update the pipeline diagram to include this side effect. Bask in all it’s glory:

Build and run the application to confirm the Sign In button enables and disables as expected.
And with that, your work is done – the application is now fully reactive. Woot!
If you got lost along the way, you can download the final project (complete with dependencies), or you can obtain the code from GitHub, where there is a commit to match each build and run step in this tutorial.
Note: Disabling buttons while some asynchronous activity is underway is a common problem, and once again ReactiveCocoa is all over this little snafu. The RACCommand encapsulates this concept, and has an enabled signal that allows you to wire up the enabled property of a button to a signal. You might want to give the class a try.
Conclusions

Hopefully this tutorial has given you a good foundation that will help you when starting to use ReactiveCocoa in your own applications. It can take a bit of practice to get used to the concepts, but like any language or program, once you get the hang of it it’s really quite simple. At the very core of ReactiveCocoa are signals, which are nothing more than streams of events. What could be simpler than that?
With ReactiveCocoa one of the interesting things I have found is there are numerous ways in which you can solve the same problem. You might want to experiment with this application, and adjust the signals and pipelines to change the way they split and combine.
It’s worth considering that the main goal of ReactiveCocoa is to make your code cleaner and easier to understand. Personally I find it easier to understand what an application does if its logic is represented as clear pipelines, using the fluent syntax.
In the second part of this tutorial series you’ll learn about more advanced subjects such as error handing and how to manage code that executes on different threads. Until then, have fun experimenting!


 1195
1195


 被折叠的 条评论
为什么被折叠?
被折叠的 条评论
为什么被折叠?
 到【灌水乐园】发言


