


pureMVC 是一个轻量级的框架 它在 flex中非常流行(和cairngorm差不多火)
目前几乎已经移植到所有平台上。
下面实现java版得pureMVC搭建
先给大家看总体的层次:
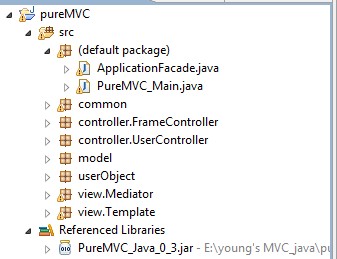
众所周知 pureMVC是一个轻量级的MVC框架 分为 Model ,View ,Controller。这三个是pureMVC的核心。
除此之外pureMVC中含有一个单例模式Facade。facade负责与Model,View,Controller通信。这样就简化了开发的复杂度。
所以首先需要编写单一模式类facade 也就是上图的 ApplicationFacade.java
public class ApplicationFacade extends Facade {

    //
    private static ApplicationFacade instance = null;

    //启动的主程序实例
    private PureMVC_Main main ;
    /**
     *
     * @return
     */
    public static ApplicationFacade getInstance(){
        if( instance == null) instance = new ApplicationFacade ();
        return instance ;
    }

    /**
     *
     */
    protected void initializeController() {
         trace.d("ApplicationFacade.initController()");
         super.initializeController();
         registerCommand(NotiName.NOTI_START, StartupCommand.class);
    }

    /**
     *
     * @param main
     */
    public void startup(PureMVC_Main _main) {
     trace.d("ApplicationFacade.startup");
	 this.main = _main;
	 //发送通知(notification)给控制器 ,通知名称为 NotiName.NOTI_START(这个String是自己定义的)
	 //sendNotification是用来发送消息的函数 这是一个全局的函数 。
	 //三个参数为 String 通知名称
	 //			 Object 通知要传递的内容可以是任何对象
	 //          String 一般默认为null
	 //这个通知会在 StartCommand.java中被处理。
	 this.sendNotification(NotiName.NOTI_START, null, null);
    }
}
这样保证了静态变量facade只有一个实例instance
而这个getInstance 择有具体的main程序来调用,当调用时 框架就启动了。
同时在main程序启动框架时,需要同时调用startup方法,
startup方法做了这么几件事情
1.将main程序的引用传给了facade
2.注册了控制器startupCommand。
public class StartupCommand extends MacroCommand{
    protected void initializeMacroCommand() {
        trace.d("PrepStartUpCommand.initializeMacroCommand()");
        addSubCommand(PrepModelCommand.class);
        addSubCommand(PrepControllerCommand.class);
        addSubCommand(PrepViewCommand.class);
    }
}
而startupCommand又注册了另外3个控制器,他们的作用分别是
注册代理:
public class PrepModelCommand extends SimpleCommand implements ICommand{

    public void execute(INotification noti){
        trace.d("PrepModelCommand.execute()");
        this.facade.registerProxy(new LoginProxy());
    }
}
让Mediator得到页面的引用
public class PrepViewCommand extends SimpleCommand implements ICommand{

    public void execute(INotification noti){
        trace.d("PrepViewCommand.execute("+ noti.getName() + ")");

        this.facade.registerMediator(new LoginMediator(new LoginWindow()));
    }
}
还有一个 是保存Controller与Command的映射,注册消息 与Command 当Command需要时 Command会被创建。
public class PrepControllerCommand extends SimpleCommand implements ICommand{

	/**
	 * 这个方法一定会被执行。用来分析传过来的消息(Notification:PureMVC中各个模块传递的信息)
	 */
    @Override
    public void execute(INotification noti){
        trace.d("PrepComtrollerCommand.excute()");
        this.facade.registerCommand(NotiName.NOTI_LOGIN, LoginCommand.class);
    }
}
这样框架就启动了。下面来说说登录的例子。
PureMVC 的View分为2个部分 一个是 纯的UI界面,另一个是Mediator模式
这种模式的好处在于他将UI界面(如loginWondow.java--登录界面)中所有的UI组件 比如 button textField ..封装在一起,通过保存UI界面的应用来调用他们。
打个比方就是:
一栋宿舍楼 ,每一间宿舍都是一个UI控件,真个宿舍楼就是一个Mediator,宿舍楼门口有看门的大爷,大爷知道所有宿舍的情况,。
当有人访问宿舍们需要知道具体某间宿舍的情况的时候 他只需要去问门卫大爷。不需要亲自走到那间宿舍。就能知道具体情况。
在Mediator中有2个重要方法:
 public String[] listNotificationInterests() {
        String[] list = {
            NotiName.LOGIN_SUCCESS, NotiName.LOGIN_FAILED
        };
        return list;
    }

	@Override
 public void handleNotification(INotification noti) {
        if (noti.getName().equals(NotiName.LOGIN_SUCCESS)){
	   trace.d("login success");
        }

        if (noti.getName().equals(NotiName.LOGIN_FAILED)){
	   trace.d("login failed " + noti.getBody().toString());
        }
    }
第一个方法罗列出 要接受的消息名字
第二个方法进行处理消息。
再看以下代码
public LoginMediator(LoginWindow v) {
		super(NAME, null);
		// TODO Auto-generated constructor stub
		this.setViewComponent(v);
		view = v;
		v.setVisible(true);

		v.btnLogin.addActionListener(new ActionListener(){
			public void actionPerformed(ActionEvent e) {
				// TODO Auto-generated method stub
				login();
			}
		});
	}

	private void login(){
		//得到所有用户登录的信息 就是界面上输入的信息
		User user = new User(
						view.txtName.getText(),
						view.pwdPwd.getText()
							);
		//将这个信息发送给LoginCommand.java控制器。
		//注意这个消息要在 prepControllerCommand.java中注册 建立Mediator到Command的映射关系
		sendNotification(NotiName.NOTI_LOGIN,user,null);
	}
在Mediator中 处理了所有UI中的事件 比如说为Button添加监听
并且收集数据 (收集 用户名和密码)封装到User中(自动以Object),然后发送消息给Command,把这些数据也发送出去。
此时由于刚才在PrepControllerCommand.java中注册了这个消息 对应的LoginCommand会被激活,处理这个消息。
public class LoginCommand extends SimpleCommand implements ICommand {


	public void execute(INotification noti) {
		//根据对应的消息名字处理相关逻辑 并且调用后台(比如数据库)
	   if (noti.getName().equals(NotiName.NOTI_LOGIN) == true) {
	    	User user = (User)noti.getBody();

	    	LoginProxy lp = new LoginProxy();

	    	if(checkLogin(user))
	    		lp.login(user);
	    	else
	    		sendNotification((String) NotiName.LOGIN_FAILED,"User name should not be empty!",null);
	   }
	}

	private boolean checkLogin(User u){
		//username should not be empty
		if(u.getUsername() == null )return false;

		return true;
	}
}
这里处理这个消息买并且调用Model中的Proxy。Proxy负责进行数据操作,比如得到远程服务器的数据,或者与数据库进行交互。
处理完数据后 吧数据通过消息(Notification)发送给Mediator 整个流程就完成了。
public class LoginProxy extends Proxy{
	public static final String NAME = "LoginProxy";

	public LoginProxy() {
        super(NAME, null);
        trace.d("LoginProxy.LoginProxy()");
    }

	public void login(User user) {
		// TODO Auto-generated method stub
		//这里用来进行数据库操作 将User信息给数据库 ,并且返回信息。,返回方式 也是使用Notification
		//这里发送的Notification在Mediator中(handleNotification方法)处理 。
		//方便起见。,我这里就不写数据库操作了。

		if(user.getUsername().equals("young") )
			sendNotification(NotiName.LOGIN_SUCCESS,"login success!",null);
		else
			sendNotification(NotiName.LOGIN_FAILED,"login error ,wrong username",null);
	}

}
Mediator在HandleNotification中处理Proxy发来的消息
源代码下载(有详细注释):


 169
169

 被折叠的 条评论
为什么被折叠?
被折叠的 条评论
为什么被折叠?
 到【灌水乐园】发言


