


 本文详细介绍了如何使用Apache CXF框架发布和使用简单的WebService。从理解WebService概念开始,逐步介绍CXF的优势、安装配置过程、编写接口与实现类,到最终发布服务并编写客户端进行调用,还涉及了Spring集成的相关内容。
实战Web Service with CXF
目标
l 理解Web Servcie 的概念
l 理解Web Service 的体系结构和工作原理
l 运用Eclipse 和 CXF发布和使用简单的Web Servcie
Web Service 简介
l 定义
n 一个应用程序
n 一个服务,能通过网络,特别是互联网来描述、发布、定位及调用的服务。
l 各式各样的Web Service 解决方案
n Sun Microsystems:Sun ONE
n BEA WebLogic
n IBM WebLogic
n JBoss Application Server
n Microsoft: .NET
n Axis
n CXF
l 数据传输标准
n XML
l 通信协议
n SOAP : Simple Object Access Protocol
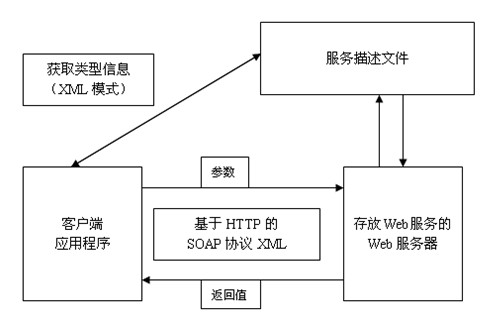
Web Service 体系结构

Web Service 工作原理
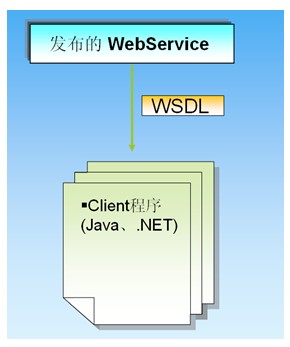
Web Service 服务和使用
l Web Service服务者
l Web Service 使用者
使用 Web 服务的原理
面向服务的体系架构
l 一个组件模型
l 将应用程序的不同功能单元(服务)通过这些服务之间定义良好的接口和契约联系起来。
l 构建在各种这样的系统中的服务可以以一种统一和通用的方式进行交互
使用Apache CXF开发Web Service
Apache CXF
l Apache CXF的前身是叫Apache CeltiXfire
l CXF 官方网站: http://incubator.apache.org/cxf/
l CXF继承自Celtix 和 XFire 两大开源项目
l 提供对JAX-WS全面支持
l 提供多种Binding、Data Binding、Transport 以及Format的支持
l 可以采用Code First 或者WSDL First 来实现Web Service的发布和使用
Apache CXF的优势
l JAX-WS Support
l Spring Integration
l Aegis Databinding
l Restful Services
l WS-* Support
l Apache Licensed
l CXF 的应用开发简单
l CXF 在Stand alone 方式下执行效率高
1. 下载和准备CXF
l 下载地址:http://cxf.apache.org/download.html
l 解压下载的软件包
2. 创建CXF 的library
l 打开Eclipse IDE for Java EE
l 在”Preference”菜单里,选中”Java->Build path-> User library”;
l 创建(new) 一个新的library(名为CXF),把cxf解压后的lib目录里的所有jar文件加入;
3. 创建一个Java项目
l 创建一个Java project
l 在项目的Library 里加入上一步定义的”cxf”库
4. 写Web Service 的接口
l 书写一个WebService的接口类
| package demo.ws.server; import javax.jws.WebParam; import javax.jws.WebService; @WebService public interface HelloWorld { String sayHi( @WebParam(name="text") String text ); } |
5. 写Web Service 的实现
l 书写一个 Web Service 的实现类
| package demo.ws.server; import javax.jws.WebService; @WebService(endpointInterface="demo.ws.server.HelloWorld",serviceName="HelloWorld") public class HelloWorldImpl implements HelloWorld { @Override public String sayHi(String text) { return "Hello" + text; } } |
6:写发布Web服务的代码
l 用Java应用程序发布一个Web服务
| package demo.ws.server; import javax.xml.ws.Endpoint; /** * 写发布Web服务的代码 */ public class WebServerApp {
public static void main(String[] args) { System.out.println("Starting Server"); HelloWorldImpl implementor = new HelloWorldImpl(); String address = "http://localhost:9000/HelloWorld"; Endpoint.publish(address, implementor); System.out.println("Server started."); } } |
7:发布Web服务
l 运行上一步编写的Web服务发布程序;
l 此程序启动了一个服务,会一直运行直至手工停止;
l 打开浏览器,访问http://localhost:9000/HelloWorld?wsdl,验证Web服务是否成功发布

出现上图效过,说明Web 服务发送成功。图片中圈中的name=”text”就是在HelloWorld接口中sayHi的参数@WebParam(name="text");
8:写Web服务客户端
| package demo.ws.server; import javax.xml.namespace.QName; import javax.xml.ws.Service; import javax.xml.ws.soap.SOAPBinding;
/** * 写Web服务的客户端 * @author Administrator */ public class HelloWordClient {
private static final QName SERVER_NAME =new QName("http://server.ws.demo/","HelloWorld"); private static final QName PORT_NAME =new QName("http://server.ws.demo/","HelloWorldPort");
public static void main(String[] args) { Service service = Service.create(SERVER_NAME); String endpointAddress = "http://localhost:9000/HelloWorld"; service.addPort(PORT_NAME, SOAPBinding.SOAP11HTTP_BINDING, endpointAddress); HelloWorld hw = service.getPort(HelloWorld.class); System.out.println(hw.sayHi("悟空")); } } |
9:运行Web服务客户端
l 运行Web服务客户端,检验效果

Spring 集成
l 在Spring 中定义服务器Bean;
| <beans xmlns="http://www.springframework.org/schema/beans" xmlns:xsi="http://www.w3.org/2001/XMLSchema-instance" xmlns:jaxws="http://cxf.apache.org/jaxws" xsi:schemaLocation=" http://www.springframework.org/schema/beans http://www.springframework.org/schema/beans/spring-beans.xsd http://cxf.apache.org/jaxws http://cxf.apache.org/schemas/jaxws.xsd">
<!-- 在spring中定义服务Bean --> <import resource="classpath:META-INF/cxf/cxf.xml" /> <import resource="classpath:META-INF/cxf/cxf-extension-soap.xml" /> <import resource="classpath:META-INF/cxf/cxf-servlet.xml" />
<!-- implementor指定的是接口的实现类 --> <jaxws:endpoint id="helloWorld" implementor="demo.ws.server.HelloWorldImpl" address="/HelloWorld" /> </beans> |
l 在Web.xml里设置CXFServlet;
| <?xml version="1.0" encoding="UTF-8"?> <web-app id="WebApp_ID" version="2.4" xmlns="http://java.sun.com/xml/ns/j2ee" xmlns:xsi="http://www.w3.org/2001/XMLSchema-instance" xsi:schemaLocation="http://java.sun.com/xml/ns/j2ee http://java.sun.com/xml/ns/j2ee/web-app_2_4.xsd">
<display-name>cxf</display-name> <!-- spring配置 --> <context-param> <param-name>contextConfigLocation</param-name> <param-value>classpath:beans.xml</param-value> </context-param> <listener> <listener-class> org.springframework.web.context.ContextLoaderListener </listener-class> </listener>
<!-- cxf配置 --> <servlet> <servlet-name>CXFServlet</servlet-name> <servlet-class> org.apache.cxf.transport.servlet.CXFServlet </servlet-class> <load-on-startup>1</load-on-startup> </servlet> <servlet-mapping> <servlet-name>CXFServlet</servlet-name> <url-pattern>/*</url-pattern> </servlet-mapping> </web-app> |
在这里,配置好后可以启动tomcat,会出现如下情况,说明发布成功

注意,在启动tomcat最好将cxf相关的.jar文件,放入WEB-INF/lib目录下,引用用户自定义的cxf库,我在发布的时候容易出现错误,把.jar文件全部放入WEB-INF/lib目录下就解决了。
l 客户端同样可以集成Spring---定义client的bean
| <beans xmlns="http://www.springframework.org/schema/beans" xmlns:xsi="http://www.w3.org/2001/XMLSchema-instance" xmlns:jaxws="http://cxf.apache.org/jaxws" xsi:schemaLocation=" http://www.springframework.org/schema/beans http://www.springframework.org/schema/beans/spring-beans.xsd http://cxf.apache.org/jaxws http://cxf.apache.org/schemas/jaxws.xsd">
<bean id="client" class="demo.ws.server.HelloWorld" factory-bean="clientFactory" factory-method="create"/> <bean id="clientFactory" class="org.apache.cxf.jaxws.JaxWsProxyFactoryBean"> <property name="serviceClass" value="demo.ws.server.HelloWorld" /> <property name="address" value="http://localhost:8080/cxf/HelloWorld" /> </bean> </beans> |
l 写Web服务客户端
| package demo.ws.server;
import org.springframework.context.ApplicationContext; import org.springframework.context.support.ClassPathXmlApplicationContext;
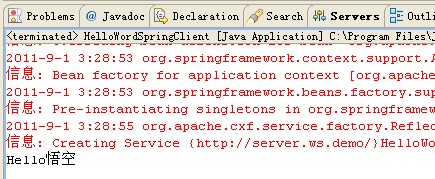
/** * 写Web服务的客户端 * @author Administrator */ public class HelloWordSpringClient { public static void main(String[] args) { ApplicationContext context = new ClassPathXmlApplicationContext("beans_client.xml"); HelloWorld helloWorld = (HelloWorld) context.getBean("client"); System.out.println(helloWorld.sayHi("悟空")); } } |
运行如下:
总结:
l Web Servcie 是一个应用程序,他能通过网络,特别是互联网来描述、发布、定位及调用服务;
l Web Servcie 体系结构包含三种角色:服务提供商、服务代理商和服务请求者。这些角色之间有相互存在着一些操作,他们分别是:发布、查找和绑定
l Web Service 是基于XML。它在Internet上一般使用SOAP进行传输;
l UDDI用于维护存储服务提供商及其服务信息的注册表;
l WSDL是用来描述Web Service的,客户端程序经常通过WSDL来使用Web Service;
程序下载地址:http://download.csdn.net/source/3565331


 67
67

 被折叠的 条评论
为什么被折叠?
被折叠的 条评论
为什么被折叠?
 到【灌水乐园】发言


