


四、编辑服务端代码
1、项目建成后,包含一些文件。
在src目录下相应包内有:HelloWorld.java、HelloWorldImpl.java和HelloWorldServer.java三个文件;
在META-INF/sca目录下有default.scdl文件;
在bin目录下有HelloWorld_sca.jar文件。如图所示: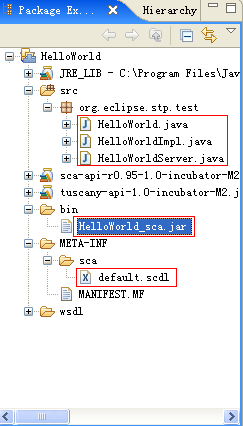
2、修改HelloWorld.java文件
原文件为:
package
org.eclipse.stp.test;
import org.osoa.sca.annotations.Remotable;
import org.osoa.sca.annotations.Service;
@Service()
@Remotable()
public interface HelloWorld {
}
import org.osoa.sca.annotations.Remotable;
import org.osoa.sca.annotations.Service;
@Service()
@Remotable()
public interface HelloWorld {
}
修改为:
package
org.eclipse.stp.test;
import org.osoa.sca.annotations.Remotable;
import org.osoa.sca.annotations.Service;
@Service()
@Remotable()
public interface HelloWorld {
public void sayHello(String value);
}
import org.osoa.sca.annotations.Remotable;
import org.osoa.sca.annotations.Service;
@Service()
@Remotable()
public interface HelloWorld {
public void sayHello(String value);
}
3、修改HelloWorldImpl.java文件
第一步、增加sayHello()方法
原文件为:
package
org.eclipse.stp.test;
import org.osoa.sca.annotations.Service;
import org.osoa.sca.annotations.OneWay;
@Service(org.eclipse.stp.test.HelloWorld. class )
public class HelloWorldImpl implements HelloWorld {
}
import org.osoa.sca.annotations.Service;
import org.osoa.sca.annotations.OneWay;
@Service(org.eclipse.stp.test.HelloWorld. class )
public class HelloWorldImpl implements HelloWorld {
}
修改为:(*注意:并没有完全修改完毕,这里只是手工添加了一个方法)
package
org.eclipse.stp.test;
import org.osoa.sca.annotations.Service;
import org.osoa.sca.annotations.Session;
@Session()
@Service(org.eclipse.stp.test.HelloWorld. class )
public class HelloWorldImpl implements HelloWorld {
public void sayHello(String value){
System.out.println( " Hello " + value);
}
}
import org.osoa.sca.annotations.Service;
import org.osoa.sca.annotations.Session;
@Session()
@Service(org.eclipse.stp.test.HelloWorld. class )
public class HelloWorldImpl implements HelloWorld {
public void sayHello(String value){
System.out.println( " Hello " + value);
}
}
第二步、利用工具为sayHello方法添加注释 Annotation
选中HelloWorldImpl.java中的sayHello方法名称,在Annotation view中会显示如图的信息将红色的OneWay设置成true。
图(1)选中方法。(下图)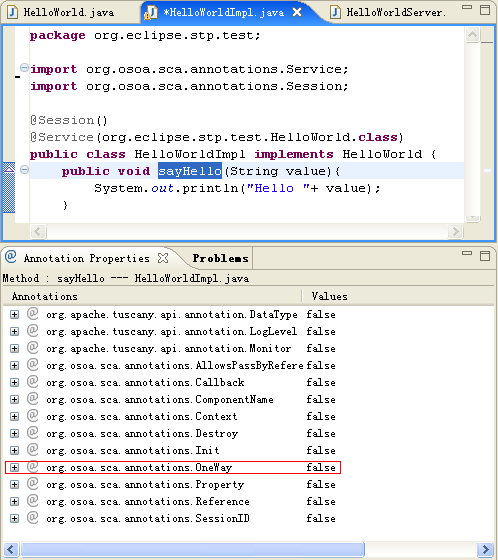
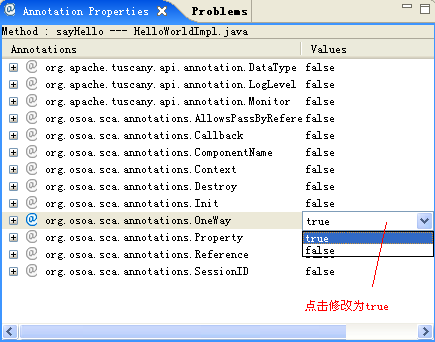
图(2)设置OneWay值为true。(下图)
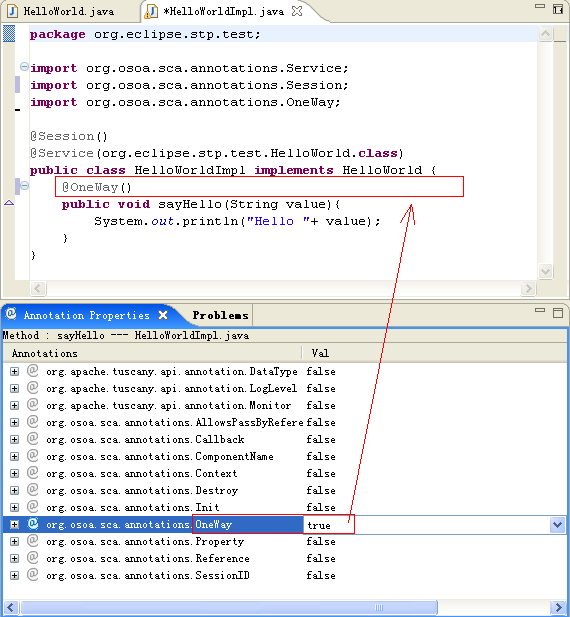
图(3)代码同步完成注释添加。(下图)
第三步、利用工具为HelloWorldImpl类添加注释 Annotation
选中HelloWorldImpl名,如图示: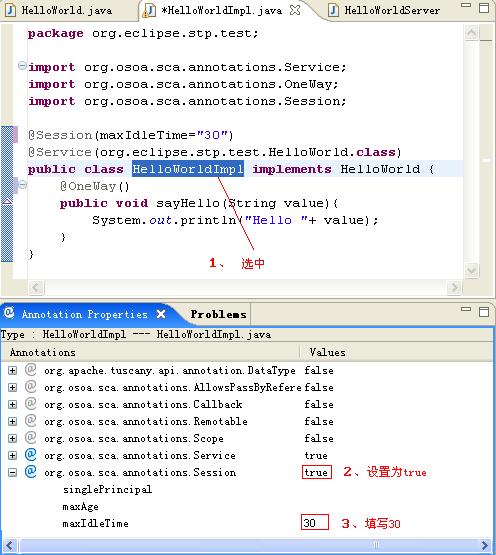
最后,代码修改完毕,如下:
package
org.eclipse.stp.test;
import org.osoa.sca.annotations.Service;
import org.osoa.sca.annotations.OneWay;
import org.osoa.sca.annotations.Session;
@Session(maxIdleTime = " 30 " )
@Service(org.eclipse.stp.test.HelloWorld. class )
public class HelloWorldImpl implements HelloWorld {
@OneWay()
public void sayHello(String value){
System.out.println( " Hello " + value);
}
}
五、创建客户端代码
第一步、新建java project ,选中Java Project,Next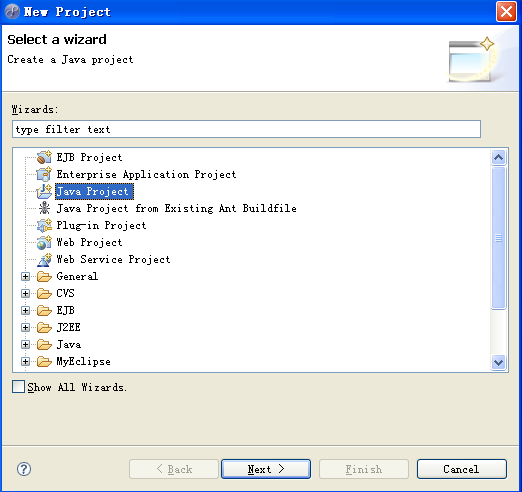
输入项目名称为:HelloWorldRMIClient,其他保持默认值,Next.
Java Settings也保持默认值,Finish.
第二步、创建一个新的Interface。文件如下:
package
org.eclipse.stp.test;
import java.rmi.Remote;
public interface HelloWorld extends Remote {
public void sayHello(String value);
}
import java.rmi.Remote;
public interface HelloWorld extends Remote {
public void sayHello(String value);
}
第三步、创建一个新的Class。文件如下:
package
org.eclipse.stp.test;
import java.rmi.Naming;
public class HelloWorldRMIClient {
public static void main(String[] args) {
try {
HelloWorld service = (HelloWorld)Naming.lookup( " rmi://localhost:1099/HelloWorldRemoteService " );
service.sayHello( " Welcome to SOA World ! " );
} catch (Exception e){
e.printStackTrace();
}
}
}
rmi信息参照:default.scdl文件中的rmi:binding.rmi内容,default.scdl内容如下:
<?
xml version="1.0" encoding="UTF-8"
?>
< composite xmlns ="http://www.osoa.org/xmlns/sca/1.0" xmlns:rmi ="http://incubator.apache.org/tuscany/xmlns/binding/rmi/1.0-incubator-M2" name ="HelloWorldComposite" >
< component name ="HelloWorldComponent" >
< implementation .java class ="org.eclipse.stp.test.HelloWorldImpl" />
</ component >
< service name ="HelloWorldService" >
< interface .java interface ="org.eclipse.stp.test.HelloWorld" />
< rmi:binding .rmi host ="localhost" port ="1099" serviceName ="HelloWorldRemoteService" />
< reference > HelloWorldComponent </ reference >
</ service >
</ composite >
<待续>


 1万+
1万+

 被折叠的 条评论
为什么被折叠?
被折叠的 条评论
为什么被折叠?
 到【灌水乐园】发言


