


原帖地址 :http://my.oschina.net/sfshine/blog/151673
左右滑动的控件我们使用的也是非常多了,但是基本上都是使用的viewpager 等 android基础的控件,那么我们有么有考虑过查看他的源码进行定制呢?当然,如果你自我感觉非常好的话可以自己定制一个,osc的ScrollLayout就是自己定义的View 和Viewpager的区别还是不小的
代码不是很多不到300行,但是却实现了左右滑动页面的效果,还是值得学习的.效果如下:

我们看到ScrollLayout直接继承了ViewGroup然后自定义了一系列功能,那么接下来就分析一下:
我们知道ViewGroup的绘制流程基本分为onMeasure ,onLayout ,onDraw三部分
那么就首先看onMeasure
@Override
    protected void onMeasure(int widthMeasureSpec, int heightMeasureSpec) {
        //Log.e(TAG, "onMeasure");
        super.onMeasure(widthMeasureSpec, heightMeasureSpec);
        final int width = MeasureSpec.getSize(widthMeasureSpec);
        final int widthMode = MeasureSpec.getMode(widthMeasureSpec);
        if (widthMode != MeasureSpec.EXACTLY) {
            throw new IllegalStateException(
                    "ScrollLayout only canmCurScreen run at EXACTLY mode!");
        }
        final int heightMode = MeasureSpec.getMode(heightMeasureSpec);
        if (heightMode != MeasureSpec.EXACTLY) {
            throw new IllegalStateException(
                    "ScrollLayout only can run at EXACTLY mode!");
        }

        // The children are given the same width and height as the scrollLayout
        final int count = getChildCount();
        for (int i = 0; i < count; i++) {
            getChildAt(i).measure(widthMeasureSpec, heightMeasureSpec);
        }
        // Log.e(TAG, "moving to screen "+mCurScreen);
        scrollTo(mCurScreen * width, 0);
    }
widthMode != MeasureSpec.EXACTLY
那么scrollTo的作用是什么呢?
其实我们可以把android View 认为是一个桌布,屏幕的左上角是 0,0 scrollTo 就是把这个view移动到某个位置.
如图来说明 0,0 表示屏幕的左上角 view调用了view.scrollTo(2,3)后就可以跳转到这个位置了~

至于我们的viewpager是如何工作的我们在看完onLayout后再说~
这一句话其实是检查是否width是"绝对大小" 其实也就是检查是否是确定的像素 如100dp或者 match_parent
如果是wrap_content就抛异常了.
然后就是把这个layout的孩子的宽高都和他自己一样:
final int count = getChildCount();
for (int i = 0; i < count; i++) {
getChildAt(i).measure(widthMeasureSpec, heightMeasureSpec);
}
最后是scrollTo(mCurScreen * width, 0); 滚动的当前的屏幕page中去.
然后重写了onLayout来layout 子View
@Override
    protected void onLayout(boolean changed, int l, int t, int r, int b) {
        int childLeft = 0;
        final int childCount = getChildCount();
        for (int i = 0; i < childCount; i++) {
            final View childView = getChildAt(i);
            if (childView.getVisibility() != View.GONE) {
                final int childWidth = childView.getMeasuredWidth();
                childView.layout(childLeft, 0, childLeft + childWidth,
                        childView.getMeasuredHeight());
                childLeft += childWidth;
            }
        }
    }
代码其实也很简单 就是把他的孩子横向排开, 宽度是前面measure获取的 然后调用父类的dispatchDraw 和 onDraw把他们画出来这些都不表了
接上面,那么这个pager是怎么像我们看到的那样可以左右滑动呢?
其实在layout的时候 这个控件会把他的孩子一字排开,如下图的红色方框所示.
我们知道,这个控件只有一个屏幕大小,那么他就会使用scrollTo 左右移动,如下图蓝色的部分,那么我们可以看到左右滑动的效果了.
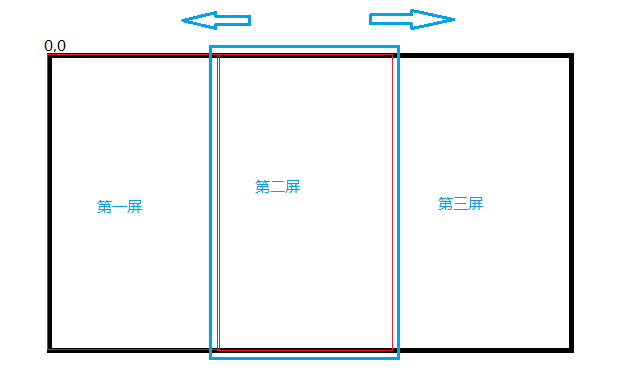
当然 这样其实只是实现"计算机"意义的滚动,因为这个滚动只用手机才能知道用户看上去只不过是其中一个屏幕而已,从一个屏幕跳转到另一个屏幕也没有什么过渡动画,这就想osc客户端关闭的左右滑动一样.虽然这个app确实是在左右滑动把各个孩子屏幕显示给用户,但是用户只能看到当前的屏幕而已
那么怎么让用户有看到左右滑动时候一个屏幕进入另一个屏幕退出的效果呢?
public void snapToScreen(int whichScreen) {
    //是否可滑动
    if(!isScroll) {
        this.setToScreen(whichScreen);
        return;
    }

    scrollToScreen(whichScreen);
}

public void scrollToScreen(int whichScreen) {
    // get the valid layout page
    whichScreen = Math.max(0, Math.min(whichScreen, getChildCount() - 1));
    if (getScrollX() != (whichScreen * getWidth())) {
        final int delta = whichScreen * getWidth() - getScrollX();
        mScroller.startScroll(getScrollX(), 0, delta, 0,
                Math.abs(delta) * 1);//持续滚动时间 以毫秒为单位
        mCurScreen = whichScreen;
        invalidate(); // Redraw the layout

        if (mOnViewChangeListener != null)
        {
            mOnViewChangeListener.OnViewChange(mCurScreen);
        }
    }
}
不可滑动的我们就不看了,其实就是个scrollTo 着重看可以滑动界面的实现,也就是scrollToScreen
我们知道,如果想让一个空间滑动,本质上其实是改变这个控件的坐标,然后不断的刷新屏幕,这样很多帧和在一起连续播放用户就可以感觉这个屏幕是在滚动了:
为了实现滚动这里用到了Scroller. Scroller可以认为是一个存储屏幕参数的容器,View需要做动画的时候就从Scroller中取出已经计算好坐标, 使用这个坐标不断的刷新屏幕,view的位置就不断变化了.
代码实现如下:
public void scrollToScreen(int whichScreen) {
        // get the valid layout page
        whichScreen = Math.max(0, Math.min(whichScreen, getChildCount() - 1));
        if (getScrollX() != (whichScreen * getWidth())) {
            final int delta = whichScreen * getWidth() - getScrollX();
            mScroller.startScroll(getScrollX(), 0, delta, 0,
                    Math.abs(delta) * 1);//持续滚动时间 以毫秒为单位
            mCurScreen = whichScreen;
            invalidate(); // Redraw the layout

            if (mOnViewChangeListener != null)
            {
                mOnViewChangeListener.OnViewChange(mCurScreen);
            }
        }
    }
核心代码是startScroll()函数 这个函数是android源码中的函数,具体作用其实是改变一些数值,他有五个参数
从(startx,starty) 到 (dx ,dy) 最后一个参数是在多少时间内完成这个操作 这个函数只是在这一段时间中计算移动到的坐标,并不会改变view的位置,view的位置一定是由draw来做的.
public void startScroll(int startX, int startY, int dx, int dy, int duration) {
       mMode = SCROLL_MODE;
       mFinished = false;
       mDuration = duration;
       mStartTime = AnimationUtils.currentAnimationTimeMillis();
       mStartX = startX;
       mStartY = startY;
       mFinalX = startX + dx;
       mFinalY = startY + dy;
       mDeltaX = dx;
       mDeltaY = dy;
       mDurationReciprocal = 1.0f / (float) mDuration;
   }
除了移动位置 ,还需要知道是否移动结束了,如果结束了就不要再刷新屏幕了 这个是通过Scroller的computeScrollOffset 函数实现的,如果移动没有结束就返回true否则返回false
这样完事具备就剩下刷新屏幕了~ 在scrollToScreen函数中一定调用了 invalidate()函数告诉View重新进行绘制.在绘制的过程中,其父View会调用Scrolllayout实现的computeScroll函数来真正的移动view的坐标这个是通过scrollTo函数实现的,而坐标就是从scroller中取到的.ok 上面图中的蓝色方框终于开始移动了,移动了一段距离后就执行postInvalidate()函数,我们知道,postInvallidate函数是 异步进行刷新 ,最后还是执行invalidate()函数,invalidate()又开始调用computeScroll ...这个死循环在mScroller.computeScrollOffset()为false的时候才会结束,这样动画也就执行完了,那他就滑动到下一屏了~
总之就是 invalidate ->computeScroll scrollTo->postInvalidate->invalidate 这样的死循环 终止的条件和坐标由scroller来决定
| 为了易于控制滑屏控制,Android框架提供了 computeScroll()方法去控制这个流程。在绘制View时,会在draw()过程调用该 方法。因此, 再配合使用Scroller实例,我们就可以获得当前应该的偏移坐标,手动使View/ViewGroup偏移至该处。 computeScroll()方法原型如下,该方法位于ViewGroup.java类中 |
| 我们像下面这样调用,postInvalidate执行后,会去调computeScroll 方法,而这个方法里再去调postInvalidate,这样就可以不断地去调用scrollTo方法了,直到mScroller动画 (computScroll 为 false)结束,当然第一次时,我们需要手动去调用一次postInvalidate才会去调用 |
@Override
    public void computeScroll() {
        if (mScroller.computeScrollOffset()) {
            scrollTo(mScroller.getCurrX(), mScroller.getCurrY());
            postInvalidate();
        }
    }
然后就是处理这个view的手势操作事件了 首先是对拦截事件的处理
这个控件有个用来表示当前view 所处运动状态的 标志位mTouchState
有两个值
TOUCH_STATE_REST:这个view停止运动
TOUCH_STATE_SCROLLING:这个view正在滚动
onInterceptTouchEvent就是用两个标志位来判断是否需要吧事件想view的孩子分配.代码如下:
实际上就是,手指在view的运动超过一定的距离就进行把state置为TOUCH_STATE_SCROLLING 这样返回的就是true, 于是事件让view自己处理 孩子获取不到到事件了,否则就把事件拦截
@Override
    public boolean onInterceptTouchEvent(MotionEvent ev) {
        //Log.e(TAG, "onInterceptTouchEvent-slop:" + mTouchSlop);
        final int action = ev.getAction();
        if ((action == MotionEvent.ACTION_MOVE)
                && (mTouchState != TOUCH_STATE_REST)) {
            return true;
        }
        final float x = ev.getX();
        final float y = ev.getY();
        switch (action) {
        case MotionEvent.ACTION_MOVE:
            final int xDiff = (int) Math.abs(mLastMotionX - x);
            if (xDiff > mTouchSlop) {
                mTouchState = TOUCH_STATE_SCROLLING;
            }
            break;
        case MotionEvent.ACTION_DOWN:
            mLastMotionX = x;
            mLastMotionY = y;
            mTouchState = mScroller.isFinished() ? TOUCH_STATE_REST
                    : TOUCH_STATE_SCROLLING;
            break;
        case MotionEvent.ACTION_CANCEL:
        case MotionEvent.ACTION_UP:
            mTouchState = TOUCH_STATE_REST;
            break;
        }
        return mTouchState != TOUCH_STATE_REST;
    }
事件拦截到后就会执行ScrollLayout的onTouch函数了
@Override
    public boolean onTouchEvent(MotionEvent event) {
        //是否可滑动
        if(!isScroll) {
            return false;
        }

        if (mVelocityTracker == null) {
            mVelocityTracker = VelocityTracker.obtain();
        }
        mVelocityTracker.addMovement(event);
        final int action = event.getAction();
        final float x = event.getX();
        final float y = event.getY();
        switch (action) {
        case MotionEvent.ACTION_DOWN:
            //Log.e(TAG, "event down!");
            if (!mScroller.isFinished()) {
                mScroller.abortAnimation();
            }
            mLastMotionX = x;

            //---------------New Code----------------------
            mLastMotionY = y;
            //---------------------------------------------

            break;
        case MotionEvent.ACTION_MOVE:
            int deltaX = (int) (mLastMotionX - x);

            //---------------New Code----------------------
            int deltaY = (int) (mLastMotionY - y);
            if(Math.abs(deltaX) < 200 && Math.abs(deltaY) > 10)
                break;
            mLastMotionY = y;
            //-------------------------------------

            mLastMotionX = x;
            scrollBy(deltaX, 0);
            break;
        case MotionEvent.ACTION_UP:
            //Log.e(TAG, "event : up");
            // if (mTouchState == TOUCH_STATE_SCROLLING) {
            final VelocityTracker velocityTracker = mVelocityTracker;
            velocityTracker.computeCurrentVelocity(1000);
            int velocityX = (int) velocityTracker.getXVelocity();
            //Log.e(TAG, "velocityX:" + velocityX);
            if (velocityX > SNAP_VELOCITY && mCurScreen > 0) {
                // Fling enough to move left
                //Log.e(TAG, "snap left");
                snapToScreen(mCurScreen - 1);
            } else if (velocityX < -SNAP_VELOCITY
                    && mCurScreen < getChildCount() - 1) {
                // Fling enough to move right
                //Log.e(TAG, "snap right");
                snapToScreen(mCurScreen + 1);
            } else {
                snapToDestination();
            }
            if (mVelocityTracker != null) {
                mVelocityTracker.recycle();
                mVelocityTracker = null;
            }
            // }
            mTouchState = TOUCH_STATE_REST;
            break;
        case MotionEvent.ACTION_CANCEL:
            mTouchState = TOUCH_STATE_REST;
            break;
        }
        return true;
    }
在用户手指放到view上移动的时候会通过
int deltaX = (int) (mLastMotionX - x);

            //---------------New Code----------------------
            int deltaY = (int) (mLastMotionY - y);
            if(Math.abs(deltaX) < 200 && Math.abs(deltaY) > 10)
                break;
            mLastMotionY = y;
            //-------------------------------------

            mLastMotionX = x;
            scrollBy(deltaX, 0);
</pre><p style="padding-top: 0px; padding-bottom: 0px; margin-top: 8px; margin-bottom: 8px; line-height: 22.5px; letter-spacing: 0.5px; font-size: 13px; color: rgb(51, 51, 51); font-family: 微软雅黑, Verdana, sans-serif, 宋体;">这几句话来移动到相应的位置</p><p style="padding-top: 0px; padding-bottom: 0px; margin-top: 8px; margin-bottom: 8px; line-height: 22.5px; letter-spacing: 0.5px; font-size: 13px; color: rgb(51, 51, 51); font-family: 微软雅黑, Verdana, sans-serif, 宋体;">如果用户手指放开,还会计算当前的速度,如果速度达到一定的值就会跳转到下一页 VelocityTracker类专门用来测量当前移动的速度 </p><p style="padding-top: 0px; padding-bottom: 0px; margin-top: 8px; margin-bottom: 8px; line-height: 22.5px; letter-spacing: 0.5px; font-size: 13px; color: rgb(51, 51, 51); font-family: 微软雅黑, Verdana, sans-serif, 宋体;"><pre name="code" class="java">final VelocityTracker velocityTracker = mVelocityTracker;
velocityTracker.computeCurrentVelocity(1000);
int velocityX = (int) velocityTracker.getXVelocity();
//Log.e(TAG, "velocityX:" + velocityX);
if (velocityX > SNAP_VELOCITY && mCurScreen > 0) {
// Fling enough to move left
//Log.e(TAG, "snap left");
snapToScreen(mCurScreen - 1);
} else if (velocityX < -SNAP_VELOCITY
&& mCurScreen < getChildCount() - 1) {
// Fling enough to move right
//Log.e(TAG, "snap right");
snapToScreen(mCurScreen + 1);
} else {
snapToDestination();
}
if (mVelocityTracker != null) {
mVelocityTracker.recycle();
mVelocityTracker = null;
}
// }
mTouchState = TOUCH_STATE_REST;
至此,自定义ScrollLayout就分析完了. 这个博客花费了不少时间 ,但是自己收获很大,温习了很多知识.可能这个博客和枯燥,但是看完相信你会有收获的~android 自定义View是每一个android工程师必备的技能,大家一定好好学习研究~


 5177
5177

 被折叠的 条评论
为什么被折叠?
被折叠的 条评论
为什么被折叠?
 到【灌水乐园】发言


