


 本文详细介绍了Android中SharedPreferences的存储方式、如何获取和使用SharedPreferences对象,包括写入和读取数据的方法,并通过实例展示了如何在实际项目中应用SharedPreferences进行数据存储。
当一个应用程序在Android中安装后,我们在使用应用的过程中会产生很多的数据,应用都有自己的数据,那么我们应该如何存储数据呢?
数据存储方式
Android 的数据存储有5种方式:
1. SharedPreferences存储数据
SharedPreferences数据存储,也叫作xml存储。这是将数据存储“data/data/程序包名/share_prefs”路径下的到xml文件中。
相关连接:《Android中数据存储——SharedPreferences存储数据》
2. 文件存储数据
分为内部储存和外部存储。内部存储是应用程序使用Android为自己分配的内存空间,数据存储到“/data/data/程序包名/files”路径下的相应文件中。外部存储是使用手机sdcard的内存(这个sdcard并不是我们经常说的那个可以拆卸替换的SD卡,那个SD卡我们称之为扩展卡),使用这部分内存要声明相应的权限。
相关连接: 《Android中数据存储——文件存储数据 》
3. SQLite数据库存储数据
使用数据库进行存储,这个一般数据量比较大的时候。
相关连接:《Android中数据存储——SQLite数据库存储数据 》
4. 使用ContentProvider存储数据
这个比较眼熟,ContentProvider也是Android的四大组件之一。ContentProvider一般是第三方提供的数据存储方式,向我们手机中的通讯录联系人,照片,音乐等……
相关连接:《Android中数据存储——ContentProvider存储数据 》
5. 网络存储数据
这个是将数据上传到网络上进行存储。
下面进入我们今天的主要内容,使用SharedPreferences存储数据。
SharedPreferences存储数据
SharedPreferences是一种轻型的数据存储方式,实际上是基于XML文件存储的“key-value”键值对数据。通常用来存储程序的一些配置信息。其存储在“data/data/程序包名/shared_prefs“目录下。
使用SharedPreferences来存储数据首相我们要获得SharedPreferences的对象。
获得SharedPreferences的对象
获得SharedPreferences对象的方法有三种:
(1)通过Context的getSharedPrerences(key, [模式])方法获取SharedPreferences对象;方法的第一个参数是用于指定SharedPreferences文件的名称,第二个参数是指定操作模式,主要有两种模式进行选择:MODE_PRIVATE, MODE_MULTI_PROCESS。默认操作是MODE_PRIVATE。除此之外还有MODE_EORLD_READEABLE,MODE_WORLD_WRITEABLE两种。
(2)通过Activity类提供的getPrerences(key)方法获取到SharedPreferences对象;该方法会创建一个以当前活动类名作为SharedPreferences文件名的文件。
(3)通过PreferencesManager类中的getDefaultPreferernces()方法获得;这是一个静态的方法,他接受一个Context参数,并将当前应用程序的包名作为SharedPreferences文件名。
下面我们来看一下如何使用SharedPreferences读写数据……
写数据
步骤:
(1)根据Context的getSharedPrerences(key, [模式])方法获取SharedPreferences对象;
(2)利用SharedPreferences的editor()方法获取Editor对象;
(3)通过Editor的putXXX()方法,将键值对存储数据;
(4)通过Editor的commit()方法将数据提交到SharedPreferences内。
我们来看代码:
    //key = "sharedpreferences_test",也就是数据存储在data/data/程序包名/shared_prefs目录下的sharedpreferences_test.xml文件下。
        SharedPreferences preferences = getSharedPreferences("sharedpreferences_test", MODE_PRIVATE);
        SharedPreferences.Editor editor = preferences .edit();
        editor.putString("data", "我是存储的数据!");
        editor.commit();
读数据
步骤:
(1)根据Context的getSharedPrerences(key, [模式])方法获取SharedPreference对象;
(2)通过SharedPreference对象的getXXX方法获得数据。例如:getString(String s, String s1)方法有两个位参数,第一个s为要获得的值的键,第二个s1为如果键值不存在返回的默认的String类型的值。
我们来看代码:
        SharedPreferences preferencesOutput = getSharedPreferences("sharedpreferences_text", MODE_PRIVATE);
        String content = preferencesOutput.getString("data", "我是默认数据值");
apply和commit的区别
在存储数据中有两种提交方法,一种是使用commit提交,一种是使用apply提交。我们来看一下他们的区别:
官方对commit的解释:
        /**
         * Commit your preferences changes back from this Editor to the
         * {@link SharedPreferences} object it is editing.  This atomically
         * performs the requested modifications, replacing whatever is currently
         * in the SharedPreferences.
         *
         * <p>Note that when two editors are modifying preferences at the same
         * time, the last one to call commit wins.
         *
         * <p>If you don't care about the return value and you're
         * using this from your application's main thread, consider
         * using {@link #apply} instead.
         *
         * @return Returns true if the new values were successfully written
         * to persistent storage.
         */
        boolean commit();
commit是同步的提交到硬件磁盘,因此,在多个并发的提交commit的时候,他们会等待正在处理的commit保存到磁盘后在操作,从而降低了效率。commit提交后返回boolean表明修改是否提交成功 。
        /**
         * Commit your preferences changes back from this Editor to the
         * {@link SharedPreferences} object it is editing.  This atomically
         * performs the requested modifications, replacing whatever is currently
         * in the SharedPreferences.
         *
         * <p>Note that when two editors are modifying preferences at the same
         * time, the last one to call apply wins.
         *
         * <p>Unlike {@link #commit}, which writes its preferences out
         * to persistent storage synchronously, {@link #apply}
         * commits its changes to the in-memory
         * {@link SharedPreferences} immediately but starts an
         * asynchronous commit to disk and you won't be notified of
         * any failures.  If another editor on this
         * {@link SharedPreferences} does a regular {@link #commit}
         * while a {@link #apply} is still outstanding, the
         * {@link #commit} will block until all async commits are
         * completed as well as the commit itself.
         *
         * <p>As {@link SharedPreferences} instances are singletons within
         * a process, it's safe to replace any instance of {@link #commit} with
         * {@link #apply} if you were already ignoring the return value.
         *
         * <p>You don't need to worry about Android component
         * lifecycles and their interaction with <code>apply()</code>
         * writing to disk.  The framework makes sure in-flight disk
         * writes from <code>apply()</code> complete before switching
         * states.
         *
         * <p class='note'>The SharedPreferences.Editor interface
         * isn't expected to be implemented directly.  However, if you
         * previously did implement it and are now getting errors
         * about missing <code>apply()</code>, you can simply call
         * {@link #commit} from <code>apply()</code>.
         */
        void apply();
apply是将修改数据原子提交到内存, 而后异步真正提交到硬件磁盘,apply只是提交到内容,后面有调用apply的函数的将会直接覆盖前面的内存数据,这样从一定程度上提高了很多效率。 但是apply不返回存储结果,无法知道是否存储成功。
因此综上所述,如果不关心存储结果的话推荐使用apply,如果关心存储是否成功的话推荐使用commit。
SharedPreferences存储数据学习巩固
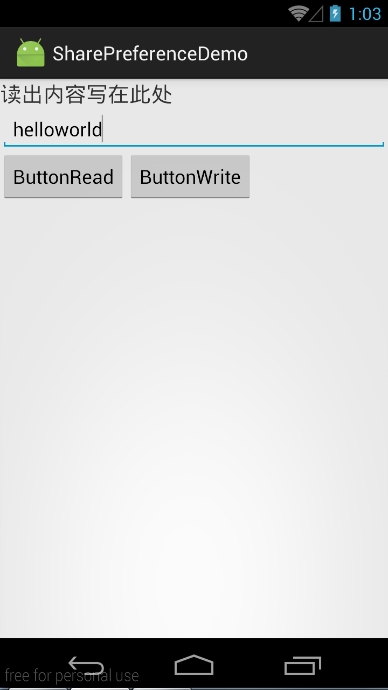
下面我们举一个例子来练习使用一下SharedPreferences存储,功能描述:我们定义一个TextView用于显示从SharedPreferences中读取到的数据,用一个EditText来输入要存储到SharedPreferences中的数据。通过两个Button来控制读和写两个操作。
1. 首先定义界面布局。
<LinearLayout xmlns:android="http://schemas.android.com/apk/res/android"
    xmlns:tools="http://schemas.android.com/tools"
    android:layout_width="match_parent"
    android:layout_height="match_parent"
    android:orientation="vertical"
    tools:context=".MainActivity">

    <TextView
        android:id="@+id/textview_output"
        android:layout_width="wrap_content"
        android:layout_height="wrap_content"
        android:text="读出内容写在次数"
        android:textSize="20sp" />

    <EditText
        android:id="@+id/edittext_input"
        android:layout_width="match_parent"
        android:layout_height="wrap_content"
        android:hint="请输入要写入的内容" />

    <LinearLayout
        android:layout_width="match_parent"
        android:layout_height="wrap_content"
        android:orientation="horizontal">

        <Button
            android:id="@+id/button_read"
            android:layout_width="wrap_content"
            android:layout_height="wrap_content"
            android:text="ButtonRead" />

        <Button
            android:id="@+id/button_write"
            android:layout_width="wrap_content"
            android:layout_height="wrap_content"
            android:text="ButtonWrite" />
    </LinearLayout>
</LinearLayout>
2. 在Activity中声明各个控件,并创建对象。添加两个Button的点击事件。
Activity中的代码:
public class MainActivity extends Activity implements View.OnClickListener {
    private Button mButtonRead;
    private Button mButtonWrite;
    private EditText mEditTextInput;
    private TextView mTextViewOutput;

    @Override
    protected void onCreate(Bundle savedInstanceState) {
        super.onCreate(savedInstanceState);
        setContentView(R.layout.activity_main);
        mButtonRead = (Button) findViewById(R.id.button_read);
        mButtonWrite = (Button) findViewById(R.id.button_write);

        mEditTextInput = (EditText) findViewById(R.id.edittext_input);
        mTextViewOutput = (TextView) findViewById(R.id.textview_output);

        mButtonRead.setOnClickListener(this);
        mButtonWrite.setOnClickListener(this);
    }

    @Override
    public void onClick(View view) {
        switch (view.getId()) {
            case R.id.button_write:
                writeSharePreference();
                break;
            case R.id.button_read:
                readSharePreference();
                break;
            default:
                break;
        }
    }

    /*
    从data/data/应用名/shared_prefs目录下文件读取相关数据
    */
    private void readSharePreference() {
        SharedPreferences preferencesOutput = getSharedPreferences("sharedpreferences_text", MODE_PRIVATE);
        String content = preferencesOutput.getString("input", "我是默认值");
        mTextViewOutput.setText(content);
    }
    /*
    向data/data/应用名/shared_prefs目录下文件写相关数据
    */
    private void writeSharePreference() {
        SharedPreferences preferencesInput = getSharedPreferences("sharedpreferences_text", MODE_PRIVATE);
        SharedPreferences.Editor editor = preferencesInput.edit();
        editor.putString("input", mEditTextInput.getText().toString());
        editor.commit();
    }
}
点击写数据按钮,将数据写入:
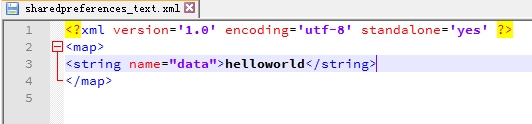
查看data/data/应用名/shared_prefs目录:

打开sharedpreferences_text.xml文件查看内容:
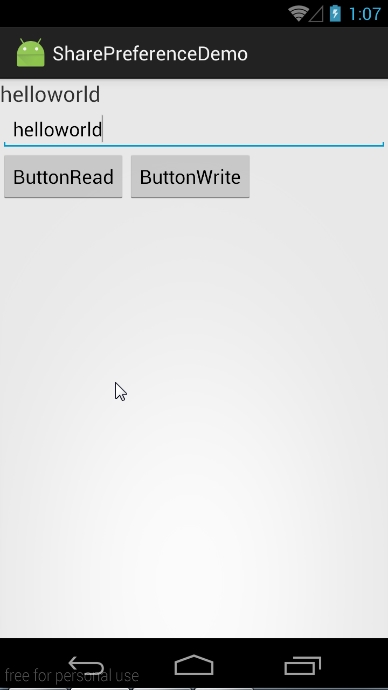
点击读数据按钮:


 1121
1121

 被折叠的 条评论
为什么被折叠?
被折叠的 条评论
为什么被折叠?
 到【灌水乐园】发言


