


入门和实践: http://www.ibm.com/developerworks/cn/opensource/os-ad-gwt/
Eclipse GWT Plugin -- Cypal
Home page: http://code.google.com/p/cypal-studio/
Guide document: http://www.cypal.in/studiodocs
Guide animation: http://www.cypal.in/Cypal_Studio_Screencast1.html
我的第一个GWT example (开发环境:Eclipse + Cypal):
1. Create new " Dynamic Web Project". Remember that you MUST set " Configuration" as " Cypal Studio for GWT"
2. Create a GWT module: Right click "src" node, select " New -> Others -> GWT module", input package name (such as "gwt.example") and class name (such as "MyModule")
It will generate following files and folders:

MyModule.gwt.xml codes:
MyModule.java codes:
3. Add following codes to onModuleLoad method:
4. Run the GWT app: Right click "MyModule.gwt.xml", select "Run As -> Gwt Hosted Mode Application"
5. Add RPC function
1) Create GWT Remote Service: Right click "src" node, select " New -> Others -> GWT Remote Service", and then input info like following:

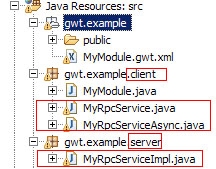
It will generate 3 files:
MyRpcService class in gwt.example. client package
MyRpcServiceAsync class in gwt.example. client package
MyRpcServiceImpl class in gwt.example. server package
MyRpcService.java codes:
MyRpcServiceAsync.java codes:
MyRpcServiceImpl.java codes:
另外MyModule.gwt.xml 也 自动添加了一行代码:
WEB-INF/web.xml也
自动生成下列代码:
2) Add a method to MyService for being called by GWT client
* Add following line to MyService.java:
When you save, the MyRpcServiceAsync.java 自动生成对应的下列代码:
* Add following line to MyServiceImpl.java:
3) Add call rpc method in the client side: 在MyModule.java的onModuleLoad method的最后添加下列代码
4) Run the GWT app again. You can see the button name is changed to "YoYo"
Eclipse GWT Plugin -- Cypal
Home page: http://code.google.com/p/cypal-studio/
Guide document: http://www.cypal.in/studiodocs
Guide animation: http://www.cypal.in/Cypal_Studio_Screencast1.html
我的第一个GWT example (开发环境:Eclipse + Cypal):
1. Create new " Dynamic Web Project". Remember that you MUST set " Configuration" as " Cypal Studio for GWT"
2. Create a GWT module: Right click "src" node, select " New -> Others -> GWT module", input package name (such as "gwt.example") and class name (such as "MyModule")
It will generate following files and folders:
MyModule.gwt.xml codes:
- <module>
- <!-- Inherit the core Web Toolkit stuff. -->
- <inherits name='com.google.gwt.user.User'/>
- <!-- Specify the app entry point class. -->
- <entry-point class='gwt.example.client.MyModule'/>
- <inherits name="com.google.gwt.user.theme.standard.Standard"/>
- </module>
- public class MyModule implements EntryPoint {
- public void onModuleLoad() {
- }
- }
3. Add following codes to onModuleLoad method:
- Button button =new Button("Click me!");
- button.addClickListener(new ClickListener(){
- public void onClick(Widget arg0){
- Window.alert("Hello World!");
- }
- });
- RootPanel.get().add(button);
4. Run the GWT app: Right click "MyModule.gwt.xml", select "Run As -> Gwt Hosted Mode Application"
5. Add RPC function
1) Create GWT Remote Service: Right click "src" node, select " New -> Others -> GWT Remote Service", and then input info like following:
It will generate 3 files:
MyRpcService class in gwt.example. client package
MyRpcServiceAsync class in gwt.example. client package
MyRpcServiceImpl class in gwt.example. server package
MyRpcService.java codes:
- package gwt.example.client;
- @RemoteServiceRelativePath("myrpc")
- public interface MyRpcService extends RemoteService {
- public static class Util {
- public static MyRpcServiceAsync getInstance() {
- return GWT.create(MyRpcService.class);
- }
- }
- }
MyRpcServiceAsync.java codes:
- package gwt.example.client;
- public interface MyRpcServiceAsync {
- }
MyRpcServiceImpl.java codes:
- package gwt.example.server;
- public class MyRpcServiceImpl extends RemoteServiceServlet implements MyRpcService {
- }
另外MyModule.gwt.xml 也 自动添加了一行代码:
- <servlet class="gwt.example.server.MyRpcServiceImpl" path="/myrpc"/></module>
- <servlet>
- <servlet-name>MyRpcService</servlet-name>
- <servlet-class>
- gwt.example.server.MyRpcServiceImpl</servlet-class>
- </servlet>
- <servlet-mapping>
- <servlet-name>MyRpcService</servlet-name>
- <url-pattern>/myrpc</url-pattern>
- </servlet-mapping>
2) Add a method to MyService for being called by GWT client
* Add following line to MyService.java:
- public String getButtonName();
When you save, the MyRpcServiceAsync.java 自动生成对应的下列代码:
- public void getButtonName(AsyncCallback<String> callback);
* Add following line to MyServiceImpl.java:
- public String getButtonName() {
- return "YoYo";
- }
3) Add call rpc method in the client side: 在MyModule.java的onModuleLoad method的最后添加下列代码
- //update button name
- MyRpcServiceAsync rpcService = MyRpcService.Util.getInstance();
- ServiceDefTarget target = (ServiceDefTarget) rpcService;
- String relativeUrl = GWT.getModuleBaseURL() + "myrpc";
- target.setServiceEntryPoint(relativeUrl);
- rpcService.getButtonName(new AsyncCallback(){
- public void onFailure(Throwable caught) {
- GWT.log("Error ", caught);
- caught.printStackTrace();
- }
- public void onSuccess(Object result) {
- button.setText(result.toString());
- }
- });
4) Run the GWT app again. You can see the button name is changed to "YoYo"


 95
95

 被折叠的 条评论
为什么被折叠?
被折叠的 条评论
为什么被折叠?
 到【灌水乐园】发言


