


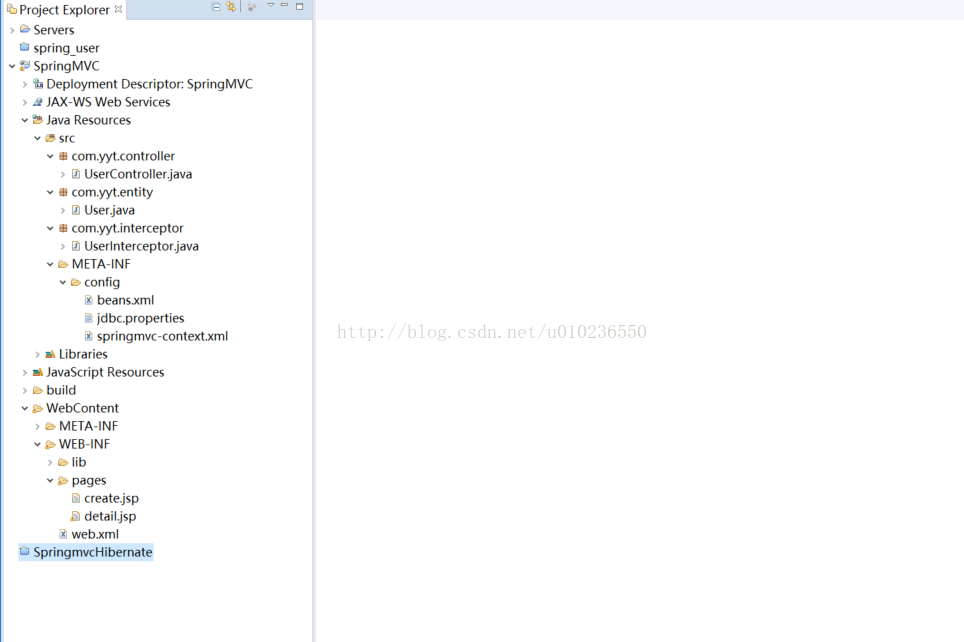
- 基于eclipse 学习spring mvc(来源参考于github,具体链接记不清了)
- 看看图
xml
bean.xml
<?xml version="1.0" encoding="UTF-8"?>
<beans xmlns="http://www.springframework.org/schema/beans"
	xmlns:xsi="http://www.w3.org/2001/XMLSchema-instance" xmlns:tx="http://www.springframework.org/schema/tx"
	xmlns:aop="http://www.springframework.org/schema/aop" xmlns:context="http://www.springframework.org/schema/context"
	xmlns:cache="http://www.springframework.org/schema/cache"
	xsi:schemaLocation="http://www.springframework.org/schema/beans
						http://www.springframework.org/schema/beans/spring-beans-3.0.xsd
						http://www.springframework.org/schema/tx
						http://www.springframework.org/schema/tx/spring-tx-3.0.xsd
						http://www.springframework.org/schema/context
						http://www.springframework.org/schema/context/spring-context-3.0.xsd
						http://www.springframework.org/schema/cache
						http://www.springframework.org/schema/cache/spring-cache.xsd
						http://www.springframework.org/schema/aop
				http://www.springframework.org/schema/aop/spring-aop-3.0.xsd">

	<!-- 打开Spring 的 Annotation支持 -->
	<context:annotation-config/>
	<!--配置spring的注解自动扫描  去哪些包中找annotation-->
	<context:component-scan base-package="com.yyt" />
	<!-- 指定JDBC配置文件 src下的 使用 classpath:jdbc.properties-->
	<context:property-placeholder location="classpath:META-INF/config/jdbc.properties" />

	<!-- 配置C3P0数据源
	<bean id="dataSource" class="com.mchange.v2.c3p0.ComboPooledDataSource"
		destroy-method="close">
		 数据库驱动类名
		<property name="driverClass" value="${driverClassName}" />
		 连接数据库URL
		<property name="jdbcUrl" value="${url}" />
		 连接数据库的用户名
		<property name="user" value="${user}" />
		 连接数据库的密码
		<property name="password" value="${password}" />
		初始数据源连接池的连接数
		<property name="initialPoolSize" value="10" />
		 数据源连接池的最大的连接数
		<property name="maxPoolSize" value="40" />
		 数据源连接池的最小的连接数
		<property name="minPoolSize" value="10" />

		<property name="maxIdleTime" value="60"></property>

		<property name="acquireIncrement" value="5"></property>
		每60秒检查所有连接池中的空闲连接。Default: 0
		<property name="idleConnectionTestPeriod" value="60"></property>
	</bean>-->

	<!-- dbcp数据源 -->
	 <bean id="dataSource" class="org.apache.commons.dbcp.BasicDataSource" destroy-method="close">
	    <property name="driverClassName" value="${jdbc.driverClassName}" />
	    <property name="url" value="${jdbc.url}" />
	    <property name="username" value="${jdbc.username}" />
	    <property name="password" value="${jdbc.password}" />
	    <!-- 连接池启动时的初始化 -->
	    <property name="initialSize" value="1"/>
	    <!-- 连接池的最大值 -->
		<!-- <property name="maxActive" value="500"/> -->
	    <!-- 最小空闲值,当空闲的连接数少于阀值时,连接池就会预申请去一些链接,以免洪峰来时来不及申请-->
		<property name="minIdle" value="1"/>
		<!-- 最大等待连接中的数量,设置为0时,表示没有限制。如果最大空闲值,当经过一个高峰时间后,连接池可以慢慢将已经用不到的链接慢慢释放一部分,一直减少到maxle为止-->
		<property name="maxIdle" value="20"/>
		<!-- 最大等待秒数,单位为毫秒, 超过时间会报出错误信息 -->
		<property name="maxWait" value="1000"/>
		<property name="maxActive" value="100"/>
		<property name="timeBetweenEvictionRunsMillis" value="300000"/>
		<!--是否自我中断,默认是 false  -->
		<property name="removeAbandoned" value="true"/>
		<!-- 几秒后数据连接会自动断开 -->
		<property name="removeAbandonedTimeout" value="60"/>
		<!-- 是否记录中断事件 默认false -->
		<property name="logAbandoned" value="false"/>
	 </bean>

</beans><?xml version="1.0" encoding="UTF-8"?>
<beans xmlns="http://www.springframework.org/schema/beans"
xmlns:xsi="http://www.w3.org/2001/XMLSchema-instance"
xmlns:p="http://www.springframework.org/schema/p"
xmlns:context="http://www.springframework.org/schema/context"
xmlns:mvc="http://www.springframework.org/schema/mvc"
xsi:schemaLocation="http://www.springframework.org/schema/mvc http://www.springframework.org/schema/mvc/spring-mvc.xsd
http://www.springframework.org/schema/context http://www.springframework.org/schema/context/spring-context.xsd
http://www.springframework.org/schema/beans http://www.springframework.org/schema/beans/spring-beans.xsd">
<mvc:annotation-driven />
<!-- ①:对web包中的所有类进行扫描,以完成Bean创建和自动依赖注入的功能 -->
<context:component-scan base-package="com.yyt" />
<!-- 这两个类用来启动基于Spring MVC的注解功能,将控制器与方法映射加入到容器中 -->
<bean class="org.springframework.web.servlet.mvc.annotation.DefaultAnnotationHandlerMapping" />
<bean class="org.springframework.web.servlet.mvc.annotation.AnnotationMethodHandlerAdapter" />
<!-- 这个类用于Spring MVC视图解析 -->
<bean id="viewResolver"
class="org.springframework.web.servlet.view.InternalResourceViewResolver">
<property name="prefix" value="/WEB-INF/pages/" />
<property name="suffix" value=".jsp" />
</bean>
<!-- 在实际开发中通常都需配置 mvc:annotation-driven标签,这个标签是开启注解 -->
<mvc:annotation-driven></mvc:annotation-driven>
<!-- 自定义拦截器 -->
<mvc:interceptors>
<mvc:interceptor>
<!-- 拦截器拦截的URL格式 -->
<mvc:mapping path="/" />
<!-- 处理拦截的具体实现类 -->
<bean class="com.yyt.interceptor.UserInterceptor" />
</mvc:interceptor>
</mvc:interceptors>
</beans>
controller :UserController.java
package com.yyt.controller;

import org.springframework.stereotype.Controller;
import org.springframework.ui.Model;
import org.springframework.web.bind.annotation.ModelAttribute;
import org.springframework.web.bind.annotation.RequestMapping;

import com.yyt.entity.User;

/**
 * SpringMVC常用注解

  @Controller

  负责注册一个bean 到spring 上下文中

  @RequestMapping

  注解为控制器指定可以处理哪些 URL 请求

  @RequestBody

  该注解用于读取Request请求的body部分数据,使用系统默认配置的HttpMessageConverter进行解析,然后把相应的数据绑定到要返回的对象上 ,再把HttpMessageConverter返回的对象数据绑定到 controller中方法的参数上

  @ResponseBody

  该注解用于将Controller的方法返回的对象,通过适当的HttpMessageConverter转换为指定格式后,写入到Response对象的body数据区

  @ModelAttribute

  在方法定义上使用 @ModelAttribute 注解:Spring MVC 在调用目标处理方法前,会先逐个调用在方法级上标注了@ModelAttribute 的方法

  在方法的入参前使用 @ModelAttribute 注解:可以从隐含对象中获取隐含的模型数据中获取对象,再将请求参数 –绑定到对象中,再传入入参将方法入参对象添加到模型中

  @RequestParam

  在处理方法入参处使用 @RequestParam 可以把请求参 数传递给请求方法

  @PathVariable

  绑定 URL 占位符到入参

  @ExceptionHandler

  注解到方法上,出现异常时会执行该方法

  @ControllerAdvice

  使一个Contoller成为全局的异常处理类,类中用@ExceptionHandler方法注解的方法可以处理所有Controller发生的异常
 * learning spring mvc
 * @author syw
 */
@Controller
public class UserController {

	/**
	 * @ModelAttribute 注释的方法会在Controller每个方法执行之前都执行,因此对于一个Controller中包含多个URL的时候,要谨慎使用。
	 */
	@ModelAttribute
	public void testModeAttribute()	{
		System.out.println("test Attribute success");
	}

	/**
	* 1. 使用RequestMapping注解来映射请求的URL
	* 2. 返回值会通过视图解析器解析为实际的物理视图, 对于InternalResourceViewResolver视图解析器,会做如下解析
	* 通过prefix+returnVal+suffix 这样的方式得到实际的物理视图,然后会转发操作
	* "/WEB-INF/pages/create.jsp"
	* @return
	*/
	@RequestMapping("")
	public String Create(Model model) {
		return "create";
	}

	//user:视图层传给控制层的表单对象;model:控制层返回给视图层的对象
	/**
	 * Save方法上方有一个@RequestMapping, 是用于匹配请求的路径,比如这里匹配的请求路径就是“http://localhost:8080/SpringMVC/save”
	 * 即当tomcat服务启动后,在浏览器输入这个url时,如果在这个方法打断点了,就会跳入该方法
	 * @param user
	 * @param model
	 * @return
	 */
	@RequestMapping("/save")
	public String Save(@ModelAttribute("syw") User user, Model model) {
		model.addAttribute("user", user);
		return "detail";
	}
}
entity(modle): User.java
package com.yyt.entity;

import java.io.Serializable;
import java.util.Date;

public class User implements Serializable {
	/**
	 * @author zjn
	 */
	private static final long serialVersionUID = 1L;
	private Integer id; // id
	private String name; // name
	private String pwd; // pwd
	private Integer age; // age
	private Date creatTime; // creatTime

	public Integer getId() {
		return id;
	}

	public void setId(Integer id) {
		this.id = id;
	}

	public String getName() {
		return name;
	}

	public void setName(String name) {
		this.name = name;
	}

	public String getPwd() {
		return pwd;
	}

	public void setPwd(String pwd) {
		this.pwd = pwd;
	}

	public Integer getAge() {
		return age;
	}

	public void setAge(Integer age) {
		this.age = age;
	}

	public Date getCreatTime() {
		return creatTime;
	}

	public void setCreatTime(Date creatTime) {
		this.creatTime = creatTime;
	}

}
interceptor: MyInterceptor.java
package com.yyt.interceptor;

import javax.servlet.http.HttpServletRequest;
import javax.servlet.http.HttpServletResponse;

import org.springframework.web.servlet.HandlerInterceptor;
import org.springframework.web.servlet.ModelAndView;

/**
 * <?xml version="1.0" encoding="UTF-8"?>
<beans:beans xmlns:beans="http://www.springframework.org/schema/beans"
	xmlns:xsi="http://www.w3.org/2001/XMLSchema-instance"
	xmlns:context="http://www.springframework.org/schema/context"
	xmlns:mvc="http://www.springframework.org/schema/mvc"
	xmlns:p="http://www.springframework.org/schema/p"
	xsi:schemaLocation="http://www.springframework.org/schema/mvc
		http://www.springframework.org/schema/mvc/spring-mvc-4.1.xsd
		http://www.springframework.org/schema/beans http://www.springframework.org/schema/beans/spring-beans-4.1.xsd
		http://www.springframework.org/schema/context http://www.springframework.org/schema/context/spring-context-4.1.xsd">

	<mvc:annotation-driven />
	<!-- ①:对web包中的所有类进行扫描,以完成Bean创建和自动依赖注入的功能 -->
	<context:component-scan base-package="com.yyt" />

	<!-- 这两个类用来启动基于Spring MVC的注解功能,将控制器与方法映射加入到容器中 -->
	<beans:bean
		class="org.springframework.web.servlet.mvc.annotation.DefaultAnnotationHandlerMapping" />
	<beans:bean
		class="org.springframework.web.servlet.mvc.annotation.AnnotationMethodHandlerAdapter" />

	<!-- 这个类用于Spring MVC视图解析 -->
	<beans:bean id="viewResolver"
		class="org.springframework.web.servlet.view.InternalResourceViewResolver">
		<beans:property name="prefix" value="/WEB-INF/pages/" />
		<beans:property name="suffix" value=".jsp" />
	</beans:bean>

	<!-- 在实际开发中通常都需配置 mvc:annotation-driven标签,这个标签是开启注解 -->
        <mvc:annotation-driven></mvc:annotation-driven>
	<!-- 自定义拦截器 -->
</beans:beans>
 * @author tao.zeng
 *
 */
public class UserInterceptor implements HandlerInterceptor {

	@Override
    public boolean preHandle(HttpServletRequest request, HttpServletResponse response, Object handler)
            throws Exception {
        System.out.println("======处理请求之前======");
        return true;
    }

    @Override
    public void postHandle(
            HttpServletRequest request, HttpServletResponse response, Object handler, ModelAndView modelAndView)
            throws Exception {
        System.out.println("========处理请求后,渲染页面前======");
        modelAndView.addObject("post","interceptor change view before rendering");
    }

    @Override
    public void afterCompletion(
            HttpServletRequest request, HttpServletResponse response, Object handler, Exception ex)
            throws Exception {
        System.out.println("========视图渲染结束了,请求处理完毕====");
    }

}
create.jsp
<%@ page language="java" contentType="text/html; charset=UTF-8"
	pageEncoding="UTF-8"%>
<!DOCTYPE html PUBLIC "-//W3C//DTD HTML 4.01 Transitional//EN" "http://www.w3.org/TR/html4/loose.dtd">
<html>
<head>
<meta http-equiv="Content-Type" content="text/html; charset=UTF-8">
<title>Add User From</title>
</head>
<body>
	<form action="save" method="post">
		<fieldset>
		<legend>创建用户</legend>
			<p>
				<label>姓名:</label> <input type="text" id="name" name="name"
					tabindex="1">
			</p>
			<p>
				<label>年龄:</label> <input type="text" id="age" name="age"
					tabindex="2">
			</p>
			<p>
				<label>密码:</label> <input type="text" id="pwd" name="pwd"
					tabindex="3">
			</p>
			<p id="buttons">
				<input id="reset" type="reset" tabindex="4" value="取消"> <input
					id="submit" type="submit" tabindex="5" value="创建">
			</p>
		</fieldset>
	</form>
</body>
</html>
detail.jsp
<%@ page language="java" contentType="text/html; charset=UTF-8"
	pageEncoding="UTF-8"%>
<!DOCTYPE html PUBLIC "-//W3C//DTD HTML 4.01 Transitional//EN" "http://www.w3.org/TR/html4/loose.dtd">
<html>
<head>
<meta http-equiv="Content-Type" content="text/html; charset=UTF-8">
<title>Insert title here</title>
</head>
<body>
	<div id="gloobal">
		<h4>创建成功</h4>
		<p>
		<h5>详情:</h5>
		姓名:${user.name}<br /> 年龄:${user.age}<br /> 密码:${user.pwd}<br />
		</p>
	</div>
</body>
</html>
运行效果:
======处理请求之前======
test Attribute success
========处理请求后,渲染页面前======
========视图渲染结束了,请求处理完毕====
test Attribute success
test Attribute success
========处理请求后,渲染页面前======
========视图渲染结束了,请求处理完毕====
test Attribute success


 被折叠的 条评论
为什么被折叠?
被折叠的 条评论
为什么被折叠?
 到【灌水乐园】发言


