


一、实例基本业务为银行转账,A账户向B账户转账,业务执行过程要保证A、B两个帐号数据操作同时成功或失败,此时就需要事务进行控制,基本实例代码如下:
转账DAO:
public interface AccountDao {
    //转出操作
    public void outMoney(String out,double money);

    //转入操作
    public void inMoney(String in,double money);
}
- 1
- 2
- 3
- 4
- 5
- 6
- 7
转账DAO实现类:
/**
 * @Description:转账DAO实现 ,需要继承JdbcDaoSupport,配置bean时注入dataSource数据源,子类即可通过this使用jdbc模版
 */
public class AccountDaoImpl extends JdbcDaoSupport implements AccountDao {

    //转出
    @Override
    public void outMoney(String out, double money) {
        String sql = "update account set money = money - ? where name = ?";
        this.getJdbcTemplate().update(sql,money,out);
    }

    //转入
    @Override
    public void inMoney(String in, double money) {
        String sql = "update account set money = money + ? where name = ?";
        this.getJdbcTemplate().update(sql,money,in);
    }
}
- 1
- 2
- 3
- 4
- 5
- 6
- 7
- 8
- 9
- 10
- 11
- 12
- 13
- 14
- 15
- 16
- 17
- 18
- 19
转账Service服务接口:
public interface AccountService {
    public void transferAccount(String out,String in,double money);
}
- 1
- 2
- 3
转账Service服务接口实现类:
public class AccountServiceImpl implements AccountService{
//注入DAO层bean
private AccountDao accountDao;
public void setAccountDao(AccountDao accountDao) {
    this.accountDao = accountDao;
}

/**
 * 无事务管理
 * 转账业务方法
 */
@Override
public void transferAccount(final String out,final String in,final double money) {
    accountDao.outMoney(out, money);
    try{
        int i = 1/0;
    }catch(Exception e){
        e.printStackTrace();
    }
    accountDao.inMoney(in, money);
}
- 1
- 2
- 3
- 4
- 5
- 6
- 7
- 8
- 9
- 10
- 11
- 12
- 13
- 14
- 15
- 16
- 17
- 18
- 19
- 20
- 21
}
xml配置文件:
<?xml version="1.0" encoding="UTF-8"?>
<beans  xmlns="http://www.springframework.org/schema/beans"
        xmlns:xsi="http://www.w3.org/2001/XMLSchema-instance"
        xmlns:aop="http://www.springframework.org/schema/aop"
        xmlns:context="http://www.springframework.org/schema/context"
        xmlns:tx="http://www.springframework.org/schema/tx"
        xmlns:util="http://www.springframework.org/schema/util" xmlns:task="http://www.springframework.org/schema/task"
        xsi:schemaLocation="
            http://www.springframework.org/schema/beans http://www.springframework.org/schema/beans/spring-beans-4.0.xsd
            http://www.springframework.org/schema/context http://www.springframework.org/schema/context/spring-context-4.0.xsd
            http://www.springframework.org/schema/aop http://www.springframework.org/schema/aop/spring-aop-4.0.xsd
            http://www.springframework.org/schema/util http://www.springframework.org/schema/util/spring-util-4.0.xsd
            http://www.springframework.org/schema/task http://www.springframework.org/schema/task/spring-task-4.0.xsd
            http://www.springframework.org/schema/tx http://www.springframework.org/schema/tx/spring-tx-4.0.xsd">
<!-- 引入属性文件 -->
<context:property-placeholder location="classpath:jdbc-connect.properties"/>

<!-- 配置数据源,使用C3P0连接池 -->
<bean id="dataSource" class="com.mchange.v2.c3p0.ComboPooledDataSource">
    <property name="driverClass" value="${jdbc.driverClass}"/>
    <property name="jdbcUrl" value="${jdbc.url}"/>
    <property name="user" value="${jdbc.username}"/>
    <property name="password" value="${jdbc.password}"/>
</bean>

<!-- 注册转账DAO bean,注入数据源,操作数据库 -->
<bean name="accountDao" class="com.test.spring.transaction.demo1.AccountDaoImpl">
    <property name="dataSource" ref="dataSource"/>
</bean>

<!-- 注册转账service bean,注入DAO -->
<bean name="accountService" class="com.test.spring.transaction.demo1.AccountServiceImpl">
    <property name="accountDao" ref="accountDao"/>
</bean>
</beans>
- 1
- 2
- 3
- 4
- 5
- 6
- 7
- 8
- 9
- 10
- 11
- 12
- 13
- 14
- 15
- 16
- 17
- 18
- 19
- 20
- 21
- 22
- 23
- 24
- 25
- 26
- 27
- 28
- 29
- 30
- 31
- 32
- 33
- 34
- 35
二、下面开始对上面基本实例,对Service业务层添加事务管理,几种不同的事务管理方式如下:
1、编程式事务管理:为service层注入事务管理模版来操作事务
xml配置文件:
<!-- 引入属性文件 -->
<context:property-placeholder location="classpath:jdbc-connect.properties"/>

<!-- 配置数据源,使用C3P0连接池 -->
<bean id="dataSource" class="com.mchange.v2.c3p0.ComboPooledDataSource">
    <property name="driverClass" value="${jdbc.driverClass}"/>
    <property name="jdbcUrl" value="${jdbc.url}"/>
    <property name="user" value="${jdbc.username}"/>
    <property name="password" value="${jdbc.password}"/>
</bean>

<!-- 配置事务管理器:管理数据源的事务,引入数据源dataSource -->
<bean id="transactionManager" class="org.springframework.jdbc.datasource.DataSourceTransactionManager">
    <property name="dataSource" ref="dataSource" />
</bean>

<!-- 配置事务管理器的模版,简化事务调用操作,模版是对事务管理的模板化,引入事务管理器transactionManager -->
<bean id="transactionTemplate" class="org.springframework.transaction.support.TransactionTemplate">
    <property name="transactionManager" ref="transactionManager"/>
</bean>

<!-- 注册转账DAO bean,注入数据源,操作数据库dataSource -->
<bean name="accountDao" class="com.test.spring.transaction.demo2.AccountDaoImpl">
    <property name="dataSource" ref="dataSource"/>
</bean>

<!-- 注册转账service bean,注入DAO,注入事务管理模版(事务定义在service服务层)transactionTemplate -->
<bean name="accountService" class="com.test.spring.transaction.demo2.AccountServiceImpl">
    <property name="accountDao" ref="accountDao"/>
    <property name="transactionTemplate" ref="transactionTemplate"/>
</bean>
- 1
- 2
- 3
- 4
- 5
- 6
- 7
- 8
- 9
- 10
- 11
- 12
- 13
- 14
- 15
- 16
- 17
- 18
- 19
- 20
- 21
- 22
- 23
- 24
- 25
- 26
- 27
- 28
- 29
- 30
- 31
修改转账Service服务接口实现类的转账业务方法:
/**
 * 使用编程式事务管理
 */
@Override
public void transferAccount(final String out,final String in,final double money) {

    transactionTemplate.execute(

        //使用匿名内部类的方式执行,注意:匿名内部类使用外部参数,外部参数需要声明为final类型
        new TransactionCallback(){
            @Override
            public Object doInTransaction(TransactionStatus status) {

                //执行业务方法
                accountDao.outMoney(out, money);
                try{
                    int i = 1/0;
                }catch(Exception e){
                    e.printStackTrace();
                }

                //执行业务方法
                accountDao.inMoney(in, money);
                return null;
            }
        }
    );
}
- 1
- 2
- 3
- 4
- 5
- 6
- 7
- 8
- 9
- 10
- 11
- 12
- 13
- 14
- 15
- 16
- 17
- 18
- 19
- 20
- 21
- 22
- 23
- 24
- 25
- 26
- 27
- 28
2、声明式事务管理一:通过拦截器基于service层事务代理的方式管理和操作事务
xml配置文件:
<!-- 引入属性文件 -->
<context:property-placeholder location="classpath:jdbc-connect.properties"/>

<!-- 配置数据源,使用C3P0连接池 -->
<bean id="dataSource" class="com.mchange.v2.c3p0.ComboPooledDataSource">
    <property name="driverClass" value="${jdbc.driverClass}"/>
    <property name="jdbcUrl" value="${jdbc.url}"/>
    <property name="user" value="${jdbc.username}"/>
    <property name="password" value="${jdbc.password}"/>
</bean>

<!-- 注册转账DAO bean,注入数据源,操作数据库dataSource -->
<bean name="accountDao" class="com.test.spring.transaction.demo3.AccountDaoImpl">
    <property name="dataSource" ref="dataSource"/>
</bean>

<!-- 注册转账service bean,注入DAO,注入事务管理模版(事务定义在service服务层)transactionTemplate -->
<bean name="accountService" class="com.test.spring.transaction.demo3.AccountServiceImpl">
    <property name="accountDao" ref="accountDao"/>
</bean>

<!-- 配置事务管理器:管理数据源的事务,引入数据源dataSource -->
<bean id="transactionManager" class="org.springframework.jdbc.datasource.DataSourceTransactionManager">
    <property name="dataSource" ref="dataSource" />
</bean>

<!-- 配置Service层事务代理对象,对业务对象进行事务方面的曾强处理 -->
<bean id="accountServiceProxy" class="org.springframework.transaction.interceptor.TransactionProxyFactoryBean">
    <!-- 增强的service目标对象 -->
    <property name="target" ref="accountService"/>
    <!-- 使用的事务管理器 -->
    <property name="transactionManager" ref="transactionManager"/>
    <!-- 注入事务属性:比如事务的隔离级别、传播级别、异常处理等 -->
    <property name="transactionAttributes">
        <props>
            <prop key="transferAccount">PROPAGATION_REQUIRED</prop>
        </props>
    </property>
</bean>
- 1
- 2
- 3
- 4
- 5
- 6
- 7
- 8
- 9
- 10
- 11
- 12
- 13
- 14
- 15
- 16
- 17
- 18
- 19
- 20
- 21
- 22
- 23
- 24
- 25
- 26
- 27
- 28
- 29
- 30
- 31
- 32
- 33
- 34
- 35
- 36
- 37
- 38
- 39
恢复转账Service服务接口实现类的转账业务方法为开始状态:
@Override
public void transferAccount(final String out,final String in,final double money) {
    accountDao.outMoney(out, money);
    try{
        int i = 1/0;
    }catch(Exception e){
        e.printStackTrace();
    }
    accountDao.inMoney(in, money);
}
- 1
- 2
- 3
- 4
- 5
- 6
- 7
- 8
- 9
- 10
3、声明式事务管理二:基于AOP配置的通知性事务管理
xml配置文件:
<!-- 引入属性文件 -->
<context:property-placeholder location="classpath:jdbc-connect.properties"/>

<!-- 配置数据源,使用C3P0连接池 -->
<bean id="dataSource" class="com.mchange.v2.c3p0.ComboPooledDataSource">
    <property name="driverClass" value="${jdbc.driverClass}"/>
    <property name="jdbcUrl" value="${jdbc.url}"/>
    <property name="user" value="${jdbc.username}"/>
    <property name="password" value="${jdbc.password}"/>
</bean>

<!-- 注册转账DAO bean,注入数据源,操作数据库dataSource -->
<bean name="accountDao" class="com.test.spring.transaction.demo4.AccountDaoImpl">
    <property name="dataSource" ref="dataSource"/>
</bean>

<!-- 注册转账service bean,注入DAO,注入事务管理模版(事务定义在service服务层)transactionTemplate -->
<bean name="accountService" class="com.test.spring.transaction.demo4.AccountServiceImpl">
    <property name="accountDao" ref="accountDao"/>
</bean>

<!-- 配置事务管理器:管理数据源的事务,引入数据源dataSource -->
<bean id="transactionManager" class="org.springframework.jdbc.datasource.DataSourceTransactionManager">
    <property name="dataSource" ref="dataSource" />
</bean>

<!-- 配置事务性通知,以切面通知的方式对业务进行事务曾强处理 -->
<tx:advice id="accountAdvice" transaction-manager="transactionManager">
    <!-- 配置事务属性,比如事务的隔离级别、传播级别、异常处理等 -->
    <tx:attributes>
        <tx:method name="transferAccount" propagation="REQUIRED"/>
    </tx:attributes>
</tx:advice>

<!-- 配置切面 -->
<aop:config>
    <aop:pointcut id="accountPointcut" expression="execution(* com.test.spring.transaction.demo4.AccountServiceImpl.transferAccount(..))"/>
    <aop:advisor advice-ref="accountAdvice" pointcut-ref="accountPointcut"/>
</aop:config>
- 1
- 2
- 3
- 4
- 5
- 6
- 7
- 8
- 9
- 10
- 11
- 12
- 13
- 14
- 15
- 16
- 17
- 18
- 19
- 20
- 21
- 22
- 23
- 24
- 25
- 26
- 27
- 28
- 29
- 30
- 31
- 32
- 33
- 34
- 35
- 36
- 37
- 38
- 39
恢复转账Service服务接口实现类的转账业务方法为开始状态:
@Override
public void transferAccount(final String out,final String in,final double money) {
    accountDao.outMoney(out, money);
    try{
        int i = 1/0;
    }catch(Exception e){
        e.printStackTrace();
    }
    accountDao.inMoney(in, money);
}
- 1
- 2
- 3
- 4
- 5
- 6
- 7
- 8
- 9
- 10
4、声明式事务管理三:基于AspectJ注解的事务管理
xml配置文件:
<!-- 引入属性文件 -->
<context:property-placeholder location="classpath:jdbc-connect.properties"/>

<!-- 配置数据源,使用C3P0连接池 -->
<bean id="dataSource" class="com.mchange.v2.c3p0.ComboPooledDataSource">
    <property name="driverClass" value="${jdbc.driverClass}"/>
    <property name="jdbcUrl" value="${jdbc.url}"/>
    <property name="user" value="${jdbc.username}"/>
    <property name="password" value="${jdbc.password}"/>
</bean>

<!-- 注册转账DAO bean,注入数据源,操作数据库dataSource -->
<bean name="accountDao" class="com.test.spring.transaction.demo5.AccountDaoImpl">
    <property name="dataSource" ref="dataSource"/>
</bean>

<!-- 注册转账service bean,注入DAO,注入事务管理模版(事务定义在service服务层)transactionTemplate -->
<bean name="accountService" class="com.test.spring.transaction.demo5.AccountServiceImpl">
    <property name="accountDao" ref="accountDao"/>
</bean>

<!-- 配置事务管理器:管理数据源的事务,引入数据源dataSource -->
<bean id="transactionManager" class="org.springframework.jdbc.datasource.DataSourceTransactionManager">
    <property name="dataSource" ref="dataSource" />
</bean>

<!-- 基于AspectJ注解的事务管理驱动事务管理器 -->
<tx:annotation-driven transaction-manager="transactionManager"/>
- 1
- 2
- 3
- 4
- 5
- 6
- 7
- 8
- 9
- 10
- 11
- 12
- 13
- 14
- 15
- 16
- 17
- 18
- 19
- 20
- 21
- 22
- 23
- 24
- 25
- 26
- 27
- 28
修改转账Service服务接口实现类,为其添加@Transactional事务注解,服务方法不变:
@Transactional
public class AccountServiceImpl implements AccountService{

    private AccountDao accountDao;
    public void setAccountDao(AccountDao accountDao) {
        this.accountDao = accountDao;
    }

    @Override
    public void transferAccount(final String out,final String in,final double money) {
        accountDao.outMoney(out, money);
        try{
            int i = 1/0;
        }catch(Exception e){
            e.printStackTrace();
        }
        accountDao.inMoney(in, money);
    }
}
- 1
- 2
- 3
- 4
- 5
- 6
- 7
- 8
- 9
- 10
- 11
- 12
- 13
- 14
- 15
- 16
- 17
- 18
- 19
总结: Spring配置文件中关于事务配置总是由三个组成部分,分别是DataSource、TransactionManager和代理机制这三部分,无论哪种配置方式,一般变化的只是代理机制这部分。
DataSource、TransactionManager这两部分只是会根据数据访问方式有所变化,比如使用Hibernate进行数据访问时,DataSource实际为SessionFactory,TransactionManager的实现为HibernateTransactionManager。
盗图如下:
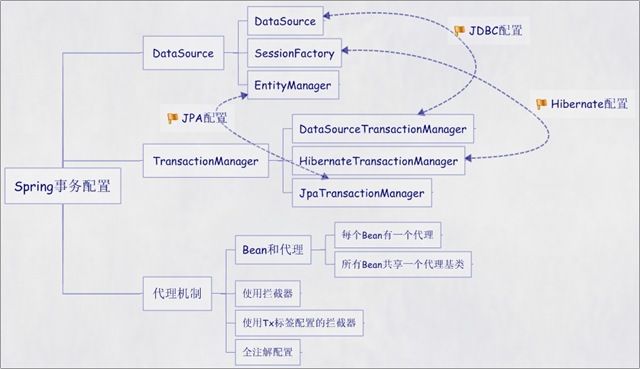
通过上面的实例也可以发现,从操作事务到交给事务管理器,经历了模版方式、拦截器代理方式、AOP配置切面通知方式、AspectJ注解方式,无论哪一种,它们都是通过配置拿到事务管理器,然后对Service业务方法进行曾强事务处理。
代码下载地址:http://download.csdn.net/detail/javaloveiphone/9609316


 759
759

 被折叠的 条评论
为什么被折叠?
被折叠的 条评论
为什么被折叠?
 到【灌水乐园】发言


