


欢迎大家到我的博客查看对应内容,并关注我学习Ionic 1和Ionic 2的历程,共同学习,共同进步。
注:本篇乃是译文,难免会有疏漏,欢迎大家批评指正,大家也可挪步原文。
我最近在寻找一种在ionic app中作为本地存储的解决方案,就我所查找的资料来看,最流行的方式是使用SQLite数据库。
然而,跟随别人探寻PouchDB的脚步发现PouchDB能够实现本地存储并与服务器端同步,但是对于特定的app来说我并需要服务器端。而且PouchDB可以不使用SQL语句的方式进行数据库存储,而我本身又有数据库经验,所以我想我应该使用SQLite.
随着继续深入了解,在ionic app的开发中使用PouchDB要比SQLite拥有更好的性能,开发也更加容易,即使只是用PouchDB作为本地存储。
注:也可以使用LokiJS代替PouchDB,详情可参考我的另外一篇译文ionic怎样使用LokiJS作为本地存储。
本篇文章的源码可在Github上找到。
关于PouchDB
PouchDB是一个开源的JavaScript库,在浏览器中使用IndexedDB或WebSQL存储数据。是从Apache CouchDB衍生而来,并且允许本地数据和CouchDB服务器进行数据同步。
IndexedDB或WebSQL均有存储空间的限制,如果想要在ionic mobile app中获得“无限制”存储,最好还是使用SQLite。如果安装了Cordova SQLite插件,那么PouchDB将会自动使用SQLite数据库。
注:SQLite的速度确实要比IndexedDB或WebSQL的速度慢。
安装相关库
为了在我们的app中让PouchDB能够使用SQLite,我们需要安装:
- SQLite Plugin for Cordova
- PouchDB库
安装SQLite Plugin和其他Cordova Plugin一样,在ionic app的目录下,终端执行:
$ cordova plugin add io.litehelpers.cordova.sqlitestorage安装PouchDB,这里我使用bower,大家也可使用其他方式:
$ bower install pouchdb安装完成PouchDB,下一步自然是在index.html中引入js文件:
<script src="lib/pouchdb/dist/pouchdb.min.js"></script>这样就完成了相关库的安装,下面就是写代码了。
我们要做什么?
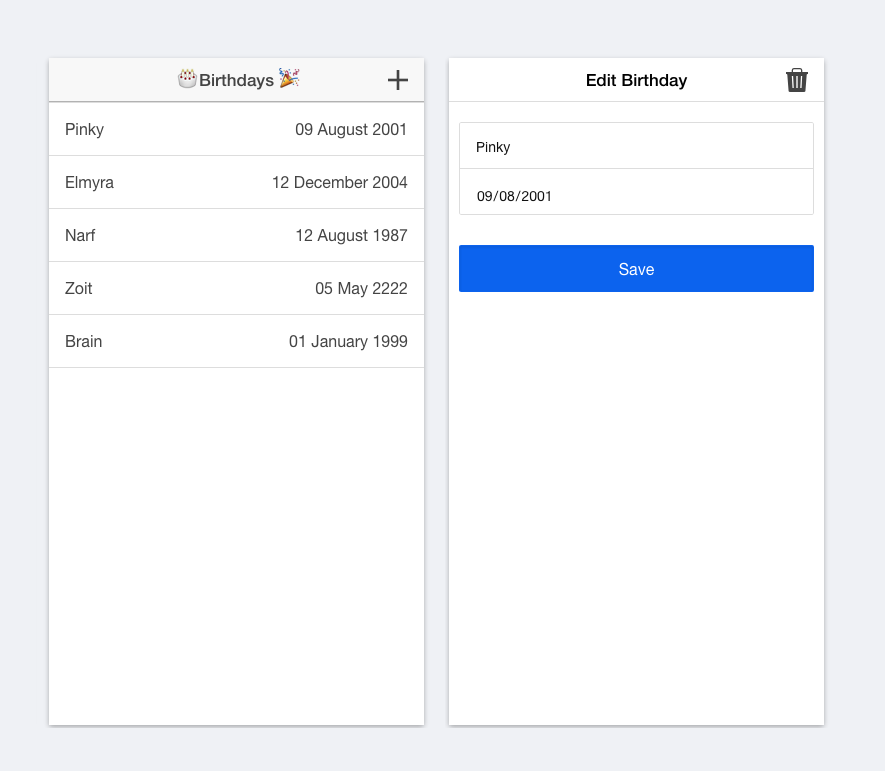
本文中,我们是要完成一个生日记录的app,具有增加、删除、更新、查看朋友们生日的功能:
构造数据库相关操作的service
第一步,我们需要构造一个service封装PouchDB的功能调用:
angular.module('starter').factory('BirthdayService', ['$q', BirthdayService]);

function BirthdayService($q) {
    var _db;

    // We'll need this later.
    var _birthdays;

    return {
        initDB: initDB,

        // We'll add these later.
        getAllBirthdays: getAllBirthdays,
        addBirthday: addBirthday,
        updateBirthday: updateBirthday,
        deleteBirthday: deleteBirthday
    };

    function initDB() {
        // Creates the database or opens if it already exists
        _db = new PouchDB('birthdays', {adapter: 'websql'});
    };
}initDB函数当数据库不存在时会新建一个数据库,当数据库存在时打开数据库。
可以看到,上面的代码只实现了initDB函数,下面实现其他功能函数:
addBirthday函数
addBirthday函数用来向我们的数据库插入一条生日信息:
function addBirthday(birthday) {
      return $q.when(_db.post(birthday));
};
咦,怎么没有insert语句呢?在PouchDB中,birthday对象会被简单处理成JSON,并存储在数据库中。
插入数据有2种方式,一种是像上面那样使用post方法,一种是使用put方法。使用post方法,PouchDB会自动帮你生成_id,而使用put方法,需要自己手动添加_id。
看到这,大家可能有些疑惑,为什么要将_db.post封装到$q的promise中。我会在下文解释。
updateBirthday函数
function updateBirthday(birthday) {
    return $q.when(_db.put(birthday));
};deleteBirthday函数
function deleteBirthday(birthday) {
    return $q.when(_db.remove(birthday));
};getAllBirthdays函数
function getAllBirthdays() {
    if (!_birthdays) {
       return $q.when(_db.allDocs({ include_docs: true}))
            .then(function(docs) {

                // Each row has a .doc object and we just want to send an
                // array of birthday objects back to the calling controller,
                // so let's map the array to contain just the .doc objects.
                _birthdays = docs.rows.map(function(row) {
                    // Dates are not automatically converted from a string.
                    row.doc.Date = new Date(row.doc.Date);
                    return row.doc;
                });

                // Listen for changes on the database.
                _db.changes({ live: true, since: 'now', include_docs: true})
                   .on('change', onDatabaseChange);

                return _birthdays;
            });
    } else {
        // Return cached data as a promise
        return $q.when(_birthdays);
    }
};这里使用allDocs 函数获得数据库内所有的birthday对象,并返回一个数组。我不想让调用这个service的controller能够获取到PouchDB或docs的所有信息,所以我将rows数组映射成为一个只包含row.doc对象的新数组。
可以看到这里对row.doc.Date做了转换,转换成Date对象,因为不幸的是JSON中的日期不能自动转换回Date对象。
我还将结果保存了一份到_birthdays数组中作为缓存使用,这样我只需要在app开始时访问一次数据库。
但是,这就有个问题,要怎样保持_birthdays缓存和数据库内容的同步呢?下面的onDatabaseChange 函数就是为此而生的:
function onDatabaseChange(change) {
    var index = findIndex(_birthdays, change.id);
    var birthday = _birthdays[index];

    if (change.deleted) {
        if (birthday) {
            _birthdays.splice(index, 1); // delete
        }
    } else {
        if (birthday && birthday._id === change.id) {
            _birthdays[index] = change.doc; // update
        } else {
            _birthdays.splice(index, 0, change.doc) // insert
        }
    }
}

// Binary search, the array is by default sorted by _id.
function findIndex(array, id) {
    var low = 0, high = array.length, mid;
    while (low < high) {
    mid = (low + high) >>> 1;
    array[mid]._id < id ? low = mid + 1 : high = mid
    }
    return low;
}
onDatabaseChange 函数使你能够在数据库变化时更新_birthdays缓存。onDatabaseChange 函数需要传入一个对象作为参数,此参数包含了id值和doc对象内的真实数据。如果此id没有在_birthdays数组中找到,那就意味着我们我们要新增加一条生日记录了,否则就意味着我们要进行update或delete操作了。
为什么使用$q
上文留下了一个问题:为什么使用$q封装数据库操作?
PouchDB所有的数据库操作都是异步的,并且使用promise。不幸的是当promise被resolve后,Angular并不知道需要去更新UI,然而,当使用$q封装相关操作后,神奇的事情就发生了,Angular就知道应该去更新UI了。
创建UI
目前为止,我们已经创建了service承担大部分工作了,现在开始UI的设计。
首先,我们添加一个controller:OverviewController调用birthdayService.initDB函数初始化数据库,注意操作应该在$ionicPlatform.ready(表示设备已经就绪)内执行:
angular.module('starter').controller('OverviewController', ['$scope', '$ionicModal', '$ionicPlatform', 'BirthdayService', OverviewController]);

function OverviewController($scope, $ionicModal, $ionicPlatform, birthdayService) {
    var vm = this;

    // Initialize the database.
    $ionicPlatform.ready(function() {
        birthdayService.initDB();

        // Get all birthday records from the database.
        birthdayService.getAllBirthdays().then(function(birthdays) {
            vm.birthdays = birthdays;
        });
    });

    // Initialize the modal view.
    $ionicModal.fromTemplateUrl('add-or-edit-birthday.html', {
        scope: $scope,
        animation: 'slide-in-up'
    }).then(function(modal) {
        $scope.modal = modal;
    });

    vm.showAddBirthdayModal = function() {
        $scope.birthday = {};
        $scope.action = 'Add';
        $scope.isAdd = true;
        $scope.modal.show();
    };

    vm.showEditBirthdayModal = function(birthday) {
        $scope.birthday = birthday;
        $scope.action = 'Edit';
        $scope.isAdd = false;
        $scope.modal.show();
    };

    $scope.saveBirthday = function() {
        if ($scope.isAdd) {
            birthdayService.addBirthday($scope.birthday);
        } else {
            birthdayService.updateBirthday($scope.birthday);
        }
        $scope.modal.hide();
    };

    $scope.deleteBirthday = function() {
        birthdayService.deleteBirthday($scope.birthday);
        $scope.modal.hide();
    };

    $scope.$on('$destroy', function() {
        $scope.modal.remove();
    });

    return vm;
}
最后,在index.html中创建UI,这里我们使用$ionicModal弹出“增加生日”和“编辑生日”的界面:
<body ng-app="starter">
  <ion-pane ng-controller="OverviewController as vm">
    <ion-header-bar class="bar-stable">
      <h1 class="title">Birthdays</h1>
      <div class="buttons">
        <button ng-click="vm.showAddBirthdayModal()" class="button button-icon icon ion-plus"></button>
      </div>
    </ion-header-bar>
    <ion-content>
      <ion-list>
        <ion-item ng-repeat="b in vm.birthdays" ng-click="vm.showEditBirthdayModal(b)">
          <div style="float: left">{{ b.Name }}</div>
          <div style="float: right">{{ b.Date | date:"dd MMMM yyyy" }}</div>
        </ion-item>
      </ion-list>
    </ion-content>
  </ion-pane>

  <script id="add-or-edit-birthday.html" type="text/ng-template">
    <ion-modal-view>
      <ion-header-bar>
        <h1 class="title">{{ action }} Birthday</h1>
        <div class="buttons">
        <button ng-hide="isAdd" ng-click="deleteBirthday()" class="button button-icon icon ion-trash-a"></button>
        </div>
      </ion-header-bar>
      <ion-content>
        <div class="list list-inset">
          <label class="item item-input">
          <input type="text" placeholder="Name" ng-model="birthday.Name">
          </label>
          <label class="item item-input">
          <input type="date" placeholder="Birthday" ng-model="birthday.Date">
          </label>
        </div>
        <div class="padding">
          <button ng-click="saveBirthday()" class="button button-block button-positive activated">Save</button>
        </div>
      </ion-content>
    </ion-modal-view>
  </script>
</body>
检查数据库
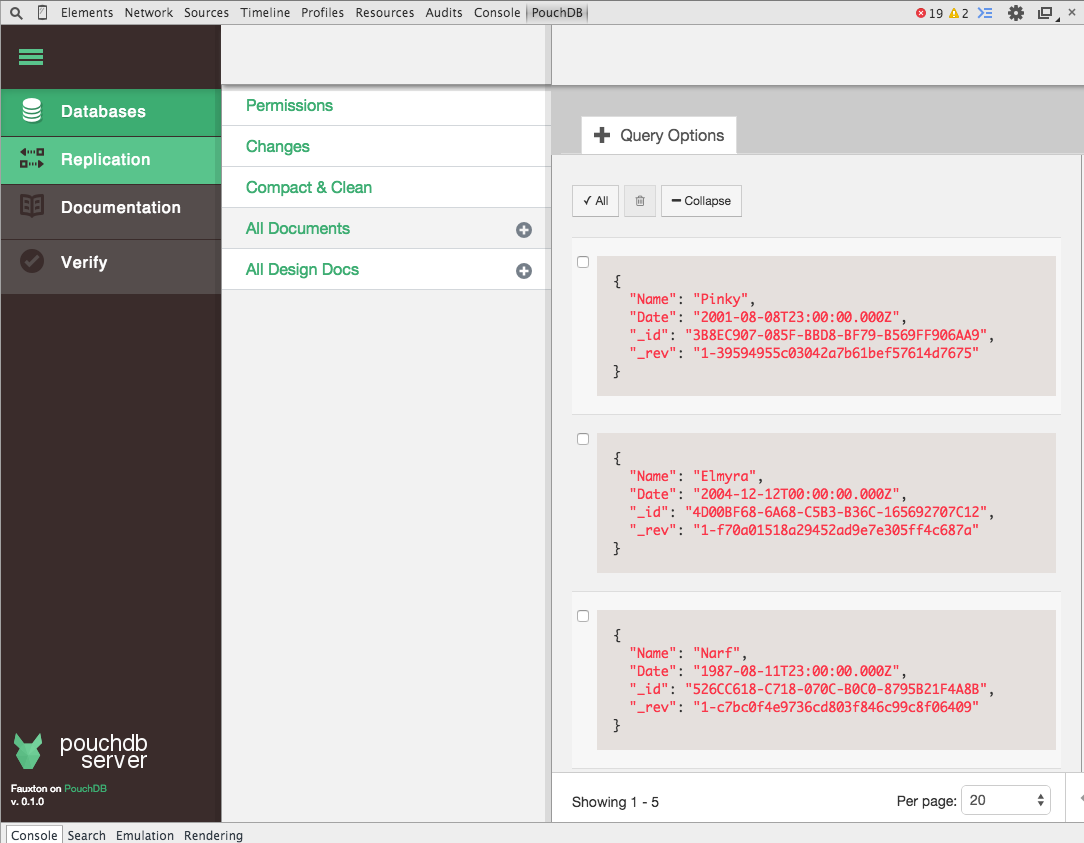
Chrome上有个PouchDB Inspector扩展可以方便的在Chrome Developer Tools内查看数据库的内容:
注:当使用
$ ionic serve --lab在浏览器中查看效果时,不能使用PouchDB Inspector。因为它会使用iframe展示Android和IOS的UI效果,而PouchDB Inspector连接PouchDB是通过window.PouchDB的,当window对象处于iframe标签内就不能使用window.PouchDB了。
可能存在的问题
注意,当你在桌面浏览器上测试此app时,PouchDB使用IndexDB adapter或WebSQL adapter,具体使用哪个取决于你的浏览器,可以使用如下方式获知使用的是那个adapter:
var db = new PouchDB('birthdays');
console.log(db.adapter); 在手机上测试时,即使使用SQLite,上面的代码可能返回结果也是websql,为了证实使用的确实是SQLite,需要使用如下代码(StackOverflow问答):
var db = new PouchDB('birthdays');
db.info().then(console.log.bind(console)); 这段代码会返回一个对象,其中sqlite_plugin属性为true或false。
删除数据库
var db = new PouchDB('birthdays');
db.destroy().then(function() { console.log('ALL YOUR BASE ARE BELONG TO US') });理论上来说,也可以使用PouchDB Inspector删除数据库,不过因为某些原因,我没有测试通过。
结语
可以看出,使用PouchDB还是很方便的,功能也很强大。
推荐一款个人使用了半年的理财产品:创建了6年的挖财,新人收益36%,7天18%,1年10%,注册送308元券


 113
113


 被折叠的 条评论
为什么被折叠?
被折叠的 条评论
为什么被折叠?
 到【灌水乐园】发言


