


一.原理
1.下面的Xfermode子类可以改变这种行为:
AvoidXfermode 指定了一个颜色和容差,强制Paint避免在它上面绘图(或者只在它上面绘图)。
PixelXorXfermode 当覆盖已有的颜色时,应用一个简单的像素XOR操作。
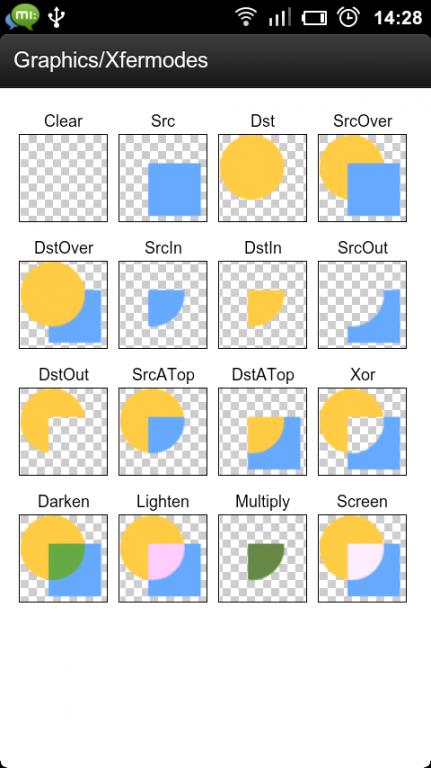
PorterDuffXfermode 这是一个非常强大的转换模式,使用它,可以使用图像合成的16条Porter-Duff规则的任意一条来控制Paint如何与已有的Canvas图像进行交互。
2.Porter-Duff 效果图:
二、实现
1.定义抽象类 AbsRoundImageView (继承ImageView)
private static final PorterDuffXfermode xFermode = new PorterDuffXfermode(PorterDuff.Mode.DST_IN);

private Paint mBitmapPaint;

/**
 * 图片可视区
 */
protected Path roundPath;

/**
 * 图片边框
 */
protected Path borderPath;

/**
 * 边框宽度
 */
protected float borderWidth;

/**
 * 边框颜色
 */
protected int borderColor;

private Paint borderPaint;
2.自定义属性
<declare-styleable name="AbsRoundImageView">
    <attr name="borderWidth" format="dimension|reference"/>
    <attr name="borderColor" format="color|reference"/>
</declare-styleable>
protected void initAttrs(AttributeSet attrs){
if (attrs != null) {
TypedArray ta = getContext().obtainStyledAttributes(attrs, R.styleable.AbsRoundImageView);
borderWidth = ta.getDimension(R.styleable.AbsRoundImageView_borderWidth, 0);
borderColor = ta.getColor(R.styleable.AbsRoundImageView_borderColor, 0);
ta.recycle();
}
}3.onDraw,圆形、圆角图片绘制流程都是一样的,绘制图片,绘制边框。
@Override
protected void onDraw(Canvas canvas) {
    drawImage(canvas);
    drawBorder(canvas);
}- 绘制图片
private void drawImage(Canvas canvas) {
    Drawable drawable = getDrawable();
    if(!isInEditMode() && drawable != null) {
        try {
            Bitmap bitmap;
            if (drawable instanceof ColorDrawable) {
                bitmap = Bitmap.createBitmap(2, 2, Bitmap.Config.ARGB_8888);
            } else {
                bitmap = Bitmap.createBitmap(drawable.getIntrinsicWidth(), drawable.getIntrinsicHeight(), Bitmap.Config.ARGB_8888);
            }
            Canvas drawCanvas = new Canvas(bitmap);
            drawable.setBounds(0, 0, drawCanvas.getWidth(), drawCanvas.getHeight());
            drawable.draw(drawCanvas);

            Bitmap roundBm = getRoundBitmap();
            mBitmapPaint.reset();
            mBitmapPaint.setFilterBitmap(false);
            mBitmapPaint.setXfermode(xFermode);
            drawCanvas.drawBitmap(roundBm, 0, 0, mBitmapPaint);
            mBitmapPaint.setXfermode(null);
            canvas.drawBitmap(bitmap, 0, 0, mBitmapPaint);
        } catch (Exception e) {
            e.printStackTrace();
        }
    }
}- 绘制边框
private void drawBorder(Canvas canvas) {
    borderPaint.setStyle(Paint.Style.STROKE);
    borderPaint.setColor(borderColor);
    canvas.drawPath(borderPath, borderPaint);
}
4.定义抽象方法
/**
 * 初始化边框Path
 */
protected abstract void initBorderPath();

/**
 * 初始化图片区域Path
 */
protected abstract void initRoundPath();
三、圆角图片CircleImageView,继承AbsRoundImageView并实现抽象方法
- 通过path的addCircle方法确定圆形区域
@Override
protected void initRoundPath() {
    roundPath.reset();
    final int width = getWidth();
    final int height = getHeight();
    final float cx = width * 0.5f;
    final float cy = height * 0.5f;
    final float radius = Math.min(width, height) * 0.5f;
    roundPath.addCircle(cx, cy, radius, Path.Direction.CW);
}
@Override
protected void initBorderPath() {
borderPath.reset();
final float halfBorderWidth = borderWidth * 0.5f;
final int width = getWidth();
final int height = getHeight();
final float cx = width * 0.5f;
final float cy = height * 0.5f;
final float radius = Math.min(width, height) * 0.5f;
borderPath.addCircle(cx, cy, radius - halfBorderWidth, Path.Direction.CW);
}四、圆角图片RoundImageView继承AbsRoundImageView并实现抽象方法
1.自定义属性,因为要控制四个角的弧度,所以要再定义四个属性
<declare-styleable name="RoundImageView">
    <attr name="leftTopRadius" format="dimension|reference"/>
    <attr name="rightTopRadius" format="dimension|reference"/>
    <attr name="rightBottomRadius" format="dimension|reference"/>
    <attr name="leftBottomRadius" format="dimension|reference"/>
</declare-styleable>
protected void initAttrs(AttributeSet attrs) {
super.initAttrs(attrs);
if (attrs != null) {
TypedArray ta = getContext().obtainStyledAttributes(attrs, R.styleable.RoundImageView);
leftTopRadius = ta.getDimension(R.styleable.RoundImageView_leftTopRadius, 0);
rightTopRadius = ta.getDimension(R.styleable.RoundImageView_rightTopRadius, 0);
rightBottomRadius = ta.getDimension(R.styleable.RoundImageView_rightBottomRadius, 0);
leftBottomRadius = ta.getDimension(R.styleable.RoundImageView_leftBottomRadius, 0);
ta.recycle();
}
}2.关键是控制四个位置的圆角,path的addRoundRect有不同参数个数的,其中有一个三个参数如下,float数组类型的参数便是控制四个位置弧度的。
/**
 * Add a closed round-rectangle contour to the path. Each corner receives
 * two radius values [X, Y]. The corners are ordered top-left, top-right,
 * bottom-right, bottom-left
 *
 * @param rect The bounds of a round-rectangle to add to the path
 * @param radii Array of 8 values, 4 pairs of [X,Y] radii
 * @param dir  The direction to wind the round-rectangle's contour
 */
public void addRoundRect(RectF rect, float[] radii, Direction dir) {
    if (rect == null) {
        throw new NullPointerException("need rect parameter");
    }
    addRoundRect(rect.left, rect.top, rect.right, rect.bottom, radii, dir);
}
使用这个方法才可以控制圆角位置,radii 参数是一个含有8个值,4对坐标的数组, 每两个值控制一个方向的值,左上角开始,依次按照顺时针方向
0,1位置 - 左上角
2,3位置 - 右上角
4,5位置 - 右下角
6,7位置 - 左下角
- 所以区域可以这样写
@Override
protected void initRoundPath() {
    roundPath.reset();
    final int width = getWidth();
    final int height = getHeight();
    leftTopRadius = Math.min(leftTopRadius, Math.min(width, height) * 0.5f);
    rightTopRadius = Math.min(rightTopRadius, Math.min(width, height) * 0.5f);
    rightBottomRadius = Math.min(rightBottomRadius, Math.min(width, height) * 0.5f);
    leftBottomRadius = Math.min(leftBottomRadius, Math.min(width, height) * 0.5f);

    RectF rect = new RectF(0, 0, width, height);
    roundPath.addRoundRect(rect,
            new float[]{leftTopRadius, leftTopRadius, rightTopRadius, rightTopRadius,
                    rightBottomRadius, rightBottomRadius, leftBottomRadius, leftBottomRadius},
            Path.Direction.CW);
}
@Override
protected void initBorderPath() {
borderPath.reset();
/**
* 乘以0.5会导致border在圆角处不能包裹图片
*/
final float halfBorderWidth = borderWidth * 0.35f;
final int width = getWidth();
final int height = getHeight();
leftTopRadius = Math.min(leftTopRadius, Math.min(width, height) * 0.5f);
rightTopRadius = Math.min(rightTopRadius, Math.min(width, height) * 0.5f);
rightBottomRadius = Math.min(rightBottomRadius, Math.min(width, height) * 0.5f);
leftBottomRadius = Math.min(leftBottomRadius, Math.min(width, height) * 0.5f);
RectF rect = new RectF(halfBorderWidth, halfBorderWidth,
width - halfBorderWidth, height - halfBorderWidth);
borderPath.addRoundRect(rect,
new float[]{leftTopRadius, leftTopRadius, rightTopRadius, rightTopRadius,
rightBottomRadius, rightBottomRadius, leftBottomRadius, leftBottomRadius},
Path.Direction.CW);
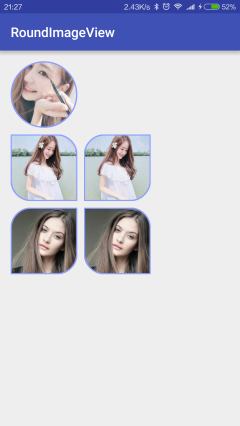
}五、使用
布局
<com.beiing.roundimage.CircleImageView
        android:layout_width="wrap_content"
        android:layout_height="wrap_content"
        android:scaleType="centerCrop"
        android:src="@mipmap/head"
        app:borderWidth="2dp"
        app:borderColor="#8c9eff"
        />
 <com.beiing.roundimage.RoundImageView
                android:layout_width="100dp"
                android:layout_height="100dp"
                android:scaleType="centerCrop"
                android:src="@mipmap/test"
                app:borderWidth="2dp"
                app:borderColor="#8c9eff"
                app:leftTopRadius="10dp"
                app:rightTopRadius="30dp"
                app:rightBottomRadius="10dp"
                app:leftBottomRadius="30dp"
                />
测试常见的图片加载库加载
- Glide
 circleImageViewGlide = (CircleImageView) findViewById(R.id.circle_image_glide);
 Glide.with(this).load("http://img2.imgtn.bdimg.com/it/u=1939271907,257307689&fm=21&gp=0.jpg").into(circleImageViewGlide);
- Picasso
roundImageViewPicasso = (RoundImageView) findViewById(R.id.round_image_picasso);
 Picasso.with(this).load("http://img0.imgtn.bdimg.com/it/u=2263418180,3668836868&fm=206&gp=0.jpg").fit().into(roundImageViewPicasso);
- xUtils3
roundImageViewXutils = (RoundImageView) findViewById(R.id.round_image_xutils);
x.image().bind(roundImageViewXutils, "http://img0.imgtn.bdimg.com/it/u=2263418180,3668836868&fm=206&gp=0.jpg",
                new ImageOptions.Builder().setCrop(true).build());
扩展
继承AbsRoundImageView,实现抽象方法,绘制自定义形状的图片。


 2887
2887

 被折叠的 条评论
为什么被折叠?
被折叠的 条评论
为什么被折叠?
 到【灌水乐园】发言


