


本笔记学习自Spring in Action 第三版
Spring 核心部分,将介绍如下方面:
- Spring 依赖注入(DI)和 面向切面编程(AOP)
- 装配Bean
- 最小化Spring XML配置
- AOP特性
1 Spring之旅
内容:
- 探索Spring核心模块
- 解耦应用对象
- 使用AOP管理横切关注点
- Spring的Bean容器
Spring到底是什么?本章将给出一个清晰的认识。
1.1 简化JAVA开发
Spring是为了解决企业级应用开发的复杂性而创建的,使用Spring可以让简单的JavaBean实现之前只有EJB才能完成的事情。不只是服务器端开发,任何的Java应用都能在简单性、可测试性和松耦合等方面从Spring中获益。
Spring最根本的使命:简化Java开发,为了这个目的,Spring采取了4种关键策略:
- 基于POJO的轻量级和最小侵入性编程;
- 通过依赖注入和面向接口实现松耦合
- 基于切面和管理进行声明式编程;
- 通过切面和模板较少样板式代码。
1.1.1 基于POJO的轻量级与最小侵入性
许多框架,如EJB会强迫开发者编写大量冗余代码将应用与框架绑定。而Spring则不会强迫开发者实现Spring规范的接口,或继承Spring规范的类。
比如EJB:
package com.habuma.ejb.session;
import javax.ejb.SessionBean;
import javax.ejb.SessionContext;
public classHelloWorldBeanimplementsSessionBean{
    public void ejbActivate(){}
    public void ejbPassivate(){}
    public void ejbRemove(){}
    public void setSessionContext(SessionContextctx){}
    public StringsayHello(){
        return"HelloWorld";
    }
    public void ejbCreate(){}
}
Spring:
package com.habuma.spring;
public classHelloWorldBean{
    public StringsayHello(){
        return"HelloWorld";
    }
}
显然,Spring的POJO没有被框架进行任何的侵入,他通过依赖注入来装配它们。
1.1.2 依赖注入
任何一个有实际意义的应用都是由两个或者更多的类组成,这些类相互之间进行协作来完成特定的业务逻辑。通常,每个对象负责管理与自己相互写作的对象的引用,这将会导致高度耦合和难以测试的代码。
比如:
package com.springinaction.knights;

public class DamselRescuingKnight implements Knight{

    private RescueDamsel Questquest;

    public DamselRescuingKnight(){
        quest=new RescueDamselQuest();
    }
    public void embarkOnQuest() throws QuestException{
        quest.embark();
    }
}
在这个例子里,勇士与营救公主例子耦合到了一起,
一方面紧密耦合的代码难以测试,难以复用以及理解。而另一方面,一定程度的耦合又是必须的,完全没有耦合的代码什么都做不了。
通过依赖注入(DI)的方式实现上面的例子:
package com.springinaction.knights;
public class BraveKnight implements Knight{
    private Questquest;
    public BraveKnight(Quest quest){
        this.quest = quest;
    }
    public void embarkOnQuest() throws  QuestException{
        quest.embark();
    }
}
显然,骑士不再和任何quest紧密结合,冒险任务通过构造器传入骑士类,这种方式就是依赖注入的方式之一 - 构造器注入。
这就是依赖注入最大的好处,松耦合,只要对象只通过接口来变现依赖关系,那么这种依赖就能在对象间进行替换。
注入一个Quest到Knight
Spring通过XML进行装配
<bean id="knight"class="com.springinaction.knights.BraveKnight">
    <constructor-argref="quest"/>
</bean>
<bean id="quest" class="com.springinaction.knights.SlayDragonQuest"/>
它如何工作
Spring通过应用上下文(Application Context)装载Bean的定义并把它们组装起来。 ApplicationContext负责对象的创建和组装。
此处使用ClassPathXmlApplicationContext加载knights.xml
package com.springinaction.knights;
import org.springframework.context.ApplicationContext;
import org.springframework.context.support.ClassPathXmlApplicationContext;
public class KnightMain{
    public static void main(String[] args){
        ApplicationContext context = new ClassPathXmlApplicationContext("knights.xml");
        Knight knight = (Knight)context.getBean("knight");
        knight.embarkOnQuest();
    }
}
可以发现,KnightMain这个类完全不知道是哪个骑士去完成哪个探险任务,一切都由knights.xml这个文件来配置。
1.1.3 应用切面
依赖注入让相互协作的软件保持松散耦合,而AOP编程允许把遍布应用各处的功能分离出来形成可重用的组件。
非AOP应用,每一个业务模块都需要管理自己的日志、安全、事物模块:
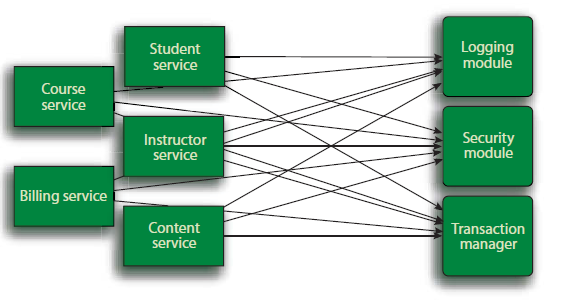
AOP应用:
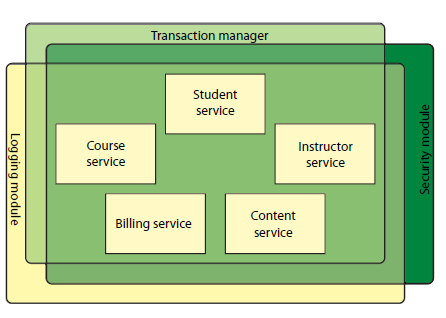
我们可以把切面想象成一个覆盖在很多组件之上的一个外壳,应用由各自业务功能模块组成。利用AOP,你可以使用各种功能层去包裹核心业务层。这个理念可以让安全、事物和关注点与核心业务逻辑相分离。
拿之前的骑士例子举例,我们创造一个吟游诗人用诗歌来记载骑士的事迹并传颂。
吟游诗人类,在每次执行任务前与后唱歌:
package com.springinaction.knights;
public class Minstrel{
    public void singBeforeQuest(){
        System.out.println("Fa la la;The knight is so brave!");
    }
    public void singAfterQuest(){
    System.out.println("Tee hee he;The brave knight did embark on a quest!");
    }
}
如果不使用面向切面:
package com.springinaction.knights;
public class BraveKnight implements Knight{
    private Quest quest;
    private Minstrel minstrel;
    public BraveKnight(Questquest,Minstrelminstrel){
        this.quest=quest;
        this.minstrel=minstrel;
    }
    public void embark On Quest() throws QuestException{
        minstrel.singBeforeQuest();
        quest.embark();
        minstrel.singAfterQuest();
    }
}
可以达到预期的效果,但是吟游诗人侵入了骑士类,增加了复杂度。
使用Spring 的AOP配置:
<bean id="knight"class="com.springinaction.knights.BraveKnight">
    <constructor-arg ref="quest"/>
</bean>

<bean id="quest" class="com.springinaction.knights.SlayDragonQuest"/>

<bean id="minstrel" class="com.springinaction.knights.Minstrel"/>

<aop:config>
    <aop:aspect ref="minstrel">
        <!-- 定义切面 -->
        <aop:pointcut id="embark" expression="execution(* *.embarkOnQuest(..))"/>
        <aop:before pointcut-ref="embark" method="singBeforeQuest"/>
        <aop:after pointcut-ref="embark" method="singAfterQuest"/>
    </aop:aspect>
</aop:config>
Spring AOP采用了AspectJ的切点表达式语言。
1.1.4 使用模板消除样板式代码
如JDBC,编程中往往需要使用样板式代码。Spring旨在通过模板封装来消除样板式代码。Spring的JdbcTemplate使得在执行数据库操作时,避免传统的JDBC样板式代码。
比如修改后的JDBC:
public Employee getEmployeeById(long id){
    return jdbcTemplate.queryForObject(
        "select id,firstname,lastname,salary"+
        "from employeewhereid=?",
        new RowMapper<Employee>(){
            public Employee mapRow(ResultSet rs,int rowNum) throws SQLException{
            Employee employee=new Employee();
            employee.setId(rs.getLong("id"));
            employee.setFirstName(rs.getString("firstname"));
            employee.setLastName(rs.getString("lastname"));
            employee.setSalary(rs.getBigDecimal("salary"));
            return employee;
            }
        },
    id);
}
这就是Spring的样板技术,来简化代码。
1.2 容纳Bean
在基于Spring的应用中,应用对象生存于Spring容器中。Spring容器创建对象,装配,配置,管理他们的整个生命周期。
容器是Spring框架的核心。不存在单一的Spring容器。Spring自带了几种容器实现,可以归为两种不同的类型。
Bean工厂(bean factories),最简单的容器,提供基本的DI支持。
应用Context(applicationContext)基于BeanFactory构建,提供面相应用的服务。
1.2.1 与应用上下文共事
Spring自带几种类型的Application Context,下面罗列3种:
ClassPathXmlApplicationContext : 类路径下的配置文件。
FileSystemXmlapplicationcontext:文件系统下的XML配置文件(即在制定的文件路径,而不是类路径下)。
XmlWebApplicationContext:Web应用下的XML配置文件。
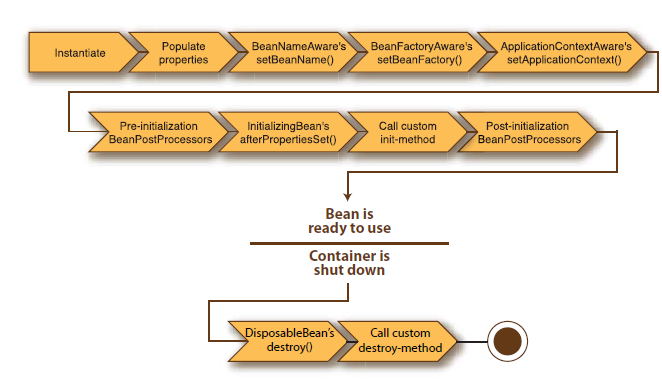
1.2.2 Bean的声明周期
相比Java的实例化、使用、以及被垃圾回收,Spring容器对Bean的生命周期要细腻很多:
对于这些位于Spring容器中的Bean,每一个生命周期都可以自定义。
详细描述:
1. Spring对Bean进行实例化。
2. Spring将值和Bean的引用注入进Bean的对应属性中。
3. 如果Bean实现了BeanNameAware接口,Spring将Bean的ID传递给setBeanName()接口方法。
4. 如果Bean实现了BeanFactoryAware接口,Spring将调用setBeanFactory()接口方法,将BeanFactory容器实例传入。
5. 如果Bean实现了ApplicationContextAware接口,则通过set方法将应用上下文传入。
6. 如果实现了BeanPostProcessor接口,则调用postProcessBeforeInitialization()接口方法。
7. 如果实现了InitializingBean接口,则调用afterPropertiesSet()接口方法,累死,如果使用init-method声明初始化方法,该方法也会调用。
8. 如果实现了BeanPostProcessor接口,则调用postPoressAfterInitialization()方法。
9. 此时,Bean已经准备就绪,可以被应用程序使用,他们将一直驻留在AppliactionContext中,直到ApplicationContext被摧毁。
10. 如果Bean实现了DisposableBean接口,Spring将调用塔的destory()接口方法,如果Bean使用destory-method声明了销毁方法,该方法也会被调用。
1.3 俯瞰Spring风景线
Spring通过DI(依赖注入)、AOP(面向切面编程)、消除模板样式来简化企业级Java开发。除了这些,Spring还能做更多的事情。
1.3.1 Spring模块
Spring具有6个定义明确的模块:
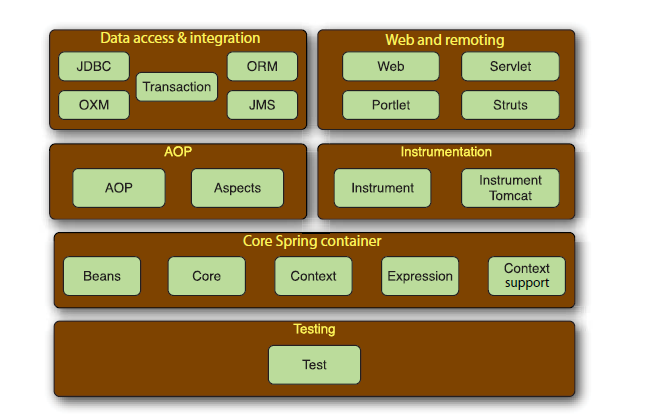
核心Spring容器
这是Spring框架最核心的步伐,他负责Spring应用中的Bean的创建、配置和管理。
在该模块中科院发现Spring和Bean工厂提供了依赖注入,在BeanFactory智商,还会发现集中Spring应用的上下文实现。
除了BeanFactory和ApplicationContext,该模块还提供了许多企业级服务,比如邮件、JNDI访问、EJB集成和调度。
AOP模块
在AOP模块中,Spring对面向切面编程提供了丰富的支持。这个模块是Spring应用系统开发切面的基础。
数据访问与集成(DATA ACCESS & INTEGRATION)
含有JDBC的样式代码,构建了一个语义丰富的数据库异常层。
提供了ORM模块,对流行的ORM框架进行集成,如Hibernate,Java Persisternace API,JDO和iBATIS。
Spring事务管理支持所有的ORM和JDBC
Web和远程调用(WEB AND REMOTING)
集成了多种流行的MVC框架,如Struts、JSF、WebWork和Tapestry
自带一个MVC框架,提供基于Servlet的框架和基于Java Portlet API的应用
远程调用服务集成了RMI、Hessian、Burlap、JAX-WS,自带远程调用框架HTTP invoker
测试
即测试模块,为JNDI、Servlet和Portlet提供一系列的模拟对象实现
1.3.2 Spring Portfolio
Spring Portfolio是多个基于核心Spring框架之上的框架和类库,他为开发者提供了Spring编程模型。这里来介绍几个框架:
Spring Web Flow
基于Spring MVC框架的基于流程的会话式Web应用(购物车,向导)。
Spring Web Service
契约优先的WebService服务
Spring Security
利用Spring AOP的声明安全机制。
Spring Integration
集成模式
Spring Batch
对数据进行大量操作,即批处理应用
Spring Social
Spring的社交网络扩展模块
Spring Mobile
Spring框架对Android的支持
Spring Dynamic Modules
整合了Spring声明式的DI和OSGI的动态组件模型。能模块化方式的构建应用,并且在OSGI框架内以声明的方式发布和消费服务。
Spring LDAP
基于Spring风格的LDAP访问
Spring Rich Client
富应用工具箱,为Swing准备的。
2 装配Bean
内容
- 声明Bean
- 构造器注入和Setter方法注入
- 装配Bean
- 控制Bean的创建和销毁
在Spring里,对象无需自己负责查找或创建与其相关的其他对象。容器负责把需要相互协作的对象引用赋予各个对象。
创建应用对象之间协作关系的行为通常被称为装配(wiring),这是依赖注入的本质。
2.1 声明Bean
举例,在比赛中,我们需要一些参赛者,即Performer接口:
package com.springinaction.springidol;
public interface Performer{
    void perform() throws PerformanceException;
}
2.1.1 创建Spring配置
传统的XML文件配置方式:
<?xml version="1.0" encoding="UTF-8"?>
<beans xmlns="http://www.springframework.org/schema/beans"
    xmlns:xsi="http://www.w3.org/2001/XMLSchema-instance"
    xsi:schemaLocation="http://www.springframework.org/schema/beans
        http://www.springframework.org/schema/beans/spring-beans-3.0.xsd">
<!-- Bean declarations go here-->
</beans>
在beans元素内,可以放置所有的Spring配置信息,包括bean元素的声明。
| 命名空间 | 用途 |
|---|---|
| aop | 为声明切面以及将@AspectJ注解的类代理为Spring切面 |
| beans | 声明Bean和装配Bean |
| context | 为Spring ApplicationContext提供配置,包括自动检测和自动装配Bean、注入非Spring直接管理的对象 |
| jee | 提供Java EE API集成,例如JNDI和EJB |
| jms | 为声明消息驱动的POJO提供了配置元素 |
| lang | 支持Groovy、JRuby、BeanShell等脚本实现的Bean |
| mvc | 启动Spring MVC能力,例如面向注解的控制器、视图控制器和拦截器 |
| oxm | 支持Spring对象与xml的映射 |
| tx | 提供声明式事物的配置 |
| util | 提供各种各样的工具类元素,包括Bcan、属性占位符 |
Spring Portfolio的许多成员也提供了各自的命名空间。
2.1.2 声明一个简单Bean
声明一个杂技师:
package com.springinaction.springidol;
    public class Juggler implements Performer{
    private int beanBags = 3;
    public Juggler(){
    }
    public Juggler(int beanBags){
        this.beanBags=beanBags;
    }
    public void perform() throws PerformanceException{
    System.out.println("JUGGLING"+beanBags+"BEANBAGS");
    }
}
声明第一个选手Duke,是一个杂技师:
<bean id="duke" class="com.springinaction.springidol.Juggler"/>当Spring容器加载bean时,Spring会使用默认构造方法来实例化duke,即public Juggler(),
尝试让duke表演:
ApplicationContext ctx=new ClassPathXmlApplicationContext(
    "com/springinaction/springidol/spring-idol.xml");
Performer performer=(Performer)ctx.getBean("duke");
performer.perform();
此时Duke可以抛3个袋子。
通过构造器注入
我们尝试让Duke一次抛15个豆袋子:
<bean id="duke" class="com.springinaction.springidol.Juggler">
    <constructor-arg value="15"/>
</bean>
我们通过constructor-arg配置来注入属性。
通过构造器注入对象引用
扩展Duck,使他成为一个会朗读诗歌的杂技师。
package com.springinaction.springidol;
public class PoeticJuggler extends Juggler{
    private Poem poem;
    public PoeticJuggler(Poem poem){
        super();
        this.poem = poem;
    }
    public PoeticJuggler(int beanBags,Poem poem){
        super(beanBags);
        this.poem=poem;
    }
    public void perform() throws PerformanceException{
        super.perform();
        System.out.println("Whilereciting...");
        poem.recite();
    }
}
诗歌接口:
package com.springinaction.springidol;
public interface Poem{
    void recite();
}
诗歌实现:
package com.springinaction.springidol;
public class Sonnet29 implements Poem{
    private static String[] LINES={
    "When,in disgrace with fortune and men's eyes,",
    "I all alone beweep my outcast state",
    "And trouble deaf heaven with my bootless cries",
    “。。。”};
    public Sonnet29(){
    }
    public void recite(){
        for(int i = 0;i< LINES.length;i++){
            System.out.println(LINES[i]);
        }
    }
}
Spring配置:
<bean id="sonnet29" class="com.springinaction.springidol.Sonnet29"/>
<bean id="poeticDuke" class="com.springinaction.springidol.PoeticJuggler">
    <constructor-arg value="15"/>
    <constructor-arg ref="sonnet29"/>
</bean>
通过工厂方法创建Bean
有时想声明的Bean没有公开的构造方法,比如使用静态工厂方法来实例化对象。
比如我们有个舞台的Bean,并且是单例的。
package com.springinaction.springidol;
public class Stage{
    private Stage(){
    }
    private static class StageSingletonHolder{
        static Stage instance=new Stage();
    }
    public static Stage getInstance(){
        return StageSingletonHolder.instance;
    }
}
bean配置:
<bean id = "theStage" class="com.springinaction.springidol.Stage" factory-method = "getInstance" />2.1.4 Bean的作用域
所有的Spring Bean默认都是单例。当容器分配一个Bean时,他总是给出的是同一个实例。如果需要每次请求时,都获得唯一的实例,需要配置scope为prototype。
比如门票:
<bean id = "ticket" class="com.springinaction.springidol.Ticket" scope = "prototype"/>scope除了prototype还有:
| 作用域 | 定义 |
|---|---|
| singleton | 每一个Spring容器中,一个Bean定义只有一个对象实例 |
| prototype | 允许Bean的定义可以被实例化任意次 |
| request | 在一次HTTP请求中,每个Bean对应一个实例,作用域基于Web的Spring上下文。 |
| session | 在一个HTTPSession,其他条件同上 |
| global-session | 同上,作用域为Portlet上下文 |
2.1.5 初始化和销毁bean
Bean使用init-method和destroy-method参数来配置bean。
比如我们有个表演大厅的bean,每次开场与结束需要开灯关灯。
public class Auditorium{
    public void turnOnLights(){
        ...
    }
    public void turnOffLights(){
        ...
    }
}
bean声明:
<bean id="auditorium" class="com.springinaction.springidol.Auditorium"
    init-method="turnOnLights" destroy-method="turnOffLights"/>
另也可以通过实现Spring的init和dispose接口。
默认的init-method和destory-method
如果很多Bean都有相同名字的初始化方法和销毁方法,可以通过配置beans元素实现
<?xml version="1.0"encoding="UTF-8"?>
    <beans xmlns="http://www.springframework.org/schema/beans"
        xmlns:xsi="http://www.w3.org/2001/XMLSchema-instance"
        xsi:schemaLocation="http://www.springframework.org/schema/beans
        http://www.springframework.org/schema/beans/spring-beans-3.0.xsd"
        default-init-method="turnOnLights"
        default-destroy-method="turnOffLights">...
    </beans>
2.2 注入Bean属性
Spring借助属性的set方法来配置属性的值,以实现setter方式注入。
比如:
package com.springinaction.springidol;
public class Instrumentalist implements Performer{
    public Instrumentalist(){
    }
    public void perform() throws PerformanceException{
        System.out.print("Playing"+song + " : ");
        instrument.play();
    }
    private String song;
    public void setSong(String song){
        this.song = song;
    }
    public String getSong(){
        return song;
    }
    public String screamSong(){
        return song;
    }
    private Instrument instrument;
    public void set Instrument(Instrument instrument){
        this.instrument = instrument;
    }
}
定义演奏家:
package com.springinaction.springidol;
public interface Instrument{
    public void play();
}<bean id="kenny" class="com.springinaction.springidol.Instrumentalist"/>2.2.1 注入简单值
我们用property标签来配置Bean的属性,他调用了属性的set方法。
注入String:
<bean id = "kenny" class="com.springinaction.springidol.Instrumentalist">
    <property name = "song" value = "Jingle Bells"/>
</bean>
注入基本类型:
<bean id="kenny" class="com.springinaction.springidol.Instrumentalist">
    <property name="song" value="Jingle Bells"/>
    <property name="age" value="37"/>
</bean>
2.2.2 引用其他Bean
定义乐器:
package com.springinaction.springidol;
public class Saxophone implements Instrument{
    public Saxophone(){
    }
    public void play(){
    System.out.println("TOOT TOOT TOOT");
    }
}
<bean id="saxophone" class="com.springinaction.springidol.Saxophone"/>
注入乐器:
<bean id="kenny2" class="com.springinaction.springidol.Instrumentalist">
    <property name="song" value="Jingle Bells"/>
    <property name="instrument" ref="saxophone"/>
</bean>
注入内部Bean
如果Kenny想要自己私人的萨克斯,不与他们公用。即配置内部Bean:
setter注入:
<bean id="kenny" class="com.springinaction.springidol.Instrumentalist">
    <property name="song" value = "Jingle Bells"/>
    <property name="instrument">
        <bean class="org.springinaction.springidol.Saxophone"/>
    </property>
</bean>
通过构造方法注入:
<bean id="duke" class="com.springinaction.springidol.PoeticJuggler">
    <constructor-arg value="15"/>
    <constructor-arg>
        <bean class="com.springinaction.springidol.Sonnet29"/>
    </constructor-arg>
</bean>
内部Bean没有ID,所以他不能被复用。
2.2.3 使用Spring的命名空间p装配属性
Spring使用命名空间p提供了另一种Bean属性的装配方式。
命名空间p的schema URL为 http://www.springframework.org/schema/p.
<?xml version="1.0"encoding="UTF-8"?>
<beans xmlns="http://www.springframework.org/schema/beans"
    xmlns:p="http://www.springframework.org/schema/p"
    xmlns:xsi="http://www.w3.org/2001/XMLSchema-instance"
    xsi:schemaLocation="http://www.springframework.org/schema/beans
        http://www.springframework.org/schema/beans/spring-beans-3.0.xsd">
配置Bean:
<bean id="kenny" class="com.springinaction.springidol.Instrumentalist"
    p:song = "Jingle Bells"
    p:instrument-ref = "saxophone"/>
2.2.4 装配集合
Spring提供了4种类型的集合配置元素。
| 集合元素 | 用途 |
|---|---|
| <list> | 装配list类型的值,允许重复 |
| <set> | 装配set类型的值,不允许重复 |
| <map> | 装配map类型的值,名称和值可以是任何类型 |
| <props> | 装配properties类型的值,名称和值必须都是String型 |
例如Hank可以使用多个乐器:
package com.springinaction.springidol;
import java.util.Collection;
public class OneManBand implements Performer{
    public OneManBand(){
    }
    public void perform() throws PerformanceException{
        for (Instrument instrument:instruments){
            instrument.play();
        }
    }
    private Collection<Instrument>instruments;
    public void setInstruments(Collection<Instrument> instruments){
        this.instruments=instruments;
    }
}
装配List、Set和Array
使用list配置元素,为Hank赋予表演时所用到的乐器集合:
list配置:
<bean id="hank" class="com.springinaction.springidol.OneManBand">
    <property name="instruments">
        <list>
            <ref bean="guitar"/>
            <ref bean="cymbal"/>
            <ref bean="harmonica"/>
        </list>
    </property>
</bean>
任意的Collection接口的实现都可以使用list元素,
List<Instrument> instruments;
Instrument[] instruments;
装配Map集合
当OneManBand表演时,perform()方法遍历乐器(instrument)的集合并把每种乐器的音符打印出来。
public classOneManBand implements Performer{
    public OneManBand(){
    }
    public void perform() throws PerformanceException{
        for (String key:instruments.keySet()){
            System.out.print(key + " : ");
            Instrument instrument=instruments.get(key);
            instrument.play();
        }
    }
    private Map<String,Instrument> instruments;
    public void setInstruments(Map<String,Instrument> instruments){
        this.instruments=instruments;
    }
}
注入map:
<bean id="hank" class="com.springinaction.springidol.OneManBand">
    <property name="instruments">
        <map>
            <entry key="GUITAR " value-ref="guitar"/>
            <entry key="CYMBAL" value-ref="cymbal"/>
            <entry key="HARMONICA" value-ref="harmonica"/>
        </map>
    </property>
</bean>
entry的其他属性:
- Key : 制定map中entry的键为String
- key - ref : 键为其他Bean的引用
- value : entry值为String
- value-ref: 值为其他引用
装配Properties
当Map的每一对键值都是String型时,可与考虑使用Properties来代替Map
private Properties instruments;
public void setInstruments(Properties instruments){
    this.instruments = instruments;
}
<bean id="hank" class="com.springinaction.springidol.OneManBand">
<property name="instruments">
<props>
<prop key="GUITAR">STRUM STRUM STRUM</prop>
<prop key="CYMBAL">CRASH CRASH CRASH</prop>
<prop key="HARMONICA">HUM HUM HUM</prop>
</props>
</property>
</bean>装配空值
Spring还可以装配一个空值,即null值。
<property name = "someNonNullProperty"><null/></property>2.3 使用表达式装配
Spring3引入了Spring表达式语言(SpEL)。通过SpEL可与通过运行期执行的表达式将值装配到Bean的属性或构造器参数中。
SpEL特性:
- 使用Bean的ID来引用Bean;
- 调用方法和访问对象的属性;
- 对值进行算数、关系和逻辑运算;
- 正则表达式匹配;
- 集合操作。
2.3.1 SpEL的基本原理
字面值
使用#{ }定符把值装配到Bean的属性中。
例子:
    <property name="count" value="#{5}"/>
    <property name="message" value="The value is #{5}"/>
    <property name="frequency" value="#{89.7}"/>
    <property name="capacity" value="#{1e4}"/>
    <property name="name" value="#{'Chuck'}"/>
    <property name='name' value='#{"Chuck"}'/>
    <property name="enabled" value="#{false}"/>
引用Bean、Properties和方法
比如我们通过表达式,使用BeanID将一个Bean装配到另一个Bean的属性中
<property name="instrument" value="#{saxophone}"/>同:
<property name="instrument" ref="saxophone"/>使用其他bean中的属性:
<bean id="carl" class="com.springinaction.springidol.Instrumentalist">
    <property name="song" value="#{kenny.song}"/>
</bean>
等价java代码:
Instrumentalist carl = new Instrumentalist();
carl.setSong(kenny.getSong());
更多的用法:
<property name="song" value="#{songSelector.selectSong()}"/>
<property name="song" value="#{songSelector.selectSong().toUpperCase()}"/>
<property name="song" value="#{songSelector.selectSong()?.toUpperCase()}"/>
如果selectSong()返回null,SpEL会抛出一个空指针异常。
当使用 ?. 运算符来代替 . 运算符,那么就能保证不出现空指针异常。
操作类
使用T( )运算符会调用类作用于的方法和常量。比如使用Java的Math类:
T(java.lang.Math)如果需要一个Math的PI常量:
<property name="multiplier" value="#{T(java.lang.Math).PI}"/>需要一个随机数:
<property name="randomNumber" value="#{T(java.lang.Math).random()}"/>2.3.2 在SpEL值上执行操作

2.3.3 在SpEL中筛选集合
SpEL可以操作集合,能引用集合中某个成员。比如我们定义一个City类:
package com.habuma.spel.cities;

public classCity{
    private String name;
    private String state;
    private int population;
    // setter & getter...
}
使用SpEL表达式装配:
<util:list id="cities">
    <bean class="com.habuma.spel.cities.City" p:name="Chicago" p:state="IL" p:population="2853114"/>
    <bean class="com.habuma.spel.cities.City" p:name="Atlanta" p:state="GA" p:population="537958"/>
    <bean class="com.habuma.spel.cities.City" p:name="Dallas" p:state="TX" p:population="1279910"/>
    <bean class="com.habuma.spel.cities.City" p:name="Houston" p:state="TX" p:population="2242193"/>
    <bean class="com.habuma.spel.cities.City" p:name="Odessa" p:state="TX" p:population="90943"/>
    <bean class="com.habuma.spel.cities.City" p:name="ElPaso" p:state="TX" p:population="613190"/>
    <bean class="com.habuma.spel.cities.City" p:name="Jal" p:state="NM" p:population="1996"/>
    <bean class="com.habuma.spel.cities.City" p:name="LasCruces" p:state="NM" p:population="91865"/>
</util:list>
他配置了含有8个City Bean的List集合。
访问集合成员
如果提取某一个成员:
<property name="chosenCity" value="#{cities[2]}"/>随机挑选一个成员:
<property name="chosenCity" value="#{cities[T(java.lang.Math).random() * cities.size()]}"/>[ ]中括号运算符始终通过索引访问集合中的成员,它也可以用来获取Map集合中的成员:
<property name="chosenCity" value="#{cities['Dallas']}"/>[ ]也可以获取Property的值,比如:
<util:properties id="settings" location="classpath:settings.properties"/>Spring还为SpEL创造了两种特殊的寻则属性的方式:systemEnvironment 和systemProperties。例如:
<property name="homePath" value="#{systemEnvironment['HOME']}"/>

<property name="homePath" value="#{systemProperties['application.home']}"/>
查询集合成员
我们可以通过(. ? [ ])运算符来获取值,比如:
<property name="bigCities" value="#{cities.?[population gt 100000]}"/>“. ^ [ ]”,“. $ [ ]”,查询第一个和最后个匹配项
投影集合
集合投影是从集合的每一个成员中选择特定的属性放入一个新的集合中。SpEL的投影运算符(.![ ])能做到这点
如果我们只需要City中的一个名称:
<property name="cityNames" value="#{cities.![name]}"/>微小的调整:
<property name="cityNames" value="#{cities.![name+','+state]}"/>进阶:
<property name="cityNames" value="#{cities.?[population gt 100000].![name+','+state]}"/>2.4 小结
Spring容器是Spring框架的核心。Spring自带了多种容器实现,他们可以归为两类。BeanFactory是最简单的容器,提供DI和Bean装配服务。当需要更高级的框架服务时,可以选择Spring 的 ApplicationContext
Spring容器中装配Bean的最常见方式是使用XML文件。XML文件包含了所有组件的配置信息,而Spring容器利用这些配置信息实现依赖注入,以便Bean能够与其所依赖的其他Bean相关联。
3 最小化Spring XML配置
内容
- Bean的自动装配
- Bean的自动检测
- 面向注解的Bean装配
- 基于Java的Spring配置
随着应用的发展,XML配置也会越来越复杂。Spring提供了几种技巧,可以帮助我们减少XML的配置数量。
- 自动装配(autowiring) 有助于减少甚至消除配置<property>元素和<constuctor-arg>元素;让Spring自动识别如何装配Bean的依赖关系。
- 自动检测(autodiscovery) 比自动装配更进了一部,让Spring能够自动识别哪些类需要被配置成Spring Bean,从而减少对<bean>元素的使用。
3.1 自动装配Bean属性
如果我们的应用上下文只有一个java.ql.DataSource类型的Bean,那么任意一个依赖DataSource的其他Bean就是需要这个DataSource Bean。
应用这种明确的场景,Spring提供了自动装配(autowiring)。
3.1.1 4种类型的自动装配
- byName :把与Bean的属性具有相同名字(或者ID)的其他Bean自动装配到Bean的对应属性中。如果没有跟属性的名字相匹配的Bean,则该属性不进行装配。
- byType: 把与Bean的属性具有相同类型的其他Bean自动装配到Bean的对应属性中。如果没有跟属性的类型相匹配的Bean,则该属性不被装配。
- constructor : 把与Bean的构造器入参具有相同类型的其他Bean自动装配到Bean构造器的对应入参中。
- autodetect:首先尝试使用constructor进行自动装配,如果失败,则使用byType
byName自动装配
举例:
<bean id="kenny2" class="com.springinaction.springidol.Instrumentalist">
    <property name="song" value="Jingle Bells"/>
    <property name="instrument" ref="saxophone"/>
</bean>
ref:
<bean id="instrument" class="com.springinaction.springidol.Saxophone"/>在这个例子中,萨克斯的bean id与kenny2的 property name一样,所以Spring可以利用这个信息自动装配instrument。
<bean id="kenny" class="com.springinaction.springidol.Instrumentalist" autowire="byName">
    <property name="song" value="JingleBells"/>
</bean>
当bean设置了autowire = byName时,Spring会特殊对待kenny的所有属性,他们为这些属性寻找其名字相同的Spring Bean,并通过setter注入进行装配。
byType 自动装配
工作方法类似于byName,当尝试byType时,Spring会寻找哪一个Bean的类型与属性相匹配。
当出现多个Bean都匹配成功的场景,Spring会直接抛出异常,所以Spring为了避免这个问题,提供了两种选择:可以自动装配标识一个首选Bean,或者取消某个Bean的自动装配候选资格。
primary的属性默认为true,即所以的Bean都是首选属性,如果要使用这个标签,就需要把非首选属性设置为false。
<bean id="saxophone" class="com.springinaction.springidol.Saxophone" primary="false"/>自动忽略:
<bean id="saxophone" class="com.springinaction.springidol.Saxophone" autowire-candidate="false"/>constructor自动装配
如果通过构造器注入来配置Bean,那么可以移除<constructor-arg>元素。
Spring在应用上下文中自动选择Bean注入到构造器入参中。
<bean id="duke" class="com.springinaction.springidol.PoeticJuggler" autowire="constructor"/>和byType一样,具有相同的局限性。当有多个Bean匹配到构造器入参时,Spring也会自动报错而不会猜测哪个适用。
最佳自动装配
当配置一个Bean的autowire属性为autodetect时,Spring首先尝试使用constructor自动装配,如果发现没有高早起匹配的Bean,Spring将自动尝试byType。
3.1.2 默认自动装配
<?xml version="1.0"encoding="UTF-8"?>
<beans xmlns="http://www.springframework.org/schema/beans"
    xmlns:xsi="http://www.w3.org/2001/XMLSchema-instance"
    xsi:schemaLocation="http://www.springframework.org/schema/beans
    http://www.springframework.org/schema/beans/spring-beans-3.0.xsd"
    default-autowire="byType">

</beans>
默认的default-autowire属性设置为none,标识所有Bean都不使用自动装配。
3.1.3 混合使用自动装配和显式装配
如果对某个Bean选择了自动装配策略,我们可以依旧对其进行显示装配。
<bean id="kenny" class="com.springinaction.springidol.Instrumentalist" autowire="byType">
    <property name="song" value="JingleBells"/>
    <property name="instrument"><null/></property>
</bean>
3.2 使用注解装配
使用注解自动装配与在XML中使用autowire属性自动装配并没有太大差别。
Spring容器默认禁用注解装配。我们需要在Spring配置中启用它。最简单的启动方式是使用Spring的context命名空间配置中的<context:annotation-config>:
<?xml version="1.0"encoding="UTF-8"?>
<beans xmlns="http://www.springframework.org/schema/beans"
    xmlns:xsi="http://www.w3.org/2001/XMLSchema-instance"
    xmlns:context="http://www.springframework.org/schema/context"
    xsi:schemaLocation="http://www.springframework.org/schema/beans
    http://www.springframework.org/schema/beans/spring-beans-3.0.xsd
    http://www.springframework.org/schema/context
    http://www.springframework.org/schema/context/spring-context-3.0.xsd">
<context:annotation-config/>
<!-- bean declarations go here-->
</beans>
Spring 3 支持几种不同的用于自动装配的注解:
- Spring自带的@Autowired注解;
- JSR-330的@Inject注解;
- JSR-250的@Resource注解。
3.2.1 使用@Autowired
假设我们希望用@Autowired让Spring自动装配乐器演奏家。
@Autowired
public void setInstrument(Instrument instrument){
    this.instrument = instrument;
}
当Spring发现我们对setInstrument( )方法使用@Autowired注解时,Spring就会尝试对该方法执行byType自动装配。
任意方法:
@Autowired
public void heresYourInstrument(Instrument instrument){
    this.instrument=instrument;
}
构造方法:
@Autowired
public Instrumentalist(Instrument instrument){
    this.instrument=instrument;
}
另外,我们还可以使用@Autowired注解直接标注属性,并删除setter方法:
@Autowired
private Instrument instrument;
@Autowired不会受到private关键字的限制。
如果没有自动匹配到Bean或存在多个匹配的Bean,@Autowired注解就会遇到一些麻烦。
可选的自动装配
当缺少匹配的Bean时:
@Autowired具有强契约特性,所标注的属性或参数必须是可装配的。如果没有Bean可以装配到@Autowired所标注的参数或属性中,自动装配就会失败(NoSuchBeanDefinitionException)。
属性不一定非要装配,null值业恩师可以接受的,这种情况下,可以通过设置@Autowired的required属性来false来配置自动装配。
@Autowired(required=false)
private Instrument instrument;
如果Spring这样配置了,那么当没查找到与之匹配类型的Instrument的Bean,应用不会发生任何问题,而instrument属性的值会设置为null。
当有多个构造器使用@Autowired注解时,只有一个可以设置required为true。当使用@Autowired标注多个构造器时,Spring就会从所有满足装配条件的构造器中选择入参最多的那个构造器。
限制歧义性的依赖
当有多个匹配Bean时:
@Autowired注解也会抛出异常。
为了帮助@Autowired鉴别哪一个Bean才是我们所需要的,我们可以配合使用Spring的@Qualifier注解。
例如为了确保instrument为guitar,我们使用@Qualifier
@Autowired
@Qualifier("guitar")
private Instrument instrument;
如上所示,@Qualifier注解将尝试注入ID为guitar的Bean。
如果吉他Bean像如下的XML那样声明:
通过qualifier来缩小范围。
<bean class="com.springinaction.springidol.Guitar">
    <qualifier value="stringed"/>
</bean>
也可以通过@Qulifier注解来标注Guitar类:
@Qualifier("stringed")
public class Guitar implements Instrument{
    ...
}
创建自定义的限定器(Qualifier)
我需要定义一个注解:
@Target({ElementType.FIELD,ElementType.PARAMETER,ElementType.TYPE})
@Retention(RetentionPolicy.RUNTIME)
@Qualifier
public @interface StringedInstrument{}
使用StringedInstrument代替Qualifier:
@StringedInstrument
public class Guitar implements Instrument{
    ...
}
@Autowired
@StringedInstrument
private Instrument instrument;如果需要进一步缩小范围:
@Target({ElementType.FIELD,ElementType.PARAMETER,ElementType.TYPE})
@Retention(RetentionPolicy.RUNTIME)
@Qualifier
public @interface Strummed{
}
@Autowired
@StringedInstrument
@Strummed
private Instrument instrument;3.2.2 借助@Inject实现基于标准的自动装配
Java Community Process(JCP)最近发布了Java依赖注入规范,即JSR-330,@Inject。Spring3.0兼容@Inject
@Inject
private Instrument instrument;
和@Autowired一样,@Inject可以用来自动装配属性、方法和构造器;
不同的是,@Inject没有required属性,所以如果依赖的关系不存在,就会抛出异常。
JSR-330提供了一个技巧:与其直接注入一个引用,不如要求@Inject注入一个Provider。Provider接口实现Bean引用的延迟注入以及注入Bean。
例如我们有一个KnifeJuggler类需要注入一个或多个Knife的实例。knife的作用域为property,knifeJuggler需要5个Knife Bean
private Set<Knife>knives;

@Inject
public KnifeJuggler(Provider<Knife> knifeProvider){
    knives =new HashSet<Knife>();
    for(int i=0;i<5; i++) {
        knives.add(knifeProvider.get());
    }
}
限定@Inject所标注的属性
正如我们所看到的,@Inject和@Autowired有很多共同点,当有歧义名时,@Inject使用@Named注解来实现@Qualifier的功能。
@Inject
@Named("guitar")
private Instrument instrument;
创建自定义的JSR-330 Qualifier
package com.springinaction.springidol;
import java.lang.annotation.ElementType;
import java.lang.annotation.Retention;
import java.lang.annotation.RetentionPolicy;
import java.lang.annotation.Target;
import javax.inject.Qualifier;
@Target({ElementType.FIELD,ElementType.PARAMETER,ElementType.TYPE})
@Retention(RetentionPolicy.RUNTIME)
@Qualifier
public @interface StringedInstrument{
}
3.2.3 在注解注入中使用表达式
Spring3.0 引入了@Value,它是一个新的装配注解,可以让我们使用注解装配String类型的值和基本类型的值。例如:
@Value("Eruption")
private String song;
该方案最大的用处是通过SpEL表达式来装配属性,比如:
@Value("#{systemProperties.myFavoriteSong}")
private String song;
3.3 自动检测Bean
Spring提供<context:component-scan>元素,来实现<context:annotation-config>一样的功能,还允许Spring自动检测Bean和定义Bean。
<beans xmlns="http://www.springframework.org/schema/beans"
    xmlns:xsi="http://www.w3.org/2001/XMLSchema-instance"
    xmlns:context="http://www.springframework.org/schema/context"
    xsi:schemaLocation="http://www.springframework.org/schema/beans
    http://www.springframework.org/schema/beans/spring-beans-3.0.xsd
    http://www.springframework.org/schema/context
    http://www.springframework.org/schema/context/spring-context-3.0.xsd">
    <context:component-scan
        base-package="com.springinaction.springidol">
    </context:component-scan>
</beans>
<context:component-scan>元素会扫描指定的包以及其子包,查找出能自动注册为Spring Bean的类。
3.3.1 为自动检测标注Bean
默认情况下,<context:component-scan>查找使用构造型(stereotype)注解所标注的类,这些特殊的注解如下:
- @Component:通用的构造型注解,标识该类为Spring组件
- @Controller:标识该类定义为Spring MVC controller
- @Repository : 标识将该类定义为数据仓库
- @Service: 标识将该类定义为服务
- 使用@Component标注的任意自定义注解。
使用@Component注解标注Guitar类:
package com.springinaction.springidol;
import org.springframework.stereotype.Component;
@Component
public class Guitar implements Instrument{
    public void play(){
        System.out.println("Strum strum strum");
    }
}
Spring会自动把它注册成Spring Bean。Bean的ID默认为guitar。
再标注Instrumentalist类:
@Component("eddie")
public class Instrumentalist implements Performer{
// ...
}
该Spring Bean的ID 为显示配置的eddie。
3.3.2 过滤组件扫描
通过<context:component-scan>配置<context:include-filter>和<context:exclude-filter>子元素,我们可以随意调整扫描行为。
比如我们增加一个过滤器,来自动注册所有的Instrument实现类:
<context:component-scan base-package="com.springinaction.springidol">
    <context:include-filter type="assignable" expression="com.springinaction.springidol.Instrument"/>
</context:component-scan>
type和expression属性一起协作来定义组件扫描策略。在这种情况下,我们要求派生于Instrument的所有类自动注册为Spring Bean。
| 过滤器 | 描述 |
|---|---|
| annotation | 过滤器通过扫描使用注定注解标注的哪些类,通过expression属性指定要扫描的注释 |
| assignable | 扫描派生于expression属性所指定类型的哪些类 |
| aspectj | 扫描与expression属性所指定的AspectJ表达式所匹配的类 |
| custom | 使用自定义的TypeFilter实现类,该类由expression属性指定 |
| regex | 扫描类的名称与expression属性指定的正则表达式所匹配的那些类 |
除了<context:include-filter>我们还可以使用<context:exclude-filter>来告知哪些类不需要被注册为SpringBean。例:
<context:component-scan base-package="com.springinaction.springidol">
    <context:include-filter type="assignable" expression="com.springinaction.springidol.Instrument"/>
    <context:exclude-filter type="annotation" expression="com.springinaction.springidol.SkipIt"/>
</context:component-scan>
基于注解的过滤策略经常会被用到,并且也是本书中使用最多的策略。
3.4 使用Spring基于Java的配置
Spring3.0 可以几乎不使用XML而使用纯粹的Java代码来配置Spring应用。
3.4.1 创建基于Java的配置
我们仍然需要少量的XML来启用Java配置:
<?xml version="1.0"encoding="UTF-8"?>
<beans xmlns="http://www.springframework.org/schema/beans"
    xmlns:xsi="http://www.w3.org/2001/XMLSchema-instance"
    xmlns:context="http://www.springframework.org/schema/context"
    xsi:schemaLocation="http://www.springframework.org/schema/beans
        http://www.springframework.org/schema/beans/spring-beans-3.0.xsd
        http://www.springframework.org/schema/context
        http://www.springframework.org/schema/context/spring-context-3.0.xsd">
    <context:component-scan base-package="com.springinaction.springidol"/>
</beans>
<context:component-scan>自动注册使用构造型注解的Bean,并且加载@Configuration注解所标注的类。
3.4.2 定义一个配置类
基于Java的配置使用@Configuration注解的Java类,等价于XML配置中的<beans>元素。
package com.springinaction.springidol;
import org.springframework.context.annotation.Configuration;
@Configuration
public class SpringIdolConfig{
    // Be andeclaratio nmethods go here
}
@Configuration注解会作为一个标识告知Spring:这个类将包含一个或多个Spring Bean的定义。
3.4.3 声明一个简单的Bean
我们使用@Bean注解来定义一个duck的Bean:
@Bean
public Performer duke(){
    return new Juggler();
}
这表现出了基于Java配置的优点,会有编译器检查。
3.4.4 使用Spring的基于Java配置进行注入
@Bean
public Performer duke15(){
    return new Juggler(15);
}
@Bean
public Performer kenny(){
Instrumentalist kenny=new Instrumentalist();
kenny.setSong("Jingle Bells");
return kenny;
}
@Bean
private Poem sonnet29(){
return new Sonnet29();
}
@Bean
public Performer poeticDuke(){
return new PoeticJuggler(sonnet29());
}3.5 小结
Spring通过自动装配,组件检测,JAVA定义来减少甚至消除xml配置。
4 面向切面的Spring
内容:
- 面向切面编程的基本原理
- 为POJO创建切面
- 使用@AspectJ注解
- 为AspectJ切面注入依赖
在软件中,有些行为是对于大部分应用是通用的,比如日志、安全和事务,这些功能被称为横切关注点(cross-cutting concerns)。这些横切关注点从概念上是与应用的业务逻辑相分离的。将这些横切关注点与业务逻辑相分离正是面向切面编程(AOP)所要解决的。
4.1 什么是面向切面编程
切面能帮助我们模块化横切关注点。横切关注点可以被描述为影响应用多出的功能。例如,安全就是一个横切关注点,应用中的许多方法都会涉及安全规则。
继承和委托是最常见的实现重用通用功能的面向对象技术。但是,如果在整个应用中使用相同的基类,继承往往会导致一个脆弱的对象体系;而使用委托可能需要对委托对象进行复杂的调用。
切面提供了取代继承和委托的另一种选择,在使用面向切面编程时,我们仍然在一个地方定义通用功能,但是我们可以通过声明的方式定义这个功能以何种方式在何处应用,而无需修改受影响的类。
横切关注点可以被模块化为特殊的类,这些类被称为切面。
4.1.1 定义AOP术语
描述切面的常用术语有通知(advice)、切点(pointcut)和连接点(join point)。
通知
切面的工作被称为通知。Spring切面可以应用5种类型的通知:
- Before : 在方法被调用之前调用通知。
- After: 在方法完成之后调用通知,无论方法执行是否成功。
- After-returning : 在方法成功执行之后调用通知。
- After-throwing:在方法抛出异常后调用通知。
- Around:通知包裹了被通知的方法。
连接点(joinpoint)
我们应用可能也需要对数以千计的时机应用通知,这些时机被称为连接点。
切点(Poincut)
切点有助于缩小切面所通知连接点的范围。
如果通知定义了“什么”和“何时”,那么切点就定义了“何处”。
切面(Aspect)
切面是通知和切点的结合,它是什么,在何时,何处完成其功能。
引入(Introduction)
引入允许我们向现有的类添加新方法或属性,即无修改现有类的情况下,让他们具有新的行为和状态。
织入(Weaving)
织入将切面应用到目标对象来创建新的代理对象的过程。切面在指定的连接点被织入到目标对象中。在目标对象的生命周期里有多个点可以进行织入。
- 编译器:切面在目标类编译时被织入。这种方式需要特殊的编译器。AspectJ的织入编译器就是以这种方式织入切面的。
- 类加载器:切面在目标类加载到JVM时被织入。这种方式需要特殊的类加载器,它可以在目标类被引用应用之前增强该目标类的字节码。
- 运行期:切面在应用允许的某个时刻被织入。在织入切面时,AOP容器会为目标对象动态的创建一个代理对象。Spring AOP就是以这种方式织入切面。
4.1.2 Spring对AOP的支持
目前流行的AOP框架(Spring in action 第三版的时期):
- AspectJ
- JBoss AOP
- Spring AOP
Spring提供了4种各具特色的AOP支持:
- 基于代理的近点AOP;
- @AspectJ注解驱动的切面;
- 纯POJO切面;
- 注入式AspectJ切面
前三种都是Spring基于代理的AOP变体,因此Spring对AOP的支持局限于方法拦截。如果AOP需求超过了简单方法拦截(比如构造器或属性拦截),那么应该考虑在AspectJ里实现切面,利用Spring的DI把Spring Bean注入到AspectJ切面中。
Spring通知是Java编写的
Spring的通知更容易为Java开发人员理解,而AspectJ则是扩展性语言,能够给与AOP更强更细的控制,但也带来了学习成本。
Spring在运行期通知对象
Spring通过代理包装了Bean。
Spring只支持方法连接点
因为Spring基于动态代理,所以Spring只支持方法连接点。他不像AspectJ和Jboss还支持字段和构造器接入点。
4.2 使用切点选择连接点
Spring支持AspectJ来指明切点
| AspectJ指示器 | 描述 |
|---|---|
| arg() | 限制连接点匹配参数为指定类型的执行方法 |
| @args() | 限制连接点匹配参数为指定注解标注的执行方法 |
| execution() | 用于匹配是连接点的执行方法 |
| this() | 限制连接点匹配AOP代理的Bean引用为指定类型的类 |
| target() | 限制连接点匹配目标对象为指定类型的类 |
| @target() | 限制连接点匹配特定的执行对象,这些对象对应的类要具备指定类型的注释 |
| within() | 限制连接点匹配指定的类型 |
| @within() | 限定连接点匹配指定注解所标注的类型 |
| @annotation | 限制匹配带有指定注解的连接点 |
4.2.1 编写切点
例如,我们编写当Instrument的play()方法执行时会触发通知。
我们使用execution( )指示器选择Instrument的play( )方法。方法表达式以*开始,标识了我们不关心方法返回值的类型。然后我们指定了全限定类名和方法名。对于参数列表,我们使用(..)标识切点选择任意的play()方法,无论该方法的入参是什么。
execution(* com.springinaction.springidol.Instrument.play(..))我们假设切点仅匹配springidol包,可以使用within( )指示器来限制匹配:
execution(* com.springinaction.springidol.Instrument.play(..)) && within (com.springinaction.springidol.*)4.2.2 使用Spring的bean()指示器
execution(*com.springinaction.springidol.Instrument.play())
and bean(eddie)
在这里,我们希望执行Instrument的play( )方法时应用通知,但限定Bean的ID为eddie。
execution(*com.springinaction.springidol.Instrument.play())
and !bean(eddie)
在此场景下,切面的通知会被编织到所有的ID不为eddie的Bean中。
4.3 在XML中声明切面
Spring的AOP配置元素简化了基于POJO切面的声明:
| AOP配置元素 | 描述 |
|---|---|
| <aop:advisor> | 定义AOP通知器 |
| <aop:after> | 定义AOP后置通知 |
| <aop:after-returning> | 定义AOP after returning的通知 |
| <aop:after-throwing> | 定义了after-throwing通知 |
| <aop:around> | 定义AOP环绕通知 |
| <aop:aspect> | 定义切面 |
| <aop:aspectj-autoproxy> | 启用@AspectJ注解驱动的切面 |
| <aop:before> | 定义前置通知 |
| <aop:config> | 顶层AOP配置元素 |
| <aop:declare - parents> | 为被通知的对象引入额外的接口,并透明的实现 |
| <aop:pointcut> | 定义切点 |
我们定一个观众:
package com.springinaction.springidol;
public class Audience{
    //表演之前
    public void takeSeats(){
        System.out.println("The audience is taking their seats.");
    }
    //表演前
    public void turnOffCellPhones(){
        System.out.println("The audience is turning off their cellphones");
    }
    //表演后
    public void applaud(){
        System.out.println("CLAP CLAP CLAP CLAP CLAP");
    }
    //表演失败后
    public void demandRefund(){
        System.out.println("Boo! We want our money back!");
    }
}
通过XML注册:
<bean id="audience" class="com.springinaction.springidol.Audience"/>4.3.1 声明前置和后置通知
通过Spring AOP配置元素,把audience Bean变成一个切面
<aop:config>
    <aop:aspect ref="audience">
        <aop:before pointcut=
"execution(* com.springinaction.springidol.Performer.perform(..))"
        method="takeSeats"/>
        <aop:before pointcut=
"execution(* com.springinaction.springidol.Performer.perform(..))"
        method="turnOffCellPhones"/>
        <aop:after-returning pointcut=
"execution(* com.springinaction.springidol.Performer.perform(..))"
        method="applaud"/>
        <aop:after-throwing pointcut=
"execution(* com.springinaction.springidol.Performer.perform(..))"
        method="demandRefund"/>
    </aop:aspect>
</aop:config>
<aop:after-throwing>定义了抛出后通知,如果所匹配的方式执行时抛出任何异常,都将调用demandRefund( )方法。
为了避免重复定义切点,我们可以使用<aop:pointcut>。
<aop:config>
    <aop:aspect ref="audience">
        <aop:pointcut id="performance" expression=
"execution(* com.springinaction.springidol.Performer.perform(..))"/>
        <aop:before pointcut-ref="performance" method="takeSeats" />
        <aop:before pointcut-ref="performance" method="turnOffCellPhones"/>
        <aop:after-returning pointcut-ref="performance" method="applaud" />
        <aop:after-throwing pointcut-ref="performance" method="demandRefund" />
    </aop:aspect>
</aop:config>
4.3.2 声明环绕通知
所谓环绕通知就是使得前置通知和后置通知共享信息。
比如我们希望刚刚的观众报告每个参赛者表演了多长时间。
新的通知方法:
public void watchPerformance(ProceedingJoinPoint joinpoint){
    try {
        System.out.println("The audience is taking their seats.");
        System.out.println("The audience is turning off their cellphones");
        long start=System.currentTimeMillis();
        joinpoint.proceed();
        longend=System.currentTimeMillis();                 System.out.println("CLAP CLAP CLAP CLAP CLAP");
        System.out.println("The performance took"+(end-start)+ "milliseconds.");
    } catch(Throwablet){
        System.out.println("Boo! We want our money back!");
    }
}
使用<aop:around>元素,声明环绕通知:
<aop:config>
    <aop:aspect ref="audience">
        <aop:pointcut id="performance2" expression=
"execution(* com.springinaction.springidol.Performer.perform(..))"
        />
        <aop:around pointcut-ref="performance2" method="watchPerformance()"/>
    </aop:aspect>
</aop:config>
4.3.3 为通知传递参数
假设我们有一个选手是读心者,他能截听志愿者想什么:
package com.springinaction.springidol;
public interface MindReader{
    void interceptThoughts(String thoughts);
    String getThoughts();
}
package com.springinaction.springidol;
public class Magician implements MindReader{
private String thoughts;
public void interceptThoughts(String thoughts){
System.out.println("Intercepting volunteer's thoughts");
this.thoughts=thoughts;
}
public String getThoughts(){
return thoughts;
}
}定义被截听者接口:
package com.springinaction.springidol;
public interface Thinker{
    void thinkOfSomething(String thoughts);
}

package com.springinaction.springidol;
public class Volunteer implements Thinker{
    private String thoughts;
    public void thinkOfSomething(String thoughts){
        this.thoughts=thoughts;
    }
    public String getThoughts(){
        return thoughts;
    }
}
我们通过aop配置将通知方法的参数传递给通知。
<aop:config>
    <aop:aspectref="magician">
        <aop:pointcut id="thinking"
            expression="execution(*
com.springinaction.springidol.Thinker.thinkOfSomething(String))
            and args(thoughts)"/>
        <aop:before
            pointcut-ref="thinking"
            method="interceptThoughts"
            arg-names="thoughts" />
    </aop:aspect>
</aop:config>
4.3.4 通过切面引入新功能
Ruby和Groovy使用开放类的理念,他们不用修改对象或类的定义就能够为对象或类增加新的办法。
Java不是动态语言,一旦类编译完成,就很难增加新功能。
其实切面的存在就是为原有类添加了新功能,所以我们也可以利用切面来提供新的方法。
我们让所有表演者(Performer)引入Contestant接口:
package com.springinaction.springidol;
public interface Contestant{
    void receiveAward();
}
使用AOP引入,即使用<aop:declare-parents>元素:
<aop:aspect>
    <aop:declare-parents
        types-matching="com.springinaction.springidol.Performer+"
        implement-interface="com.springinaction.springidol.Contestant"
        default-impl="com.springinaction.springidol.GraciousContestant"
    />
</aop:aspect>
我们还可以使用delegate-ref来标识
<aop:declare-parents
    types-matching="com.springinaction.springidol.Performer+"
    implement-interface="com.springinaction.springidol.Contestant"
    delegate-ref="contestantDelegate"
/>

<bean id="contestantDelegate" class="com.springinaction.springidol.GraciousContestant"/>
4.4 注解切面
使用注解来创建切面是AspectJ 5所引入的关键特性。
例如Audience类:
package com.springinaction.springidol;
import org.aspectj.lang.annotation.AfterReturning;
import org.aspectj.lang.annotation.AfterThrowing;
import org.aspectj.lang.annotation.Aspect;
import org.aspectj.lang.annotation.Before;
import org.aspectj.lang.annotation.Pointcut;

@Aspect
public class Audience{
    @Pointcut("execution(* com.springinaction.springidol.Performer.perform(..))")
    public void performance(){}

    @Before("performance()")
    public void takeSeats(){
        System.out.println("The audience is taking their seats.");
    }
    @Before("performance()")
    public void turnOffCellPhones(){
        System.out.println("The audience is turning off their cellphones");
    }
    @AfterReturning("performance()")
    public void applaud(){
        System.out.println("CLAP CLAP CLAP CLAP CLAP");
    }
    @AfterThrowing("performance()")
    public void demandRefund(){
        System.out.println("Boo! We want our money back!");
    }
}
然后Spring使用自动代理创建类:
<aop:aspectj-autoproxy>
需要配置相应命名空间:
<beans xmlns="http://www.springframework.org/schema/beans"
    xmlns:xsi="http://www.w3.org/2001/XMLSchema-instance"
    xmlns:aop="http://www.springframework.org/schema/aop"
    xsi:schemaLocation="http://www.springframework.org/schema/beans
        http://www.springframework.org/schema/beans/spring-beans-3.0.xsd
        http://www.springframework.org/schema/aop
        http://www.springframework.org/schema/aop/spring-aop-3.0.xsd">
4.4.1 注解环绕通知
@Around("performance()")
public void watchPerformance(ProceedingJoinPoint joinpoint){
try {
    System.out.println("The audience is taking their seats.");
    System.out.println("The audience is turning off their cellphones");
    long start=System.currentTimeMillis();
    joinpoint.proceed();
    long end=System.currentTimeMillis();
    System.out.println("CLAP CLAP CLAP CLAP CLAP");
    System.out.println("The performance took"+(end-start) + "milliseconds.");
} catch(Throwable t){
    System.out.println("Boo!We want our money back!");
}
}
4.4.2 传递参数给所标注的通知
package com.springinaction.springidol;
import org.aspectj.lang.annotation.Aspect;
import org.aspectj.lang.annotation.Before;
import org.aspectj.lang.annotation.Pointcut;
@Aspect
public class Magician implements MindReader{
    private String thoughts;

    @Pointcut("execution(*com.springinaction.springidol." + "Thinker.thinkOfSomething(String))&&args(thoughts)")
    public void thinking(String thoughts){}

    @Before("thinking(thoughts)")
    public void interceptThoughts(String thoughts){
        System.out.println("Intercepting volunteer's thoughts:"+thoughts);
        this.thoughts=thoughts;
    }

    public String getThoughts(){
        return thoughts;
    }
}
4.4.3 标准引入
package com.springinaction.springidol;
import org.aspectj.lang.annotation.Aspect;
import org.aspectj.lang.annotation.DeclareParents;
@Aspect
public class ContestantIntroducer{
@DeclareParents(
value="com.springinaction.springidol.Performer+",
defaultImpl=GraciousContestant.class)
public static Contestant contestant;
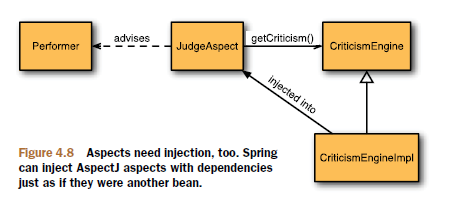
}4.5 注入AspectJ切面
我们为Spring Idol选修比赛创建一个新切面,裁判。
package com.springinaction.springidol;
public aspect JudgeAspect{
    public JudgeAspect(){}

    pointcu tperformance() : execution(*perform(..));

    after() returning() :performance(){
        System.out.println(criticismEngine.getCriticism());
    }

    // injected
    private CriticismEngine criticismEngine;
    public void setCriticismEngine(CriticismEngine criticismEngine){
        this.criticismEngine=criticismEngine;
    }
}
JudgeAspect的主要职责是在表演结束后为表演发表评论。
CriticismEngine实现:
package com.springinaction.springidol;
public class CriticismEngine Implimplements CriticismEngine{
    public CriticismEngineImpl(){}
    public String getCriticism(){
        int i=(int)(Math.random()*criticismPool.length);
        returncriticismPool[i];
    }
    // injected
    private String[] criticismPool;
    public void setCriticismPool(String[] criticismPool){
        this.criticismPool=criticismPool;
    }
}<bean id="criticismEngine" class="com.springinaction.springidol.CriticismEngineImpl">
<property name="criticisms">
<list>
<value>I'm not being rude,but that was appalling.</value>
<value>You maybe the least talented person in this show.</value>
<value>Do everyone a favor and keep your day job.</value>
</list>
</property>
</bean><bean class="com.springinaction.springidol.JudgeAspect" factory-method="aspectOf">
<property name="criticismEngine" ref="criticismEngine"/>
</bean>


 1036
1036


 被折叠的 条评论
为什么被折叠?
被折叠的 条评论
为什么被折叠?
 到【灌水乐园】发言


