


1、为什么要使用Profile
在开发过程中,我们的软件会面对不同的运行环境,比如开发环境、测试环境、生产环境,而我们的软件在不同的环境中,有的配置可能会不一样,比如数据源配置、日志文件配置、以及一些软件运行过程中的基本配置,那每次我们将软件部署到不同的环境时,都需要修改相应的配置文件,这样来回修改,是个很麻烦的事情,为了简化和规范这些参数配置,需要对其进行统一规范管理,此时maven提供的profile功能,通过不同的环境激活不同的profile来达到多环境构建。profile是其中的一种方式,还有种就是使用filtering来达到多环境构建。
2、什么是Profile
<profile>就像<dependencies>一样是pom文件里的一个xml元素,在profile里几乎可以定义所有在pom里的定义的内容(<dependencies>,<properties>,插件配置等等,不过不能再定义他自己了)。当一个profile被激活时,它定义的<dependencies>,<properties>等就会覆盖掉原pom里定义的相同内容,从而可以通过激活不同的profile来使用不同的配置。
在POM.XML中定义profiles
<!-- profile 的感性认识 -->
<project>
...
<profiles>
<profile>
<!-- 本地开发环境 -->
<id>dev</id>
<properties>
<profiles.active>dev</profiles.active>
<deploy.url>http://localhost:8080/manager/text</deploy.url>
</properties>
<activation>
<!-- 默认激活 dev -->
<activeByDefault>true</activeByDefault>
</activation>
</profile>
<profile>
<!-- 测试环境 -->
<id>test</id>
<properties>
<profiles.active>test</profiles.active>
<deploy.url>http://localhost:7894/manager/text</deploy.url>
</properties>
</profile>
<profile>
<!-- 生产环境 -->
<id>pro</id>
<properties>
<profiles.active>pro</profiles.active>
<deploy.url>http://localhost:3456/manager/text</deploy.url>
</properties>
</profile>
</profiles>
...
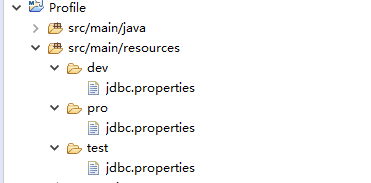
</project>然后在resources下创建dev,pro,test三个目录,然后分别创建不同的数据库连接配置
最后在POM.XML的build中配置Profile
      <resources>
	        <resource>
	            <directory>src/main/resources</directory>
	            <!-- 资源根目录排除各环境的配置,使用单独的资源目录来指定 -->
	            <excludes>
	                <exclude>test/*</exclude>
	                <exclude>pro/*</exclude>
	                <exclude>dev/*</exclude>
	            </excludes>
	        </resource>
	        <resource>
	            <!-- 根据参数指定资源目录 -->
	            <directory>src/main/resources/${profiles.active}</directory>
	        </resource>
       </resources>
注意:
<exclude>中的一个*与两个*的区别
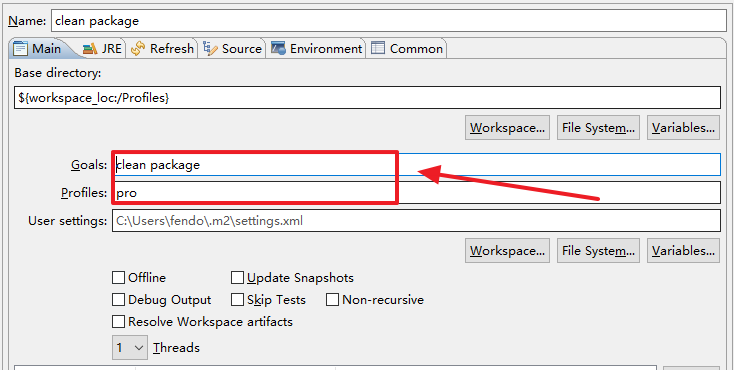
然后在Eclipse中项目右键"RUN AS"---->"RUN Configurations"输入你要操作的命令以及环境等
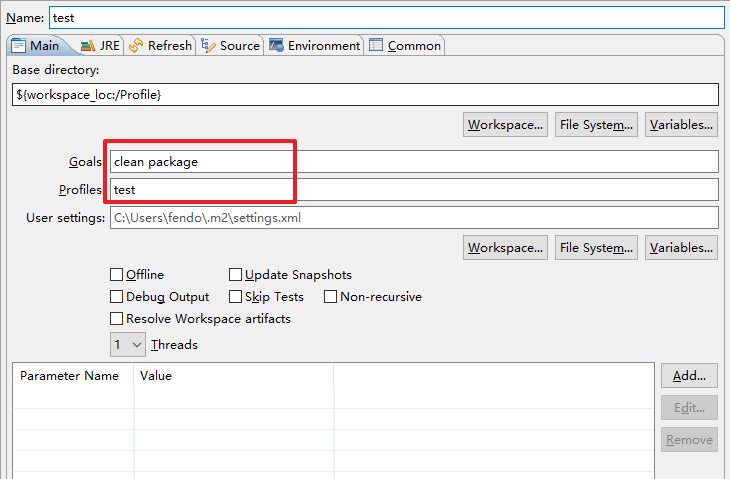
然后到该项目的classes下查看jdbc.properties文件
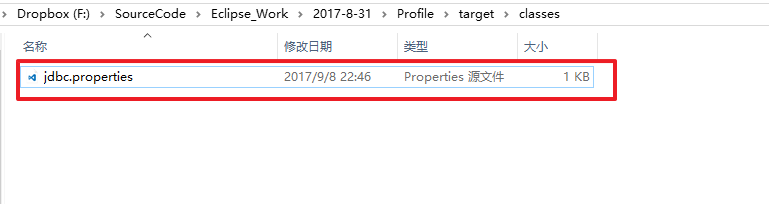
会发现jdbc.properties中的连接信息全是test,说明导入的就是test目录下jdbc.properties文件

在上面我还配置了tomcat插件,用来发布项目
            <plugin>
		       <groupId>org.apache.tomcat.maven</groupId>
		       <artifactId>tomcat7-maven-plugin</artifactId>
		       <version>2.1</version>
		          <configuration>
		             <!-- <port>8080</port> -->
                             <uriEncoding>UTF-8</uriEncoding>
			     <charset>UTF-8</charset>
			     <encoding>UTF-8</encoding>
		             <url>${deploy.url}</url>
		             <server>tomcat7</server>
		             <username>admin</username>
                             <password>admin</password>
                             <path>/fendo</path>
		         </configuration>
  	    </plugin>
使用方式如下,先去tomcat的conf文件下修改tomcat-users.xml,在<tomcat-users>节点里添加如下内容:
	<role rolename="manager-gui"/>
	<role rolename="manager-script"/>
	<role rolename="manager-jmx"/>
	<role rolename="manager-status"/>
	<user username="admin" password="admin" roles="manager-gui, manager-script, manager-jmx, manager-status"/>
然后修改.m2下的settings.xml,新增如下<server>
   <server>
       <id>tomcat7</id>
       <username>admin</username>
       <password>admin</password>
</server>注意其中的额id要与POM.XML配置的tomcat插件<server>节点名一样,用户名与密码要与tomcat-users.xml中的一样,然后启动tomcat,启动好之后,在Eclipse中项目右键"RUN AS"---->"RUN Configurations"输入你要操作的命令以及环境等
cmd下
mvn clean package tomcat7:deployEclipse下运行的参数,直接只有后面的部分:
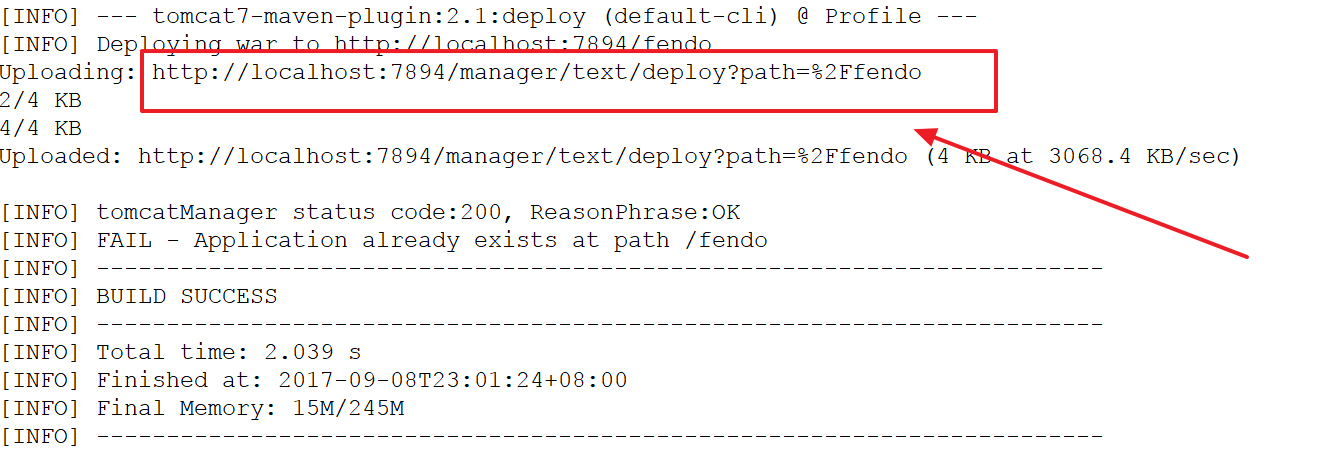
clean package tomcat7:deploy
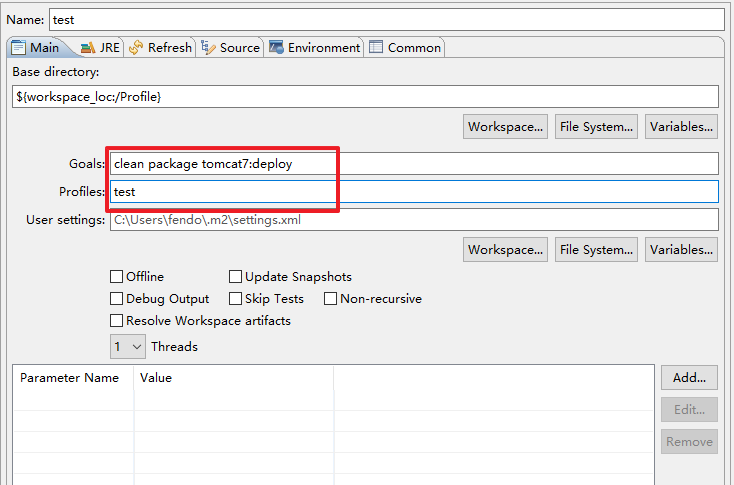
看日志发现他发布到了http://localhost:7894/manager/text 这个tomcat,这是因为在上面test配置所对应得就是这个tomcat!!!
注意:
我上面配置三个环境,在本地测试,所以要三台Tomcat,每台Tomat的端口号要不一样。
然后我们访问下http://localhost:7894/fendo 看看

会发现成功的输出了Hell World.
完整项目: http://download.csdn.net/download/u011781521/9970763
3、什么是Filtering
Filtering 是 maven 的 resource 插件 提供的功能,作用是用环境变量、pom文件里定义的属性和指定配置文件里的属性替换属性(*.properties)文件里的占位符(${jdbc.url}),具体使用如下:
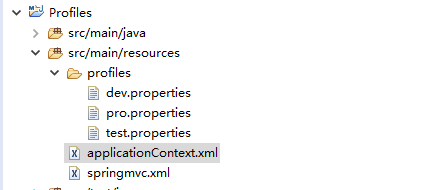
在src/main/resources/profiles目录下有多个配置文件xxx.properties,如下:
三个配置文件中都是不同的数据库连接,具体内容如下
dev.properties
profile.env=dev

uname=dev
upass=dev
driver_class=com.mysql.jdbc.Driver
url=jdbc:mysql://localhost:3306/dev?useUnicode=true&characterEncoding=UTF-8

initPoolSize=5
maxPoolSize=10
profile.env=pro


uname=pro
upass=pro
driver_class=com.mysql.jdbc.Driver
url=jdbc:mysql://localhost:3306/pro?useUnicode=true&characterEncoding=UTF-8

initPoolSize=5
maxPoolSize=10
test.properties
profile.env=test

uname=test
upass=test
driver_class=com.mysql.jdbc.Driver
url=jdbc:mysql://localhost:3306/test?useUnicode=true&characterEncoding=UTF-8

initPoolSize=5
maxPoolSize=10
配置 resource 插件,启用filtering功能并添加属性到env:
      <filters>
          <filter>src/main/resources/profiles/${env}.properties</filter>
      </filters>
      <resources>
          <resource>
              <directory>src/main/resources</directory>
              <filtering>true</filtering>
          </resource>
          <resource>
              <directory>src/main/java</directory>
              <includes>
                  <include>**/*.xml</include>
                  <include>**/*.properties</include>
              </includes>
              <filtering>true</filtering>
          </resource>
      </resources>
其中${env}是在profile中配置的,如下:
  <profiles>
    <profile>
        <!-- 本地开发环境 -->
        <id>dev</id>
        <properties>
            <env>dev</env>
            <deploy.url>http://localhost:8080/manager/text</deploy.url>
        </properties>
        <activation>
            <!-- 默认激活 dev -->
            <activeByDefault>true</activeByDefault>
        </activation>
    </profile>
    <profile>
        <!-- 测试环境 -->
        <id>test</id>
        <properties>
            <env>test</env>
            <deploy.url>http://localhost:7894/manager/text</deploy.url>
        </properties>
    </profile>
    <profile>
        <!-- 生产环境 -->
        <id>pro</id>
        <properties>
            <env>pro</env>
            <deploy.url>http://localhost:3456/manager/text</deploy.url>
        </properties>
    </profile>
在applicationContext.xml中引用了${uname},${upass}等
	<bean id="dataSource" class="com.mchange.v2.c3p0.ComboPooledDataSource">
		<property name="user" value="${uname}"></property>
		<property name="password" value="${upass}"></property>
		<property name="jdbcUrl" value="${url}"></property>
		<property name="driverClass" value="${driver_class}"></property>
		<property name="initialPoolSize" value="${initPoolSize}"></property>
		<property name="maxPoolSize" value="${maxPoolSize}"></property>
	</bean>
然后在Eclipse中项目右键"RUN AS"---->"RUN Configurations"输入你要操作的命令以及环境等
打包之后,在classes下查看applicationContent.xml
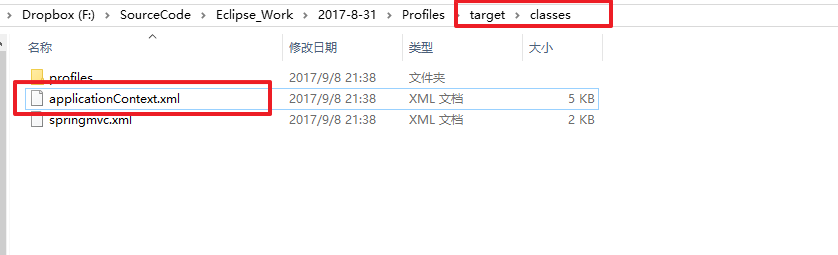
会发现其中的${url},${name}等会替换成pro.properties中的数据

在构建的时候,如果你输入的是dev,那么上面替换的就是dev里面定义的数据。
在CMD下执行以下命令就行了:
mvn clean package -Ppro 即构建出生产环境需要的war包

mvn tomcat:redeploy -Ptest 即发布到测试环境
完整项目: http://download.csdn.net/download/u011781521/9970765


 2283
2283


 被折叠的 条评论
为什么被折叠?
被折叠的 条评论
为什么被折叠?
 到【灌水乐园】发言


