


原文出处 : Android 蓝牙开发之搜索、配对、连接、通信大全
蓝牙( Bluetooth®):是一种无线技术标准,可实现固定设备、移动设备和楼宇个人域网之间的短距离数据
交换(使用2.4—2.485GHz的ISM波段的UHF无线电波)。蓝牙设备最多可以同时和7个其它蓝牙设备建立连接,进
行通信,当然并不是每一个蓝牙都可以达到最大值。下面,我们从蓝牙的基本概念开始,一步一步开始了解蓝牙。
基本概念:
安卓平台提供对蓝牙的通讯栈的支持,允许设别和其他的设备进行无线传输数据。应用程序层通过安卓API来调用蓝牙的相关功
能,这些API使程序无线连接到蓝牙设备,并拥有P2P或者多端无线连接的特性。
蓝牙的功能:
1、扫描其他蓝牙设备
2、为可配对的蓝牙设备查询蓝牙适配器
3、建立RFCOMM通道
4、通过服务搜索来链接其他的设备
5、与其他的设备进行数据传输
6、管理多个连接
蓝牙建立连接必须要求:
1、打开蓝牙
2、查找附近已配对或可用设备
3、连接设备
4、设备间数据交换
常用的蓝牙API如下:
| BluetoothAdapter | 代表本地蓝牙适配器(蓝牙无线电)。BluetoothAdapter是所有蓝牙交互的入口。使用这个你可以发现其他蓝牙设备,查询已配对的设备列表,使用一个已知的MAC地址来实例化一个BluetoothDevice,以及创建一个BluetoothServerSocket来为监听与其他设备的通信。
|
| BlueDevice | 代表一个远程蓝牙设备,使用这个来请求一个与远程设备的BluetoothSocket连接,或者查询关于设备名称、地址、类和连接状态等设备信息。 |
| BluetoothSocket | 代表一个蓝牙socket的接口(和TCP Socket类似)。这是一个连接点,它允许一个应用与其他蓝牙设备通过InputStream和OutputStream交换数据。 |
| BluetoothServerSocket | 代表一个开放的服务器socket,它监听接受的请求(与TCP ServerSocket类似)。为了连接两台Android设备,一个设备必须使用这个类开启一个服务器socket。当一个远程蓝牙设备开始一个和该设备的连接请求,BluetoothServerSocket将会返回一个已连接的BluetoothSocket,接受该连接。 |
BluetoothAdapter 中常用方法如下所示:
| boolean |
cancelDiscovery()
Cancel the current device discovery process.
|
| static boolean |
checkBluetoothAddress(
String address)
Validate a String Bluetooth address, such as "00:43:A8:23:10:F0"
Alphabetic characters must be uppercase to be valid. |
| void |
closeProfileProxy(int profile,
BluetoothProfile proxy)
Close the connection of the profile proxy to the Service.
|
| boolean |
disable()
Turn off the local Bluetooth adapter—do not use without explicit user action to turn off Bluetooth.
|
| boolean |
enable()
Turn on the local Bluetooth adapter—do not use without explicit user action to turn on Bluetooth.
|
| String |
getAddress()
Returns the hardware address of the local Bluetooth adapter.
|
| Set< BluetoothDevice> |
getBondedDevices()
Return the set of
BluetoothDevice objects that are bonded (paired) to the local adapter.
|
| synchronized static BluetoothAdapter |
getDefaultAdapter()
Get a handle to the default local Bluetooth adapter.
|
| String |
getName()
Get the friendly Bluetooth name of the local Bluetooth adapter.
|
| int |
getProfileConnectionState(int profile)
Get the current connection state of a profile.
|
| boolean |
getProfileProxy(
Context context,
BluetoothProfile.ServiceListener listener, int profile)
Get the profile proxy object associated with the profile.
|
| BluetoothDevice |
getRemoteDevice(byte[] address)
Get a
BluetoothDevice object for the given Bluetooth hardware address.
|
| BluetoothDevice |
getRemoteDevice(
String address)
Get a
BluetoothDevice object for the given Bluetooth hardware address.
|
| int |
getScanMode()
Get the current Bluetooth scan mode of the local Bluetooth adapter.
|
| int |
getState()
Get the current state of the local Bluetooth adapter.
|
| boolean |
isDiscovering()
Return true if the local Bluetooth adapter is currently in the device discovery process.
|
| boolean |
isEnabled()
Return true if Bluetooth is currently enabled and ready for use.
|
| BluetoothServerSocket |
listenUsingInsecureRfcommWithServiceRecord(
String name,
UUID uuid)
Create a listening, insecure RFCOMM Bluetooth socket with Service Record.
|
| BluetoothServerSocket |
listenUsingRfcommWithServiceRecord(
String name,
UUID uuid)
Create a listening, secure RFCOMM Bluetooth socket with Service Record.
|
| boolean |
setName(
String name)
Set the friendly Bluetooth name of the local Bluetooth adapter.
|
| boolean |
startDiscovery()
Start the remote device discovery process.
|
| boolean |
startLeScan(
BluetoothAdapter.LeScanCallback callback)
Starts a scan for Bluetooth LE devices.
|
| boolean |
startLeScan(
UUID[] serviceUuids,
BluetoothAdapter.LeScanCallback callback)
Starts a scan for Bluetooth LE devices, looking for devices that advertise given services.
|
| void |
stopLeScan(
BluetoothAdapter.LeScanCallback callback)
Stops an ongoing Bluetooth LE device scan.
|
BluetoothDevice 中常用方法如下所示:
| BluetoothGatt |
connectGatt(
Context context, boolean autoConnect,
BluetoothGattCallback callback)
Connect to GATT Server hosted by this device.
|
| boolean |
createBond()
Start the bonding (pairing) process with the remote device.
|
| BluetoothSocket |
createInsecureRfcommSocketToServiceRecord(
UUID uuid)
Create an RFCOMM
BluetoothSocket socket ready to start an insecure outgoing connection to this remote device using SDP lookup of uuid.
|
| BluetoothSocket |
createRfcommSocketToServiceRecord(
UUID uuid)
Create an RFCOMM
BluetoothSocket ready to start a secure outgoing connection to this remote device using SDP lookup of uuid.
|
| int |
describeContents()
Describe the kinds of special objects contained in this Parcelable's marshalled representation.
|
| boolean |
equals(
Object o)
Compares this instance with the specified object and indicates if they are equal.
|
| boolean |
fetchUuidsWithSdp()
Perform a service discovery on the remote device to get the UUIDs supported.
|
| String |
getAddress()
Returns the hardware address of this BluetoothDevice.
|
| BluetoothClass |
getBluetoothClass()
Get the Bluetooth class of the remote device.
|
| int |
getBondState()
Get the bond state of the remote device.
|
| String |
getName()
Get the friendly Bluetooth name of the remote device.
|
| int |
getType()
Get the Bluetooth device type of the remote device.
|
| ParcelUuid[] |
getUuids()
Returns the supported features (UUIDs) of the remote device.
|
| int |
hashCode()
Returns an integer hash code for this object.
|
| boolean |
setPairingConfirmation(boolean confirm)
Confirm passkey for
PAIRING_VARIANT_PASSKEY_CONFIRMATION pairing.
|
| boolean |
setPin(byte[] pin)
Set the pin during pairing when the pairing method is
PAIRING_VARIANT_PIN
Requires |
| String |
toString()
Returns a string representation of this BluetoothDevice.
|
| void |
writeToParcel(
Parcel out, int flags)
Flatten this object in to a Parcel.
|
BluetoothSocket 中常用方法如下所示:
| void |
close()
Closes the object and release any system resources it holds.
|
| void |
connect()
Attempt to connect to a remote device.
|
| InputStream |
getInputStream()
Get the input stream associated with this socket.
|
| OutputStream |
getOutputStream()
Get the output stream associated with this socket.
|
| BluetoothDevice |
getRemoteDevice()
Get the remote device this socket is connecting, or connected, to.
|
| boolean |
isConnected()
Get the connection status of this socket, ie, whether there is an active connection with remote device.
|
BluetoothServerSocket 中常用方法如下所示:
| BluetoothSocket |
accept(int timeout)
Block until a connection is established, with timeout.
|
| BluetoothSocket |
accept()
Block until a connection is established.
|
| void |
close()
Immediately close this socket, and release all associated resources.
|
以上四个类贯穿于我们蓝牙通信的全过程,包括蓝牙搜索、配对、连接以及通信。
使用蓝牙需要在配置文件Androidmanifest.xml 中注册两种权限:
<uses-permission Android:name="android.permission.BLUETOOTH" />
<uses-permission android:name="android.permission.BLUETOOTH_ADMIN" />
其中,权限1在得到默认蓝牙适配器时需要,即BluetoothAdapter mBluetoothAdapter=BluetoothAdapter.getDefaultAdapter( )
权限2在mBluetoothAdapter.enable( )或者mBluetoothAdapter.disable( ) 时需要使用到。
一、蓝牙搜索功能的实现:
1、得到蓝牙适配器:
若mBluetoothAdapter为 null,则说明当前手机不支持蓝牙功能(现在几乎所有手机都支持了吧。。。)
2、判断蓝牙是否打开:
值得注意的是,强制打开蓝牙设备的情况有三种:
(1)没有任何提示,直接打开了蓝牙。如Nexus 5 Android 4.4.4 手机。
(2)会弹出提示框,提示安全警告 “ ***应用尝试开启蓝牙”,可以选择“拒绝”或“允许”。大多数手机都是这样的。
(3)强制打开蓝牙失败,并且没有任何提示。
3、注册蓝牙搜索广播接收者:
(1)Android 的广播机制:
Adnroid的广播机制(以intent对象的形式广播出去),Android系统广播的时候不会关心你是否收得到消息、只负责广播出去,而
且广播的对象只是在应用程序中注册了的广播接收器。我们要做的就是自定义广播接收器并将其注册给应用程序,在广播接收器中
将接收到广播事件作出相应的处理。如果广播的事件并不是我们定义的广播接收器需要的事件类型,一般是会过滤掉不被接收。只
有当广播事件和我们写的接收器定义的接收的事件类型一致的时候才会触发广播接收器。并且触发广播接收器的onReceive方法。当
然我们自定义的广播接收器需要接受事件的类型是在XML清单文件的<intent-filter>中自己定义声明的或者自己在程序代码中定义一
个IntentFilter对象然后通过对象的addAction()方法来自定义接收事件类型。然后我们需要将接收到的事件的处理代码写在onReceive
方法中。
(2)注册分为两种:静态注册和动态注册。
- 静态注册就是在AndroidManifest.xml文件中定义,注册的广播接收器必须继承BroadReceiver
- 动态注册就是在程序中使用Context.registerReceiver注册。
我们先演示动态注册:
对应的静态注册如下:
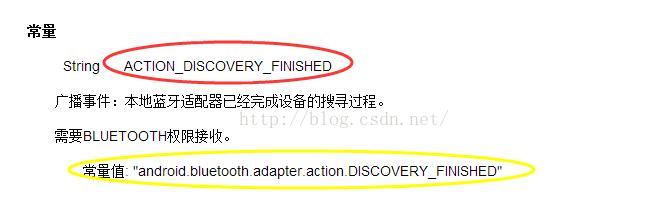
我们如何知道BluetoothAdapter.ACTION_DISCOVERY_FINISHED对应着android.bluetooth.adapter.action.DISCOVERY_FINISHED呢?
这就要看强大的API了。如图就是一种对应关系:
此处推荐别人上传的中文API:
4、定义广播接收:
自定义的广播接收器对象必须要继承BroadcastReceiver,然后重写onReceive方法,处理接收的数据的代码就写在这个方法里面。
两种方法:
- 自定义一个类实现BroadcastReceiver抽象类,并且实现其onReceiver(Context context, Intent intent )方法。
- 直接new BroadcastReceiver()来搞定。
方法1如下:
方法2如下:
5、开始广播:
通过 mBluetoothAdapter.startDiscovery( ); 来开始广播。当广播的事件是我们刚刚注册的事件时就会触发广播接收器,并且触
发广播接收器中的onReceiver()方法。
6、解除注册:
通过 unregisterReceiver(mReceiver); 来解除刚刚的注册。
至此我们完成了蓝牙通信的第一步:蓝牙搜索。
下边给出一个完整Demo实例。
功能为:点击按钮将搜索附近的蓝牙设备,并且判断是否与本设备已经配对,分类显示。
代码如下:
mainActivity.Java
AndroidManifest.xml代码如下:
布局文件activity_main.xml代码如下:
程序运行结果如下:

二、蓝牙自动配对功能实现:
蓝牙配对是建立连接的基础和前提。为什么不配对便无法建立连接?
任何无线通信技术都存在被监听和破解的可能,蓝牙SIG为了保证蓝牙通信的安全性,采用认证的方式进行数据交互。同时为
了保证使用的方便性,以配对的形式完成两个蓝牙设备之间的首次通讯认证,经配对之后,随后的通讯连接就不必每次都要做确
认。所以认证码的产生是从配对开始的,经过配对,设备之间以PIN码建立约定的link key用于产生初始认证码,以用于以后建立的
连接。
所以如果不配对,两个设备之间便无法建立认证关系,无法进行连接及其之后的操作,所以配对在一定程度上保证了蓝牙通信
的安全,当然这个安全保证机制是比较容易被破解的,因为现在很多个人设备没有人机接口,所以PIN码都是固定的而且大都设置为
通用的0000或者1234之类的,所以很容易被猜到并进而建立配对和连接。
关于蓝牙的自动配对,大家可以参考我的这篇博客:Android蓝牙自动配对Demo,亲测好使!!!
这里自夸一下,这篇博客还是受到了大家的一些好评。该自动配对方法,博主在魅蓝、华为、联想、红米以及Nexus手机上都有测
试过,使用的Android系统包括4.0+和5.0+,所以各位可以仔细阅读该博客。
三、蓝牙通信的实现:
本文所述的蓝牙通信为:Android 端蓝牙设备与其他蓝牙设备之间的通信。
下边讲述 Android手机端蓝牙与Arduino外接蓝牙模块之间进行通信。
(1)Arduino 端蓝牙模块
蓝牙模块在Arduino 端只是一个串口,将蓝牙模块的Tx、Rx接在Arduino开发板上。
初始化与Android蓝牙通信的串口,使用串口.read()来读取来自手机蓝牙的信息;使用串口.println(“XXXXXX”)来向手机
端蓝牙发送信息。
Demo代码如下:
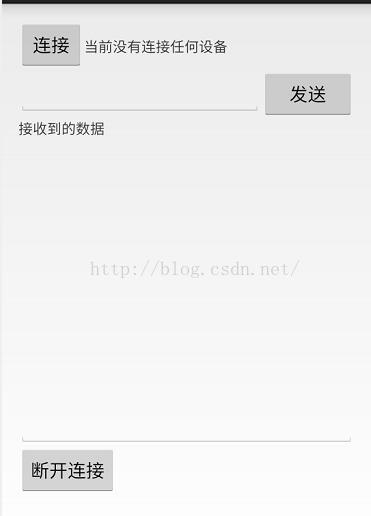
(2)手机端蓝牙模块:
Demo运行结果如下所示:
Demo代码如下:
MainActivity.java
BluetoothReceiver.java
配对工具类ClsUtils.java如下:
配置文件AndroidManifest.xml如下:
布局文件如下:
程序分析:
程序主要分为:自动配对==>>建立连接==>>开启线程监听是否收到信息==>>向Arduino 端发送信息==>>断开连接
自动配对:通过mBluetoothAdapter.startDiscovery();来实现。我们来看一下API中对该方法的描述:
public boolean startDiscovery ()
开始对远程设备进行查找的进程
它通常牵涉到一个大概需时12秒的查询扫描过程,紧跟着是一个对每个获取到自身蓝牙名称的新设备的页面扫描。
这是一个异步调用方法:该方法将马上获得返回值,注册ACTION_DISCOVERY_STARTED and
ACTION_DISCOVERY_FINISHED意图准确地确定该探索是处于开始阶段或者完成阶段。注册ACTION_FOUND以活动远程蓝牙设
备 已找到的通知。
设备查找是一个重量级过程。当查找正在进行的时候,用户不能尝试对新的远程蓝牙设备进行连接,同时存在的连接将获得有限制
的带宽以 及高等待时间。用户可用cencelDiscovery()类来取消正在执行的查找进程。发现的过程不会由活动来进行管理,但是它会
作为一个系统服务来运 行,因此即使它不能直接请求这样的一个查询动作,也必需取消该搜索进程。
设备搜寻只寻找已经被连接的远程设备。许多蓝牙设备默认不会被搜寻到,并且需要进入到一个特殊的模式当中。
如果蓝牙状态不是STATE_ON,这个API将返回false。蓝牙打开后,等待ACTION_STATE_CHANGED更新成STATE_ON。
需要BLUETOOTH_ADMIN权限。
返回值
成功返回true,错误返回false。
由上面我们可以看出,当调用该方法并且发现设备时,将执行我们自定义的广播接收类中的onReceiver()会被执行,实现自动配对具体可以参考:
建立连接:使用了一个异步AsyncTask任务。关于AsyncTask的使用,可以参考本博客:
我们首先利用远程蓝牙的mac地址得到了远程蓝牙设备:
其次利用UUID得到了一个BluetoothSocket对象:
然后调用connect()方法建立了socket连接
最后通过:
来取消了搜索。
开启线程,监听输入:当socket创建成功后,需要监听输入。
我们首先通过BluetoothSocket对象得到输入流。
通过read()方法来读取来自Arduino端的信息。其中,read()方法是一个可以阻塞的方法。阻塞的意思是,当输入流中没有数据
传来时,该方法被阻塞,程序不会执行下边的内容,直到有数据传来。
如果有数据传来,则通过Message和Handler来更新UI,实现数据的显示。
向Arduino发送信息:同样适用了AsyncTask类来实现, android AsyncTask介绍 。
当我们点击发送按钮时,首先判断socket是否成功创建,成功则使用输出流发送信息。否则,给出提示。
断开连接:
首先我们需要通过btSocket.close( )来关闭socket,然后调用线程的join( )来将线程停止。实现了蓝牙之间的断开连接操作。
至此,我们学习了Android蓝牙的搜索、配对、连接、通信,对蓝牙开发有了一个较为初步的认识。


 1777
1777


 被折叠的 条评论
为什么被折叠?
被折叠的 条评论
为什么被折叠?
 到【灌水乐园】发言


