


 本文详细探讨了DecorView的创建过程,从Activity的setContentView方法开始,讲解了PhoneWindow如何通过installDecor和generateDecor创建DecorView,以及DecorView的结构初始化。通过inflate方法将布局文件添加到mContentParent,最终在ViewRootImpl中完成添加和显示到屏幕的步骤,涉及measure、layout和draw的执行。
DecorVIew 的创建
我们通过一个示例来看看顶层View(DecorView)是怎么创建出来的。
示例:
public class MainActivity extends Activity {

    @Override
    protected void onCreate(Bundle savedInstanceState) {
        super.onCreate(savedInstanceState);
        setContentView(R.layout.activity_main);

    }
  }
在上面我们一般都会调用setContentView方法来设置布局。该方法调用了Activity的setContentView方法,我们去看看:
public class Activity extends ContextThemeWrapper
        implements LayoutInflater.Factory2,
        Window.Callback, KeyEvent.Callback,
        OnCreateContextMenuListener, ComponentCallbacks2,
        Window.OnWindowDismissedCallback {

.......

 public void setContentView(int layoutResID) {
        getWindow().setContentView(layoutResID);//调用与之关联Window中的setContentView()方法
        initWindowDecorActionBar();
    }

......

 }
在父类Activity中其实就是调用与之关联的Window(真正的对象类型是PhoneWindow)setContentView()来创建DecorView对象。进入源码看看实现的过程:
进入Window类(实现对象类型是PhoneWindow)的setContentView():
 public class PhoneWindow extends Window implements MenuBuilder.Callback {

     ......

    public void setContentView(int layoutResID) {
        if (mContentParent == null) {
            installDecor();
        } else {
            mContentParent.removeAllViews();
        }
        mLayoutInflater.inflate(layoutResID, mContentParent);
        final Callback cb = getCallback();
        if (cb != null) {
            cb.onContentChanged();
        }
    }

     ......

 }
可以看出,首先判断mContentParent 是否为null,如果是则调用installDecor(),否则移除所有的VIew。然后通过mLayoutInflater解析我们的布局文件设置到mContentParent。
接下来调用getCallback()获取CallBack对象。还记得Activity实现了Window.callBack吗?在创建Activity对象的时候,实现Window.callBack。然后在创建PhoneWindow对象的时候调用了setCallBack(this).因此这里获取到CallBack对象其实就是当前Activity本身。这里就是当PhoneWindow接收到系统的事件回调到Activity。
mContentParent 是什么呢?从这里就能看出来mContentParent是个ViewGroup且包裹我们整个布局文件(layout.xml)。
进入installDecor:
 public class PhoneWindow extends Window implements MenuBuilder.Callback {

     ......

      private void installDecor() {
        if (mDecor == null) {
            mDecor = generateDecor();
            mDecor.setIsRootNamespace(true);
        }
        if (mContentParent == null) {
            mContentParent = generateLayout(mDecor);

            mTitleView = (TextView)findViewById(com.android.internal.R.id.title);
            if (mTitleView != null) {
              //根据FEATURE_NO_TITLE隐藏,或者设置mTitleView的值
              ......
                }
            }
        }
    }

     ......
代码可能有长,但主要的操作就generateDecor()创建出mDecor,mDecor是DecorView对象,而DecorView继承于FrameLayout。
generateLayout(mDecor)传入mDecor对象,设置mContentParent 。
最后就是根据FEATURE_NO_TITLE标记来是否显示Title。
进入generateDecor()方法:
protected DecorView generateDecor() {
        return new DecorView(getContext(), -1);
    }
简单粗暴,就是new出了一个DecorView对象。保存在成员变量mDecor中。
DecorView是Activity的顶级View,一般来说它内部包含标题栏和内容栏(layout.xml,即mContentParent)。内容栏是一定存在的,并且具体的id是‘content’。因此这个时候创建出的DecorView还是一个空白的FrameLayout;
接下来就是调用了generateLayout(mDecor)来初始化DecorView的结构。进入该方法:
  protected ViewGroup generateLayout(DecorView decor) {

      ......

       View in = mLayoutInflater.inflate(layoutResource, null);
        decor.addView(in, new ViewGroup.LayoutParams(FILL_PARENT, FILL_PARENT));

        ViewGroup contentParent = (ViewGroup)findViewById(ID_ANDROID_CONTENT);

      ......

  }
这个方法很长,主要的就是加载具体的布局文件,然后添加到DecorView中。这些布局文件中都包含一个id为content的FrameLayout,将其引用返回给mContentParent。
这样DecorView的结构接初始化完成了。
回到setContentView方法中, 调用了mLayoutInflater.inflate(layoutResID, mContentParent);在这里就是把我们写的布局文件通过inflater加入到mContentParent中。
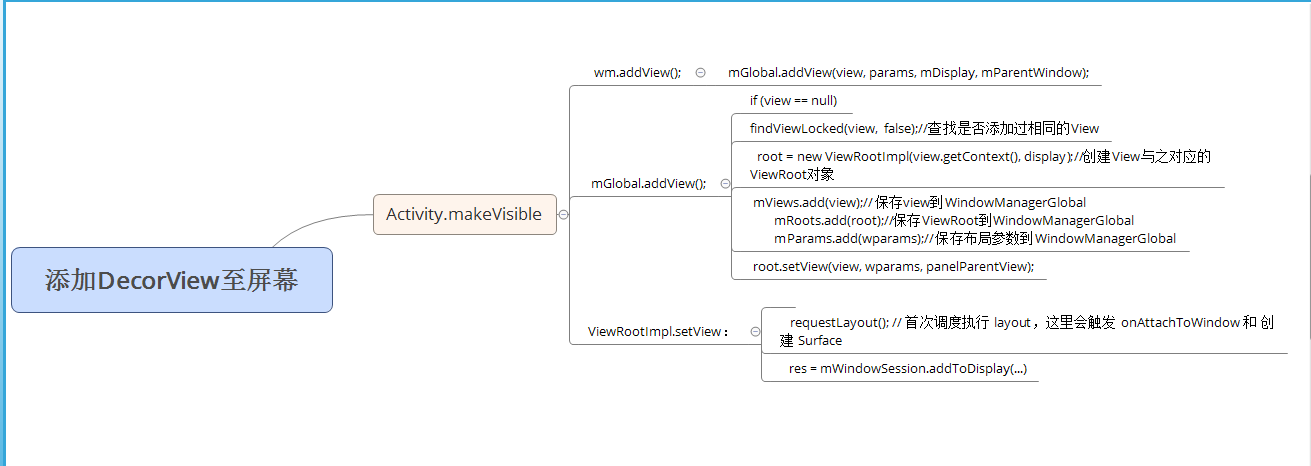
这样我们写的布局文件成功的添加到DecorView中的mContentParent。现在只是完成了DecorView的创建并初始化,我们还需要把这个创建并初始化完DecorView添加并显示到屏幕上,这里我们就需要用到WindowManager。但是现在的DecorView不能被WM所识别,还无法接收外界输入的信息。在ActivityThread的handleResumeActivity方法中,首先会调用Activity.onResume方法,接着调用Activity.makeVisible方法。正在makeVisible方法中DecorView真正的完成了添加和显示这个两个过程,Activity视图才能被用户所看到:
 void makeVisible() {
        if (!mWindowAdded) {
            ViewManager wm = getWindowManager();
            wm.addView(mDecor, getWindow().getAttributes());
            mWindowAdded = true;
        }
        mDecor.setVisibility(View.VISIBLE);
    }
调用了 wm.addView(mDecor, getWindow().getAttributes());这里的wm真实的对象类型是WindowManagerImpl,在创建PhoneWindow对象的文章可以知道。
进入WindowManagerImpl.addView 方法:
    @Override
    public void addView(View view, ViewGroup.LayoutParams params{
    mGlobal.addView(view, params, mDisplay, mParentWindow);
}
实际上是调用了 WindowManagerGlobal.addView。
public void addView(View view, ViewGroup.LayoutParams params,
        Display display, Window parentWindow) {

     ......

        if (view == null) {
            ......
        }
     ......
        int index = findViewLocked(view, false);//查找是否添加过相同的View
        if (index >= 0) {

        }

       root = new ViewRootImpl(view.getContext(), display);//创建View与之对应的ViewRoot对象

       view.setLayoutParams(wparams);

       mViews.add(view);//保存view到WindowManagerGlobal
       mRoots.add(root);//保存ViewRoot到WindowManagerGlobal
       mParams.add(wparams);//保存布局参数到WindowManagerGlobal

     .....
    root.setView(view, wparams, panelParentView);
    ......
}
这个方法很长,把不必要的删了。主要的操作,验证view的合法性,
在10行查找该view是否已经添加过至窗口。
然后创建该 View 对应的 ViewRoot,ViewRoot 控制着一个视图的结构(每次 addView 都会创建一个),里面包含了与 WindowManager 通信的 Binder 对象、View 所在界面的 ContextImpl、该视图结构的顶端的 DecorView等信息;
在19-21行把添加的 View、创建的 ViewRootImpl、布局参数添加到 WindowManagerGlobal 中去。用于判断以后添加的view是否已经被添加过。
最后就是ViewRootImpl.setView:
public void setView(View view, WindowManager.LayoutParams attrs, View panelParentView) {
    synchronized (this) {
        if (mView == null) {
            mView = view; // 为 mView 赋值,在这里其实是DecorView
           ......
            }
           ......
          requestLayout(); // 首次调度执行 layout,这里会触发 onAttachToWindow 和 创建 Surface
            ......
            try {
                ......
             res = mWindowSession.addToDisplay(mWindow, mSeq, mWindowAttributes,
                        getHostVisibility(), mDisplay.getDisplayId(),
                        mAttachInfo.mContentInsets, mInputChannel);
            } catch (RemoteException e) {
                ......
            }
            ......
        }
    }
}
在这里方法中,做了两个重要的操作,一、在8行中调用了requestLayout() 首次调度执行 layout。二、在12行中,通过与WMS通信把窗体添加到屏幕,至于是怎么实现的,这里我们不深究。
我们看看ViewRootImpl中requestLayout()方法:
   /**
     * {@inheritDoc}
     */
    public void requestLayout() {
        checkThread();
        mLayoutRequested = true;
        scheduleTraversals();
    }
这里调用scheduleTraversals()方法:
 public void scheduleTraversals() {
        if (!mTraversalScheduled) {
            mTraversalScheduled = true;

            sendEmptyMessage(DO_TRAVERSAL);
        }
    }
这里发了一个 sendEmptyMessage(DO_TRAVERSAL)消息,由于ViewRootImpl是继承与Handler的,那我们进入ViewRootImpl.handleMessage()方法:
 @Override
    public void handleMessage(Message msg) {
        switch (msg.what) {
         ........
        case DO_TRAVERSAL:
            if (mProfile) {
                Debug.startMethodTracing("ViewAncestor");
            }

            final long traversalStartTime;
            if (ViewDebug.DEBUG_LATENCY) {
                traversalStartTime = System.nanoTime();
                mLastDrawDurationNanos = 0;
            }

            performTraversals();

            if (ViewDebug.DEBUG_LATENCY) {
                long now = System.nanoTime();

                mLastTraversalFinishedTimeNanos = now;
            }

            if (mProfile) {
                Debug.stopMethodTracing();
                mProfile = false;
            }
            break;
      ......
   }
在这个方法中, 在16行调用performTraversals()这个方法,该方法就是系统进行View 树遍历工作的核心函数,这个函数内部逻辑很复杂,但是主体逻辑很清晰,其执行的过程可简单的概括为:是否需要重新计算视图的大小(measure)、是否需要重新布局视图的位置(layout),以及是否需要重绘(Draw)。就是我们常说的View的绘制。
因此首次调用View的绘制,是通过在ViewRootImpl.setView()函数中调用了requestLayout()为开端的。
DecorView生成的过程:

把已经创建好并初始化好的DecorView添加并显示到屏幕的过程:
END。


 2万+
2万+

 被折叠的 条评论
为什么被折叠?
被折叠的 条评论
为什么被折叠?
 到【灌水乐园】发言


