


首先创建一个单工程Quartz 2D,这里就不详细叙述了,然后在创建一个继承UIViewController的类BoMyView。
在BoViewController.m中添加几行代码:

然后在BoMyView.h中添加代码:

在BoMyView.m中的代码如下:
#import "BoMyView.h"
@implementation BoMyView
- (id)initWithFrame:(CGRect)frame
{
self = [super initWithFrame:frame];
if (self)
{
//设置背景色
self.backgroundColor = [UIColor whiteColor];
pointArray = [[NSMutableArray alloc]initWithCapacity:3];
}
return self;
}
//该方法会自动加载
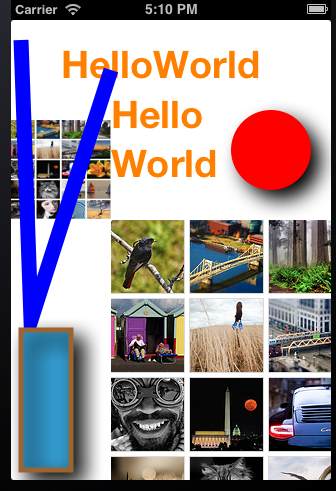
- (void)drawRect:(CGRect)rect
{
//获取上下文
self.context = UIGraphicsGetCurrentContext();
//绘制文字
[self drawMyString:nil];
//获取颜色组成比例
[self colorComents:nil];
//绘制图片
[self drawImage:nil];
//线条
[self drawMyLine:CGPointMake(20, 300)];
//绘制矩形
[self drawMyGraph:nil];
//绘制圆形
[self drawRound:nil];
//获取图形上下文
CGContextRef context = UIGraphicsGetCurrentContext();
//初始化数组
CGPoint addLines[]=
{
firstPoint,secondPoint,thirdPoint,firstPoint,
};
//开始画线条
CGContextAddLines(context, addLines, sizeof(addLines)/sizeof(addLines[0]));
//闭合路径
CGContextStrokePath(context);
}
//通过触摸方法进行操作
-(void)touchesEnded:(NSSet *)touches withEvent:(UIEvent *)event
{
//触摸产生对象
UITouch *touch = [touches anyObject];
//当前触摸点
CGPoint point = [touch locationInView:self];
[pointArray addObject:[NSValue valueWithCGPoint:point]];
//只存储3个触摸点
if (pointArray.count > 3) {
[pointArray removeObjectAtIndex:0];
}
//如果刚好存储三个点,就获取三个CGPoint的值,涉及到一个转换,NSArray只能存放对象
if (pointArray.count == 3) {
firstPoint = [[pointArray objectAtIndex:0]CGPointValue];
secondPoint = [[pointArray objectAtIndex:1]CGPointValue];
thirdPoint = [[pointArray objectAtIndex:2]CGPointValue];
}
//关键方法,重新加载drawRect方法
[self setNeedsDisplay];
}
//绘制字符串
- (void)drawMyString:(id)sender
{
//设置颜色
UIColor *color = [UIColor colorWithRed:1.0 green:0.5 blue:0 alpha:1];
[color set];
//要绘制的字符串
NSString *pStr = @"HelloWorld";
//设置字体,字号
UIFont *font = [UIFont fontWithName:@"HelveticaNeue-Bold" size:38];
//绘制
[pStr drawAtPoint:CGPointMake(50, 20) withFont:font];
//设置一个区域
CGRect rect = CGRectMake(100, 70, 110, 120);
//在矩形内绘制
[pStr drawInRect:rect withFont:font];
//打印所有字体名字
// for(NSString *str in [UIFont familyNames])
// {
// NSLog(@"%@",str);
// }
}
//绘制image
- (void)drawImage:(id)sender
{
UIImage *pImage = [UIImage imageNamed:@"image1.png"];
//在某个点绘制,根据图片尺寸绘制出来
[pImage drawAtPoint:CGPointMake(100, 200)];
//在某个矩形区域内绘制
[pImage drawInRect:CGRectMake(0, 100, 100, 100)];
}
//获取UIColor的各色组成部分
- (void)colorComents:(id)sender
{ //创建一个对象
UIColor *color = [UIColor colorWithRed:0.5 green:0.2 blue:0.1 alpha:1];
//获取ColorRef
CGColorRef cgColor = [color CGColor];
//通过颜色上下文获取一个CGFloat对象
const CGFloat *colorComents = CGColorGetComponents(cgColor);
//获取颜色组成部分
NSUInteger componentCount = CGColorGetNumberOfComponents(cgColor);
//循环输出颜色组成
for (int i = 0; i < componentCount; i++)
{
NSLog(@"%.2f",colorComents[i]);
}
}
//绘制图形
- (void)drawMyGraph:(id)sender
{ //创建一个路径
CGMutablePathRef path = CGPathCreateMutable();
CGRect rect = CGRectMake(10, 310, 50, 140);
//将区域加进路径中
CGPathAddRect(path, nil, rect);
//获取上下文
CGContextRef context = UIGraphicsGetCurrentContext();
//给矩形设置阴影
CGContextSetShadowWithColor(context, CGSizeMake(10, 10), 20, [[UIColor blackColor]CGColor]);
//将路径添加到上下文
CGContextAddPath(context, path);
//设置填充色
[[UIColor colorWithRed:0.2 green:0.6 blue:0.8 alpha:1.0]setFill];
//边线颜色
[[UIColor brownColor]setStroke];
//设置线条宽度
CGContextSetLineWidth(context, 5.0);
//在设置好的路径绘制
CGContextDrawPath(context, kCGPathFillStroke);
}
//绘制线条
- (void)drawMyLine:(CGPoint)point
{
//设置线条颜色
[[UIColor blueColor]set];
//获取上下文
CGContextRef context = UIGraphicsGetCurrentContext();
//设置起始点
CGContextMoveToPoint(context, 10, 20);
//添加线条,设置终止点
CGContextAddLineToPoint(context, point.x, point.y);
//连续画线条
CGContextAddLineToPoint(context, 100, 50);
//设置线条宽度
CGContextSetLineWidth(context, 15.0);
//设置连接处的样式kCGLineJoinRound,kCGLineJoinMiter,kCGLineJoinBevel
CGContextSetLineJoin(context, kCGLineJoinMiter);
//闭合路径
CGContextStrokePath(context);
}
//绘制圆形
- (void)drawRound:(id)sender
{
//获取上下文
CGContextRef context = UIGraphicsGetCurrentContext();
//根据上下文开始路径
CGContextBeginPath(context);
//设置绘制弧形的参数
CGContextAddArc(context, 260, 130, 40, 0, 2*M_PI,1);
//设置绘制线条颜色
CGContextSetRGBFillColor(context, 1, 0, 0, 1);
//闭合路径
CGContextFillPath(context);
}
- (void)dealloc
{
[_points release];
[super dealloc];
}
@end


 5738
5738

 被折叠的 条评论
为什么被折叠?
被折叠的 条评论
为什么被折叠?
 到【灌水乐园】发言


