在上一篇博客中,总结了如何搭建FastDFS图片服务器,并且可以通过配置nginx测试上传图片是否成功。接下
来这篇博客,将总结如何在客户端使用FastDFS上传图片。
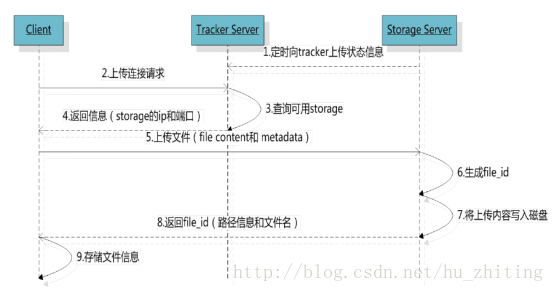
一.文件上传流程
二.上传文件的文件名
在服务端的测试中,我们可以看到成功上传图片后,文件名是由一长串组成的,而此名称都代表着不同的信
息。
客户端上传文件后存储服务器将文件ID返回给客户端,此文件ID用于以后访问该文件的索引信息。文件索引
信息包括:组名,虚拟磁盘路径,数据两级目录,文件名。

○ 组名:文件上传后所在的storage组名称,在文件上传成功后有storage服务器返回,需要客户端自行保
存。
○ 虚拟磁盘路径:storage配置的虚拟路径,与磁盘选项store_path*对应。如果配置了store_path0则是
M00,如果配置了store_path1则是M01,以此类推。
○ 数据两级目录:storage服务器在每个虚拟磁盘路径下创建的两级目录,用于存储数据文件。
文件名:与文件上传时不同。是由存储服务器根据特定信息生成,文件名包含:源存储服务器IP地址、文件
创建时间戳、文件大小、随机数和文件拓展名等信息。
三.图片服务的使用
官方提供了一个jar包:如fastdfs_client_v1.25.jar
使用方法:
1. 把FastDFS提供的jar包添加到工程中
2. 初始化全局配置。加载一个配置文件。
3. 创建一个TrackerClient对象。
4. 创建一个TrackerServer对象。
5. 声明一个StorageServer对象,null。
6. 获得StorageClient对象。
7. 直接调用StorageClient对象方法上传文件即可。
测试代码如下:
		@Test
			public void testUpload() throws Exception {
				// 1、把FastDFS提供的jar包添加到工程中
				// 2、初始化全局配置。加载一个配置文件。
				ClientGlobal.init("D:\\taotaoworkspace\\taotao-manager\\taotao-manager-web\\src\\main\\resources\\properties\\client.conf");
				// 3、创建一个TrackerClient对象。
				TrackerClient trackerClient = new TrackerClient();
				// 4、创建一个TrackerServer对象。
				TrackerServer trackerServer = trackerClient.getConnection();
				// 5、声明一个StorageServer对象,null。
				StorageServer storageServer = null;
				// 6、获得StorageClient对象。
				StorageClient storageClient = new StorageClient(trackerServer, storageServer);
				// 7、直接调用StorageClient对象方法上传文件即可。
				String[] strings = storageClient.upload_file("D:\\1.jpg", "jpg", null);
				for (String string : strings) {
					System.out.println(string);
				}
			}
我们可以将tracker_server的地址写在配置文件中,spring读取配置文件,便于修改。
为了方便,我们还可以将FastDFS的功能写在一个工具类中,便于使用。
工具类代码如下:
			package com.taotao.fastdfs;


			import java.io.BufferedOutputStream;
			import java.io.IOException;
			import java.net.URLDecoder;


			import org.csource.common.NameValuePair;
			import org.csource.fastdfs.ClientGlobal;
			import org.csource.fastdfs.StorageClient1;
			import org.csource.fastdfs.StorageServer;
			import org.csource.fastdfs.TrackerClient;
			import org.csource.fastdfs.TrackerServer;

			public class FastDFSClient {

				private TrackerClient trackerClient = null;
				private TrackerServer trackerServer = null;
				private StorageServer storageServer = null;
				private StorageClient1 storageClient = null;
				public FastDFSClient(String conf) throws Exception {
					if (conf.contains("classpath:")) {
						conf = conf.replace("classpath:", URLDecoder.decode(this.getClass().getResource("/").getPath(),"utf-8"));
					}
					ClientGlobal.init(conf);
					trackerClient = new TrackerClient();
					trackerServer = trackerClient.getConnection();
					storageServer = null;
					storageClient = new StorageClient1(trackerServer, storageServer);
				}

				/**
				 * 上传文件方法
				 * <p>Title: uploadFile</p>
				 * <p>Description: </p>
				 * @param fileName 文件全路径
				 * @param extName 文件扩展名,不包含(.)
				 * @param metas 文件扩展信息
				 * @return
				 * @throws Exception
				 */
				public String uploadFile(String fileName, String extName, NameValuePair[] metas) throws Exception {
					String result = storageClient.upload_file1(fileName, extName, metas);
					return result;
				}

				public String uploadFile(String fileName) throws Exception {
					return uploadFile(fileName, null, null);
				}

				public String uploadFile(String fileName, String extName) throws Exception {
					return uploadFile(fileName, extName, null);
				}

				/**
				 * 上传文件方法
				 * <p>Title: uploadFile</p>
				 * <p>Description: </p>
				 * @param fileContent 文件的内容,字节数组
				 * @param extName 文件扩展名
				 * @param metas 文件扩展信息
				 * @return
				 * @throws Exception
				 */
				public String uploadFile(byte[] fileContent, String extName, NameValuePair[] metas) throws Exception {

					String result = storageClient.upload_file1(fileContent, extName, metas);
					return result;
				}

				public String uploadFile(byte[] fileContent) throws Exception {
					return uploadFile(fileContent, null, null);
				}

				public String uploadFile(byte[] fileContent, String extName) throws Exception {
					return uploadFile(fileContent, extName, null);
				}

				/**
				 * 文件的下载方法
				 * @param group fastdfs的组别
				 * @param storagePath 文件的storagePath路径
				 * @param diskpath 磁盘路径
				 * @throws Exception
				 * @throws IOException
				 */
				public void download_file(String path,BufferedOutputStream output) throws IOException, Exception{
					//byte[] b = storageClient.download_file(group, path);
					byte[] b = storageClient.download_file1(path);
						try{
							if(b != null){
								output.write(b);
							}
						}catch (Exception e){} //用户可能取消了下载
						finally {
							if (output != null)
								try {
									output.close();
								} catch (IOException e) {
									e.printStackTrace();
								}
					}
				}
			      /**
				 * 文件的删除方法
				 * 返回值:0删除成功
				 * @param group fastdfs的组名
				 * @param storagePath 文件的storagePath路径
				 * @throws Exception
				 * @throws IOException
				 */
				public Integer delete_file(String group ,String storagePath) throws IOException, Exception{
					 return  storageClient.delete_file(group, storagePath);
				}
			}
四.遇到的问题
1. 在使用测试类测试图片上传功能,遇到了一个不能连接到tracker server的问题:
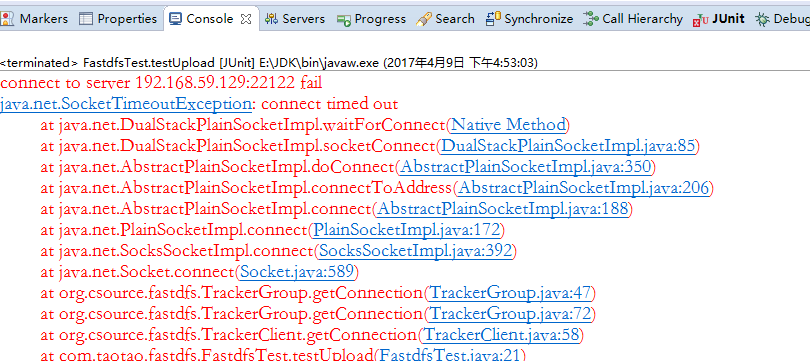
查到的最简单粗暴的方式是将防火墙关闭。
但一般都不推荐使用此方法,所以我们可以通过将端口号添加到防火墙的方法,80、22122这两个添加后依
然不能使用,通过查看tracker的配置文件,发现还有23000的端口号需要开放,添加了这三个端口号之后连接失败的
问题便解决了。
2. 连接上之后,浏览器访问图片地址,404:
解决方案:在nginx配置中,添加user root;
五.总结
搭建好了FastDFS图片服务器,加上FastDFSClient工具类,结合项目就简单很多了。点滴积累,好好地从入
门做起。


 9938
9938

 被折叠的 条评论
为什么被折叠?
被折叠的 条评论
为什么被折叠?
 到【灌水乐园】发言


