


实现自动操作,就是利用代码脚本,模拟人的操作,包括点击,滑动,输入文字,物理按键等,实现一系列操作。
为什么要实现自动操作?
为了自动化测试?android app的功能越来越多,测试们的事情都忙不过来,这时,有些大量的工作就可以交给脚本来完成。
比如,测试抢微信红包的工作,测试游戏打怪升级,测试自动聊天,测试考勤打卡等等等等。。。。
android中多种模拟操作的方法:
第一种:模拟MotionEvent
这根本没用,因为只能给自己本身的app发送Event,需要发Event的话,我不如直接调用View的onClick,onTouch等方法,或方法内部的代码直接复制走一遍。
第二种:Instrumentation
google测试用的,在操作第三方app的时候,听说要装成系统App,对不起我不是手机厂商,也不刷机。
第三种:ADB命令
用adb shell命令
input tap x y
表示在屏幕(x,y)坐标上点击.
还有 swipe 滑动,keyevent按键事件..亲测有效
网上有说 还有 sendevent方法,试过,觉得即不好用,又容易出错..
adb命令需要连接到电脑,在电脑上用命令行,,所以脚本也可以写在电脑上。。
对于root的手机来说,可以往系统写入这些命令,模拟操作。
缺点:
1.模拟点击需要从写入到反映,模拟的速度会很慢,点一下等一秒,所以要是用来秀操作,基本不可能。
2.必须root
第四种:AccessibilityService
这是google支持的,出发点是用来辅助有障碍人士使用手机的,可以模拟一些点击操作等。
AccessibilityService可以监听的事件,包括页面切换,页面滚动,监听通知等。
在AccessibilityService可以获取当前界面的AccessibilityNodeInfo。
获取当前界面的跟节点信息
AccessibilityNodeInfo root = getRootInActiveWindow();AccessibilityNodeInfo是什么,可以说就是View的代理对象,一个AccessibilityNodeInfo对应了一个View,AccessibilityNodeInfo树对应了当前界面的View树。
AccessibilityService是需要用户授权的,授权了不明辅助服务,或者root的手机,风险是很大的,很容易被盗取账号密码。
怎么写一个AccessibilityService,怎么授权,百度可以找到大把的资源,这里就不赘述了。
定位到需要的AccessibilityNodeInfo
可以通过文字,资源id等直接定位到你需要的view上
AccessibilityNodeInfo info = root.findAccessibilityNodeInfosByText("确定");
AccessibilityNodeInfo info = root.findAccessibilityNodeInfosByViewId();
没有提供直接通过View类型定位View的,但我们可以自己写一个,这样可以直接找“Button”
//查找节点
    public static AccessibilityNodeInfo findNodeByViewName(AccessibilityNodeInfo info, String viewName) {
        String name = info.getClassName().toString();
        String[] split = name.split("\\.");
        name = split[split.length - 1];
        if (name.equals(viewName)) {
            return info;
        } else {

            int count = info.getChildCount();
            if (count > 0) {
                for (int i = 0; i < count; i++) {
                    AccessibilityNodeInfo inf = findNodeByViewName(info.getChild(i), viewName);
                    if (inf != null) {
                        return inf;
                    }
                }
            } else {
                return null;
            }
        }
        return null;
    }
有的view结构很难定位,text找不到,类型也没区别,没有id。这时我们可以使用查看view树的工具,或者使用下面的方法打印整个view树结构
    private static int tabcount = -1;
    private static StringBuilder sb;

    public static void printPacketInfo(AccessibilityNodeInfo root) {
        sb = new StringBuilder();
        tabcount = 0;
        int[] is = {};
        analysisPacketInfo(root, is);
        JLog.d(sb.toString());
    }

    //打印此时的界面状况,便于分析
    private static void analysisPacketInfo(AccessibilityNodeInfo info, int... ints) {
        if (info == null) {
            return;
        }
        if (tabcount > 0) {
            for (int i = 0; i < tabcount; i++) {
                sb.append("\t\t");
            }
        }
        if (ints != null && ints.length > 0) {
            StringBuilder s = new StringBuilder();
            for (int j = 0; j < ints.length; j++) {
                s.append(ints[j]).append(".");
            }
            sb.append(s).append(" ");
        }
        String name = info.getClassName().toString();
        String[] split = name.split("\\.");
        name = split[split.length - 1];
        if ("TextView".equals(name)) {
            CharSequence text = info.getText();
            sb.append("text:").append(text);
        } else if ("Button".equals(name)) {
            CharSequence text = info.getText();
            sb.append("Button:").append(text);
        } else {
            sb.append(name);
        }
        sb.append("\n");

        int count = info.getChildCount();
        if (count > 0) {
            tabcount++;
            int len = ints.length + 1;
            int[] newInts = Arrays.copyOf(ints, len);

            for (int i = 0; i < count; i++) {
                newInts[len - 1] = i;
                analysisPacketInfo(info.getChild(i), newInts);
            }
            tabcount--;
        }

    }
该方法打印的节点树如下:
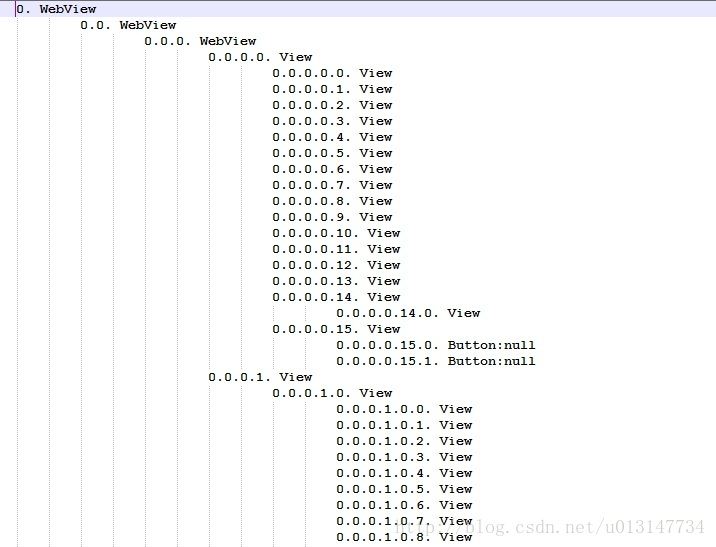
这样我们可以通过前面的0.0.0.1.1直接定位到View
        AccessibilityNodeInfo info = root;

        int[] path = {0, 0, 0, 1, 1};
        for (int i = 0; i < path.length; i++) {
            info = info.getChild(path[i]);
            if (info == null || info.getChildCount() <= 0) {
                return null;
            }
        }
        return info;
当然你有可能不知道0.0.0.1.1对应哪一个视图,可以通过
        Rect rect = new Rect();
        info.getBoundsInScreen(rect);
        //状态栏的高度
        int h = GUtil.getStatusBarHeight(context.getApplicationContext());
        rect.top -= h;
        rect.bottom -= h;
打印rect,或者直接在全局窗口创建window,显示rect为有色区域..
AccessibilityNodeInfo支持的操作
AccessibilityService本身有方法,模拟返回键,home键等
performGlobalAction(GLOBAL_ACTION_BACK)AccessibilityNodeInfo还可以直接模拟点击,长按等事件。
info.performAction(AccessibilityNodeInfo.ACTION_CLICK);但是,performAction有时候根本没用!!!
因为现在很多应用都是混合应用,内容页可能是Html5写的,看起来是按钮,其实就是普通View..他的点击事件不是通过OnClick产生,而是直接判断TouchEvent。AccessibilityNodeInfo没有提供发送down,move,up事件的api。我不能通过这系列模拟所有操作了,替代方案使用root 后的手机,向系统发送全局点击命令。
    /**点击某个视图*/
     public static void perforGlobalClick(AccessibilityNodeInfo info) {
        Rect rect = new Rect();
        info.getBoundsInScreen(rect);
        perforGlobalClick(rect.centerX(), rect.centerY());
    }

    public static void perforGlobalClick(int x, int y) {
        execShellCmd("input tap " + x + " " + y);
    }
    /**
     * 执行shell命令
     *
     * @param cmd
     */
    public static void execShellCmd(String cmd) {

        try {
            // 申请获取root权限,这一步很重要,不然会没有作用
            Process process = Runtime.getRuntime().exec("su");
            // 获取输出流
            OutputStream outputStream = process.getOutputStream();
            DataOutputStream dataOutputStream = new DataOutputStream(outputStream);
            dataOutputStream.writeBytes(cmd);
            dataOutputStream.flush();
            dataOutputStream.close();
            outputStream.close();
//            process.waitFor();
        } catch (Throwable t) {
            t.printStackTrace();
        }
    }
还有一些封装模拟操作
    private static android.os.Handler handler = new android.os.Handler(Looper.getMainLooper());

    /**
     * 全局滑动操作
     * @param x0
     * @param y0
     * @param x1
     * @param y1
     */
    public static void perforGlobalSwipe(int x0, int y0, int x1, int y1) {
        execShellCmd("input swipe " + x0 + " " + y0 + " " + x1 + " " + y1);
    }


    /**
     * 当要点击的View可能在屏幕外时
     *
     * @param info
     * @param context
     */
    public static void tryGlobalClickMaybeViewOutsideScreen(final AccessibilityNodeInfo info, final Context context, final Runnable afterScroll, final Runnable sucess) {
        Rect rect = new Rect();
        info.getBoundsInScreen(rect);

        WindowManager wm = (WindowManager) context.getSystemService(Context.WINDOW_SERVICE);
        DisplayMetrics dm = new DisplayMetrics();
        wm.getDefaultDisplay().getMetrics(dm);

        JLog.d("info rect==>" + rect);
        JLog.d("window dm -->" + dm);
        long delay = 3000;
        if (rect.top < 0) {
            JLog.d("scroll down ↓↓↓↓");
            //下滑半屏
            perforGlobalSwipe(dm.widthPixels / 2, dm.heightPixels / 4, dm.widthPixels / 2, (int) (dm.heightPixels * 0.75));
            handler.postDelayed(new Runnable() {
                @Override
                public void run() {
                    afterScroll.run();
                }
            }, delay);
        } else if (rect.bottom > dm.heightPixels) {
            JLog.d("scroll up ↑↑↑↑");
            //上滑半屏
            perforGlobalSwipe(dm.widthPixels / 2, (int) (dm.heightPixels * 0.75), dm.widthPixels / 2, dm.heightPixels / 4);
            handler.postDelayed(new Runnable() {
                @Override
                public void run() {
                    afterScroll.run();
                }
            }, delay);
        } else {
            //
            JLog.d("scroll and find the clickable view in screen");

            execShellCmd("input tap " + rect.centerX() + " " + rect.centerY());
            handler.postDelayed(sucess, 2000);
        }

    }

    /**
     * 发送全局 Home键 事件
     * @param delay 延迟时间
     */
    public static void perforGlobalHome(long delay) {
        if (delay <= 0) {
            execShellCmd("input keyevent " + KeyEvent.KEYCODE_HOME);
        } else
            handler.postDelayed(new Runnable() {
                @Override
                public void run() {
                    execShellCmd("input keyevent " + KeyEvent.KEYCODE_HOME);
                }
            }, delay);
    }


    /**
     * 发送全局 返回键 事件
     * @param delay 延迟时间
     */
    public static void perforGlobalBack(long delay) {
        if (delay <= 0) {
            execShellCmd("input keyevent " + KeyEvent.KEYCODE_BACK);
        } else
            handler.postDelayed(new Runnable() {
                @Override
                public void run() {
                    execShellCmd("input keyevent " + KeyEvent.KEYCODE_BACK);
                }
            }, delay);
    }
    /**发送一段文字,该功能经实验,不好用*/
    public static void sendString(String text) {
        StringBuilder sb = new StringBuilder();
        String[] split = text.split(" ");
        for (int i = 0; i < split.length; i++) {
            sb.append("input text " + split[i]).append("\n");
            sb.append("input keyevent " + KeyEvent.KEYCODE_SPACE).append("\n");
        }
        execShellCmd(sb.toString());
    }

    //自动为edittext粘贴上文字内容
    public static void sendTextForEditText(Context context, AccessibilityNodeInfo edittext, String text) {
        if (edittext != null) {
            ClipboardManager clipboard = (ClipboardManager)context.getSystemService(Context.CLIPBOARD_SERVICE);
            ClipData clip = ClipData.newPlainText("text", text);
            clipboard.setPrimaryClip(clip);
            //焦点(n是AccessibilityNodeInfo对象)
            edittext.performAction(AccessibilityNodeInfo.ACTION_FOCUS);
            粘贴进入内容
            edittext.performAction(AccessibilityNodeInfo.ACTION_PASTE);
            //发送
            //...
        }
    }
/**
 * 点亮亮屏,点亮屏幕要求很高,不能有手势锁,密码锁,指纹锁,还不能有屏保
 */
public static void unlock(Context context) {
      PowerManager mPowerManager = (PowerManager) context.getSystemService(Context.POWER_SERVICE);
        // 点亮亮屏
      PowerManager.WakeLock mWakeLock = mPowerManager.newWakeLock
                (PowerManager.ACQUIRE_CAUSES_WAKEUP | PowerManager.SCREEN_DIM_WAKE_LOCK, "Tag");
      Log.w("px", "mWakeLock is lock:" + mWakeLock.isHeld());
      mWakeLock.acquire();

}
有了这些功能,自己处理在哪个页面就点击什么按钮的逻辑,就可以组织一套自动脚本了。
如果需要AccessibilityService长期生存,还得允许自动运行,有的手机比如小米要放弃省电模式,神隐模式等,安全中心不能随便杀死服务。
有没有既不用root,不用系统app,不用USB调试连接电脑,而且点击,滑动精准快速,直接模拟touchEvent的方法?我没找到,我如果找到了,那也说明android实在是安全性太差了。
如果app可以在模拟器支持一切功能,那脚本的问题就好办多了。毕竟windows的脚本工具已经很成熟了。


 2417
2417


 被折叠的 条评论
为什么被折叠?
被折叠的 条评论
为什么被折叠?
 到【灌水乐园】发言


