android视频处理之动态时间水印效果

最近的项目中遇到一个非常头痛的需求,在android端录制视频的时候动态添加像监控画面一样的精确到秒的时间信息,关键是,并不是说只在播放器的界面显示时间就可以了,而是录制到视频里面去,这个MP4在电脑上播放也能看到每个画面的时间。
最后想到的办法是在录制完成以后去处理这个视频。

期间参考了很多资料,比较有用的大概是ffmpeg和比较新的Api
mediaCodec系列了。介于ffmpeg都是C实现,和一大堆NDK相关,本人不是太懂,就重点关注了MediaCodec系列。

参考逻辑流程图一目了然的这篇博文
http://blog.csdn.net/xipiaoyouzi/article/details/37599759

MediaCodec进行编解码的大体逻辑是这样的(转载):
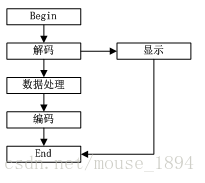
这里写图片描述

主要函数的调用逻辑如下:

这里写图片描述

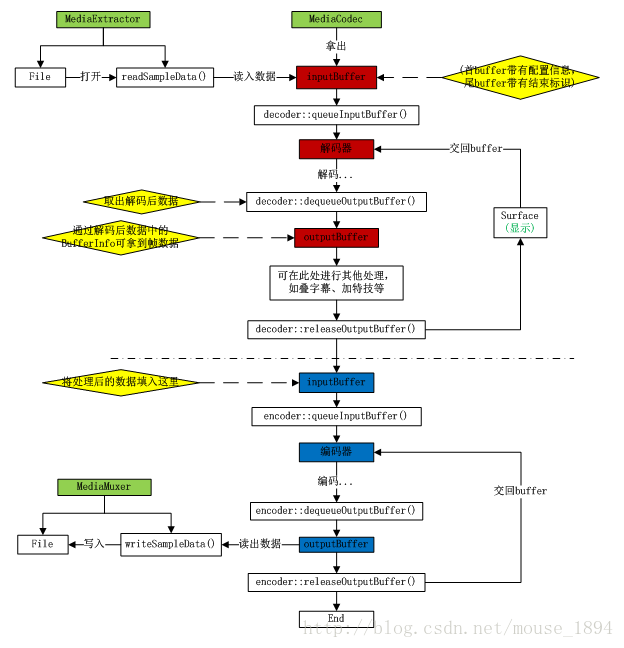
MediaExtractor,MediaCodec,MediaMuxer这三个Api已经可以很多多媒体处理工作了,比如用MediaExtractor+MediaMuxer就可以做音视频剪辑,MediaCodec+MediaMuxer就可以做自定义的录像机,一起用就可以做特效编辑,滤镜之类的了。

添加时间水印效果
这里写图片描述

关键在于取到的数据帧,是YUV格式的,根据拍摄时选取的不同还不一样,我用到的NV21格式,也就是YUV420sp,拿到NV21格式的帧以后,转成RGB渲染,然后又转回NV21交给encoder,看起来好笨重,也非常地耗时,但我还没找到更好的办法。

    private Bitmap first;

    private void handleFrameData(byte[] data, MediaCodec.BufferInfo info) {
        //YUV420sp转RGB数据 5-60ms
        ByteArrayOutputStream out = new ByteArrayOutputStream();
        YuvImage yuvImage = new YuvImage(data, ImageFormat.NV21, srcWidth, srcHeight, null);
        yuvImage.compressToJpeg(new Rect(0, 0, srcWidth, srcHeight), 100, out);
        byte[] imageBytes = out.toByteArray();

        //旋转图像,顺便解决电脑上播放被旋转90度的问题 20-50ms
        Bitmap image = BitmapFactory.decodeByteArray(imageBytes, 0, imageBytes.length);
        Bitmap bitmap = rotaingImageView(videoRotation, image);
        image.recycle();

        //渲染文字 0-1ms
        Canvas canvas = new Canvas(bitmap);
        canvas.drawText(videoTimeFormat.format(videoFirstTime + info.presentationTimeUs / 1000), 10, 30, paint);

        //预览处理帧 0-5ms
        first = bitmap;
        handler.sendEmptyMessage((int) (info.presentationTimeUs / 1000));

        synchronized (MediaCodec.class) {//记得加锁
            timeDataContainer.add(new Frame(info, bitmap));
        }
    }
      /*
    * 旋转图片
    * @param angle
    * @param bitmap
    * @return Bitmap
    */
    public Bitmap rotaingImageView(int angle, Bitmap bitmap) {
        //旋转图片 动作
        Matrix matrix = new Matrix();
        matrix.postRotate(angle);
        // 创建新的图片
        return Bitmap.createBitmap(bitmap, 0, 0, bitmap.getWidth(), bitmap.getHeight(), matrix, true);
    }

然后是转回NV21

/**
     * 获取夹了时间戳的的数据
     *
     * @return
     */
    private Frame getFrameData() {
        synchronized (MediaCodec.class) {//记得加锁

            if (timeDataContainer.isEmpty()) {
                return null;
            }

            //从队列中获取数据
            Frame frame = timeDataContainer.remove(0);取出后将此数据remove掉 既能保证PCM数据块的取出顺序 又能及时释放内存

            //转回YUV420sp 120-160ms
            frame.data = getNV21(dstWidth, dstHeight, frame.bitmap);

            return frame;
        }
    }
 public static byte[] getNV21(int width, int height, Bitmap scaled) {

        int[] argb = new int[width * height];

        scaled.getPixels(argb, 0, width, 0, 0, width, height);

        byte[] yuv = new byte[width * height * 3 / 2];

        encodeYUV420SP(yuv, argb, width, height);

        scaled.recycle();

        return yuv;
    }


    /**
     * 将bitmap里得到的argb数据转成yuv420sp格式
     * 这个yuv420sp数据就可以直接传给MediaCodec,通过AvcEncoder间接进行编码
     *
     * @param yuv420sp 用来存放yuv420sp数据
     * @param argb     传入argb数据
     * @param width    图片width
     * @param height   图片height
     */
    public static void encodeYUV420SP(byte[] yuv420sp, int[] argb, int width, int height) {
        final int frameSize = width * height;

        int yIndex = 0;
        int uvIndex = frameSize;

        int a, R, G, B, Y, U, V;
        int index = 0;
        for (int j = 0; j < height; j++) {
            for (int i = 0; i < width; i++) {

//                a = (argb[index] & 0xff000000) >> 24; // a is not used obviously
                R = (argb[index] & 0xff0000) >> 16;
                G = (argb[index] & 0xff00) >> 8;
                B = (argb[index] & 0xff) >> 0;

                // well known RGB to YUV algorithm
                Y = ((66 * R + 129 * G + 25 * B + 128) >> 8) + 16;
                U = ((-38 * R - 74 * G + 112 * B + 128) >> 8) + 128;
                V = ((112 * R - 94 * G - 18 * B + 128) >> 8) + 128;

                // NV21 has a plane of Y and interleaved planes of VU each sampled by a factor of 2
                //    meaning for every 4 Y pixels there are 1 V and 1 U.  Note the sampling is every other
                //    pixel AND every other scanline.
                yuv420sp[yIndex++] = (byte) ((Y < 0) ? 0 : ((Y > 255) ? 255 : Y));
                if (j % 2 == 0 && index % 2 == 0) {
                    yuv420sp[uvIndex++] = (byte) ((V < 0) ? 0 : ((V > 255) ? 255 : V));
                    yuv420sp[uvIndex++] = (byte) ((U < 0) ? 0 : ((U > 255) ? 255 : U));
                }

                index++;
            }
        }
    }

看到上面的代码执行耗时,根本不可能实时录制时处理,就算后台服务处理,3秒钟的720*480视频得花费约20秒..但把encodeYUV420SP等换成JNI实现后,速度加快了很多。

初始化编码器,设置编码后的视频格式

    /**
     * 初始化编码器
     */

    private void initMediaEncode() {
        try {
            MediaFormat format = MediaFormat.createVideoFormat(MediaFormat.MIMETYPE_VIDEO_AVC, dstWidth, dstHeight);
            format.setInteger(MediaFormat.KEY_BIT_RATE, 1024 * 512);
            format.setInteger(MediaFormat.KEY_FRAME_RATE, 27);
            format.setInteger(MediaFormat.KEY_COLOR_FORMAT, getVideoColorFormat());
            format.setInteger(MediaFormat.KEY_I_FRAME_INTERVAL, 1);

            mediaEncode = MediaCodec.createEncoderByType(MediaFormat.MIMETYPE_VIDEO_AVC);
            mediaEncode.configure(format, null, null, MediaCodec.CONFIGURE_FLAG_ENCODE);
        } catch (IOException e) {
            e.printStackTrace();
        }
        mediaEncode.start();

    }

    /**
     * 获取颜色格式
     */
    private int getVideoColorFormat() {
        String model = android.os.Build.MODEL;
        JLog.d("px", "phone model string is " + model);
        if (model.startsWith("MI")) {//小米
            return MediaCodecInfo.CodecCapabilities.COLOR_FormatYUV420SemiPlanar;
        } else if (videoColorFormat == MediaCodecInfo.CodecCapabilities.COLOR_FormatYUV420Planar) {
            return videoColorFormat;
        } else {
            return MediaCodecInfo.CodecCapabilities.COLOR_FormatYUV420SemiPlanar;
        }
    }

在Service中管理这任务,例如

 @Override
    public int onStartCommand(Intent intent, int flags, int startId) {
        super.onStartCommand(intent, flags, startId);
        int action = intent.getIntExtra("action", 0);
        if (action == REQUEST_CODEC) {
            VideoCodecModel video = (VideoCodecModel) intent.getSerializableExtra("video");
            video = codecDao.addItem(video);
            if (mVideo == null) {//空闲
                start(video);
            } else {//排队
                videos.add(video);
            }
        }
      return START_NOT_STICKY;
    }

 private void start(VideoCodecModel video) {
        mTask = new VideoCodecTask(video);
        mTask.setProgressHandler(handler);
        mTask.start();
    }

打开Acitivity时,绑定服务,可以查看服务的进行状态

@Override
    protected void onCreate(Bundle savedInstanceState) {
        super.onCreate(savedInstanceState);
        setContentView(R.layout.activity_show_codec);

       VideoCodecDao codecDao = VideoCodecDao.getInstance(this);
        final Intent intent = new Intent(this, WaterMarkService.class);
        connection = new ServiceConnection() {
            @Override
            public void onServiceConnected(ComponentName name, IBinder service) {
                Log.d("px", "onServiceConnected");
                //这里利用一个回调方法去监听服务的运行状态.
                binder.setOnProgressChangeListener(ShowCodecActivity.this);

            }

            @Override
            public void onServiceDisconnected(ComponentName name) {

            }
        };
        bindService(intent, connection, Context.BIND_AUTO_CREATE);
    }
  @Override
    public void onProgress(int progress, int max) {}
  @Override
    public void onCodecStart(VideoCodecModel video) {}

    @Override
    public void onCodecFinish(VideoCodecModel video) {}

    @Override
    public void onCodecError(VideoCodecModel video, String msg) {}


    @Override
    public void onCodecCancel(VideoCodecModel video, boolean delete) {}

代码片段

简单deomo的git地址

  • 2
    点赞
  • 9
    收藏
    觉得还不错? 一键收藏
  • 12
    评论
评论 12
添加红包

请填写红包祝福语或标题

红包个数最小为10个

红包金额最低5元

当前余额3.43前往充值 >
需支付:10.00
成就一亿技术人!
领取后你会自动成为博主和红包主的粉丝 规则
hope_wisdom
发出的红包
实付
使用余额支付
点击重新获取
扫码支付
钱包余额 0

抵扣说明:

1.余额是钱包充值的虚拟货币,按照1:1的比例进行支付金额的抵扣。
2.余额无法直接购买下载,可以购买VIP、付费专栏及课程。

余额充值