


官方网站传送门
PHP之道传送门
下载
第一步,先到官网下载到所需的文件或文档资源。
当前我下载的是最新稳定版本Current Stable PHP 7.1.10 (Changelog)
下载文件列表
- php-7.1.10-src.zip
- php-7.1.10-Win32-VC14-x64.zip
- php-debug-pack-7.1.10-Win32-VC14-x64.zip
- php-7.1.10.tar.gz
- php_enhanced_zh.chm
下载文件解释
- php-7.1.10-src.zip,php是开源的,所以这个是php的源代码,主要是用C语言编写,打开zip包,可以看到有*.c、*.h的文件;
- php-7.1.10-Win32-VC14-x64.zip,windows平台下安装使用。nts(Non Thread Safe,非线程安全,注释),建议下载线程安全版本。在PHP For Windows有ts版本和nts版本,这里下载的是ts版本,即线程安全版本;
- php-debug-pack-7.1.10-Win32-VC14-x64.zip,暂时用不上,作用解释( C++ 程序员开发或修改 php 扩展用的);
- php-7.1.10.tar.gz,linux/unix平台下安装使用;
- php_enhanced_zh.chm,PHP 手册-HTML Help file (with user notes),即这个版本的手册内容是加上用户注解的,而php_manual_zh.chm手册指南是无加用户注解的;
php-7.1.10.tar.gz源码包是linux/unix平台下用的,要使用还需要用gcc将其中的源码编译成二进制文件以及动态库so。
php-7.1.10-Win32-VC14-x64.zip二进制包是windows下用的,是已经使用VC14编译完毕的二进制文件和动态库dll,可以直接使用。
VC运行库各个版本下载地址列表:
Visual C++ 2005 x64(VC8)
Visual C++ 2005 x86(VC8)
Visual C++ 2008 x64(VC9)
Visual C++ 2008 x86(VC9)
Visual C++ 2010 x64(VC10)
Visual C++ 2010 x86(VC10)
Visual C++ 2012 x64(VC11)
Visual C++ 2012 x86(VC11)
Visual C++ 2013 x64(VC12)
Visual C++ 2013 x86(VC12)
Visual C++ 2015 x64(VC14)
Visual C++ 2015 x86(VC14)
安装
- 将下载的php-7.1.10-Win32-VC14-x64.zip解压,放到自己想要放置的目录下,当前解压目录(E:\0Develop\php\php-7.1.10-Win32-VC14-x64);
- 配置环境变量PATH,变量值为解压后的根目录,即php.exe所在的文件夹(E:\0Develop\php\php-7.1.10-Win32-VC14-x64);
- 执行命令,php -help,查看命令帮助 (启动PHP内置的 web 服务器)
C:\Users\aaron>php -help
Usage: php [options] [-f] <file> [--] [args...]
   php [options] -r <code> [--] [args...]
   php [options] [-B <begin_code>] -R <code> [-E <end_code>] [--] [args...]
   php [options] [-B <begin_code>] -F <file> [-E <end_code>] [--] [args...]
   php [options] -S <addr>:<port> [-t docroot] [router]
   php [options] -- [args...]
   php [options] -a

  -a               Run as interactive shell
  -c <path>|<file> Look for php.ini file in this directory
  -n               No configuration (ini) files will be used
  -d foo[=bar]     Define INI entry foo with value 'bar'
  -e               Generate extended information for debugger/profiler
  -f <file>        Parse and execute <file>.
  -h               This help
  -i               PHP information
  -l               Syntax check only (lint)
  -m               Show compiled in modules
  -r <code>        Run PHP <code> without using script tags <?..?>
  -B <begin_code>  Run PHP <begin_code> before processing input lines
  -R <code>        Run PHP <code> for every input line
  -F <file>        Parse and execute <file> for every input line
  -E <end_code>    Run PHP <end_code> after processing all input lines
  -H               Hide any passed arguments from external tools.
  -S <addr>:<port> Run with built-in web server.
  -t <docroot>     Specify document root <docroot> for built-in web server.
  -s               Output HTML syntax highlighted source.
  -v               Version number
  -w               Output source with stripped comments and whitespace.
  -z <file>        Load Zend extension <file>.

  args...          Arguments passed to script. Use -- args when first argument
                   starts with - or script is read from stdin

  --ini            Show configuration file names

  --rf <name>      Show information about function <name>.
  --rc <name>      Show information about class <name>.
  --re <name>      Show information about extension <name>.
  --rz <name>      Show information about Zend extension <name>.
  --ri <name>      Show configuration for extension <name>.
好了,这就说明我们的环境变量配置成功了,接下来我们启动PHP 5.4+版本自带的内置的 web 服务器,这样你就可以不用安装和配置功能齐全的 Web 服务器,就可以开始学习 PHP,省去配置服务器的麻烦,从-help命令看到启动内置服务器的命令如下:
php [options] -S <addr>:<port> [-t docroot] [router]启动localhost:8080,文件目录为E:\0Develop\php\workspace\myPHP的内置Web服务器:
C:\Users\aaron>php -S localhost:8080 -t E:\0Develop\php\workspace\myPHP
PHP 7.1.10 Development Server started at Thu Oct 12 15:02:19 2017
Listening on http://localhost:8080
Document root is E:\0Develop\php\workspace\myPHP
Press Ctrl-C to quit.
[Thu Oct 12 15:02:22 2017] ::1:58216 [404]: /php - No such file or directory
[Thu Oct 12 15:02:27 2017] ::1:58220 [404]: / - No such file or directory启动成功,在浏览器地址栏输入http://localhost:8080,即可访问。
如果你需要将生产环境部署在 Windows 上,那 IIS7 将会提供最稳定和最佳的性能。你可以使用 phpmanager(IIS7 的图形化插件) 让你简单的设置并管理 PHP。IIS7 也有内置的 FastCGI ,你只需要将 PHP 配置为它的处理器即可。更多详情请见dedicated area on iis.net。
一般情况下,使用不同环境开发,会导致你在上线代码时出现 Bug。如果你在 Window 下开发将会用于 Linux 下运行的代码,请应该考虑使用虚拟机。
版本
C:\Users\aaron>php -version
PHP 7.1.10 (cli) (built: Sep 26 2017 20:04:32) ( ZTS MSVC14 (Visual C++ 2015) x64 )
Copyright (c) 1997-2017 The PHP Group
Zend Engine v3.1.0, Copyright (c) 1998-2017 Zend Technologies
Hello World!
在E:\0Develop\php\workspace\myPHP目录下,创建hello.php文件,内容为下面代码
<?php
echo "Hello world!";
?>然后在浏览器地址栏输入:http://localhost:8080/hello.php
就可以看到打印Hello world!字样了
查看版本
phpinfo()
一个很简单的办法就是phpinfo();
启动PHP内置的Web服务器,执行下述代码:
将上述hello.php调整下
<?php
phpinfo();
?>访问:http://localhost:8080/hello.php
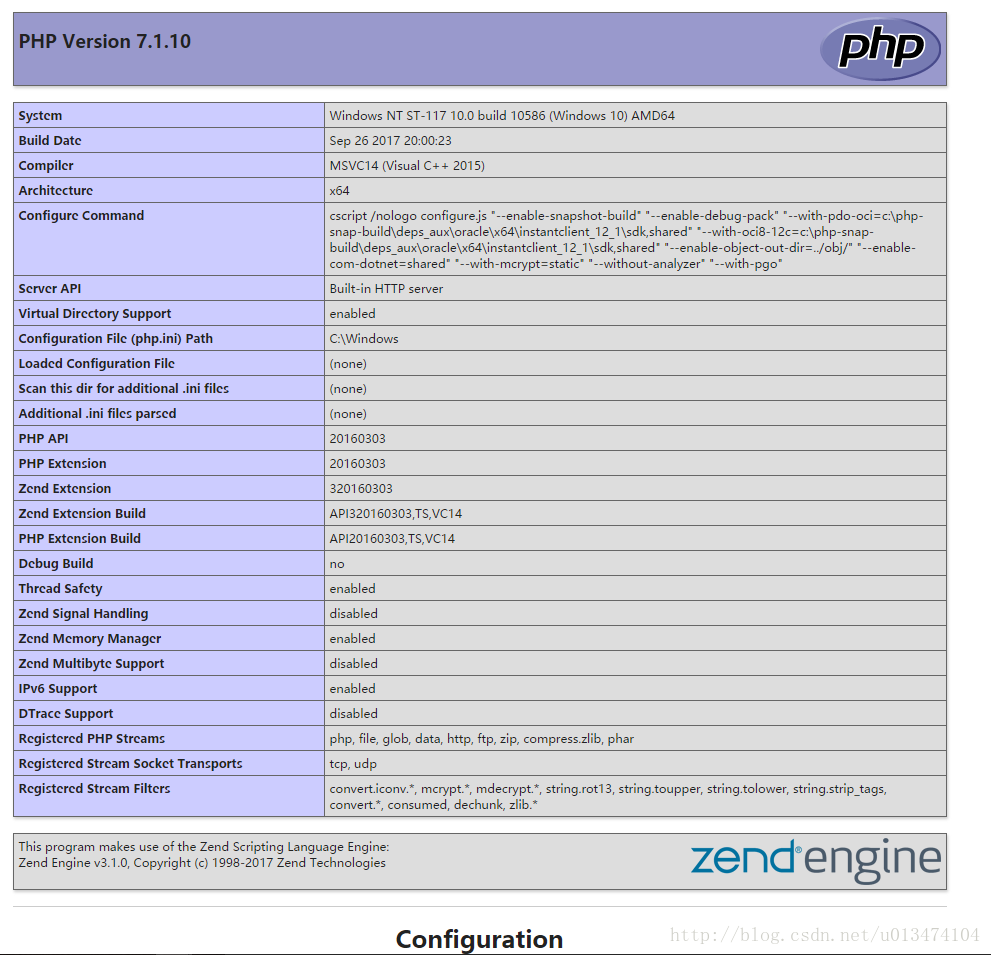
Thread Safety disabled是NTS,enabled是TS,也可以从PHP Extension Build:API20160303,TS,VC14,看得出VC运行库版本是VC14,是TS(Thread Safety)等信息
PHP v7版本中弃用不推荐使用的功能介绍
https://stackoverflow.com/questions/34903896/what-happened-to-php-mysql-dll
https://wiki.php.net/rfc/remove_deprecated_functionality_in_php7
重要的一点,mysql数据库链接弃用
ext / mysql(从PHP 5.5起;使用ext / mysqli或ext / pdo_mysql)
也就是,php_mysql.dll在php根目录/ext/目录从PHP 5.5起已经被删除,已经被php_pdo_mysql.dll和php_mysqli.dll替换
配置扩展程序
PHP 7不推荐使用以下扩展程序
ext/ereg (since PHP 5.3; use ext/pcre instead) REMOVED (PECL extension)
ext/mysql (since PHP 5.5; use ext/mysqli or ext/pdo_mysql instead) REMOVED (PECL extension)
配置mysql扩展程序
参考http://blog.csdn.net/u013474104/article/details/78336084
PHP运行模式
- CGI(通用网关接口 / Common Gateway Interface)
- FastCGI(常驻型CGI / Long-Live CGI)
- CLI(命令行运行 / Command Line Interface)
- Web模块模式(Apache等Web服务器运行的模式)
ISAPI(Internet Server Application Program Interface)
备注:在PHP5.3以后,PHP不再有ISAPI模式
CGI是个协议,跟进程什么的没关系。那fastcgi又是什么呢?Fastcgi是用来提高CGI程序性能的。
转载了一些好文章,有空再自己分析总结了
- PHP内核了解:生命周期及运行模式
- php的几种运行模式CLI、CGI、FastCGI、mod_php
- PHP运行模式
- PHP运行模式详解
- [技术探讨-服务器 : PHP] PHP的运行模式
- php运行的几种运行方式
- php运行模式
服务器与部署
待续…
等用到再写了-_-“`


 211
211


 被折叠的 条评论
为什么被折叠?
被折叠的 条评论
为什么被折叠?
 到【灌水乐园】发言


