索智R16点亮ov2640.txt
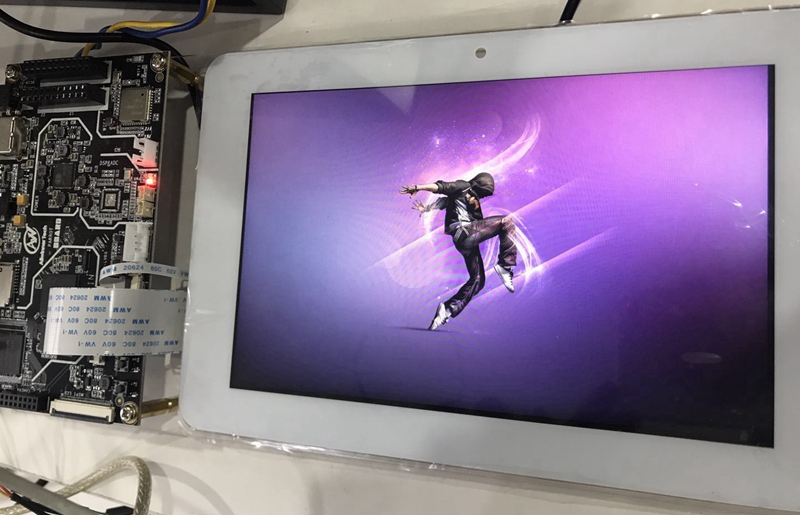
开发板:深圳市索智科技有限公司SC3817R开发板,全志R16(CPU:Quad-Core Cortex-A7 CPU)
全志官网R16的简介
android4.4.2/linux3.4.39
2016/7/18 16:38
1、配置ov2640在android层配置的分辨率为vga(预览/拍照/录像)
注意:系统自带的快拍APP就在这里查找分辨率参数发送到camera的HAL层。
这里得分辨率设置为:1280x720
驱动里面搜索可以设置为:1600x1200, 1280x960, 1024x768, 1280x720, 800x600(出错), 640x480
R:\wyb\test_ov2640_r16\android\device\softwinner\astar-evb20\configs\camera.cfg
;-------------------------------------------------------------------------------
; 用于camera的配置
;
; 采用格式:
; key = key_value
; 注意: 每个key需要顶格写;
; key_value紧跟着key后面的等号后面, 位于同一行中;
; key_value限制大小为256字节以内;
;
;-------------------------------------------------------------------------------
;-------------------------------------------------------------------------------
; exif information of "make" and "model"
;-------------------------------------------------------------------------------
key_camera_exif_make = MAKE_A31S
key_camera_exif_model = MODEL_A31ST
;-------------------------------------------------------------------------------
; 1 for single camera, 2 for double camera
;-------------------------------------------------------------------------------
number_of_camera = 1
;-------------------------------------------------------------------------------
; CAMERA_FACING_BACK
; gc0307 ov2640
;-------------------------------------------------------------------------------
camera_id = 0
;-------------------------------------------------------------------------------
; 1 for CAMERA_FACING_FRONT
; 0 for CAMERA_FACING_BACK
;-------------------------------------------------------------------------------
camera_facing = 0
;-------------------------------------------------------------------------------
; 1 for camera without isp(using built-in isp of Axx)
; 0 for camera with isp
;-------------------------------------------------------------------------------
use_builtin_isp = 0
;-------------------------------------------------------------------------------
; camera orientation (0, 90, 180, 270)
;-------------------------------------------------------------------------------
camera_orientation = 90
;-------------------------------------------------------------------------------
; driver device name
;-------------------------------------------------------------------------------
camera_device = /dev/video0
;-------------------------------------------------------------------------------
; device id
; for two camera devices with one CSI
;-------------------------------------------------------------------------------
device_id = 0
used_preview_size = 1
key_support_preview_size = 1600x1200, 1280x960, 1024x768, 1280x720, 800x600, 640x480
key_default_preview_size = 1280x720
used_picture_size = 1
key_support_picture_size = 1600x1200, 1280x960, 1024x768, 1280x720, 800x600, 640x480
key_default_picture_size = 1600x1200
used_flash_mode = 0
key_support_flash_mode = on,off,auto
key_default_flash_mode = on
used_color_effect=0
key_support_color_effect = none,mono,negative,sepia,aqua
key_default_color_effect = none
used_frame_rate = 1
key_support_frame_rate = 10
key_default_frame_rate = 10
used_focus_mode = 0
key_support_focus_mode = auto,infinity,macro,fixed,continuous-video,continuous-picture
key_default_focus_mode = auto
used_scene_mode = 0
key_support_scene_mode = auto,portrait,landscape,night,night-portrait,theatre,beach,snow,sunset,steadyphoto,fireworks,sports,party,candlelight,barcode
key_default_scene_mode = auto
used_white_balance = 0
key_support_white_balance = auto,incandescent,fluorescent,warm-fluorescent,daylight,cloudy-daylight
key_default_white_balance = auto
used_exposure_compensation = 1
key_max_exposure_compensation = 3
key_min_exposure_compensation = -3
key_step_exposure_compensation = 1
key_default_exposure_compensation = 0
2、没有/dev/video1,只有/dev/video0
R:\wyb\test_ov2640_r16\android\device\softwinner\astar-evb20\ueventd.sun8i.rc
/dev/video0 0666 media media
#/dev/video1 0666 media media
3、在init.rc(init.sun8i.rc)中加载ov2640.ko这个驱动模块。
R:\wyb\test_ov2640_r16\android\device\softwinner\astar-evb20\init.sun8i.rc
#csi module
insmod /system/vendor/modules/videobuf-core.ko
insmod /system/vendor/modules/videobuf-dma-contig.ko
insmod /system/vendor/modules/cam_detect.ko
#insmod /system/vendor/modules/actuator.ko
#insmod /system/vendor/modules/ad5820_act.ko
insmod /system/vendor/modules/cci.ko
insmod /system/vendor/modules/vfe_os.ko
insmod /system/vendor/modules/vfe_subdev.ko
#insmod /system/vendor/modules/gc0307.ko
#insmod /system/vendor/modules/ov2035.ko
insmod /system/vendor/modules/ov2640.ko
insmod /system/vendor/modules/vfe_v4l2.ko
启动之后实际加载的摄像头的驱动模块:
shell@astar-evb20:/ $ lsmod
gt82x 9849 0 - Live 0x00000000
bma250 7848 0 - Live 0x00000000
sunxi_schw 12559 0 - Live 0x00000000 (O)
rtl8150 9023 0 - Live 0x00000000
sunxi_keyboard 3021 0 - Live 0x00000000
sw_device 13916 0 - Live 0x00000000
vfe_v4l2 445444 0 - Live 0x00000000
ov2640 11637 0 - Live 0x00000000
vfe_subdev 4523 2 vfe_v4l2,ov2640, Live 0x00000000
vfe_os 3951 2 vfe_v4l2,vfe_subdev, Live 0x00000000
cci 21775 2 vfe_v4l2,ov2640, Live 0x00000000
videobuf_dma_contig 5567 1 vfe_v4l2, Live 0x00000000
videobuf_core 16520 2 vfe_v4l2,videobuf_dma_contig, Live 0x00000000
bcm_btlpm 7442 0 - Live 0x00000000
bcmdhd 629907 0 - Live 0x00000000
mali 209490 25 - Live 0x00000000 (O)
lcd 41263 0 - Live 0x00000000
disp 992816 8 mali,lcd, Live 0x00000000
nand 282774 0 - Live 0x00000000 (O)
shell@astar-evb20:/ $
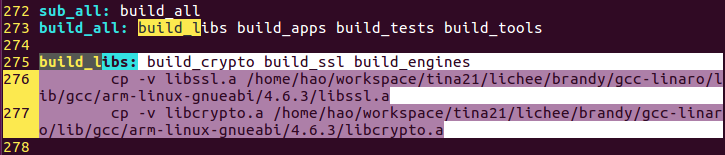
4、驱动程序:ov2640.c及其V4L2的适配层。
配置ov2640.c的编译选项,只需要修改device目录中的Makefile打开ov2640即可:
R:\wyb\test_ov2640_r16\lichee\linux-3.4\drivers\media\video\sunxi-vfe\device\ov2640.c
R:\wyb\test_ov2640_r16\lichee\linux-3.4\drivers\media\video\sunxi-vfe\device\Makefile
obj-m += ov2640.o
R:\wyb\test_ov2640_r16\lichee\linux-3.4\drivers\media\video\sunxi-vfe\Kconfig
R:\wyb\test_ov2640_r16\lichee\linux-3.4\drivers\media\video\sunxi-vfe\Makefile
5、
R:\wyb\test_ov2640_r16\lichee\tools\pack\chips\sun8iw5p1\configs\evb-20\sys_config.fex
;--------------------------------------------------------------------------------
;vip (video input port) configuration
;vip_used: 0:disable 1:enable
;vip_mode: 0:sample one interface to one buffer 1:sample two interface to one buffer
;vip_dev_qty: The quantity of devices linked to capture bus
;
;vip_define_sensor_list: If you want use sensor detect function, please set vip_define_sensor_list = 1, and
; verify that file /system/etc/hawkview/sensor_list_cfg.ini is properly configured!
;
;vip_dev(x)_pos: sensor position, "rear" or "front", if vip_define_sensor_list = 1,vip_dev(x)_pos must be configured!
;
;vip_dev(x)_isp_used 0:not use isp 1:use isp
;vip_dev(x)_fmt: 0:yuv 1:bayer raw rgb
;vip_dev(x)_stby_mode: 0:not shut down power at standby 1:shut down power at standby
;vip_dev(x)_vflip: flip in vertical direction 0:disable 1:enable
;vip_dev(x)_hflip: flip in horizontal direction 0:disable 1:enable
;vip_dev(x)_iovdd: camera module io power handle string, pmu power supply
;vip_dev(x)_iovdd_vol: camera module io power voltage, pmu power supply
;vip_dev(x)_avdd: camera module analog power handle string, pmu power supply
;vip_dev(x)_avdd_vol: camera module analog power voltage, pmu power supply
;vip_dev(x)_dvdd: camera module core power handle string, pmu power supply
;vip_dev(x)_dvdd_vol: camera module core power voltage, pmu power supply
;vip_dev(x)_afvdd: camera module vcm power handle string, pmu power supply
;vip_dev(x)_afvdd_vol: camera module vcm power voltage, pmu power supply
;x indicates the index of the devices which are linked to the same capture bus
;fill voltage in uV, e.g. iovdd = 2.8V, vip_devx_iovdd_vol = 2800000
;fill handle string as below:
;axp22_eldo3
;axp22_dldo4
;axp22_eldo2
;fill handle string "" when not using any pmu power supply
;--------------------------------------------------------------------------------
[csi0]
vip_used = 1
vip_mode = 0
vip_dev_qty = 1
vip_define_sensor_list = 0
vip_csi_pck = port:PE00
vip_csi_mck = port:PE01
vip_csi_hsync = port:PE02
vip_csi_vsync = port:PE03
vip_csi_d0 = port:PE04
vip_csi_d1 = port:PE05
vip_csi_d2 = port:PE06
vip_csi_d3 = port:PE07
vip_csi_d4 = port:PE08
vip_csi_d5 = port:PE09
vip_csi_d6 = port:PE10
vip_csi_d7 = port:PE11
vip_csi_sck = port:PE12
vip_csi_sda = port:PE13
;vip_dev0_mname = "ov5640"
vip_dev0_mname = "ov2640"
vip_dev0_pos = "rear"
vip_dev0_lane = 1
vip_dev0_twi_id = 2
;vip_dev0_twi_addr = 0x78
vip_dev0_twi_addr = 0x60
vip_dev0_isp_used = 0
vip_dev0_fmt = 0
vip_dev0_stby_mode = 0
vip_dev0_vflip = 0
vip_dev0_hflip = 0
vip_dev0_iovdd = "axp22_dldo3"
vip_dev0_iovdd_vol = 3300000
vip_dev0_avdd = ""
vip_dev0_avdd_vol = 3300000
vip_dev0_dvdd = ""
vip_dev0_dvdd_vol = 1800000
vip_dev0_afvdd = ""
vip_dev0_afvdd_vol = 3300000
vip_dev0_power_en =
vip_dev0_reset = port:PE14
vip_dev0_pwdn = port:PE15
vip_dev0_flash_en =
vip_dev0_flash_mode =
vip_dev0_af_pwdn =
6、开发板上摄像头的I2C挂载在TWI2上面了,逻辑是需要打开的(但是不打开也能够用,很奇怪!):
;----------------------------------------------------------------------------------
;i2c configuration
; twi_used = twix enable
;----------------------------------------------------------------------------------
[twi0]
twi_used = 1
twi_scl = port:PH02
twi_sda = port:PH03
[twi1]
twi_used = 1
twi_scl = port:PH04
twi_sda = port:PH05
[twi2]
twi_used = 0
twi_scl = port:PE12
twi_sda = port:PE13
直接配置摄像头的I2C了:
vip_csi_sck = port:PE12
vip_csi_sda = port:PE13
不过奇怪的是,摄像头并没有向其它平台那样生成这个设备节点:
/sys/class/i2c-adapter/i2c-2/2-0030
shell@octopus-f1:/ $
shell@octopus-f1:/ $ cd /sys/class/i2c-adapter/i2c-2/
shell@octopus-f1:/sys/class/i2c-adapter/i2c-2 $
shell@octopus-f1:/sys/class/i2c-adapter/i2c-2 $ ll
drwxr-xr-x root root 1970-01-02 08:06 2-003b
--w------- root root 4096 1970-01-02 08:06 delete_device
lrwxrwxrwx root root 1970-01-02 08:06 device -> ../../twi.2
-r--r--r-- root root 4096 1970-01-02 08:06 name
--w------- root root 4096 1970-01-02 08:06 new_device
drwxr-xr-x root root 1970-01-02 08:06 power
lrwxrwxrwx root root 1970-01-02 08:06 subsystem -> ../../../../bus/i2c
-rw-r--r-- root root 4096 1970-01-02 08:06 uevent
shell@octopus-f1:/sys/class/i2c-adapter/i2c-2 $
可能是ov2640的驱动程序不完整,没有通过i2c_detect来注册2-0030这个节点。
直接在驱动程序中读取I2C,还是对的。device ID = 0x2642。
7、奇葩的问题:
摄像头使用的是:
http://www.waveshare.net/shop/OV2640-Camera-Board.htm
OV2640 Camera Board
vsync=15HZ,XCLK=24MHZ。href/pclk都有
camera打开摄像头是绿色屏幕(VGA分辨率),但是右上角貌似出来一点点图像。
后来使用示波器的探头挂在vsync之后,图像正常。
由于开发板和摄像头模组ov2640是飞线链接,硬件另外接了一个地,然后用纸胶布将地线和vsync捆绑在在一起,解决问题。
刚开始摄像头的3.3V电源使用的是g-sensor的(VCC-3V0),看见图像出现竖条纹(电源纹波干扰),接回来(VCC-3V0-CSI)就正常了。


 本文介绍了在R16开发板上使用Tina SDK V2.1进行LCD屏幕的配置与测试,包括环境准备、LCD基本参数、编译流程以及Framebuffer的测试代码和汉字显示原理。通过测试代码展示了在Linux系统下操作Framebuffer显示字符和汉字的方法。

 最低0.47元/天 解锁文章


 2850
2850

 被折叠的 条评论
为什么被折叠?
被折叠的 条评论
为什么被折叠?
 到【灌水乐园】发言


