


Scroller了解
Scroller是一个专门用于处理滚动效果的工具类,可能在大多数情况下,直接使用Scroller的场景并不多,但是很多大家所熟知的控件在内部都是使用Scroller来实现的,如ViewPager、ListView等。
两个基本的函数
    先撇开Scroller类不谈,其实任何一个控件都是可以滚动的,因为在View类当中有scrollTo()和scrollBy()这两个方法。这两个方法都是用于对View内容进行滚动的。
     1. scrollBy()方法是让View内容相对于当前的位置滚动某段距离。
     2. scrollTo()方法则是让View内容相对于初始的位置滚动某段距离。
     3. 这两个方法都是让控件的内容滚动,而不是控件本身移动。
     4. 如果要让控件移动,则调用父布局的scrollBy或者scrollTo方法
小结:scrollTo()方法是让View相对于初始的位置滚动某段距离,由于View的初始位置是不变的,因此不管我们点击多少次scrollTo按钮滚动到的都将是同一个位置。而scrollBy()方法则是让View相对于当前的位置滚动某段距离,那每当我们点击一次scrollBy按钮,View的当前位置都进行了变动,因此不停点击会一直移动。
getScrollY()与getScrollX()源码
mScrollX:表示离视图起始位置的x水平方向的偏移量
mScrollY:表示离视图起始位置的y垂直方向的偏移量
分别通过getScrollX() 和getScrollY()方法获得。
mScrollX和mScrollY指的并不是坐标,而是偏移量。
    /**
     * The offset, in pixels, by which the content of this view is scrolled
     * horizontally.
     * {@hide}
     * X轴方向上的偏移量
     */
    @ViewDebug.ExportedProperty(category = "scrolling")
    protected int mScrollX;
    /**
     * The offset, in pixels, by which the content of this view is scrolled
     * vertically.
     * {@hide}
     * Y轴方向上的偏移量
     */
    @ViewDebug.ExportedProperty(category = "scrolling")
    protected int mScrollY;


     /**
     * Return the scrolled left position of this view. This is the left edge of
     * the displayed part of your view. You do not need to draw any pixels
     * farther left, since those are outside of the frame of your view on
     * screen.
     *
     * @return The left edge of the displayed part of your view, in pixels.
     */
    public final int getScrollX() {
        return mScrollX;
    }

    /**
     * Return the scrolled top position of this view. This is the top edge of
     * the displayed part of your view. You do not need to draw any pixels above
     * it, since those are outside of the frame of your view on screen.
     *
     * @return The top edge of the displayed part of your view, in pixels.
     */
    public final int getScrollY() {
        return mScrollY;
    }
scrollTo()和scrollBy()的源码
- scrollTo(int x,int y):如果偏移位置发生了改变,就会给mScrollX和mScrollY赋新值,改变当前位置。注意:x,y代表的不是坐标点,而是偏移量。例如:我要移动view到坐标点(100,100),那么我的偏移量就是(0,,0) - (100,100) = (-100 ,-100) ,我就要执行view.scrollTo(-100,-100),达到这个效果。
- scrollBy(int x,int y):从源码中看出,它实际上是调用了scrollTo(mScrollX + x, mScrollY + y);mScrollX + x和mScrollY + y,即表示在原先偏移的基础上在发生偏移,通俗的说就是相对我们当前位置偏移。
- 两个scroll方法中传入的参数,第一个参数x表示相对于当前位置横向移动的距离,正值向左移动,负值向右移动,单位是像素。第二个参数y表示相对于当前位置纵向移动的距离,正值向上移动,负值向下移动,单位是像素。
偏移量: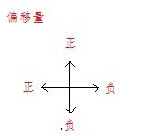
- 知道了scrollTo()和scrollBy()的意义,那么举个例子如果想把View从(0, 0)移动到(100, 100)。注意,这里说的(0, 0)和(100, 100),指的是View左上角的坐标。那么偏移量就是原点(0, 0)到目标点(100, 100)的距离,即(0 , 0) - (100, 100) = (-100, -100)。
只需要调用SView.scrollTo(-100, -100)就可以了。注意,scrollTo(int x, int y)的两个参数x和y,代表的是偏移量,这时的参照物是(0, 0)点。
然而,scrollBy()是有一定的区别的。scrollBy()的参照物是(0, 0)点加上偏移量之后的坐标。
这么描述比较抽象,举个例子。假设SView调用了scrollTo(-100, -100),此时SView左上角的坐标是(100, 100),这时再调用scrollBy(-20, -20),此时SView的左上角就被绘制到了(120, 120)这个位置。
总结一下,scrollTo()是一步到位,而scrollBy()是逐步累加。
    /**
     * Set the scrolled position of your view. This will cause a call to
     * {@link #onScrollChanged(int, int, int, int)} and the view will be
     * invalidated.
     * @param x the x position to scroll to
     * @param y the y position to scroll to
     */
    public void scrollTo(int x, int y) {
        if (mScrollX != x || mScrollY != y) {
            int oldX = mScrollX;
            int oldY = mScrollY;
            mScrollX = x;
            mScrollY = y;
            onScrollChanged(mScrollX, mScrollY, oldX, oldY);
            if (!awakenScrollBars()) {
                invalidate();
            }
        }
    }
    /**
     * Move the scrolled position of your view. This will cause a call to
     * {@link #onScrollChanged(int, int, int, int)} and the view will be
     * invalidated.
     * @param x the amount of pixels to scroll by horizontally
     * @param y the amount of pixels to scroll by vertically
     */
    public void scrollBy(int x, int y) {
        scrollTo(mScrollX + x, mScrollY + y);
    }
Scroller
但是现在还有一个问题,目前使用这两个方法完成的滚动效果是跳跃式的,没有任何平滑滚动的效果。只靠scrollTo()和scrollBy()这两个方法是很难完成类似ViewPager这样的效果的,因此我们还需要借助另外一个关键性的工具,Scroller。
Scroller的基本用法其实还是比较简单的,主要可以分为以下几个步骤:
1. 创建Scroller的实例
2. 调用startScroll()方法来初始化滚动数据并刷新界面
3. 重写computeScroll()方法,并在其内部完成平滑滚动的逻辑
4. startScroll()方法接收五个参数,第一个参数是滚动开始时X的坐标,第二个参数是滚动开始时Y的坐标,第三个参数是横向滚动的距离,正值表示向左滚动,第四个参数是纵向滚动的距离,正值表示向上滚动,第五个参数是时间,可以设置跟偏移的距离一样或者一半等,这样就不会很快。
注意:调用startScroll()方法后,必须手动invalidate()刷新界面,否则不会起作用。还有,必须重写computeScroll()方法,否则看不到预期的效果;(这个方法会在华滑动过程会多次调用)
  @Override
    public void computeScroll() {
        // 第三步,重写computeScroll()方法,并在其内部完成平滑滚动的逻辑
        if (mScroller.computeScrollOffset()) {
            scrollTo(mScroller.getCurrX(), mScroller.getCurrY());
            invalidate();
        }
    }
参考:
http://blog.csdn.net/guolin_blog/article/details/48719871
http://blog.csdn.net/manoel/article/details/39228593
http://blog.csdn.net/vipzjyno1/article/details/24577023


 被折叠的 条评论
为什么被折叠?
被折叠的 条评论
为什么被折叠?
 到【灌水乐园】发言


