翻译自:How To Create a PDF with Quartz 2D in iOS 5 – Part 2
在第一部分,我们为PDF创建了框架,使用Quartz 2D绘制了基本的文字和线条。
由于我们的PDF是一个发票文档,所以它需要看起来专业些。为了完成这个任务,在第二部分,我们加上一个logo图片,并画上一个图标来显示发票的数据。在文章的结尾,我们的PDF将会完成。
我们继续吧!
添加图片
我们要画的 PDF 图像是的 RayWenderlich.com 标志。Ray的计划是接管全世界!
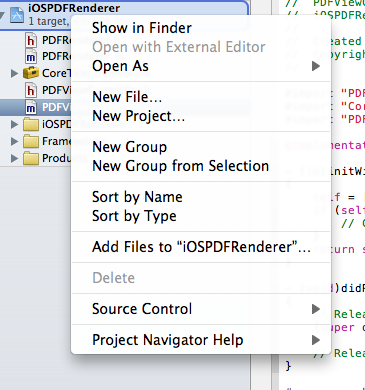
下载图片并继续,把图片加入到工程中。为了做到这一点,在工程导航栏上,按住Ctrl键点击PDFRenderer分组,选择“Add Files To iOSPDFRenderer”。选择下载的“ray-logo.png”图片,点击添加。
然后打开PDFRenderer.m,加上如下的方法:
 +(void)drawImage:(UIImage*)image inRect:(CGRect)rect
 {

    [image drawInRect:rect];

 }
是的,使用Core Graphics绘制图片很简单。所有我们需要的是一行代码,把图像绘制到当前上下文。
这个方法需要的是我们想要绘制的图片和它绘制位置的frame大小,并把图片绘制到上下文。
然后在PDFRenderer.h中声明:
+(void)drawImage:(UIImage*)image inRect:(CGRect)rect;
现在我们需要调用该方法来显示PDF。将下列代码行添加到 PDFRenderer.m 文件 drawPDF 方法中(UIGraphicsEndPDFContext前):
+(void)drawPDF:(NSString*)fileName
 {
    // Create the PDF context using the default page size of 612 x 792.
    UIGraphicsBeginPDFContextToFile(fileName, CGRectZero, nil);
    // Mark the beginning of a new page.
    UIGraphicsBeginPDFPageWithInfo(CGRectMake(0, 0, 612, 792), nil);

    [self drawText];

    CGPoint from = CGPointMake(0, 0);
    CGPoint to = CGPointMake(200, 300);
    [PDFRenderer drawLineFromPoint:from toPoint:to];

    UIImage* logo = [UIImage imageNamed:@"ray-logo.png"];
    CGRect frame = CGRectMake(20, 100, 300, 60);

    [PDFRenderer drawImage:logo inRect:frame];

    // Close the PDF context and write the contents out.
    UIGraphicsEndPDFContext();
 }
现在在模拟器中运行应用程序,你会发现与第一部分的PDF类似,只是多了Ray的logo。当然,它仍然看起来很差劲。是时候解决它了!
绘制标签
现在,我们已经知道了如何绘制发票的基本元素:文本、线条和图像。下一步是将所有的元素结合起来,来创建一个优美的布局。
为了做到这一点,我们将使用一个小技巧。我们使用interface builder创建一个视图,并在视图上添加发票的元素。然后,我们将布局视图的位置。
不使用硬编码来绘图,而是可视化的布局PDF,这将使事情容易得多。别担心,这样做是有道理的!
选择File\New\New创建一个新文件,选择iOS\User Interface\View模板,点击next。确保要选择Device family为iPhone,然后下一步。
把新的view命名为InvoiceView,点击Create。在Interface Builder中选择view,点击backspace按钮,删除它。
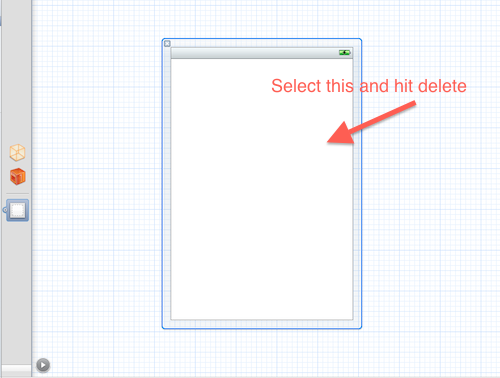
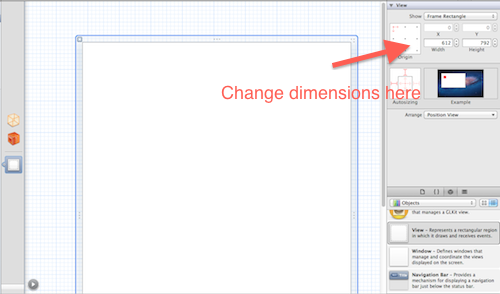
从Objects标签栏中,添加一个新的View到画布上。把view的大小调整为612宽,792高。这是A4 PDF文件的默认尺寸。
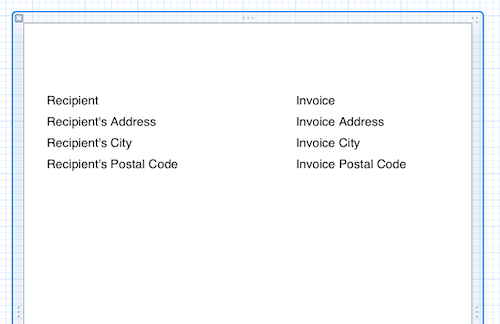
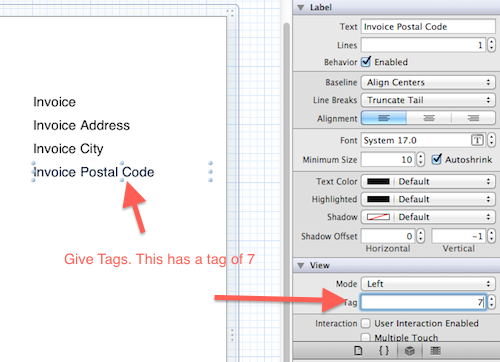
添加8个标签到view上,并如下的方法命名:
- Recipient [Name]
- Recipient’s Address
- Recipient,s City
- Recipient,s Postal Code
- Invoicer [Name]
- Invoicer’s Address
- Invoicer’s City
- Invoicer’s Postal Code
这些标签的位置将形成我们的发票的布局。给每个标签的tag值为0-7.例如,标签“Recipient”的tag值为0,“Recipient’s Address”的tag值为1,如此类推。
我们已布局玩视图。稍后我们将做稍微的修改。
打开PDFRenderer.m文件,重构drawText方法。我们要传递要绘制的文本和它的frame大小,而不是写死它。
使用如下的代码替换drawText方法(差不多一样除了不写死字符串和frame):
 +(void)drawText:(NSString*)textToDraw inFrame:(CGRect)frameRect
 {
    CFStringRef stringRef = (__bridge CFStringRef)textToDraw;
    // Prepare the text using a Core Text Framesetter.
    CFAttributedStringRef currentText = CFAttributedStringCreate(NULL, stringRef, NULL);
    CTFramesetterRef framesetter = CTFramesetterCreateWithAttributedString(currentText);

    CGMutablePathRef framePath = CGPathCreateMutable();
    CGPathAddRect(framePath, NULL, frameRect);

    // Get the frame that will do the rendering.
    CFRange currentRange = CFRangeMake(0, 0);
    CTFrameRef frameRef = CTFramesetterCreateFrame(framesetter, currentRange, framePath, NULL);
    CGPathRelease(framePath);

    // Get the graphics context.
    CGContextRef    currentContext = UIGraphicsGetCurrentContext();

    // Put the text matrix into a known state. This ensures
    // that no old scaling factors are left in place.
    CGContextSetTextMatrix(currentContext, CGAffineTransformIdentity);

    // Core Text draws from the bottom-left corner up, so flip
    // the current transform prior to drawing.
    CGContextTranslateCTM(currentContext, 0, 100);
    CGContextScaleCTM(currentContext, 1.0, -1.0);

    // Draw the frame.
    CTFrameDraw(frameRef, currentContext);

    CFRelease(frameRef);
    CFRelease(stringRef);
    CFRelease(framesetter);
 }
在PDFRenderer.h文件中,定义它:
+(void)drawText:(NSString*)textToDraw inFrame:(CGRect)frameRect;
下一步是从InvoiceView中加载标签,并使用text和frame来绘制PDF。在drawPDF的上面加入如下新方法:
+(void)drawLabels
 {
   NSArray* objects = [[NSBundle mainBundle] loadNibNamed:@"InvoiceView" owner:nil options:nil];

    UIView* mainView = [objects objectAtIndex:0];

    for (UIView* view in [mainView subviews]) {
        if([view isKindOfClass:[UILabel class]])
        {
            UILabel* label = (UILabel*)view;

            [self drawText:label.text inFrame:label.frame];
        }
    }
 }
这个方法从InvoiceView中加载标签,遍历所有的标签,调用drawText 方法并传递text和frame变量。
接下来我们修改drawPDF方法,并移除先前的测试的绘制方法。使用如下的代码替换drawPDF 方法:
 +(void)drawPDF:(NSString*)fileName
 {
    // Create the PDF context using the default page size of 612 x 792.
    UIGraphicsBeginPDFContextToFile(fileName, CGRectZero, nil);
    // Mark the beginning of a new page.
    UIGraphicsBeginPDFPageWithInfo(CGRectMake(0, 0, 612, 792), nil);

    [self drawText:@"Hello World" inFrame:CGRectMake(0, 0, 300, 50)];

    [self drawLabels];

    // Close the PDF context and write out the contents.
    UIGraphicsEndPDFContext();
 }
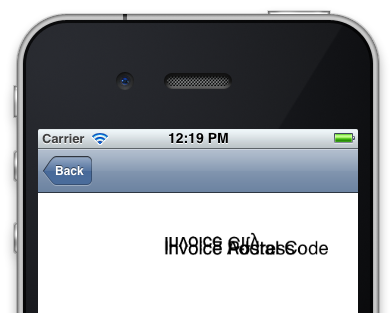
现在让我们来试一试!在模拟器中运行应用程序,你将会看到如下类似的情景:
呀 —它看起来像垃圾,是吗?这是因为在 drawText 方法文本被翻转和移动了多次的缘故。直到现在,我们只绘制一行文本,但是当我们想要绘制多行文本时出现了问题。
要解决此问题,我们需要修改 drawText 方法以翻转当前上下文到其原始坐标。在 drawText 方法中作出如下的改变来添加翻转并返回到其原始坐标:
    // Core Text draws from the bottom-left corner up, so flip
    // the current transform prior to drawing.
    // Modify this to take into consideration the origin.
    CGContextTranslateCTM(currentContext, 0, frameRect.origin.y*2);
    CGContextScaleCTM(currentContext, 1.0, -1.0);

    // Draw the frame.
    CTFrameDraw(frameRef, currentContext);


    // Add these two lines to reverse the earlier transformation.
    CGContextScaleCTM(currentContext, 1.0, -1.0);
    CGContextTranslateCTM(currentContext, 0, (-1)*frameRect.origin.y*2);
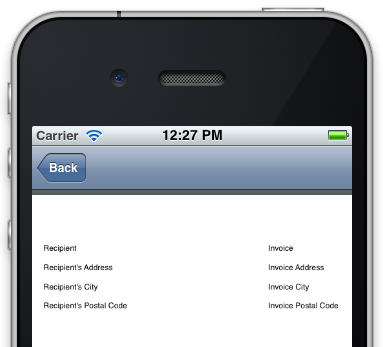
再次运行程序。你将会看到一个布局好的PDF。
添加Logo
接下来,打开InvoiceView.xib文件,在右上角添加一个用于Logo的UIImageView:

在PDFRenderer.m中加入如下的新方法(在drawPDF前):
 +(void)drawLogo
 {
    NSArray* objects = [[NSBundle mainBundle] loadNibNamed:@"InvoiceView" owner:nil options:nil];

    UIView* mainView = [objects objectAtIndex:0];

    for (UIView* view in [mainView subviews]) {
        if([view isKindOfClass:[UIImageView class]])
        {
            UIImage* logo = [UIImage imageNamed:@"ray-logo.png"];
            [self drawImage:logo inRect:view.frame];
        }
    }
 }
这个方法如同加载标签一样从Xib中加载UIImageView。然后,使用UIImageView的坐标系来绘制logo到PDF上。最后,在drawPDF方法中,在drawLabels方法之后调用此方法:
 +(void)drawPDF:(NSString*)fileName
 {
    // Create the PDF context using the default page size of 612 x 792.
    UIGraphicsBeginPDFContextToFile(fileName, CGRectZero, nil);
    // Mark the beginning of a new page.
    UIGraphicsBeginPDFPageWithInfo(CGRectMake(0, 0, 612, 792), nil);

    [self drawText:@"Hello World" inFrame:CGRectMake(0, 0, 300, 50)];

    [self drawLabels];
    [self drawLogo];

    // Close the PDF context and write out the contents.
    UIGraphicsEndPDFContext();
 }
在模拟器中运行程序,你将会看到logo正好在左上角!
借助UIView坐标来布局PDF会很直观,是吗?
绘制Table
添加表格来显示发票信息。我们的表格是由水平线和垂直线组成的。
在这种情况下,我们不会使用到InvoiceView。相反我们将使用一系列的变量,例如表格的高度和宽度、行的高度和列的宽度。
将下面的方法添加到PDFRenderer.m中(在drawPDF方法前):
     +(void)drawTableAt:(CGPoint)origin
        withRowHeight:(int)rowHeight
       andColumnWidth:(int)columnWidth
          andRowCount:(int)numberOfRows
       andColumnCount:(int)numberOfColumns

     {
        for (int i = 0; i <= numberOfRows; i++)
        {
            int newOrigin = origin.y + (rowHeight*i);

            CGPoint from = CGPointMake(origin.x, newOrigin);
            CGPoint to = CGPointMake(origin.x + (numberOfColumns*columnWidth), newOrigin);

            [self drawLineFromPoint:from toPoint:to];
        }
     }

这个方法绘制的是水平线。在这个方法的开头,我们传入了列表的起始位置的值,行和列的值,没行的高度和每列的宽度。
循环计算行的开始位置和结束位置。最后,调用drawLine:from:to方法来绘制线。然后,将如下的代码加入到drawPDF中:

 +(void)drawPDF:(NSString*)fileName
 {
    // Create the PDF context using the default page size of 612 x 792.
    UIGraphicsBeginPDFContextToFile(fileName, CGRectZero, nil);
    // Mark the beginning of a new page.
    UIGraphicsBeginPDFPageWithInfo(CGRectMake(0, 0, 612, 792), nil);

    [self drawText:@"Hello World" inFrame:CGRectMake(0, 0, 300, 50)];

    [self drawLabels];
    [self drawLogo];

    int xOrigin = 50;
    int yOrigin = 300;

    int rowHeight = 50;
    int columnWidth = 120;

    int numberOfRows = 7;
    int numberOfColumns = 4;

    [self drawTableAt:CGPointMake(xOrigin, yOrigin) withRowHeight:rowHeight andColumnWidth:columnWidth andRowCount:numberOfRows andColumnCount:numberOfColumns];

    // Close the PDF context and write the contents out.
    UIGraphicsEndPDFContext();
 }
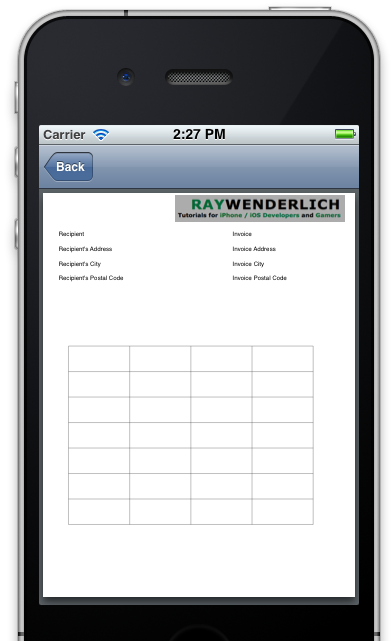
在模拟器中运行,在PDF中你能看到水平线:
下一步是绘制垂直线。在drawTable方法中,在第一个循环的下面加入另一个循环:
 +(void)drawTableAt:(CGPoint)origin
    withRowHeight:(int)rowHeight
   andColumnWidth:(int)columnWidth
      andRowCount:(int)numberOfRows
   andColumnCount:(int)numberOfColumns

 {
    for (int i = 0; i <= numberOfRows; i++)
    {
        int newOrigin = origin.y + (rowHeight*i);

        CGPoint from = CGPointMake(origin.x, newOrigin);
        CGPoint to = CGPointMake(origin.x + (numberOfColumns*columnWidth), newOrigin);

        [self drawLineFromPoint:from toPoint:to];
    }

    for (int i = 0; i <= numberOfColumns; i++)
    {
        int newOrigin = origin.x + (columnWidth*i);

        CGPoint from = CGPointMake(newOrigin, origin.y);
        CGPoint to = CGPointMake(newOrigin, origin.y +(numberOfRows*rowHeight));

        [self drawLineFromPoint:from toPoint:to];
     }
 }
第二个循环,循环计算每条线的开始和结束的位置,并绘制线条到PDF中。
再次运行程序,你回发现我们的table已经完成了!
填充表
我们将一些虚拟数据数组手动添加到我们的表中。你也可以修改来使用用户输入的数据。
在PDFRenderer.m 中加入如下的方法(在drawPDF之前):
+(void)drawTableDataAt:(CGPoint)origin
    withRowHeight:(int)rowHeight
   andColumnWidth:(int)columnWidth
      andRowCount:(int)numberOfRows
   andColumnCount:(int)numberOfColumns
 {
    NSArray* headers = [NSArray arrayWithObjects:@"Quantity", @"Description", @"Unit price", @"Total", nil];
    NSArray* invoiceInfo1 = [NSArray arrayWithObjects:@"1", @"Development", @"$1000", @"$1000", nil];
    NSArray* invoiceInfo2 = [NSArray arrayWithObjects:@"1", @"Development", @"$1000", @"$1000", nil];
    NSArray* invoiceInfo3 = [NSArray arrayWithObjects:@"1", @"Development", @"$1000", @"$1000", nil];
    NSArray* invoiceInfo4 = [NSArray arrayWithObjects:@"1", @"Development", @"$1000", @"$1000", nil];

    NSArray* allInfo = [NSArray arrayWithObjects:headers, invoiceInfo1, invoiceInfo2, invoiceInfo3, invoiceInfo4, nil];

    for(int i = 0; i < [allInfo count]; i++)
    {
        NSArray* infoToDraw = [allInfo objectAtIndex:i];

        for (int j = 0; j < numberOfColumns; j++)
        {

            int newOriginX = origin.x + (j*columnWidth);
            int newOriginY = origin.y + ((i+1)*rowHeight);

            CGRect frame = CGRectMake(newOriginX, newOriginY, columnWidth, rowHeight);

            [self drawText:[infoToDraw objectAtIndex:j] inFrame:frame];
        }
    }
 }
这个代码块创建了列表要使用的数据。第一个数组包含了表头要使用的数据(列表的第一行)。下面的三个数组包含了列表的每行和每列对应的数据。
最后一个数组包含了所有的其它数组的二维数组,来高效的构建表的数据。
之后是两个嵌套的循环,外层循环遍历每一行并提取行的数据。
内层循环计算文本的起始位置,来决定它在表中的起始点。它创建了文本的frame,并在frame中绘制文本。
在drawPDF中调用此方法(在UIGraphicsEndPDFContext之前):
[self drawTableDataAt:CGPointMake(xOrigin, yOrigin) withRowHeight:rowHeight andColumnWidth:columnWidth andRowCount:numberOfRows andColumnCount:numberOfColumns];
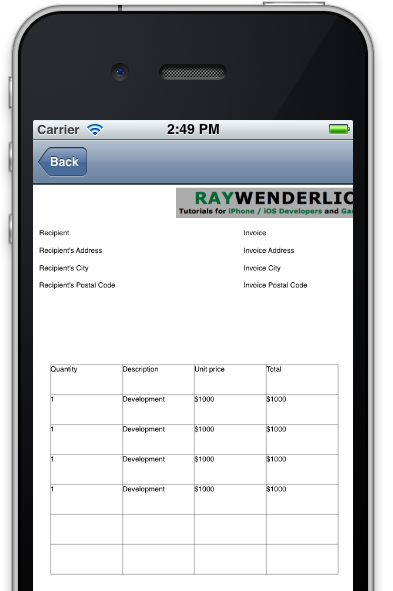
运行程序,你将会看到列表被填充了数据:
看起来不错是吧?但是让我们做一个最后的调整: 我们可以在表行和数据本身之间使用一些边距。
下面是 drawTableAt 方法的最终状态:
+(void)drawTableDataAt:(CGPoint)origin
    withRowHeight:(int)rowHeight
   andColumnWidth:(int)columnWidth
      andRowCount:(int)numberOfRows
   andColumnCount:(int)numberOfColumns
{
    int padding = 10;

    NSArray* headers = [NSArray arrayWithObjects:@"Quantity", @"Description", @"Unit price", @"Total", nil];
    NSArray* invoiceInfo1 = [NSArray arrayWithObjects:@"1", @"Development", @"$1000", @"$1000", nil];
    NSArray* invoiceInfo2 = [NSArray arrayWithObjects:@"1", @"Development", @"$1000", @"$1000", nil];
    NSArray* invoiceInfo3 = [NSArray arrayWithObjects:@"1", @"Development", @"$1000", @"$1000", nil];
    NSArray* invoiceInfo4 = [NSArray arrayWithObjects:@"1", @"Development", @"$1000", @"$1000", nil];

    NSArray* allInfo = [NSArray arrayWithObjects:headers, invoiceInfo1, invoiceInfo2, invoiceInfo3, invoiceInfo4, nil];

    for(int i = 0; i < [allInfo count]; i++)
    {
        NSArray* infoToDraw = [allInfo objectAtIndex:i];

        for (int j = 0; j < numberOfColumns; j++)
        {
            int newOriginX = origin.x + (j*columnWidth);
            int newOriginY = origin.y + ((i+1)*rowHeight);

            CGRect frame = CGRectMake(newOriginX + padding, newOriginY + padding, columnWidth, rowHeight);

            [self drawText:[infoToDraw objectAtIndex:j] inFrame:frame];
        }
    }
}
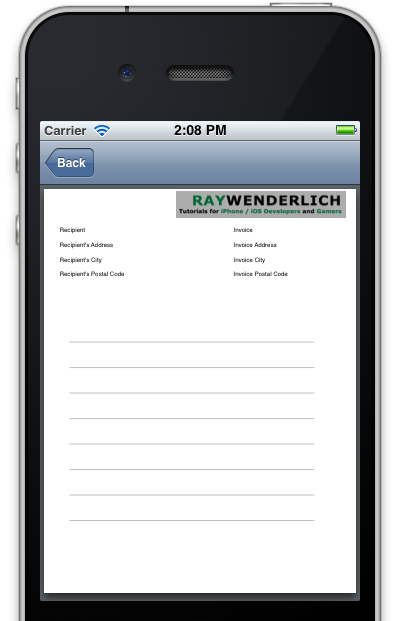
现在我们可以坐下来,欣赏最终发票 PDF,显示图像、 表格和数据。
何去何从
这儿是上述教程的完成代码。




 1521
1521

 被折叠的 条评论
为什么被折叠?


