


在先前的一篇文章"利用Snappy Ubuntu来控制piglow灯光"中,我们已经使用了webserver的方法来控制我们的piglow.在IoT世界里,MQTT信息协议也是用得非常多的一种协议.它是一个轻量级的通信协议.它基于一种订购(subscribe)及发布(publish)的机制.用简单的话说,就像我们的微信公众号一样,我们订购一个公众号,就可以收到所有从这个公众号里发出的消息.MQTT也是同样的道理.如果你想听到一个topic的话语,你可以订购这个topic.然后所有在这个topic中发布的消息,都将被收到.MQTT已经被广泛应用于各种领域,甚至是一些网路环境不是特别好的环境中.它具有使用资源少,传输数据精简,需要的系统功耗低等特点.
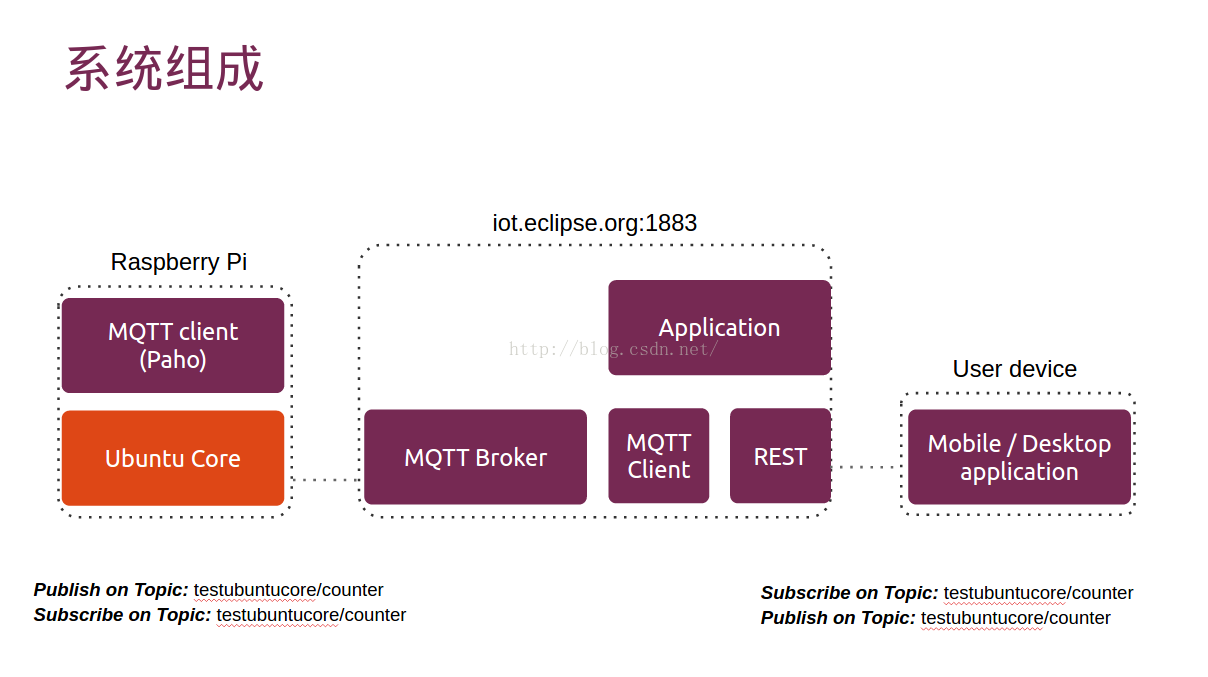
在今天的例程当中,我们将使用MQTT协议来控制我们在树莓派中的piglow灯光.当然,我们也可以从树莓派中得到一些发布的信息信息.我们的系统组成如下:
1)Go client
mqtt-piglow.go
package main

import (
  	"fmt"
 	 //import the Paho Go MQTT library
 	 MQTT "git.eclipse.org/gitroot/paho/org.eclipse.paho.mqtt.golang.git"
 	 "os"
  	"time"
)

const TOPIC = "testubuntucore/counter"

//define a function for the default message handler
var f MQTT.MessageHandler = func(client *MQTT.Client, msg MQTT.Message) {
  	fmt.Printf("Recived TOPIC: %s\n", msg.Topic())
  	fmt.Printf("Received MSG: %s\n", msg.Payload())

	s := string(msg.Payload()[:])
	fmt.Printf("check: %t\n",  (s == "on"))

	if ( s == "on" ) {
		fmt.Println("on is received!")
		TurnAllOn()
	} else if ( s == "off" )  {
		fmt.Println("off is received!")
		GlowOff()
	}
}

func main() {
	//create a ClientOptions struct setting the broker address, clientid, turn
	//off trace output and set the default message handler
	opts := MQTT.NewClientOptions().AddBroker("tcp://iot.eclipse.org:1883")

	opts.SetClientID("go-simple")
	opts.SetDefaultPublishHandler(f)

	//create and start a client using the above ClientOptions
	c := MQTT.NewClient(opts)
	if token := c.Connect(); token.Wait() && token.Error() != nil {
	 	panic(token.Error())
	}

	//subscribe to the topic and request messages to be delivered
	//at a maximum qos of zero, wait for the receipt to confirm the subscription
	if token := c.Subscribe(TOPIC, 0, nil); token.Wait() && token.Error() != nil {
	 	fmt.Println(token.Error())
	 	os.Exit(1)
	}

	// Pubish messages to TOPIC at qos 1 and wait for the receipt
	//from the server after sending each message
	i := 0;
	for true {
	 	text := fmt.Sprintf("this is msg #%d! from MQTT piglow", i)
	 	token := c.Publish(TOPIC, 0, false, text)
		token.Wait()
		time.Sleep(5 *time.Second)
		i++;
	}

	time.Sleep(3 * time.Second)

	//unsubscribe from /go-mqtt/sample
	if token := c.Unsubscribe(TOPIC); token.Wait() && token.Error() != nil {
	 	fmt.Println(token.Error())
		os.Exit(1)
	}

	c.Disconnect(250)
}
在上面的代码中,我们定义了一个TOPIC:
const TOPIC = "testubuntucore/counter"在我们的代码中,我们订购了这个TOPIC:
	if token := c.Subscribe(TOPIC, 0, nil); token.Wait() && token.Error() != nil {
	 	fmt.Println(token.Error())
	 	os.Exit(1)
	}
每当有任何的消息发布在这个TOPIC上时,我们的client就会收到消息,并在如下的handler中进行处理:
//define a function for the default message handler
var f MQTT.MessageHandler = func(client *MQTT.Client, msg MQTT.Message) {
  	fmt.Printf("Recived TOPIC: %s\n", msg.Topic())
  	fmt.Printf("Received MSG: %s\n", msg.Payload())

	s := string(msg.Payload()[:])
	fmt.Printf("check: %t\n",  (s == "on"))

	if ( s == "on" ) {
		fmt.Println("on is received!")
		TurnAllOn()
	} else if ( s == "off" )  {
		fmt.Println("off is received!")
		GlowOff()
	}
}
在我们的应用中,如果我们收到一个字符串是"on",我们就打开所有的灯;如果我们收到的是"off"字符串时,我们就关掉所有的灯.
为了能够在我们其它的client中侦听到从这个client中发出的任何的消息,我们有意地在程序中加入如下的代码:
	// Pubish messages to TOPIC at qos 1 and wait for the receipt
	//from the server after sending each message
	i := 0;
	for true {
	 	text := fmt.Sprintf("this is msg #%d! from MQTT piglow", i)
	 	token := c.Publish(TOPIC, 0, false, text)
		token.Wait()
		time.Sleep(5 *time.Second)
		i++;
	}
当然在实际的应用中,我们可以发送任何我们感兴趣的信息,也可以定义其它的TOPIC进行传输.
值得注意的是,我们使用了一个免费的MQTT broker,它来自于eclipse:
	//create a ClientOptions struct setting the broker address, clientid, turn
	//off trace output and set the default message handler
	opts := MQTT.NewClientOptions().AddBroker("tcp://iot.eclipse.org:1883")
我们整个项目的源码可以通过如下的方式得到:
$ git clone https://github.com/liu-xiao-guo/mqtt-piglow我们可以参照" 如何为我们的Snappy Ubuntu应用编译并打包Snap(2)"中介绍的那样来生成我们在树莓派上所需要的snap文件并安装上去.在实际操作中,由于下载包"golang.org/x/net/websocket"需要打洞(VPN)才可以下载.目前在树莓派上还没有好的办法来安装VPN,所有建议大家在desktop的环境中通过VPN的方式下载完整个parts,然后通过scp的方法把所有的文件都考入到树莓派中:
$ ls
icon.png  parts  snapcraft.yaml  src
$ scp -r * ubuntu@192.168.1.112:/home/ubuntu/apps/docker/1.6.2.004/work/mqtt-piglow$ snapcraft build
$ snapcraft stage
$ snapcraft snap
$ snapcraft assemble等我们安装完我们的应用后,我们一定要使用如下的方法来允许我们的应用来访问我们的设备:
$ sudo snappy hw-assign mqtt-piglow.sideload /dev/i2c-1
2)Ubuntu phone client
$ git clone https://github.com/liu-xiao-guo/mqttmain.qml
import QtQuick 2.0
import Ubuntu.Components 1.1
import Mqtt 1.0
/*!
    \brief MainView with a Label and Button elements.
*/

MainView {
    // objectName for functional testing purposes (autopilot-qt5)
    objectName: "mainView"

    // Note! applicationName needs to match the "name" field of the click manifest
    applicationName: "mqtt.liu-xiao-guo"

    /*
     This property enables the application to change orientation
     when the device is rotated. The default is false.
    */
    //automaticOrientation: true

    // Removes the old toolbar and enables new features of the new header.
    useDeprecatedToolbar: false

    width: units.gu(60)
    height: units.gu(85)

    Page {
        id: page
        title: i18n.tr("mqtt")

        MQTT {
            id: _MQTT
//            host: "mqtt.thingstud.io"
            host: "iot.eclipse.org"
            port: 1883
            topic: "testubuntucore/counter"
            username: "guest"
            password: "guest"
            onMessageReceived: {;
                _ListModel_Messages.append({"message":message});
            }
            onDisconnected: {
                _MQTT.connect();
            }
        }

        ListModel {
            id: _ListModel_Messages
        }

        Rectangle {
            radius: 5
            color: "#ffffff"
            anchors.fill: _ListView
        }

        ListView {
            id: _ListView
            clip: true
            anchors.fill: parent
            anchors.topMargin: 20
            anchors.leftMargin: 20; anchors.rightMargin: 20
            anchors.bottomMargin: 250 // This changes the things
            highlightMoveDuration: 450
            cacheBuffer: 10000
            model: _ListModel_Messages
            onCountChanged: if(count>1) currentIndex=count-1; else currentIndex = 0;
            delegate: Rectangle {
                height: 60
                width: ListView.view.width
                radius: 5
                Text {
                    anchors.fill: parent
                    anchors.margins: 15
                    color: "#000000"
                    text: model.message
                    wrapMode: Text.WordWrap
                }
                Rectangle {
                    width: parent.width
                    height: 1
                    color: "#f1f1f1"
                    anchors.bottom: parent.bottom
                }
            }
        }

        Rectangle {
            anchors.fill: _TextArea
            color: "#ffffff"
            radius: 5
            anchors.margins: -15
        }

        TextEdit {
            id: _TextArea
            anchors.bottom: control.top
            anchors.bottomMargin: 20
            anchors.leftMargin: 35
            anchors.rightMargin: 35
            anchors.left: parent.left
            anchors.right: parent.right
            height: 140
            font.pixelSize: 50
            Keys.onEnterPressed: _Rectangle_Submit.action();
        }

        Row {
            id: control
            anchors.bottom: parent.bottom
            anchors.bottomMargin: 20
            anchors.horizontalCenter: parent.horizontalCenter
            spacing: 20

            Button {
                id: sendMessage
                text: "Send Message"
                onClicked: {
                    console.log("Going to publish message: " + _TextArea.text)
                    _MQTT.publishMessage(_TextArea.text);
                    _TextArea.text = "";
                    Qt.inputMethod.hide();
                }
            }

            Button {
                id: lighton
                text: "Light on"
                onClicked: {
                    console.log("Light on is clicked")
                    _MQTT.publishMessage("on");
                }
            }

            Button {
                id: lightoff
                text: "Light off"
                onClicked: {
                    console.log("Light off is clicked")
                    _MQTT.publishMessage("off");
                }
            }
        }
    }
}
它的实现非常简单.
        MQTT {
            id: _MQTT
//            host: "mqtt.thingstud.io"
            host: "iot.eclipse.org"
            port: 1883
            topic: "testubuntucore/counter"
            username: "guest"
            password: "guest"
            onMessageReceived: {;
                _ListModel_Messages.append({"message":message});
            }
            onDisconnected: {
                _MQTT.connect();
            }
        }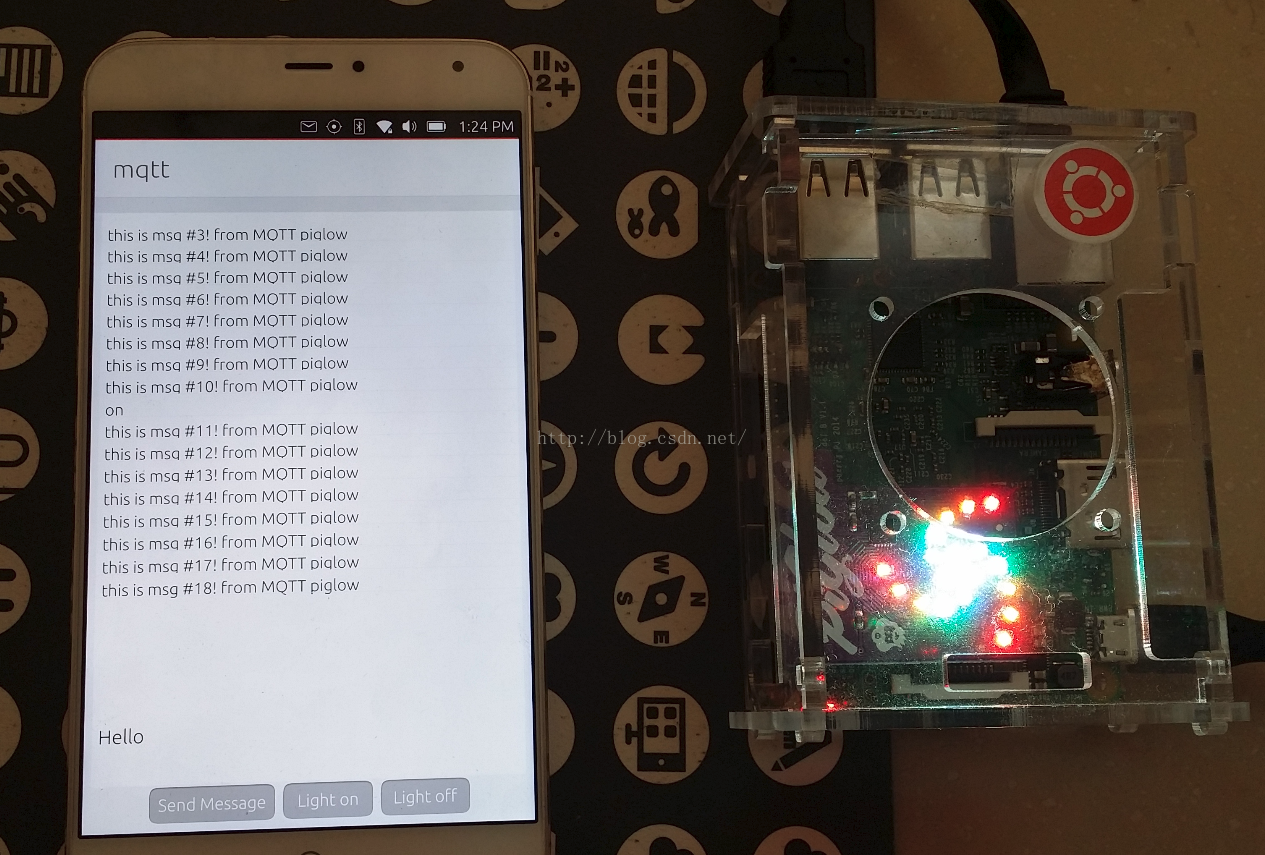
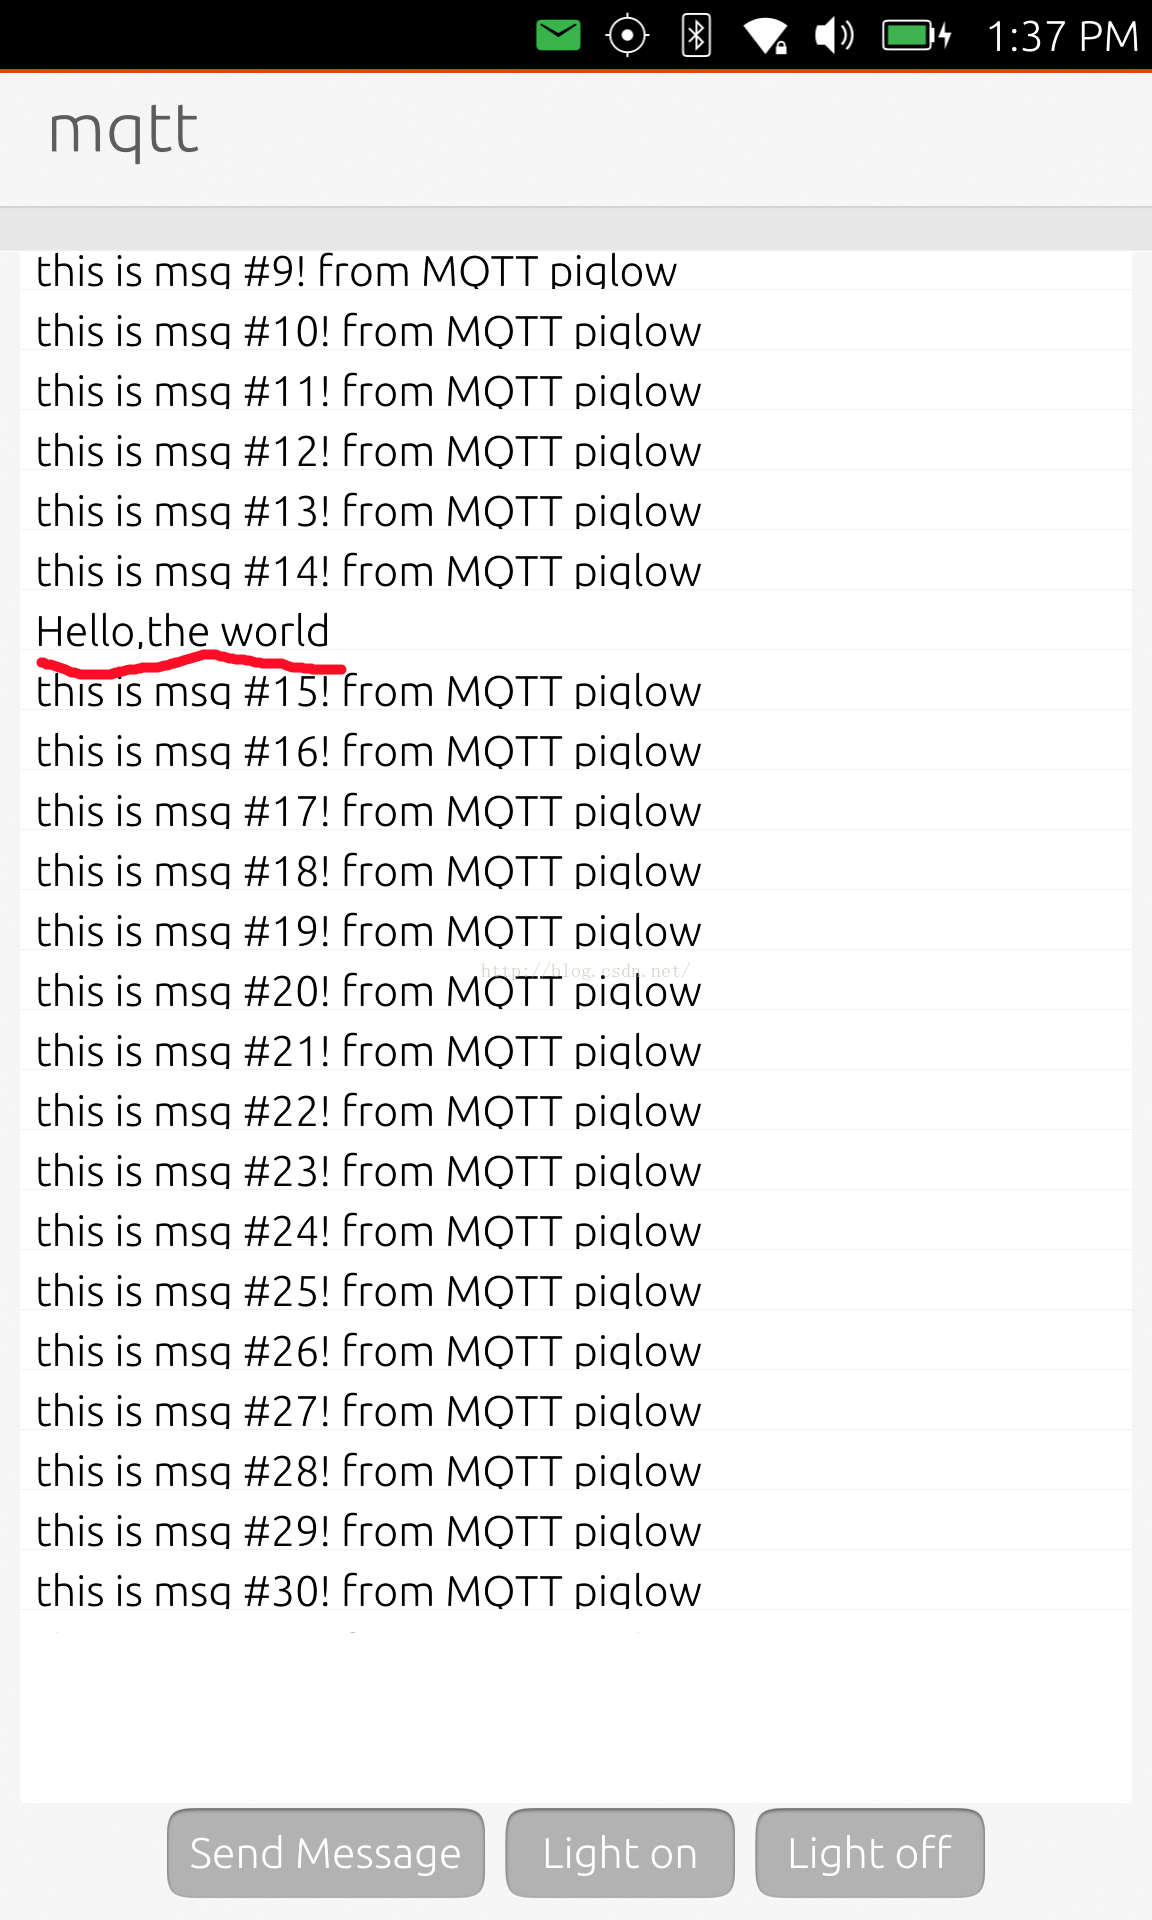
在界面的最上面,我们可以看到来做树莓派的消息(上面所说的心跳消息).当我们按下"Light on"按钮后,它通MQTT协议,向我们定义的TOPIC发布一个叫做"on"的消息.树莓派侦听到这个消息后,就会打开所有的灯(如上图所示).当然,我们也可以在屏幕的下角的地方,发动一个"Hello,the world"的消息给我们的树莓派:
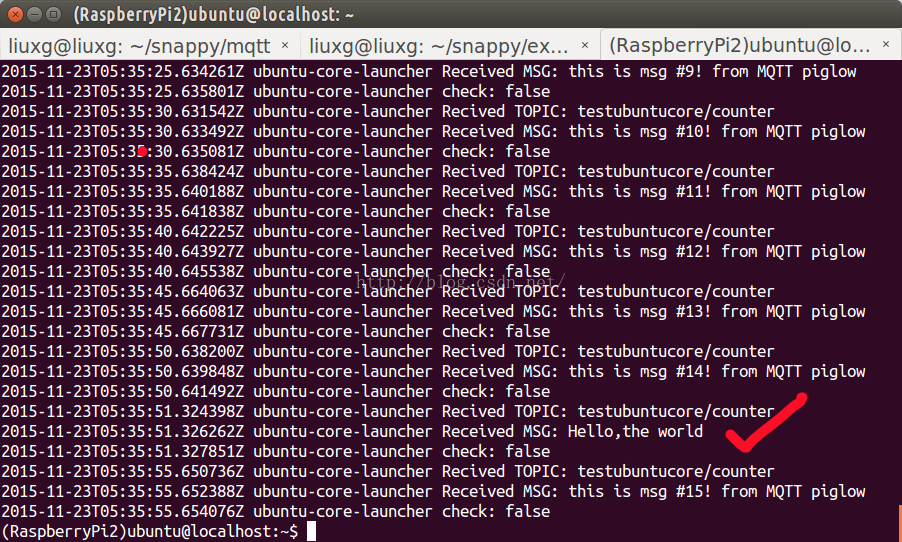
那么在我们的树莓派中可以使用如下的方法来查看我们收到的信息:
$ sudo snappy service mqtt-piglow从上面我们可以看到我们所发送的消息"Hello, the world".在实际的应用中,我们传输json格式的数据以更加有效地解析数据.
如果大家对python语言比较熟,请参照我们的例程https://github.com/campbieil/mqtt-for-ubuntu-core来得到更多的帮助.


 1444
1444

 被折叠的 条评论
为什么被折叠?
被折叠的 条评论
为什么被折叠?
 到【灌水乐园】发言


