


原文地址:http://websystique.com/spring/spring-4-hello-world-example-annotation-tutorial-full-example/
【项目代码,在文章末尾提供下载地址】
【翻译 by 明明如月 QQ 605283073】
下一篇:
Spring Beans 自动装配 使用XML配置列子(带源码)
本教程展示基于 Spring Annotation (aka javaConfig)的 Spring 4 Hello world,介绍 Spring 4 的基本概念和用法. 作为对比XML配置方式的例子也提供了出来. 我们将使用 Maven 基于Spring 4.0.6.RELEASE来创建项目.
-------------------------------------------------------------
使用以下技术和软件:
- Spring 4.0.6.RELEASE
- Maven 3
- JDK 1.6
- Eclipse JUNO Service Release 2
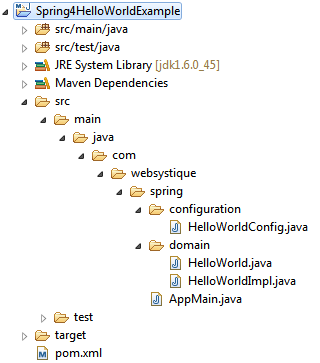
项目目录结构
第1步: 在Maven的pom.xml配置文件中添加Spring依赖
作为一个基于maven的项目。所有的依赖都在pom.xml中配置
<project xmlns="http://maven.apache.org/POM/4.0.0" xmlns:xsi="http://www.w3.org/2001/XMLSchema-instance"
  xsi:schemaLocation="http://maven.apache.org/POM/4.0.0 http://maven.apache.org/xsd/maven-4.0.0.xsd">

    <modelVersion>4.0.0</modelVersion>
    <groupId>com.websystique.spring</groupId>
    <artifactId>Spring4HelloWorldExample</artifactId>
    <version>1.0.0</version>
    <packaging>jar</packaging>

    <name>Spring4HelloWorldExample</name>

    <properties>
        <springframework.version>4.0.6.RELEASE</springframework.version>
    </properties>

    <dependencies>
        <dependency>
            <groupId>org.springframework</groupId>
            <artifactId>spring-core</artifactId>
            <version>${springframework.version}</version>
        </dependency>
        <dependency>
            <groupId>org.springframework</groupId>
            <artifactId>spring-context</artifactId>
            <version>${springframework.version}</version>
        </dependency>
    </dependencies>
    <build>
        <pluginManagement>
            <plugins>
                <plugin>
                    <groupId>org.apache.maven.plugins</groupId>
                    <artifactId>maven-compiler-plugin</artifactId>
                    <version>3.2</version>
                    <configuration>
                        <source>1.6</source>
                        <target>1.6</target>
                    </configuration>
                </plugin>
            </plugins>
        </pluginManagement>
    </build>

</project>
我们只添加了Spring core 以及Spring context 依赖。本例中用到的
Annotation(注解)属于:spring-context。
第2步:创建一个POJO类
Spring提倡弱耦合以及面向接口编程。创建一个 POJO接口以及实现。此POJO将作为spring的bean.
package com.websystique.spring.domain;

public interface HelloWorld {

    void sayHello(String name);
}
package com.websystique.spring.domain;

public class HelloWorldImpl implements HelloWorld{

    public void sayHello(String name) {
        System.out.println("Hello "+name);
    }

}
第3步: 创建Spring配置类
Spring配置类包含你应用中需要的bean的定义。@Configuration注解在类上,将其作为spring配置类。
@Bean注解的方法,定义了被spring容器管理的bean.
<pre class="java" name="code">package com.websystique.spring.configuration;

import org.springframework.context.annotation.Bean;
import org.springframework.context.annotation.Configuration;
import org.springframework.context.annotation.Description;

@Configuration
public class HelloWorldConfig {

    @Bean(name="helloWorldBean")
    @Description("This is a sample HelloWorld Bean")
    public HelloWorld helloWorld() {
        return new HelloWorldImpl();
    }

}
@Description 是 Spring4中提供的新的注解,目的是为追踪而为bean提供的一个文本解释。
上面对应的xml配置方式helloworld-config.xml
<beans xmlns="http://www.springframework.org/schema/beans"
    xmlns:xsi="http://www.w3.org/2001/XMLSchema-instance"
    xsi:schemaLocation="http://www.springframework.org/schema/beans http://www.springframework.org/schema/beans/spring-beans-4.0.xsd">

    <bean id="helloWorldBean" class="com.websystique.spring.domain.HelloWorldImpl">

</beans>
第4步: 创建带Main方法的Java应用
<pre class="java" name="code">package com.websystique.spring;

import org.springframework.context.annotation.AnnotationConfigApplicationContext;
import org.springframework.context.support.AbstractApplicationContext;

import com.websystique.spring.configuration.HelloWorldConfig;
import com.websystique.spring.domain.HelloWorld;

public class AppMain {

    public static void main(String args[]) {
        AbstractApplicationContext context = new AnnotationConfigApplicationContext(HelloWorldConfig.class);
        HelloWorld bean = (HelloWorld) context.getBean("helloWorldBean");
        bean.sayHello("Spring 4");
        context.close();
    }

}
AnnotationConfigApplicationContext 根据带有@Configuration 注解的类类创建Spring Application Context (Spring应用上下文)。
通过getBean 方法来获取Spring应用上下文中的特定bean .然后执行其中的方法:
HelloWorld bean = (HelloWorld) context.getBean("helloWorldBean");
bean.sayHello("Spring 4");
运行之后将产生如下输出:
Hello Spring 4
上面的例子如果基于XML方式如下:
package com.websystique.spring;

import org.springframework.context.support.AbstractApplicationContext;
import org.springframework.context.support.ClassPathXmlApplicationContext;

import com.websystique.spring.domain.HelloWorld;

public class AppMain {

    public static void main(String args[]) {
        AbstractApplicationContext context = new ClassPathXmlApplicationContext("helloworld-config.xml");
        HelloWorld bean = (HelloWorld) context.getBean("helloWorldBean");
        bean.sayHello("Spring 4");
        context.close();

    }

}
helloworld-config.xml在上面第3步中提到过。应该放在/src/main/resources这个类路径下。
项目代码下载:http://websystique.com/?smd_process_download=1&download_id=778


 348
348

 被折叠的 条评论
为什么被折叠?
被折叠的 条评论
为什么被折叠?
 到【灌水乐园】发言


