


1、spring是一个轻量级的容器(工厂),主要管理对象的(bean)。spring它比较重要,是因为它涉及的范围比较多,甚至可取代struts2来管理web层(springMVC),也甚至可以取代Hibernate管理DAO层(jdbcTemplate),但是我们这里说的spring还是主要集中在service层的管理上。
——spring目前已经不仅仅是一个JavaEE管理框架了,它有很多project,我们这边说的是它的核心框架,其他去它的官网可做了解。
——spring的最大优点,就是降低耦合简化开发。它的核心就是控制反转(IoC Inverse of Control)和面向切面(AOP)。
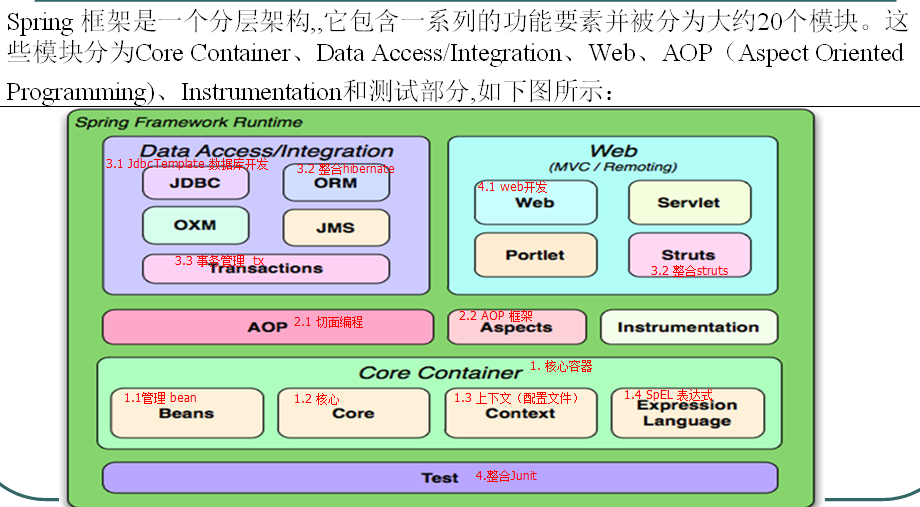
——我们说的spring的整个框架如下:
2、我们先做一个入门案例,就是基于IoC的,什么是控制反转,本质上就是创建对象的权利交给谁。我们知道原来我们创建一个service接口,然后基于这个接口创建一个实现类,到用这个实现类的时候直接在用的地方new一下就得到了这个实现类的实例,这相当于创建对象的权利掌握在实现类的自己手上。IoC控制反转就是要把这种创建对象的权利全都交给spring,我们之前说spring就是管理对象的,意思就在于此。权利交给spring之后,我们需要的实例的时候就向spring拿即可,其他的没变。
——第一步,导入jar包。4个核心jar包+1个依赖包。4个核心jar包在spring-framework-3.2.0.RELEASE\libs下,对应着我们上图核心容器里的4个部分,分别是beans、core、context和expression。1个依赖包在spring-framework-3.0.2.RELEASE-dependencies\org.apache.commons\com.springsource.org.apache.commons.logging\1.1.1下面。
——第二步,写一个接口和实现类。比如UserService接口和UserServiceImpl实现类,里面只有一个addUser方法,在实现类里面也只打印输出一句话。
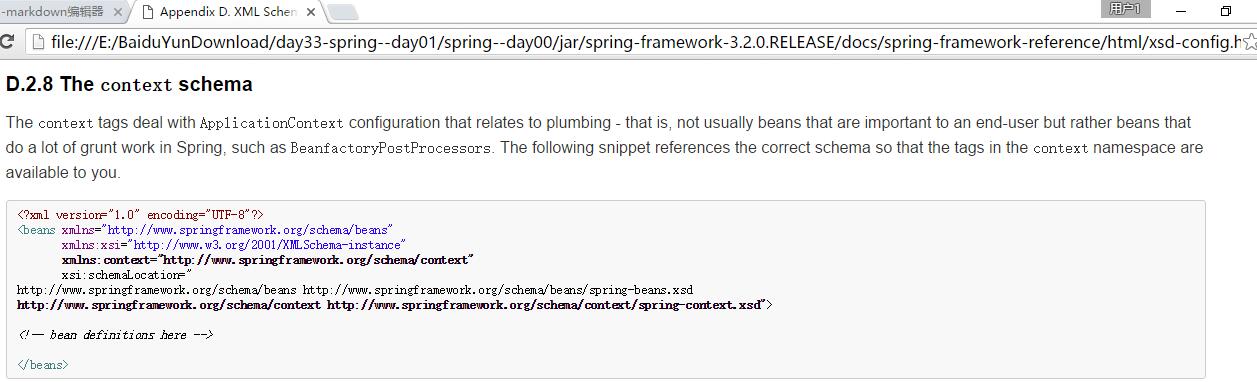
——第三步,写配置文件。位置任意但一般在src下,名称任意但一般叫做applicationContext.xml。内容的规范,首先添加schema约束,然后是添加需要IoC的实现类。找schema约束在spring-framework-3.2.0.RELEASE\docs\spring-framework-reference\html\xsd-config.html页面上有(有一种是dtd的,不要选错)。
<?xml version="1.0" encoding="UTF-8"?>
<beans xmlns="http://www.springframework.org/schema/beans"
       xmlns:xsi="http://www.w3.org/2001/XMLSchema-instance"
       xsi:schemaLocation="http://www.springframework.org/schema/beans
                           http://www.springframework.org/schema/beans/spring-beans.xsd">
    //id就是我们以后要从spring拿实例的一个key,class就是哪个实现类
    <bean id="userServiceId" class="com.hello.service.UserServiceImpl"></bean>
</beans>
——实验。我们创建一个测试类,一种用原有方法,另一种让spring提供实例。
    @Test
    public void test01(){
        UserService us=new UserServiceImpl();
        us.addUser();
    }

    @Test
    public void test02(){
        //获取容器
        String xmlPath="com/hello/service/applicationContext.xml";
        ApplicationContext applicationContext=new ClassPathXmlApplicationContext(xmlPath);
        //获取对象和调用方法
        UserService us=(UserService) applicationContext.getBean("userServiceId");
        us.addUser();
}3、DI(Dependency Injection依赖注入)。什么叫做依赖?比如B类里面有一个属性是A类private A a;,这相当于说B类依赖于A类。那么注入呢?意思就是通过setter等方法给它赋值,就是注入的简单理解。
——同样的导入jar包,写一对BookDao接口和BookDaoImpl实现类(有个save方法,输出一句话),再写一个BookService接口和BookServiceImpl实现类,在BookServiceImpl里面的addBook方法,在BookServiceImpl里面因为要用到dao层的东西,所以我们要把它当做属性来,相当于依赖了BookDao了(以前都是在这里直接new一个dao的实现类),然后实现这个属性的setter方法(用于注入):
package com.hello.service;

import com.hello.dao.BookDao;

public class BookServiceImpl implements BookService {
    private BookDao bookDao;

    public void addBook() {
        this.bookDao.save();
    }

    public void setBookDao(BookDao bookDao) {
        this.bookDao = bookDao;
    }
}
——然后配置文件,实现类照样配,只是在配置有依赖另一个类的类(也叫依赖于另一个类,也就是由另一个类的实例属性)时,需要配置这个属性,把这个属性的属性名字和在bean中的id(找到对应的bean的id,就相当于找到对应的类了)名字联系起来:
<?xml version="1.0" encoding="UTF-8"?>
<beans xmlns="http://www.springframework.org/schema/beans"
xmlns:xsi="http://www.w3.org/2001/XMLSchema-instance"
xsi:schemaLocation="http://www.springframework.org/schema/beans
http://www.springframework.org/schema/beans/spring-beans.xsd">
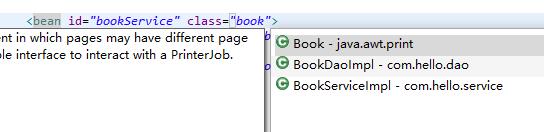
<bean id="bookService" class="com.hello.service.BookServiceImpl">
// 联系起来
<property name="bookDao" ref="bookDao"></property>
</bean>
<bean id="bookDao" class="com.hello.dao.BookDaoImpl"></bean>
</beans>——然后测试,即可。
    @Test
    public void test01(){
        String xmlPath="com/hello/test/applicationContext.xml";
        ApplicationContext applicationContext=new ClassPathXmlApplicationContext(xmlPath);
        BookService bookService=(BookService) applicationContext.getBean("bookService");
        bookService.addBook();
}4、注意事项。
——我们在写applicationContext.xml的时候,是有提示的,还是alt+/。可以提高开发效率。
5、API了解。之后不使用。
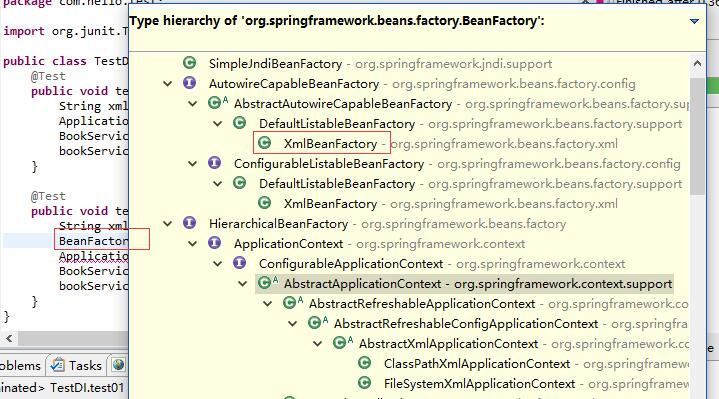
——BeanFactory。这个是工厂,用于生产任意Bean。采用延迟加载,第一次getBean的时候才实例化Bean。使用BeanFactory和它的getBean来试一下(后面不会实用)。它是在getBean的时候才实例化,可以断点测试。
    @Test
    public void test02(){
        String xmlPath="com/hello/test/applicationContext.xml";
        BeanFactory beanFactory=new XmlBeanFactory(new ClassPathResource(xmlPath));
        BookService bookService=(BookService) beanFactory.getBean("bookService");
        bookService.addBook();
}——BeanFactory的子接口之一是ApplicationContext,功能更丰富。它的加载,是当加载配置文件的时候就进行了对象的实例化。也就是执行下面一句的时候就实例化对象了。
ApplicationContext applicationContext=new ClassPathXmlApplicationContext(xmlPath);——ClassPathXmlApplicationContext,用于加载classpath(类路径或src)下的指定的xml。加载xml运行位置是/WEB-INF/classes/…xml。
——FileSystemXmlApplicationContext,用于加载指定盘符下的xml。加载xml运行位置是/WEB-INF/…xml。用servletContext.getRealPath获取具体的盘符。
注意:在BeanFactory上按住Ctrl+T。
6、现在开始要说基于XML的Bean装配了。它要分几大块。首先说实例化方式。先说说3种实例化方式:默认构造、静态工厂、实例工厂。
——默认构造。就是我们写了<bean id="" class="">之后,就是使用默认构造方式实例化的,除非我们自己写了构造方法,不然我们之前一直用的都是默认构造方法实例化的方式。
——静态工厂。常用于spring整合其他框架或工具的。用于生产实例的,所有的方法必须是static静态的。形式是<bean id="" class="工厂类权限定名称" factory-method="方法">。其实就是在我们之前的入门案例上面再加了一个类来控制,比如我们写了一个UserService接口和UserServiceImpl实现类,然后再写一个UserBeanFactory工厂类,在这个工厂类里面写一个静态方法,这个方法就是new 一个UserServiceImpl实现类的,然后我们在配置bean的时候,就只配置工厂类和里面的静态方法就能得到对应的实现类。但是貌似在操作上和层级上比直接配置实现类繁琐了一些。
工厂类里:
public class MyStaticBeanFactory {
    public static UserService createUserService(){
        return new UserServiceImpl();
    }
}
applicationContext配置:
<?xml version="1.0" encoding="UTF-8"?>
<beans xmlns="http://www.springframework.org/schema/beans"
       xmlns:xsi="http://www.w3.org/2001/XMLSchema-instance"
       xsi:schemaLocation="http://www.springframework.org/schema/beans
                           http://www.springframework.org/schema/beans/spring-beans.xsd">

    <bean id="userService" class="com.hello.factory.MyStaticBeanFactory" factory-method="createUserService"></bean>
</beans>
测试类:
    @Test
    public void test01(){
        //没有使用spring之前的写法
        UserService us=MyStaticBeanFactory.createUserService();
        us.addUser();
    }

    @Test
    public void test02(){
        //使用spring之后
        String xmlPath="com/hello/service/applicationContext.xml";
        ApplicationContext applicationContext=new ClassPathXmlApplicationContext(xmlPath);
        UserService us=(UserService) applicationContext.getBean("userService");
        us.addUser();
}——实例工厂。必须现有工厂的实例对象,然后由对象去创建对象,所以提供的所有方法都是非静态的方法。所以我们可以想象一下,只是把上面的的工厂类里面的方法变成了非静态的,然后在配置的时候配置工厂类(因为我们要获得工厂类的实例化对象),在使用的时候就是获得工厂类的实例化对象,然后用这个实例化的对象去调用里面的非静态方法去创造一个我们最终需要的类。
工厂类:
public class MyBeanFactory {
    public UserService createUserService(){
        return new UserServiceImpl();
    }
}
配置文件,因为我们配置userService的时候用到工厂类的id所以必须要配置一下工厂类:
<?xml version="1.0" encoding="UTF-8"?>
<beans xmlns="http://www.springframework.org/schema/beans"
       xmlns:xsi="http://www.w3.org/2001/XMLSchema-instance"
       xsi:schemaLocation="http://www.springframework.org/schema/beans
                           http://www.springframework.org/schema/beans/spring-beans.xsd">

    <bean id="myBeanFactory" class="com.hello.factory.MyBeanFactory"></bean>
    <bean id="userService" factory-bean="myBeanFactory" factory-method="createUserService"></bean>
</beans>
测试类:
    @Test
    public void test01(){
        //没有使用spring之前的写法
        MyBeanFactory myBF=new MyBeanFactory();
        myBF.createUserService().addUser();
    }

    @Test
    public void test02(){
        //使用spring之后
        String xmlPath="com/hello/service/applicationContext.xml";
        ApplicationContext applicationContext=new ClassPathXmlApplicationContext(xmlPath);
        UserService us=(UserService) applicationContext.getBean("userService");
        us.addUser();
    }
我们看实例工厂的方式,其实就是我们本可以直接配置UserServiceImpl实现类,然后直接调用,但是现在非要经过实例工厂的方法,所以就需要增加一个实例工厂并且配置一下,并且在配置UserServiceImpl实现类的时候就不是直接配置了,而是配置了工厂类的id和里面对用的方法。但是我们在使用的时候还是使用UserServiceImpl配置的id,只不过它再后台找实例工厂和里面对用的方法去了。
7、然后说Bean的种类。
——我们之前说的都是普通Bean。
——还有一种Bean,叫做FactoryBean,Factory就是工厂用于生产东西的,所以FactoryBean也是生产Bean的,只是它比较特殊,它只能生产一种Bean,所以FactoryBean可以叫做只生产一种Bean的特殊Bean。而且它的生产实例化方式和之前的Bean的实例化方式有些不同,之前的只要配置了<bean id="" class="Bean">那么spring就会执行构造方法自动实例化直接返回一个实例化对象,但是我们配置FactoryBean的时候<bean id="" class="...FactoryBean">,它的确是实例化了这个..FactoryBean,但是返回的是这个实例对象的getObject方法的返回值,也就是说最终我们FactoryBean生产的Bean是通过它的getObject方法得到的。
——这里需要明确的就是之前说过的BeanFactory,它是一个工厂,是可以生产任意Bean的工厂,和上面的FactoryBean不同。
8、接下来说作用域。
——作用域就是从来确定spring生产Bean实例的数量。我们需要掌握的主要是2个取值,一个是singleton,另一个是prototype。前面是单例(只实例化一次,每次取都是取的同一个),后面是多例(每次getBean取的时候都实例化一个新的)。配置就在<bean scope="">里面。
——我们可以测试一下,没有配置的时候(默认单例singleton),取两次看看是否是同一个实例化对象,配置成多例后再看看对象的地址。
<bean id="myBeanFactory" class="com.hello.factory.MyBeanFactory"></bean>
    <bean id="userService" factory-bean="myBeanFactory" factory-method="createUserService" scope="prototype"></bean>
注意:我们这个作用域只针对到配置的类,比如我们上面想要UserService是多例的话,就配置在它上面,配置在工厂类上面虽然由它来调用UserService实例化,但是仍然是单例的。
9、接下来说生命周期。
——Bean的生命周期有11个环节,我们先重点说几个环节。先说第一对,就是执行目标方法前后的两个环节,分别是Bean的初始化init和销毁destroy。先在对应的Bean中自定义这两个方法:
public class UserServiceImpl implements UserService {

    public void addUser() {
        System.out.println("我是UserServiceImpl。addUser!");
    }

    public void myInitTest(){
        System.out.println("我是自定义的初始化配置!");
    }

    public void myDestroyTest(){
        System.out.println("我是自定义的销毁配置");
    }
}
然后配置的时候,配置上这2个方法:
<bean id="myBeanFactory" class="com.hello.factory.MyBeanFactory"></bean>
    <bean id="userService" factory-bean="myBeanFactory" factory-method="createUserService" init-method="myInitTest" destroy-method="myDestroyTest"></bean>
测试使用的时候如下,就会有相应的输出:
    @Test
    public void test02(){
        //使用spring之后
        String xmlPath="com/hello/service/applicationContext.xml";
        ClassPathXmlApplicationContext applicationContext=new ClassPathXmlApplicationContext(xmlPath);
        UserService us1=(UserService) applicationContext.getBean("userService");
        System.out.println(us1);
        //1、关闭容器时才会调用destroy;2、其次要保证这个Bean是单例
        applicationContext.close();
    }
——再说一对:BeanPostProcessor(Bean后处理),它相当于一个工厂勾子,在对象初始化init的前后执行(分别有before和after方法),它的作用之一就是生成代理对象(在after那个方法中),这种生成代理对象的思想是AOP的底层。生成的代理对象一般都是在目标方法的前后执行。所以大概的顺序是:
- Bean后处理的before方法
- Bean初始化init
- Bean后处理的after方法
- Bean的代理对象的前方法
- Bean的目标方法
- Bean的代理对象的后方法
Bean后处理本质上就是实现了postBeanProcessor接口的类,它的配置就是直接写一个<bean class="">即可,没有其他参数需要配置。
我们写了一个实现BeanPostProcessor接口的类。在after方法里面写一个一个代理并且返回了这个代理对象(以后会经常使用这个方式)。
public class MyBeanPostProcessor implements BeanPostProcessor {

    public Object postProcessAfterInitialization(final Object bean, String beanName)
            throws BeansException {
        System.out.println("我是后处理的after方法!");
        return Proxy.newProxyInstance(MyBeanPostProcessor.class.getClassLoader(), bean.getClass().getInterfaces(), new InvocationHandler() {
            public Object invoke(Object proxy, Method method, Object[] args)
                    throws Throwable {
                System.out.println("---开启事务---");
                Object invoke = method.invoke(bean, args);
                System.out.println("---提交事务---");
                return invoke;
            }
        });
    }

    public Object postProcessBeforeInitialization(Object bean, String beanName)
            throws BeansException {
        System.out.println("我是后处理的before方法!");
        return bean;
    }

}
然后做了配置:
<bean class="com.hello.service.MyBeanPostProcessor"></bean>然后就测试了:
    @Test
    public void test02(){
        //使用spring之后
        String xmlPath="com/hello/service/applicationContext.xml";
        ApplicationContext applicationContext=new ClassPathXmlApplicationContext(xmlPath);
        UserService us1=(UserService) applicationContext.getBean("userService");
        us1.addUser();
    }
结果是:
我是后处理的before方法!
我是自定义的初始化配置!
我是后处理的after方法!
---开启事务---
我是UserServiceImpl。addUser!
---提交事务---
——Bean后处理的上述配置是针对所有的目标类。如果要只针对1个的话,需要配置beanName。
10、属性的依赖注入。
——依赖注入总体分两类:手动装配、自动装配(Struts和spring整合时可以自动装配,此处省略)。
——手动装配,就是手动配置信息。又分为基于XML的装配、基于注解的装配。
——基于XML的装配主要分为:构造方法、setter方法。
——甭管是什么方法,既然是属性注入,那么最终目的就是给属性赋值而已。构造方法,也就是利用构造方法赋值。
比如我们先写一个User类。注意我们写了两个构造方法,并且两个构造方法都只用了2个参数,并且注意2个构造方法的上下顺序。
package com.hello.domain;

public class User {
    private Integer id;
    private String username;
    private Integer age;

    public User(String username, Integer age) {
        super();
        this.username = username;
        this.age = age;
    }
    public User(Integer id, String username) {
        super();
        this.id = id;
        this.username = username;
    }

    public Integer getId() {
        return id;
    }
    public void setId(Integer id) {
        this.id = id;
    }
    public String getUsername() {
        return username;
    }
    public void setUsername(String username) {
        this.username = username;
    }
    public Integer getAge() {
        return age;
    }
    public void setAge(Integer age) {
        this.age = age;
    }
    @Override
    public String toString() {
        return "User [id=" + id + ", username=" + username + ", age=" + age
                + "]";
    }
}首先,我们明确的是如果我们只是配置以下bean的话,那么运行的时候初始化这个User肯定会出错,提示init方法找不到(因为自定义了构造方法,默认的已经失效),所以我们需要自己再bean中配置构造方法的注入属性。注意我们只写了2个属性,因为我们的2个构造方法,要么是id和username,要么是username和age,所以我们通过构造方法进行属性注入的话要匹配我们自定义的构造方法。如果我吧第3个属性的注释去掉的话就会报错。这个时候其实是调用了public User(Integer id, String username) {}构造方法。
<?xml version="1.0" encoding="UTF-8"?>
<beans xmlns="http://www.springframework.org/schema/beans"
       xmlns:xsi="http://www.w3.org/2001/XMLSchema-instance"
       xsi:schemaLocation="http://www.springframework.org/schema/beans
                           http://www.springframework.org/schema/beans/spring-beans.xsd">

    <bean id="user" class="com.hello.domain.User">
        <constructor-arg name="id" value="188"></constructor-arg>
        <constructor-arg name="username" value="Eric"></constructor-arg>
        <!--
        <constructor-arg name="age" value="33"></constructor-arg>
        -->
    </bean>
</beans>
当然,上面这种方式是通过name属性和value来指定了属性,所以我们写对了几个属性,然后它就会按照我们写的几个属性去找对应的构造方法。和value对应的一般是ref,value赋值类型是普通数据类型,ref是一个对象的id。
除了上面的name指定外,还有index和type。我们先来看index,下面只通过索引来匹配的,它的顺序是,如果你只有索引的话,它是从上到下依次找构造方法的,找到了第一个构造方法后,匹配里面的value值,如果类型匹配的话,那么就使用第一个构造方法,并且把对应的index上的value值赋值给构造方法的按顺序来的几个参数,如果第一个构造方法的value类型不匹配,它会自动找向下一个,都找到还不匹配,那就报错。
    <bean id="user" class="com.hello.domain.User">
        <constructor-arg index="0" value="Eric"></constructor-arg>
        <constructor-arg index="1" value="45"></constructor-arg>
    </bean>
这里面,如我们上面说了,它会自动帮我们匹配类型,但是我们自己也可以指定类型,就是加一个type属性。这样就更精准。
    <bean id="user" class="com.hello.domain.User">
        <constructor-arg index="0" type="java.lang.String" value="Eric"></constructor-arg>
        <constructor-arg index="1" type="java.lang.Integer" value="23"></constructor-arg>
</bean>注意:index和type实战中用的比较多,主要掌握。
11、属性注入的setter方法,其实和构造方法类似,只不过这一次用的是property标签。
我们先写两个类,一个是Person类:
package com.hello.domain;

public class Person {
    private String name;
    private Address homeAddr;
    private Address companyAddr;
    public String getName() {
        return name;
    }
    public void setName(String name) {
        this.name = name;
    }
    public Address getHomeAddr() {
        return homeAddr;
    }
    public void setHomeAddr(Address homeAddr) {
        this.homeAddr = homeAddr;
    }
    public Address getCompanyAddr() {
        return companyAddr;
    }
    public void setCompanyAddr(Address companyAddr) {
        this.companyAddr = companyAddr;
    }
    @Override
    public String toString() {
        return "Person [name=" + name + ", homeAddr=" + homeAddr
                + ", companyAddr=" + companyAddr + "]";
    }
}
一个是Address类:
package com.hello.domain;

public class Address {
    private String addr;
    private String tel;

    public String getAddr() {
        return addr;
    }
    public void setAddr(String addr) {
        this.addr = addr;
    }
    public String getTel() {
        return tel;
    }
    public void setTel(String tel) {
        this.tel = tel;
    }
    @Override
    public String toString() {
        return "Address [addr=" + addr + ", tel=" + tel + "]";
    }
}
然后去配置,看下面就是property属性:
<?xml version="1.0" encoding="UTF-8"?>
<beans xmlns="http://www.springframework.org/schema/beans"
       xmlns:xsi="http://www.w3.org/2001/XMLSchema-instance"
       xsi:schemaLocation="http://www.springframework.org/schema/beans
                           http://www.springframework.org/schema/beans/spring-beans.xsd">

    <bean id="person" class="com.hello.domain.Person">
        <property name="name" value="Eric"></property>
        <property name="homeAddr" ref="homeAddr"></property>
        <property name="companyAddr" ref="companyAddr"></property>
    </bean>
    <bean id="homeAddr" class="com.hello.domain.Address">
        <property name="addr" value="SuzhouHome"></property>
        <property name="tel" value="99999999"></property>
    </bean>
    <bean id="companyAddr" class="com.hello.domain.Address">
        <property name="addr" value="ShanghaiCompany"></property>
        <property name="tel" value="8888888"></property>
    </bean>
</beans>
测试:
    @Test
    public void test02(){
        //使用spring之后
        String xmlPath="com/hello/service/applicationContext.xml";
        ApplicationContext applicationContext=new ClassPathXmlApplicationContext(xmlPath);
        Person u=(Person) applicationContext.getBean("person");
        System.out.println(u);
    }
结果是:
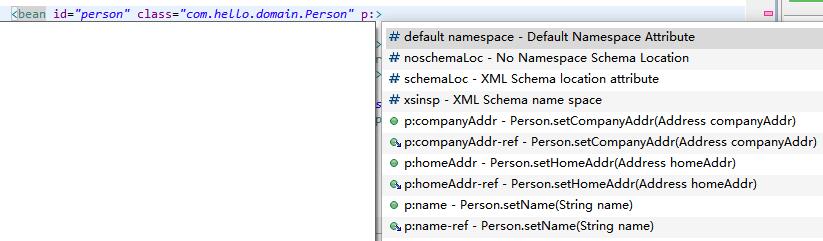
Person [name=Eric, homeAddr=Address [addr=SuzhouHome, tel=99999999], companyAddr=Address [addr=ShanghaiCompany, tel=8888888]]12、属性注入的P命名空间,只做了解。它是对setter的property方法的简化。需要添加一个配置xmlns:p="http://www.springframework.org/schema/p"。理论上把前面的p换成x也是可行的(那么后面所有的p:xxx就需要变成x:xxx了)。然后这样写属性注入,会有提示的:
<?xml version="1.0" encoding="UTF-8"?>
<beans xmlns="http://www.springframework.org/schema/beans"
       xmlns:xsi="http://www.w3.org/2001/XMLSchema-instance"
       xmlns:p="http://www.springframework.org/schema/p"
       xsi:schemaLocation="http://www.springframework.org/schema/beans
                           http://www.springframework.org/schema/beans/spring-beans.xsd">

    <bean id="person" class="com.hello.domain.Person" p:name="Eric" p:homeAddr-ref="homeAddr" p:companyAddr-ref="companyAddr"></bean>
    <bean id="homeAddr" class="com.hello.domain.Address" p:addr="SuzhouHome" p:tel="99999999"></bean>
    <bean id="companyAddr" class="com.hello.domain.Address" p:addr="ShanghaiCompany" p:tel="88888888"></bean>
</beans>13、SpEL,只做了解。也是对setter的property进行简化了,而且比较彻底,上面我们的P命名空间,还有用-ref后缀区分普通值和对象引用。这个SpEL进行了统一,所有的都用name和value。但是value是有格式的,取值是#{EL表达式}。如数值#{123},字符串#{'Eric'},另一个对象的引用#{BeanId},还有操作属性和方法#{BeanId.propertyName}、#{BeanId.toString()},静态方法或字段#{T(类).字段|方法}。
<?xml version="1.0" encoding="UTF-8"?>
<beans xmlns="http://www.springframework.org/schema/beans"
       xmlns:xsi="http://www.w3.org/2001/XMLSchema-instance"
       xsi:schemaLocation="http://www.springframework.org/schema/beans
                           http://www.springframework.org/schema/beans/spring-beans.xsd">

    <bean id="person" class="com.hello.domain.Person">
        <property name="name" value="#{'Eric'}"></property>
        <property name="homeAddr" value="#{homeAddr}"></property>
        <property name="companyAddr" value="#{companyAddr}"></property>
    </bean>
    <bean id="homeAddr" class="com.hello.domain.Address">
        <property name="addr" value="#{'SuzhouHome'}"></property>
        <property name="tel" value="#{'99999999'}"></property>
    </bean>
    <bean id="companyAddr" class="com.hello.domain.Address">
        <property name="addr" value="#{'ShanghaiCompany'}"></property>
        <property name="tel" value="#{'88888888'}"></property>
    </bean>
</beans>
14、属性注入的集合注入。
——在CollData类里面定义下面几个集合属性,生成getter/setter方法和toString方法。
private String[] stringArr;
private List<String> listData;
private Set<String> setData;
private Map<String,String> mapData;
private Properties props;
——配置如下,正好有这几种类型,可见它们的配置属于property标签的子标签。
<?xml version="1.0" encoding="UTF-8"?>
<beans xmlns="http://www.springframework.org/schema/beans"
       xmlns:xsi="http://www.w3.org/2001/XMLSchema-instance"
       xsi:schemaLocation="http://www.springframework.org/schema/beans
                           http://www.springframework.org/schema/beans/spring-beans.xsd">

    <bean id="collData" class="com.hello.domain.CollData">
        <property name="stringArr">
            <array>
                <value>Eric</value>
                <value>Andy</value>
            </array>
        </property>
        <property name="listData">
            <list>
                <value>spring</value>
                <value>summer</value>
                <value>autumn</value>
                <value>winter</value>
            </list>
        </property>
        <property name="setData">
            <set>
                <value>one</value>
                <value>two</value>
                <value>three</value>
            </set>
        </property>
        <property name="mapData">
            <map>
                <entry key="name" value="Tom"></entry>
                <entry key="age" value="23"></entry>
            </map>
        </property>
        <property name="props">
            <props>
                <prop key="language">English</prop>
                <prop key="encoding">UTF-8</prop>
            </props>
        </property>
    </bean>
</beans>
——使用。
    @Test
    public void test02(){
        //使用spring之后
        String xmlPath="com/hello/service/applicationContext.xml";
        ApplicationContext applicationContext=new ClassPathXmlApplicationContext(xmlPath);
        CollData collData=(CollData) applicationContext.getBean("collData");
        System.out.println(collData);
    }
结果:
CollData [stringArr=[Eric, Andy], listData=[spring, summer, autumn, winter], setData=[one, two, three], mapData={name=Tom, age=23}, props={encoding=UTF-8, language=English}]15、基于注解装配Bean。
——注解就是一个类,使用方法是@注解名称。我们使用注解的目的主要是取代XML配置文件。
——使用注解之前需要做2样配置。一个是命名空间的配置,一个是让spring扫描含有注解的类。也就是说我们具体的bean配置都不写在xml里了。
——命名空间的配置,添加下面加粗的部分,或者整个替代原先的。
——让spring去扫描含有注解的类,其实就是把bao名字添加进来。
<?xml version="1.0" encoding="UTF-8"?>
<beans xmlns="http://www.springframework.org/schema/beans"
       xmlns:xsi="http://www.w3.org/2001/XMLSchema-instance"
       xmlns:context="http://www.springframework.org/schema/context"
       xsi:schemaLocation="http://www.springframework.org/schema/beans
                           http://www.springframework.org/schema/beans/spring-beans.xsd
                           http://www.springframework.org/schema/context
                           http://www.springframework.org/schema/context/spring-context.xsd">

    <context:component-scan base-package="com.hello.component"></context:component-scan>
</beans>——写了一个类,注意看@Component("student")就相当于我们之前声明的bean,这里student就是id,至于class属性就是我们本类。
@Component("student")
public class Student {
    private String name;
    private Integer age;
    public String getName() {
        return name;
    }
    public void setName(String name) {
        this.name = name;
    }
    public Integer getAge() {
        return age;
    }
    public void setAge(Integer age) {
        this.age = age;
    }
    @Override
    public String toString() {
        return "Student [name=" + name + ", age=" + age + "]";
    }
}
——所以使用的时候,正常使用即可。
    @Test
    public void test02(){
        //使用spring之后
        String xmlPath="com/hello/service/applicationContext.xml";
        ApplicationContext applicationContext=new ClassPathXmlApplicationContext(xmlPath);
        Student s=(Student) applicationContext.getBean("student");
        System.out.println(s);
}——但是,我们在实际中可以把Component替换成其他同样效果但是意思更加明确的注解关键字,比如@Repository用于dao层,@Service用于service层,@Controller用于web层。
——依赖注入的方式,写在属性字段上,也可以写在setter方法上。其中@Autowired表示根据类型自动注入,@Autowired+@Qualifier("id名称")表示根据名称来注入,@Resource("根据id名称来注入")。
——还有,我们之前设置bean的时候可以指定它的初始化和销毁方法,这里同样可以,就是在我们需要指定的方法上面添加@PostConstruct或者@PreDestory。
——我们之前可以给一个类添加作用域,就是单例还是多例的那个,注解同样可以使用,就是在类的最上面添加@Scope("prototype")等。
——XML和注解混合使用的实践。
- 一般是用XML配置bean,然后用注解进行依赖注入,也就是如果service类中要应用一个dao的实现类,那么在这个实现类的属性上面使用
@Autowired。 - 当然,要使用上述依赖注入,需要在xml中做响应的配置
<context:annotation-config></context:annotation-config>。


 291
291

 被折叠的 条评论
为什么被折叠?
被折叠的 条评论
为什么被折叠?
 到【灌水乐园】发言


