


1 什么是spring
1.1官网
spring.io
1.2介绍
Spring的核心是控制反转(IoC)和面向切面(AOP)。
IoC(Inverse of Control 反转控制)
AOP(Aspect Oriented Programming 面向切面编程为内核)
简单来说,Spring是一个分层的JavaSE/EE full-stack(一站式) 轻量级开源框架。
*轻量级:依赖其他内容较小,使用资源消耗也少。对比:EJB 重量级
*分层:经典三层体系架构,spring 提供解决方案
>web:struts、spring mvc
>service:spring(事务管理、性能监控、日志记录等)
>dao:hibernate、mybatis、JdbcTemplate、(spring data jpa) 等
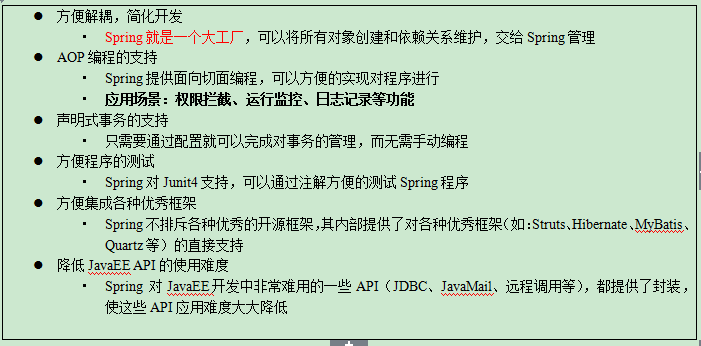
1.4Spring优点
1.5体系结构
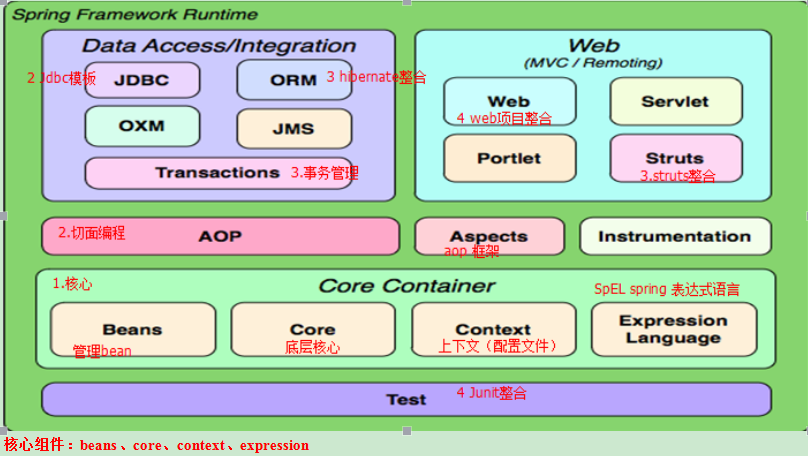
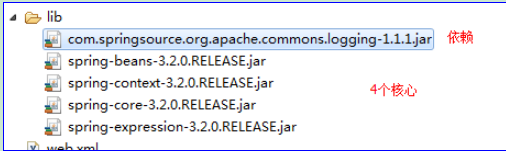
核心组件:beans、core、context、expression
1.6回顾
2 第一个实例
2.1 IoC 控制反转
*Inversion of control 控制反转,让spring创建对象实例。将创建对象实例的权利反转给spring。
对比:之前是自己new(创建),之后将由spring创建。
2.2开发步骤
*导入jar包
*spring 核心配置文件
*使用api 获得对象实例
2.3导入jar包
*版本:3.2.0
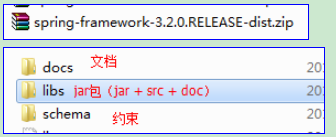
*依赖包:3.0.2

3.0.2 之后spring不再提供依赖包,但提供maven 管理依赖jar包。
*导入
2.4编写核心配置文件
*位置:任意位置,建议:src
*名称:名称任意,建议:applicationContext.xml
*内容:使用schema约束
约束内容:
参考:spring-framework-3.2.0.RELEASE\docs\spring-framework-reference\html\xsd-config.html
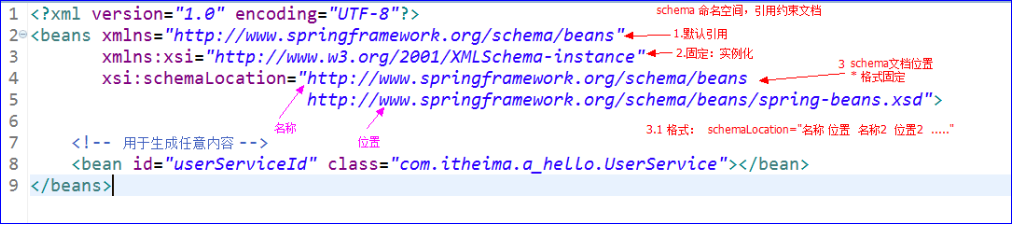
<?xml version="1.0" encoding="UTF-8"?>
<beans xmlns="http://www.springframework.org/schema/beans"
       xmlns:xsi="http://www.w3.org/2001/XMLSchema-instance"
       xsi:schemaLocation="http://www.springframework.org/schema/beans
       					   http://www.springframework.org/schema/beans/spring-beans.xsd">

	<!-- 将实例创建权,交予spring -->
	<bean id="userDao" class="com.itheima.a_hello.UserDaoImpl"></bean>

</beans>
2.5dao编写
public class UserDaoImpl implements UserDao {

	@Override
	public void save() {
		System.out.println("a_hello  userdao  save");
	}

}
2.6测试
	@Test
	public void demo01(){
		String xmlPath = "com/itheima/a_hello/beans.xml";
		ApplicationContext applicationContext = new ClassPathXmlApplicationContext(xmlPath);
		UserDao userDao = (UserDao)applicationContext.getBean("userDao");
		userDao.save();
	}
3 DI 依赖注入
*依赖:一个类中使用了另一个类,我们称为两个类存在依赖关系。
例如:service中使用dao
is a , 是一个,继承(父子类)
has a ,有一个,依赖
DI:Dependency Injection ,从spring获得service实现类(ioc),spring自动(动态的)将dao的实现类注入给service
*service 提供setter方法
public class BookServiceImpl implements BookService {

	//private BookDao bookDao = new BookDaoImpl();

	private BookDao bookDao;
	public void setBookDao(BookDao bookDao) {
		this.bookDao = bookDao;
	}

	public void addBook(){
		bookDao.save();
	}
}
*service配置<bean> 提供<property> 进行内容注入
<!-- 创建dao -->
<bean id="bookDaoId" class="com.itheima.b_di.BookDaoImpl"></bean>
<!-- 创建service -->
<bean id="bookServiceId" class="com.itheima.b_di.BookServiceImpl">
<!-- 使用<property>完成注入,相当于执行setter方法
* name : 属性名称
* ref : 配置文件另一个bean引用
-->
<property name="bookDao" ref="bookDaoId"></property>
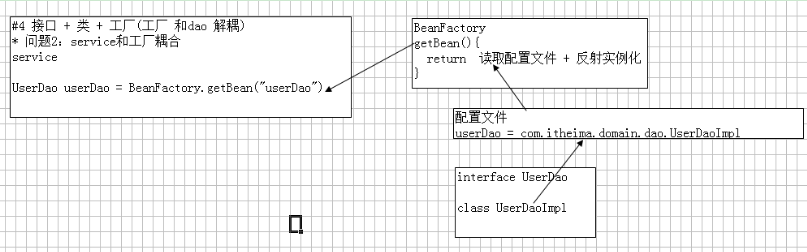
</bean>4 BeanFactory 和 ApplicationContext 使用
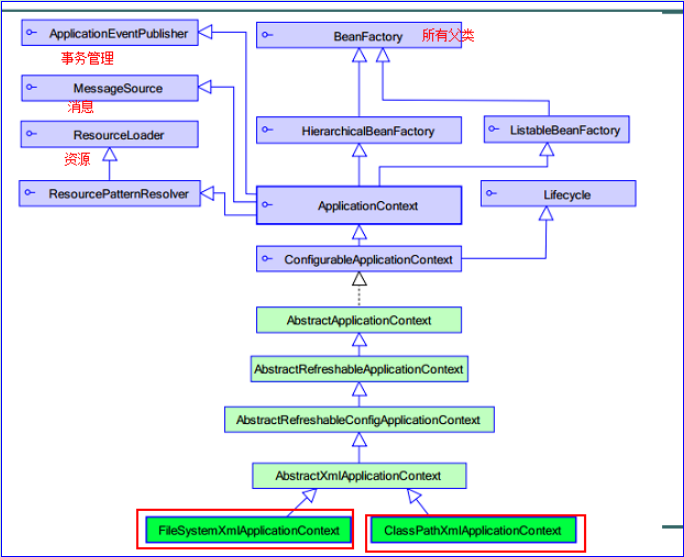
*BeanFactory 采用延迟加载,当第一次调用 getBean方法时初始化
AppliCationContext在加载完成配置文件之后就进行初始化。
*ClassPathXMLApplicationContext 加载的src下面的xml配置文件
new ClassPathXmlApplicationContext(String) 加载一个配置文件
new ClassPathXmlApplicationContext(String...) 加载多个配置文件
例如:web项目 WebRoot/WEB-INF/classes/...
*FileSystemXMLApplicationContext 加载 指定位置的xml配置文件。
例如:web项目 WebRoot/WEB-INF/.... (ServletContext.getRealPath())
5 配置约束自动提示
*步骤一:将Scheme xsd文档拷贝容易获取的目录
位置:spring-framework-3.2.0.RELEASE\schema\beans\spring-beans-3.2.xsd
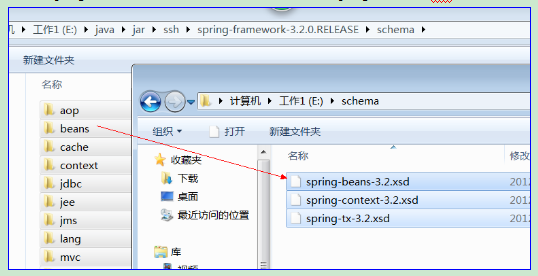
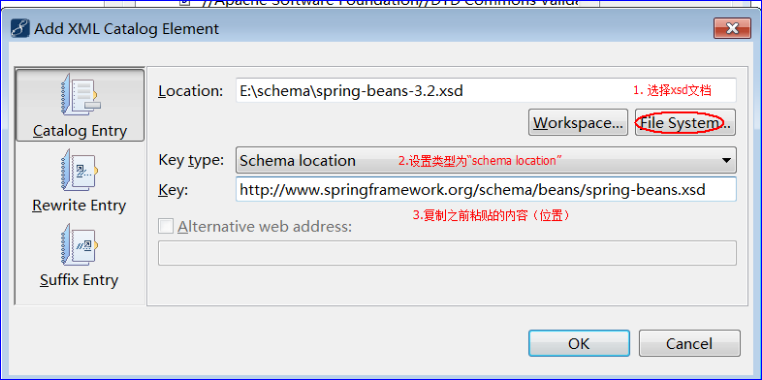
*步骤二:从xml配置文件中,获取xsd文档位置
例如:http://www.springframework.org/schema/beans/spring-beans.xsd
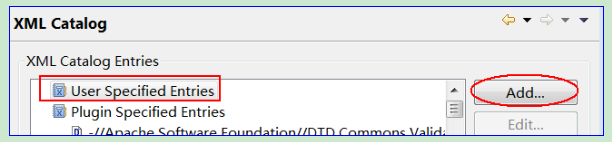
*步骤三: window/preferences/ 搜索 “xml catalog”

*步骤四:选择用户自定义,点击添加
*步骤五:添加约束提示
注意:如果xml没有提示,关闭xml重写打
6 装配Bean 基于xml
6.1bean 三种实例化方式
1. 使用默认构造实例化(默认无参)
<beanid="" class="">
2. 静态工厂(简单工厂模式),与其他项目或框架整合
<bean id="personService"
        class="com.itcast.factory.PersonServiceFactory"    factory-method="createPersonService" />
public class PersonServiceFactory {
public static PersonService createPersonService(){
return new PersonServiceImpl();
}
}
3. 实例工厂(工厂方法模式),使用工厂之间,必须创建工厂。
 <bean id=“personServiceFactory" class="com.itcast.factory.PersonServiceFactory"/>
 <bean id="personService" factory-bean=“personServiceFactory"
 factory-method="createPersonService" />
public class PersonServiceFactory {
       public  PersonService createPersonService(){
                     return new PersonServiceImpl();
       }
}
6.2bean 种类
*分类:普通bean、工厂bean
*普通Bean:之前使用的所有bean,一般很常用。例如:service、dao
*工厂Bean:spring 提供接口 FactoryBean
FactoryBean,一个特殊Bean,具有Factory工厂,用于生产特定的Bean的一种bean。
例如:ProxyFactoryBean 用于生产代理对象的一个bean
		<bean id="userDao" class="......FactoryBean">
			Object obj = new ....FactoryBean();
			if(obj instanceof FactoryBean){
				FactoryBean factroyBean = (...)obj;
				return factroyBean.getObject();
			}
			return obj;
对比:BeanFactory,用于生产任意bean的工厂。
6.3id和name属性
<bean id=""name="">
id 可以自动提示,要求名称不能重复
name 如果没有配置id,name也可以使用。特点:可以编写多个名称,使用逗号分隔
例如:name="n1,n2,n3"
<bean name="n1,n2"class="com.itheima.d_new.b_factory.MyFactory"></bean>
6.4bean作用域
*<bean id=""class="" scope="">
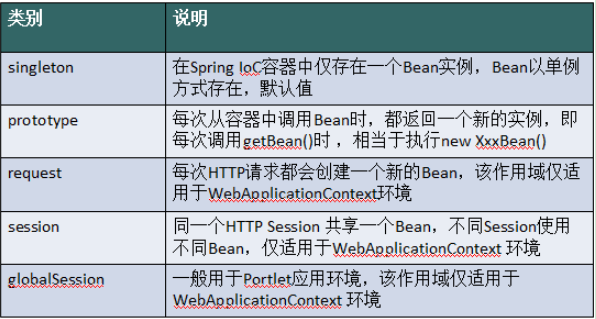
*spring 默认情况下创建的bean都是单例的。
*取值:
singleton: 单例,默认值
prototype:多例。例如:struts 与 spring整合时,action必须配置多例。
request:一次请求
session:一次会话
globalsession:集群一次会话。
*要求掌握:singleton、prototype
6.5生命周期(了解)
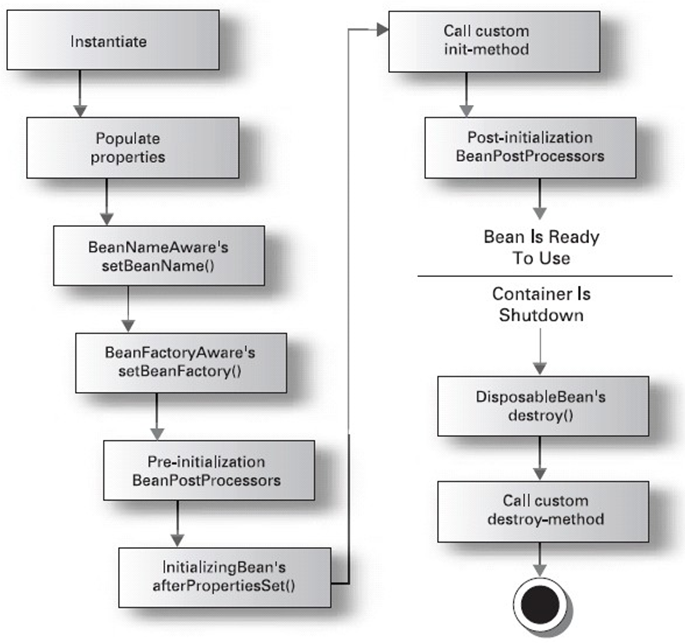
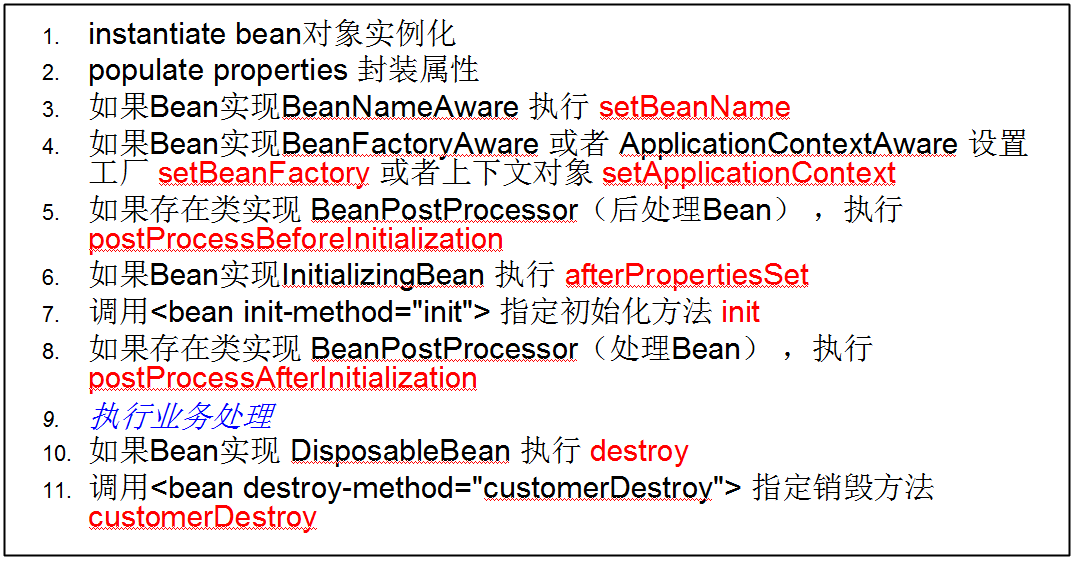
public class ReplyDao implements BeanNameAware ,ApplicationContextAware ,InitializingBean,DisposableBean{

	public ReplyDao() {
		System.out.println("1. 初始化");
	}

	private String username;
	public void setUsername(String username) {
		System.out.println("2. setter 属性注入");
		this.username = username;
	}

	@Override
	public void setBeanName(String beanName) {
		System.out.println("3 获得配置bean名称:"+beanName +",必须实现接口:BeanNameAware");
	}

	@Override
	public void setApplicationContext(ApplicationContext applicationContext)
			throws BeansException {
		System.out.println("4 . 获得spring容器,相当于TestApp new ClassPath... , 必须实现接口:ApplicationContextAware");
		System.out.println("---" + applicationContext);
		System.out.println("--- 也可以实现接口:BeanFactoryAware");
	}

	// 5 MyBeanPostProcessor  postProcessBeforeInitialization

	@Override
	public void afterPropertiesSet() throws Exception {
		System.out.println("6.初始化前属性设置");
	}

	//7 初始化 (掌握)
	public void replyInit(){
		System.out.println("7. 初始化方法,需要在xml配置 <bean init-method='' >");
	}

	// 8 MyBeanPostProcessor  postProcessAfterInitialization


	public void save() {
		System.out.println("9. save 方法");
	}

	@Override
	public void destroy() throws Exception {
		System.out.println("10. 销毁,必须实现接口:DisposableBean");
	}

	// 掌握
	public void replyDestory(){
		System.out.println("11. 销毁,需要配置,<bean destory-method=''>");
	}

}
要求:初始化和销毁、后处理bean
初始化个销毁
*需要在 <bean id="" class="" init-method="初始化方法" destroy-method="销毁方法">
*注意:销毁方法要求 1.必须是单例的 2.必须关闭容器
<bean id="replyServiceId"
		class="com.itheima.f_lifecycle.ReplyService"
		init-method="myInit" destroy-method="myDestroy"></bean>
@Test
public void demo01(){
String xmlPath = "com/itheima/f_lifecycle/beans.xml";
ClassPathXmlApplicationContext applicationContext =
new ClassPathXmlApplicationContext(xmlPath);
ReplyService replyService = (ReplyService) applicationContext
.getBean("replyServiceId");
replyService.addReply();
//关闭
applicationContext.close();
}
6.6后处理bean
*spring可以通过后处理bean,生成代理对象
* * 实现BeanPostProcessor接口,称为后处理bean(思想掌握)
* * 在执行目标方法之前可以进行对象的处理。
* * aop底层,可以通过后处理bean提供代理对象
* * 后处理bean的实现只要配置到spring容器中即可<bean class="">
/** 底层分析
 *   ReplyDaoImpl replyDao = new ReplyDaoImpl();
 *   MyBeanPostProcessor myBeanPost = new MyBeanPostProcessor();
 *   replyDao = myBeanPost.postProcessBeforeInitialization(replyDao,...);
 */
public class MyBeanPostProcessor implements BeanPostProcessor {

	//参数1:bean 被代理对象(ReplyDao 实现类) --目标类 target
	@Override
	public Object postProcessBeforeInitialization(final Object bean, String beanName)
			throws BeansException {
		//返回代理对象-- jdk
		return Proxy.newProxyInstance(
				MyBeanPostProcessor.class.getClassLoader(),
				new Class[]{ReplyDao.class},
				new InvocationHandler() {
					@Override
					public Object invoke(Object proxy, Method method, Object[] args)
							throws Throwable {
						System.out.println("开启事务");
						//执行目标类的方法
						Object obj = method.invoke(bean, args);

						System.out.println("提交事务");
						return obj;
					}
				});
	}

	@Override
	public Object postProcessAfterInitialization(Object bean, String beanName)
			throws BeansException {
		return bean;
	}

}
6.7依赖注入
*分类:手动注入、自动注入
*手动注入:基于xml、基于注解
*手动注入基于xml配置
1.构造方法注入
2.setter方法注入
3.接口注入(spring不支持)
*自动注入:框架整合--尤其是注解
byType:按类型装配
byName:按名称装配
constructor按构造
auto不确定装配。
在实际应用中建议使用手工装配,因为自动装配会产生未知情况,开发人员无法预见最终的装配结果
6.7.1构造方法注入
	<bean id="categoryId" class="com.itheima.f_injection.a_cons.Category">
		<!--
			<constructor-arg> 描述构造方法一个参数,如果有多个参数需要配置多个标签。
			* index 参数索引
			* type 参数类型
			* value 参数值
			* ref 参数值的引用对象
			## 注意:如果参数值匹配多个构造方法,将采用第一个构造
			** 结论:在开发中,如果采用构造方法注入,使用index和type结合确定构造方法。
		-->
		<constructor-arg index="0" type="java.lang.String" value="123"></constructor-arg>
		<constructor-arg index="1" type="java.lang.Integer" value="456"></constructor-arg>
	</bean>
6.7.2setter方法注入
使用<propertyname="属性名称">进行注入。
	<!-- 使用setter方法
	<bean id="companyId" class="com.itheima.f_injection.b_p.Company">
		<property name="cname" value="黑马"></property>
		<property name="address" ref="addressId"></property>
	</bean>
	<bean id="addressId" class="com.itheima.f_injection.b_p.Address">
		<property name="addr" value="软件园"></property>
	</bean>
	-->
6.8P命名空间
使用p命名空间
为了简化XML文件配置,Spring从2.5开始引入一个新的p名称空间
需添加: xmlns:p="http://www.springframework.org/schema/p"
p:<属性名>="xxx" 引入常量值
p:<属性名>_ref="xxx" 引用其它Bean对象
<?xml version="1.0" encoding="UTF-8"?>
<beans xmlns="http://www.springframework.org/schema/beans"
       xmlns:xsi="http://www.w3.org/2001/XMLSchema-instance"
       xmlns:p="http://www.springframework.org/schema/p"
       xsi:schemaLocation="http://www.springframework.org/schema/beans
       					   http://www.springframework.org/schema/beans/spring-beans.xsd">
	<!-- 使用setter方法
	<bean id="companyId" class="com.itheima.f_injection.b_p.Company">
		<property name="cname" value="黑马"></property>
		<property name="address" ref="addressId"></property>
	</bean>
	<bean id="addressId" class="com.itheima.f_injection.b_p.Address">
		<property name="addr" value="软件园"></property>
	</bean>
	-->

	<!-- p命名空间 -->
	<bean id="companyId" class="com.itheima.f_injection.b_p.Company"  p:cname="传智" p:address-ref="addressId" >
	</bean>
	<bean id="addressId" class="com.itheima.f_injection.b_p.Address" p:addr="金燕龙">
	</bean>
</beans>
6.9SpEL spring 表达式语言
* 使用 SpEL对所有操作进行简化,所有注入都采用value属性。
* 格式:<property name="" value="#{表达式}">
* 表达式语言:
所有格式统一使用 value=“********”常量 #{10} #{3.14} #{2e5} #{‘itcast’}
引用Bean #{beanId}
引用Bean属性 #{beanId.propertyName}
引用Bean方法 beanId.methodName().method2()
引用静态方法 T(java.lang.Math).PI
运算符支持 #{3 lt 4 == 4 ge 3}
正则表达式支持 #{user.name matches ‘[a-z]{6,}’}
集合支持 #{likes[3]}
	<bean id="studentId" class="com.itheima.f_injection.c_spel.Student">
		<property name="teacher" value="#{teacherId}"></property>
		<property name="pi" value="#{T(java.lang.Math).PI}"></property>
	</bean>

	<bean id="teacherId" class="com.itheima.f_injection.c_spel.Teacher">
		<property name="tname" value="#{'abc'.toUpperCase()}"></property>
	</bean>
6.10集合注入
	<bean id="collbeanId" class="com.itheima.f_injection.d_coll.CollBean">
		<!-- 数组
			<value>注入常量值
			<ref> 注入引用bean值
		-->
		<property name="arrayData">
			<array>
				<value>嫐</value>
				<value>嬲</value>
				<value>挊</value>
			</array>
		</property>

		<!-- List集合 -->
		<property name="listData">
			<list>
				<value>yyy</value>
				<value>xxx</value>
			</list>
		</property>

		<!-- Set 集合 -->
		<property name="setData">
			<set>
				<value>辟邪剑谱</value>
				<value>葵花宝典</value>
				<value>菊花宝典</value>
			</set>
		</property>


		<!-- Map 集合 -->
		<property name="mapData">
			<map>
				<entry key="k001" value="v001"></entry>
				<entry>
					<key><value>k002</value></key>
					<value>v002</value>
				</entry>
			</map>
		</property>

		<!-- Properties 对象
			* 底层 Map<String,String> 获得内容properties文件
		-->
		<property name="propsData">
			<props>
				<prop key="pk001">pv001</prop>
				<prop key="pk002">pv002</prop>
			</props>
		</property>

	</bean>
6.11总结:
<bean id="" name="" scope="singleton | prototype"  p:username=""  p:address-ref=""
    init-method=""  destory-method=""
>
   <property name="" ref="" value="#{表达式}">
   <property name="">
       <array><set><list>
       <map><entry key="" value="">
            <entry><key></key> <value></value>
       <props><prop key="">....</prop>
7 装配Bean基于 注解
*注解:使用注解类用于取代xml配置文件。
优点:xml配置少,使用注解配置信息简化
缺点:硬编码,查询时繁琐。
*spring定义注解
1@Component 组件,用于取代<beanid="" class="">
提供Component 衍生版,功能相同,但用于标识不同的层次
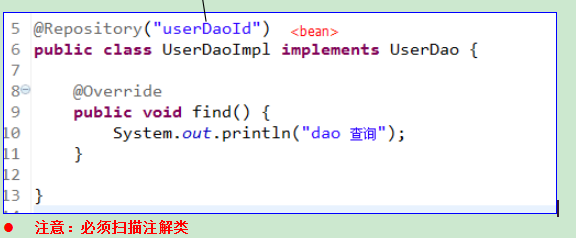
2.1@Repository修饰dao层
2.2@Service修饰service层
2.3@Controller修饰web层
方案1:
3.1.1@AutoWired 自动注入,默认按照类型
可以修饰在字段上
也可以修饰在setter方法上
缺点:如果同一个接口,有两个实现类,就会存在冲突
3.1.2@Qualifier 修改AutoWired匹配,将按照名称匹配。
方案2:
3.2@Resource 可以完成@AutoWired 和 @Qualifier 功能
例如:@Resource("userDaoId") 按照名称匹配
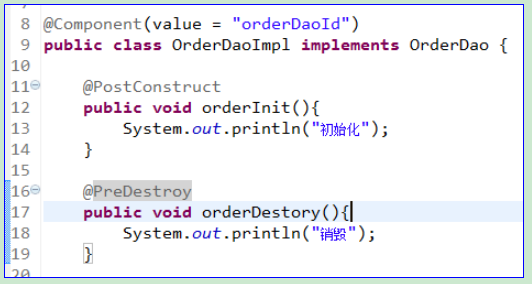
4.1@PostConstruct 初始化
4.2@PreDestroy 销毁
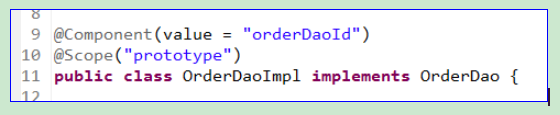
5@Scope 作用域
*使用注解,必须将“被注解修饰的类”交予spring进行扫描。
<context:component-scanbase-package="类所在包名">
7.1将service注入给action,类型匹配(默认)
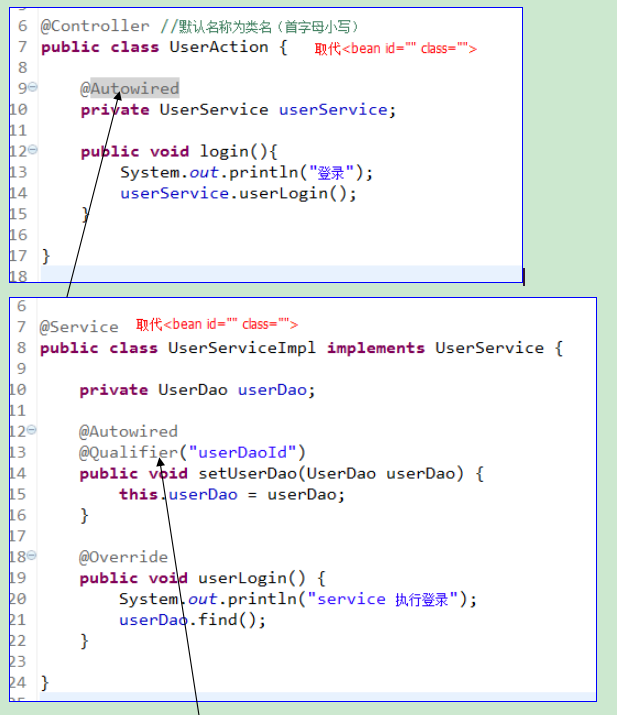
7.2将dao注入service,名称匹配
7.3初始化和销毁
7.4作用域
7.5 xml + 注解 混合使用
*开发中 xml + 注解 混合使用。
1<bean> xml配置bean ,不需要配置扫描<context:component-scan
2依赖使用注解@AutoWired,但此时注解无效的。
<context:annotation-config>将@AutoWired 和 @Resource 进行使用。
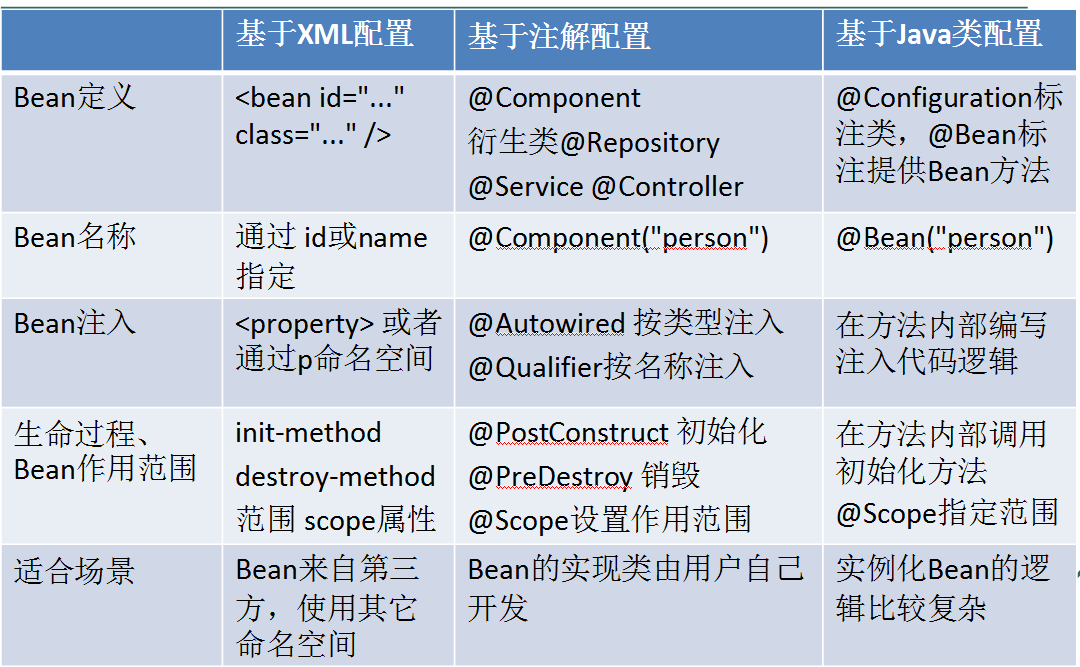
多种bean方式比较图
8 整合Junit
*导入jar包
*@RunWith(SpringJunit4ClassRunner.class) 与Junit整合
*@ContextConfiguration(locations="")加载xml配置文件
在spring"classpath:"前缀表示从src下加载指定的文件。
@RunWith(SpringJUnit4ClassRunner.class)
@ContextConfiguration(locations="classpath:com/itheima/b_anno/beans.xml")
public class TestApp {

	@Autowired
	private UserDao userDao;

	@Test
	public void demo01(){
//		String xmlPath = "com/itheima/a_hello/beans.xml";
//		ApplicationContext applicationContext = new ClassPathXmlApplicationContext(xmlPath);
//		UserDao userDao = (UserDao)applicationContext.getBean("userDao");
		userDao.save();

	}

}


 361
361

 被折叠的 条评论
为什么被折叠?
被折叠的 条评论
为什么被折叠?
 到【灌水乐园】发言


