


线程池算是Android 开发比较常用的了,涉及线程的地方大多数都会涉及线程池。

举个栗子:
假如我一个ListView,每个Item的图片需要从网上加载,如果我不使用线程池,则这样开启新线程:
new Thread(new Runnable() {
            @Override
            public void run() {
                //网络访问
            }
        }).start();
1,使用new Thread()创建线程存在的问题
2,使用线程的好处
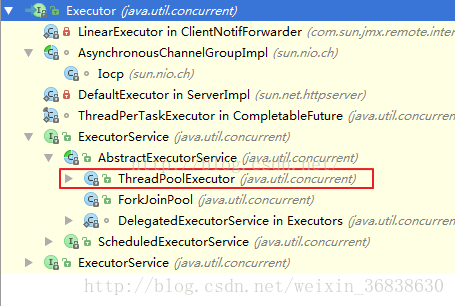
3,ThreadPoolExecutor

[java] view plain copy print?
/**
 * Creates a {@code LinkedBlockingQueue} with a capacity of
 * {@link Integer#MAX_VALUE}.
 */
public LinkedBlockingQueue() {
    this(Integer.MAX_VALUE);
}

/**
 * Creates a {@code LinkedBlockingQueue} with the given (fixed) capacity.
 *
 * @param capacity the capacity of this queue
 * @throws IllegalArgumentException if {@code capacity} is not greater
 *         than zero
 */
public LinkedBlockingQueue(int capacity) {
    if (capacity <= 0) throw new IllegalArgumentException();
    this.capacity = capacity;
    last = head = new Node<E>(null);
}
3,PriortyBlockingQueue:这个队列和LinkedBlockingQueue类似,不同的是PriorityBlockQueue中的元素不是按照FIFO来排序的,而是按照元素的Comparator来决定存取顺序的(这个功能也反映了存入PrioriBlockingQueue中的数据必须实现了Comparator接口)
OK,这是ThreadPoolExecutor的构造方法参数的解释,我们的线程提交到线程池之后又是按照什么样的规则去运行呢?OK,它们遵循如下规则:
1.execute一个线程之后,如果线程池中的线程数未达到核心线程数,则会立马启用一个核心线程去执行
2.execute一个线程之后,如果线程池中的线程数已经达到核心线程数,且workQueue未满,则将新线程放入workQueue中等待执行
3.execute一个线程之后,如果线程池中的线程数已经达到核心线程数但未超过非核心线程数,且workQueue已满,则开启一个非核心线程来执行任务
4.execute一个线程之后,如果线程池中的线程数已经超过非核心线程数,则拒绝执行该任务
OK,基于以上讲解,我们来看一个Demo:
@Override
    protected void onCreate(Bundle savedInstanceState) {
        super.onCreate(savedInstanceState);
        setContentView(R.layout.activity_main);
        poolExecutor = new ThreadPoolExecutor(3, 5,
                1, TimeUnit.SECONDS, new LinkedBlockingDeque<Runnable>(128));
}

    public void btnClick(View view) {
        for (int i = 0; i < 30; i++) {
            final int finalI = i;
            Runnable runnable = new Runnable() {
                @Override
                public void run() {
                    SystemClock.sleep(2000);
                    Log.d("google_lenve_fb", "run: " + finalI);
                }
            };
            poolExecutor.execute(runnable);
        }
} 
poolExecutor = new ThreadPoolExecutor(3, 30,
                1, TimeUnit.SECONDS, new LinkedBlockingDeque<Runnable>(6));
如上,我把最大线程数改为30,而把线程队列大小改为6(实际开发中 不会这样来设置,这里只是为了验证结论),我们来看看执行结果:

public abstract class AsyncTask<Params, Progress, Result> {
    private static final String LOG_TAG = "AsyncTask";

    private static final int CPU_COUNT = Runtime.getRuntime().availableProcessors();
    private static final int CORE_POOL_SIZE = CPU_COUNT + 1;
    private static final int MAXIMUM_POOL_SIZE = CPU_COUNT * 2 + 1;
    private static final int KEEP_ALIVE = 1;

    private static final ThreadFactory sThreadFactory = new ThreadFactory() {
        private final AtomicInteger mCount = new AtomicInteger(1);

        public Thread newThread(Runnable r) {
            return new Thread(r, "AsyncTask #" + mCount.getAndIncrement());
        }
    };

    private static final BlockingQueue<Runnable> sPoolWorkQueue =
            new LinkedBlockingQueue<Runnable>(128);

    /**
     * An {@link Executor} that can be used to execute tasks in parallel.
     */
    public static final Executor THREAD_POOL_EXECUTOR
            = new ThreadPoolExecutor(CORE_POOL_SIZE, MAXIMUM_POOL_SIZE, KEEP_ALIVE,
                    TimeUnit.SECONDS, sPoolWorkQueue, sThreadFactory);
        ....
        ....
}
OK,那么和线程池有关的最基本的ThreadPoolExecutor我们就说完了,接下来我们就来看看系统配置好的提供给我们的线程池。
4,FixedThreadPool
ExecutorService fixedThreadPool = Executors.newFixedThreadPool(3); 源码:
public static ExecutorService newFixedThreadPool(int nThreads) {
        return new ThreadPoolExecutor(nThreads, nThreads,
                                      0L, TimeUnit.MILLISECONDS,
                                      new LinkedBlockingQueue<Runnable>());
    }
我们看到核心线程数和最大线程数一样,说明在FixedThreadPool中没有非核心线程,所有的线程都是核心线程,且线程的超时时间为0,说明核心线程即使在没有任务可执行的时候也不会被销毁(这样可让FixedThreadPool更快速的响应请求),最后的线程队列是一个LinkedBlockingQueue,但是LinkedBlockingQueue却没有参数,这说明线程队列的大小为Integer.MAX_VALUE(2的31次方减1),OK,看完参数,我们大概也就知道了FixedThreadPool的工作特点了,当所有的核心线程都在执行任务的时候,新的任务只能进入线程队列中进行等待,直到有线程被空闲出来。OK,我们来看一个Demo:
ExecutorService fixedThreadPool = Executors.newFixedThreadPool(3);
        for (int i = 0; i < 30; i++) {
            final int finalI = i;
            Runnable runnable = new Runnable(){
                @Override
                public void run() {
                    SystemClock.sleep(3000);
                    Log.d("google_lenve_fb", "run: "+ finalI);
                }
            };
            fixedThreadPool.execute(runnable);
} 
5,SingleThreadExecutor
public static ExecutorService newSingleThreadExecutor() {
    return new FinalizableDelegatedExecutorService
        (new ThreadPoolExecutor(1, 1,
                                0L, TimeUnit.MILLISECONDS,
                                new LinkedBlockingQueue<Runnable>()));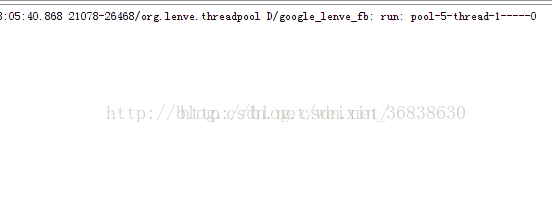
} ExecutorService singleThreadExecutor = Executors.newSingleThreadExecutor();
for (int i = 0; i < 30; i++) {
final int finalI = i;
Runnable runnable = new Runnable() {
@Override
public void run() {
Log.d("google_lenve_fb", "run: " + Thread.currentThread().getName() + "-----" + finalI);
SystemClock.sleep(1000);
}
};
singleThreadExecutor.execute(runnable);
} 执行效果如下:
6,CachedThreadPool
public static ExecutorService newCachedThreadPool() {
    return new ThreadPoolExecutor(0, Integer.MAX_VALUE,
                                  60L, TimeUnit.SECONDS,
                                  new SynchronousQueue<Runnable>());
} ExecutorService cachedThreadPool = Executors.newCachedThreadPool();
for (int i = 0; i < 30; i++) {
final int finalI = i;
Runnable runnable = new Runnable(){
@Override
public void run() {
Log.d("google_lenve_fb", "run: " + Thread.currentThread().getName() + "----" + finalI);
}
};
cachedThreadPool.execute(runnable);
SystemClock.sleep(2000);
} 
ExecutorService cachedThreadPool = Executors.newCachedThreadPool();
        for (int i = 0; i < 30; i++) {
            final int finalI = i;
            Runnable runnable = new Runnable(){
                @Override
                public void run() {
                    SystemClock.sleep(2000);
                    Log.d("google_lenve_fb", "run: " + Thread.currentThread().getName() + "----" + finalI);
                }
            };
            cachedThreadPool.execute(runnable);
            SystemClock.sleep(1000);
} 7,ScheduledThreadPool
public ScheduledThreadPoolExecutor(int corePoolSize) {
    super(corePoolSize, Integer.MAX_VALUE,
          DEFAULT_KEEPALIVE_MILLIS, MILLISECONDS,
          new DelayedWorkQueue());
}
我们可以看到,它的核心线程数量是固定的(我们在构造的时候传入的),但是非核心线程是无穷大,当非核心线程闲置时,则会被立即回收。
使用ScheduledThreadPool时,我们可以通过如下几个方法来添加任务:
1.延迟启动任务:
public ScheduledFuture<?> schedule(Runnable command,
long delay, TimeUnit unit); ScheduledExecutorService scheduledExecutorService = Executors.newScheduledThreadPool(3);
Runnable runnable = new Runnable(){
@Override
public void run() {
Log.d("google_lenve_fb", "run: ----");
}
};
scheduledExecutorService.schedule(runnable, 1, TimeUnit.SECONDS); 2.延迟定时执行任务:
public ScheduledFuture<?> scheduleAtFixedRate(Runnable command,
                                              long initialDelay,
                                              long period,
TimeUnit unit); ScheduledExecutorService scheduledExecutorService = Executors.newScheduledThreadPool(3);
Runnable runnable = new Runnable(){
@Override
public void run() {
Log.d("google_lenve_fb", "run: ----");
}
};
scheduledExecutorService.scheduleAtFixedRate(runnable, 1, 1, TimeUnit.SECONDS); 延迟1秒之后每隔1秒执行一次新任务。
public ScheduledFuture<?> scheduleWithFixedDelay(Runnable command,
                                                 long initialDelay,
                                                 long delay,
TimeUnit unit); ScheduledExecutorService scheduledExecutorService = Executors.newScheduledThreadPool(3);
Runnable runnable = new Runnable(){
@Override
public void run() {
Log.d("google_lenve_fb", "run: ----");
}
};
scheduledExecutorService.scheduleWithFixedDelay(runnable, 1, 1, TimeUnit.SECONDS);第一次延迟1秒之后,以后每次也延迟1秒执行。
OK,至此,Android开发中常用的线程池就说完了。
8,线程池其他常用功能
1.shutDown() 关闭线程池,不影响已经提交的任务
2.shutDownNow() 关闭线程池,并尝试去终止正在执行的线程
3.allowCoreThreadTimeOut(boolean value) 允许核心线程闲置超时时被回收
4.submit 一般情况下我们使用execute来提交任务,但是有时候可能也会用到submit,使用submit的好处是submit有返回值,举个栗子:
public void submit(View view) {
    List<Future<String>> futures = new ArrayList<>();
    ThreadPoolExecutor threadPoolExecutor = new ThreadPoolExecutor(3, 5, 1,
            TimeUnit.SECONDS, new LinkedBlockingDeque<Runnable>());
    for (int i = 0; i < 10; i++) {
        Future<String> taskFuture = threadPoolExecutor.submit(new MyTask(i));
        //将每一个任务的执行结果保存起来
        futures.add(taskFuture);
    }
    try {
        //遍历所有任务的执行结果
        for (Future<String> future : futures) {
            Log.d("google_lenve_fb", "submit: " + future.get());
        }
    } catch (InterruptedException e) {
        e.printStackTrace();
    } catch (ExecutionException e) {
        e.printStackTrace();
    }
}

class MyTask implements Callable<String> {

    private int taskId;

    public MyTask(int taskId) {
        this.taskId = taskId;
    }

    @Override
    public String call() throws Exception {
        SystemClock.sleep(1000);
        //返回每一个任务的执行结果
        return "call()方法被调用----" + Thread.currentThread().getName() + "-------" + taskId;
    }
}
5. 自定义线程池
除了使用submit来定义线程池获取线程执行结果之外,我们也可以通过自定义ThreadPoolExecutor来实现这个功能,如下:
public void customThreadPool(View view) {
    final MyThreadPool myThreadPool = new MyThreadPool(3, 5, 1, TimeUnit.MINUTES, new LinkedBlockingDeque<Runnable>());
    for (int i = 0; i < 10; i++) {
        final int finalI = i;
        Runnable runnable = new Runnable(){
            @Override
            public void run() {
                SystemClock.sleep(100);
                Log.d("google_lenve_fb", "run: " + finalI);
            }
        };
        myThreadPool.execute(runnable);
    }
}
class MyThreadPool extends ThreadPoolExecutor{

    public MyThreadPool(int corePoolSize, int maximumPoolSize, long keepAliveTime, TimeUnit unit, BlockingQueue<Runnable> workQueue) {
        super(corePoolSize, maximumPoolSize, keepAliveTime, unit, workQueue);
    }

    @Override
    protected void beforeExecute(Thread t, Runnable r) {
        super.beforeExecute(t, r);
        Log.d("google_lenve_fb", "beforeExecute: 开始执行任务!");
    }

    @Override
    protected void afterExecute(Runnable r, Throwable t) {
        super.afterExecute(r, t);
        Log.d("google_lenve_fb", "beforeExecute: 任务执行结束!");
    }

    @Override
    protected void terminated() {
        super.terminated();
        //当调用shutDown()或者shutDownNow()时会触发该方法
        Log.d("google_lenve_fb", "terminated: 线程池关闭!");
    }
}
执行结果如下:
D/google_lenve_fb: beforeExecute: 开始执行任务!
D/google_lenve_fb: run: 0
D/google_lenve_fb: beforeExecute: 任务执行结束!
D/google_lenve_fb: beforeExecute: 开始执行任务!
D/google_lenve_fb: run: 1
D/google_lenve_fb: beforeExecute: 任务执行结束!
D/google_lenve_fb: beforeExecute: 开始执行任务!
D/google_lenve_fb: run: 2
D/google_lenve_fb: beforeExecute: 任务执行结束!
参考资料
1.http://blog.csdn.net/u010687392/article/details/49850803
2.《Android开发艺术探索》


 1万+
1万+

 被折叠的 条评论
为什么被折叠?
被折叠的 条评论
为什么被折叠?
 到【灌水乐园】发言


